
PC Recording Studios for Dummies (Jeff Strong)
.pdf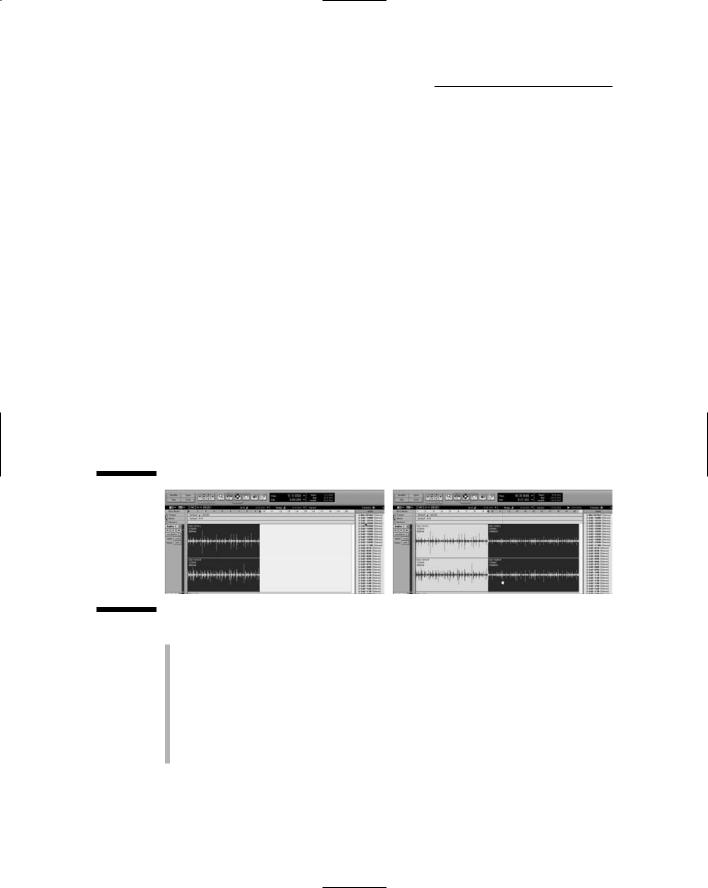
122 Part III: Choosing and Installing Recording Software
works only if you know the rules in the first place. My experience is that, with looping, the temptation is to skip the rule-learning process, which makes breaking the rules less of a creative decision and more of a decision made because the recordist doesn’t know any better. But I digress.
Anyway, I’ll leave the ethical struggle to you over whether using loops in music constitutes a real musical composition or a fast-food version of musicmaking. (I have no bias, really. No really, I mean it. Really. . . .)
Loops, whether you like them or not, are here to stay. In fact, looping has become pretty much standard in songs that you hear on radio stations favored by the teen set, and it’s even gaining popularity among serious composers.
Most audio recording programs have some ability to use loops. At the very minimum, almost all programs let you insert loops into your song and arrange them to meet your needs, as shown in Figure 6-5. Here the loop automatically adjusts its tempo to fit your song and can be transposed up or down to fit the key of your composition.
Beyond these basics, many programs — ACID is one example — offer you ways to manipulate the loops to make them unique. A short sampling of what you can do includes the following functions:
Figure 6-5:
Using loops is as simple as clicking and dragging one into your song.
Edit: The contents of the loop often show up in your program either as MIDI data or as audio waveforms. If it’s MIDI data, you can edit the notes just like you would any other MIDI data, including changing duration, placement in time, and pitch. Audio waveform data can be cut and pasted and otherwise edited by using the same techniques you’d use to edit standard audio data.
Sophisticated looping programs give you more editing power to create your own unique loops and effects from the included loops.
TEAM LinG - Live, Informative, Non-cost and Genuine !
Chapter 6: Understanding Computer Recording Software 123
Quantize: You can adjust the timing of your loops in many loop programs (quantize is the term of choice here). Basic programs allow you to quantize only MIDI-based loops, but full-featured programs offer the ability to quantize audio loops as well. This can be handy because adding a bunch of loops together — where each has a slightly different feel — can result in a sloppy-sounding groove. Quantizing all the loops in one fell swoop can fix the problem.
You can also find groove-quantizing features that make it easy for you to morph existing loops into a different feel. This tool makes your loop library go further and allows you to create even more unique music.
Lots of loops: More powerful loop programs come with more extensive loop libraries. Of course, if you buy a less expensive looping program, you can always add more loops.
Beat mapping: This feature is handy for remixing. With this tool, you can map the tempo of an existing song so that you can add looped passages to it easily. You’re not likely to find this feature in lower-end programs; it’s been relegated to more powerful loop programs.
Effects: Some programs offer the ability to create effects such as realtime reverse of your loop, DJ stuttering effects, and many others. More likely than not, the more powerful the program, the more powerful the effects you can perform on your loops.
Connecting two (or more) programs
Chances are that, as you build your computerbased studio, you’ll find more than one program that you want to use. And chances are good that you use one program for one thing and the other for something else. For example, maybe you want to use Pro Tools for recording and mixing audio and ACID for composing with loops. (Chapter 7 has more about these and other programs.)
To top it off, you’re probably going to want to use both these programs at the same time and you’re going to want them to synchronize with
one another. If this is the case, you’re in luck because there’s a program that is made to handle this scenario. It’s called ReWire (www.propellerheads.se/ technologies).
If you have a vague inkling that you might one day want to hook one program to another, make sure that it’s ReWire capable, because as the audio recording world stands now, the ReWire way is becoming the standard way to connect programs.
TEAM LinG - Live, Informative, Non-cost and Genuine !

124 Part III: Choosing and Installing Recording Software
Making Use of Mixing
Mixing is one of the essential elements of all audio recording programs. Mixing is the ability to blend your individual tracks together into a single pair of stereo tracks. Simple mixers let you control the volume and panning information (left to right positioning in the stereo field), whereas full-featured mixers give you nearly complete flexibility over numerous elements of your tracks. These include
Automation: Being able to automate your mix — changing volumes, panning, effects send levels, and others — is important because when you mix with your mouse you can adjust only one thing at a time. To have a complex mix where each of your tracks has changes throughout the song requires decent automation capabilities. Powerful programs let you adjust everything: volume, panning, muting, soloing, send levels, effects parameters, and so on.
Send effects: Sends are signal routing functions that let you send part of your audio signal to a different place in the mixer. Basic programs limit the number of Sends available to you for each track to as few as 5, whereas more sophisticated programs raise this limit to 64 or more. This feature is important if you do complex mixes that use numerous effects. (For this, you also need a very powerful computer or a host-based effects processor. Chapter 15 has much more on Sends, including hostbased plug-ins).
Inserts: Inserts are signal routing functions that let to place an effect inline with the audio signal as it works its way through the mixer. Like Send limitations (see preceding bullet) many basic programs have low limits on the number of insert effects you can plug in to each track. Fullfeatured programs raise this limit to where you have much more flexibility in what you can do.
Surround mixing: Being able to mix beyond a two-channel stereo format can be helpful if you mix for video or DVD audio. Basic programs don’t offer this option, so if this important to you, you need to look for a fullfeatured (read: more expensive) solution.
Offline bouncing: Offline bouncing lets you mix your song as quickly as your computer’s processor can process the data rather than in real time. This is a handy feature if you have a lot of songs to mix or if your songs are long. The alternative is real-time bouncing, where your song plays at regular speed (and you hear it all through your speakers). With long songs, the wait can be agonizing (for me anyway). This feature is one I consider a necessity, though it might not be one for you.
TEAM LinG - Live, Informative, Non-cost and Genuine !

Chapter 6: Understanding Computer Recording Software 125
Digging Into Digital Signal Processing
Being able to digitally process your audio after you’ve recorded it is one of the pluses that computer-based recording has going for it. This processing is either done with plug-ins that you can add to your chosen audio recording program (see Chapter 15) or is one of the functions available in the program you buy.
Plug-ins can easily be added to any program, so the digital signal processing (DSP) abilities contained in a program are going to be only a minor concern for you when you’re program shopping. Regardless, here are some processing functions that you might find in your audio recording programs:
Duplication: Being able to quickly and easily duplicate a selection allows you to mess with your audio data without the risk of losing your original data. Even though most audio editing operations are done nondestructively (meaning they don’t change the original audio data), many DSP functions do alter your data, so you need to make sure you work on a duplicate in case you do something that you dislike and want to go back to the original.
Consolidation: As you edit your audio tracks, you often end up with a bunch of short snippets arranged end to end to make your song. Although you can leave these individual sections separate, it’s often better to consolidate them into one continuous audio file when you mix. This takes some of the load off your hard drive and makes it easier later on if you want to export or import the track to another program to work on it there (such as taking it to a professional mixer). In this case, being able to consolidate is important. Not all programs have this function, so look closely if you want to be able to do this.
Quantization: Being able to quantize MIDI is a common feature, but quantizing audio files requires a more elaborate program. This feature is easily abused, but when you need it (you’ve recorded a track that you know you can’t replicate, but it needs some timing adjustment, for example), it can save you tons of hassle.
Transposition/pitch shifting: Like quantization, being able to transpose a MIDI phrase is a no-brainer, but being able to do this to an audio file takes a more sophisticated program. Having this option can save you from having to re-record all your tracks when you finally realize (or admit) that you can’t sing your song in the key you recorded it in.
TEAM LinG - Live, Informative, Non-cost and Genuine !

126 Part III: Choosing and Installing Recording Software
Finishing Up with Mastering
The final step in recording your music is to master it. Mastering is the process of optimizing the dynamics and tonal balance of your music, arranging the sequence of your songs, and getting it to the format needed to make copies for distribution.
For an audio recording program to be able to do mastering, you need the following capabilities:
Parametric equalizer: A parametric equalizer is an EQ where you can adjust precise frequencies. This type of EQ is necessary in mixing as well as mastering. Because of this, most audio recording programs have one. If not, or if the one supplied with the programs doesn’t sound very good (all too common, unfortunately), you can get a third-party plug-in to do the job in your existing program. Chapter 15 has more about finding third-party plug-ins.
Multiband compressor: A multiband compressor is a compressor that lets you apply different levels of compression to specific frequency ranges. You won’t find a multiband compressor in many of the audio recording programs, so you might need to get a third-party plug-in for this.
Limiter: A limiter is essential if you want to squeeze out a bit more volume in your music. Most audio recording programs come with a limiter; the question is going to be whether the limiter included with the program is good enough to do the job necessary in mastering. A mastering limiter should be absolutely transparent — it should have no sound of its own when plugged in.
Dithering: If you follow my recommendations, you’ll get a program that can record in 24 bits. This means that when you’re done recording, mixing, and mastering your music, you need to get your music from 24 bits to 16 bits so you can put it on a CD. You want to do this without messing with the sound of your music, so you want to have the option of being able to apply dither — a process that adds random noise to your music to make it sound better as it fades out. Most full-featured programs come with a decent selection of dithering algorithms that you can apply when you create a bounce of your mix.
Most audio recording software can handle most of the basic tasks you put before it, but audio recording programs aren’t often set up to handle the last step — putting your music on CD. In this case, you need to get a CD-burning program that can create Red Book audio CDs from your CD-Rs. I cover the elements of mastering and provide a list of programs you can use for this last step in Chapter 14.
TEAM LinG - Live, Informative, Non-cost and Genuine !

Chapter 7
Finding the Right
Software for You
In This Chapter
Finding software that fits your budget, musical style, and computer system
Checking out the major players: Pro Tools, Logic, SONAR, and Nuendo
Looking at other options: ACID, Cubase, Digital Performer, and Cakewalk
The most important decision you can make when getting a computer-based recording system up and going involves choosing which software you want
to use. The software plays an important role in how you do your day-to-day audio recording work, but it also impacts lots of other facets of your recording experience — what hardware you can use, the types of recording and editing you can do, and the number of tracks you can work with, to name just a few. Understanding how you work and the strengths and weaknesses of the various software programs that are on the market can keep you from spending your money on a program that doesn’t fit your needs.
In this chapter, I help you clarify your needs and goals and offer you an overview of many of the most common software programs available. I cover audio and MIDI capabilities, maximum track counts, editing abilities, and the compatibility of software and hardware, among others. In all, this chapter helps you easily find the right software and hardware for your needs.
Audio recording software can have many different types of features. Not all software programs have all the features you want, so you might end up needing to get more than one program to do what you want. This is just one of the inevitable facts of life. Don’t stick with just one software program that does a lot of things well and a few things badly; go out and plunk down some cash to get a program that fills in the holes for you. Almost all programs let you save your audio files as BWAV (Broadcast Wave) files, so you can freely share files among programs.
TEAM LinG - Live, Informative, Non-cost and Genuine !

128 Part III: Choosing and Installing Recording Software
In this chapter, I discuss the different tasks for which you use recording software, such as recording, editing, looping, processing, and so on. If any of these tasks are unfamiliar to you, check out Chapter 6, where I explain these different areas in detail.
Determining Your Needs
Before you go out and buy a recording program, take a few minutes to clarify what you need and want in a program. Doing so can save you a ton of hassle because not all programs are made alike — each program offers different features and has its own particular strengths and weaknesses. Knowing your needs and how they relate to a program’s available features can keep you from getting the wrong program and having to learn a whole new program that does meet your needs.
Here are some things to consider before buying any software:
Setting your budget: Recording software runs from free to over a thousand dollars. That’s quite a range, so narrowing down your budget to, say, around $100 can weed out a lot of options. When setting your budget, think about all the aspects of recording that you want to cover with your system. For example, if you set a budget of $300 for a software program and also plan on forking over $800 for soft-synths or a hardware synthesizer, getting a program such as Logic Pro — which gives you both the soft-synths and the recording program in one fell swoop — might actually put you back less than buying everything separately.
Examining your musical style: The style of music you make and the way you work can narrow down your software options. For example, if you intend to record mostly soft-synths and you do a lot of MIDI work, Pro Tools wouldn’t be your best choice because it’s more aligned with people who want to record live instruments and edit and mix audio tracks rather than MIDI tracks. Plugging in soft-synths and running MIDI-intensive music isn’t what Pro Tools does best. If this is your desire, you’re better off with Logic Pro (on a Mac) or SONAR (on a Windows PC).
Exploring computer platform compatibility: Certain software runs on only one computer platform. Logic Audio or Digital Performer, for example, can only run on a Mac, whereas SONAR requires a Windows machine. Other software, such as Pro Tools or Cubase, can run equally well on both platforms. So if you already have a computer or know which type you intend to get, your choices do narrow down a bit. In the sections that follow I explain the platform limitations (if any) of each program.
Exploring hardware compatibility: Some software programs do require specific hardware in order to run. For example — and this is the most extreme example — Pro Tools simply won’t run without Digidesign hardware. If you have hardware other than Digidesign, Pro Tools won’t boot
TEAM LinG - Live, Informative, Non-cost and Genuine !
Chapter 7: Finding the Right Software for You 129
up. In less extreme cases, you might find that certain programs don’t work very well with certain types of hardware. This is becoming less of an issue as manufacturers work to keep their products compatible with other products, but hardware compatibility is something to keep in mind as you decide on the particulars of your system. Pay special attention to your hardware’s drivers (the software that comes with your audio interface hardware) — make sure that the software you intend to use supports those drivers.
Because there are so many variables in hardware and software, not all manufacturers of software can test all the hardware variations. The best thing you can do to ensure that certain hardware works with certain software is to see whether other users have had success with the combination. Internet forums are good places to find this information. (Check out Chapter 20.) The Web site of the hardware and/or software manufacturer is another great place to look for compatibility issues. Be sure to do your footwork before you buy. This action will minimize the chances of you not being able to get your system working.
Exploring software compatibility: Many people want to run more than one audio recording program at a time or they want to use third-party plug-ins with their main program. If this describes you, make sure you understand what other software is compatible with your main recording program. For example, there are several plug-in formats (see Chapter 15), and each recording program uses one (or sometimes two) of them. So if you want to use a compressor that is in, say, VST format, you need to make sure that you get a recording program that supports VST plug-ins.
Planning for the future: If your budget is limited or you aren’t sure how deeply you want to get into computer-based recording, you’ll probably be tempted to get a basic, entry-level recording program to give you a taste of the process. This is well and good, but I encourage you to think about the future and choose an entry-level program that has an upgrade path built in to it. I say this because software makers fashion their programs with a certain workflow and graphic look, and having to abandon that workflow and look just because you’ve outgrown a particular software version would be a pain.
Need more convincing? If you get used to a program that doesn’t have an upgrade option, you’ll be forced to learn a new program’s ways of working, which could take you weeks to figure out. On the other hand, if you think ahead, you can get into a basic program for very little money and upgrade to a fuller-feature version of that same program, saving you the hassle (and headache) of learning a program from scratch. In the following sections, I foster this idea of “planning for the future” by describing several recording program options for each manufacturer so you can find an entry-level program that has a simple upgrade path.
TEAM LinG - Live, Informative, Non-cost and Genuine !
130 Part III: Choosing and Installing Recording Software
Tons of audio recording programs are available. Because I believe in being able to upgrade to a better program as your needs grow, I include only the most popular programs that have a decent upgrade path. I believe this saves you money and hassle in the long run. Because developing software is expensive and risky for the manufacturers, buying a product from a company that has several versions of its program for different users increases the chances that the software you get good at using is available down the road.
Examining Popular Programs
As you’ll see when you scope out the many (and I mean many; hundreds of different programs are available) audio recording programs that are out there, they all offer different features, and each has strengths and weaknesses to contend with. This section explores the most common programs and gives you a good sense of what they offer.
Because I can’t possibly cover all the different programs available, I encourage you to go online and look for other programs. You might find the perfect program for you — one that I don’t even list here. (Okay, okay, that’s highly unlikely given my masterful command of all things audio, but stranger things have happened.) Also, because space is limited in this chapter, I can’t go into great depth about the programs I do describe. Before you buy, take some time to check out the Web sites of the programs that look good to you. There you can find a much more comprehensive description, some screen shots of the programs, and more often than not, a free trial download.
If at all possible, try the software you’re interested in before you buy. If you can’t get your hands on a demo, try to find someone in your area that uses the program and ask to see it in action. (Many local music stores have demos ready to go and will walk you through the program.) This is an important step in the decision-making process because each software program operates differently and what’s intuitive for one person might be counter-intuitive for another. A perfect example here is Logic Audio. For whatever reason, some people have trouble wrapping their puny brains around the way it works, but others find the way it works completely logical and truly the only intelligent way of ever doing anything (Sorry, I couldn’t help myself.) Fifteen minutes spent fiddling around with the various windows is usually enough for many people to get a grasp of the program and to see whether it makes sense to them.
Pro Tools
Chances are good that you’ve heard of Pro Tools. Pro Tools is the most-used audio recording program in professional studios. Does this mean it’s the best audio program available? Of course not. Pro Tools became the most-used
TEAM LinG - Live, Informative, Non-cost and Genuine !

Chapter 7: Finding the Right Software for You 131
program because, when it first came out, Digidesign (the maker of Pro Tools) was one of the first companies to develop hardware that guaranteed a certain level of stability and performance. The company did this at a price point that was attractive to commercial studio owners at the time. And the company had a very good (make that excellent) marketing department.
Pro Tools comes in two versions:
TDM: Pro Tools TDM uses DSP (digital signal processing) chips that you install into your computer. These chips run Pro Tools, so your computer’s own CPU never actually does any processing of your audio. Using DSP chips guarantees certain track and plug-in counts, so TDM is the version that many commercial studios use. The advantage of this system was dramatic when computers were slower, but now, for most people, it’s not needed. The only advantage to TDM now (unless you record and mix over 100 tracks at a time) is in the quality of some of the plug-ins you can find, such as equalizers, reverbs, and compressors. This is because the DSP chips in the TDM system allow for some powerhungry, great-sounding plug-ins and also because having these plug-ins run on the DSP chips keeps them from being cracked (counterfeited). Complete TDM systems start at around $10,000.
LE: Pro Tools LE is a host-based version of Digidesign’s popular product. Host-based means that the software runs off your computer’s processor, so the number of tracks and plug-ins you can have is dictated by the power of your computer. With the speed of today’s computers Pro Tools LE is plenty powerful enough for the needs of most recordists. Unfortunately, Digidesign has chosen to limit the capabilities of Pro Tools LE by imposing a pretty arbitrary track count limit of 32 audio tracks on the program. Still, 32 audio tracks is plenty for most people. You can get an entire LE system for under $500, including both the software and the audio interface to run it. (Chapter 4 has more on audio interfaces.)
Seeing the strengths of Pro Tools
Pro Tools excels at several things, including
Audio recording: Pro Tools began its life as a no-frills audio recorder and editor and was therefore set up with audio recording in mind. The layout of the interface is similar to that of a tape deck and analog mixing board, as shown in Figure 7-1 — which means that if you’re an analog dinosaur and you want to get into digital recording, this interface might be the easiest for you to get used to. Also, if you plan to record mostly audio with only the occasional MIDI track to spice things up, this program might be the easiest way to get started.
Audio editing: Editing audio is Pro Tool’s strongest suit. With this program, you can make even the most exacting edits quickly and accurately.
TEAM LinG - Live, Informative, Non-cost and Genuine !
