

110 Technique 17: Installing Made Easy with RPM
When you install Webmin, you see a message like this: You can now login to http:// localhost:10000/. That’s the URL of the mini–Web server that Webmin installed on your system. Jump to that URL in your favorite browser, and you’re connected to Webmin. Check it out!
If you try to install a package that requires other packages, rpm tells you about it. Check the notes on the download page. If the developer is friendly, he or she will tell you what you need and where to find it. See Technique 18 to learn about a tool (Synaptic) that helps resolve interpackage dependencies automatically.
Removing RPMs
RPM packages are just as easy to get rid of as they are to install. To remove a program installed with RPM, open your terminal window, give yourself superuser privileges, and issue the following command:
rpm --erase package_name
To find the package name to erase, look at the file that you used to install the package. The package name precedes the version number in the name of the package file.
If you’re having trouble finding the package name for the software you want to remove, see Technique 16. In that technique, you find a whole mess of RPM queries that you can use to track down packages and the stuff that they install.
Flagging Down RPM
To put it mildly, the rpm command has a ton of options. Some of the most useful flags are listed in Table 17-1.
TABLE 17-1: HANDY RPM FLAGS
Flag What It Does
-i Installs a new package, but displays an error message if an older version is already installed
-U Installs a new package, upgrading an older version if found
-e Uninstalls a package
-h Displays a progress bar while it’s working
-v Gives a bit more feedback while it’s working
Our favorite combination is -Uhv. That installs (or upgrades) a package, displays a progress bar, and displays an informative message if something goes wrong.
Type rpm --help | more at the command line for a quick view of all the flags and options.
Getting Graphic with RPM
Web-wide, open-source software is often distributed in RPM form. We refer you to a lot of RPMs in this book, but you’ll no doubt be surfing and finding more timesavers daily.
Fedora, Mandrake, and SuSE each come with their own tools for managing RPM packages included on the distribution media. In the sections that follow, you’ll find step-by-step directions on how to use each distribution’s package management tool.
Quick installations from distribution media with Fedora’s Package Manager
Adding packages from the Fedora distribution media (CD or DVD) is easy. To install a package from your Fedora disc, follow these steps:
1. Put the DVD or CD in the drive and wait for the disc to mount. Depending on your current user privileges, you may be prompted for a password.
Getting Graphic with RPM 111
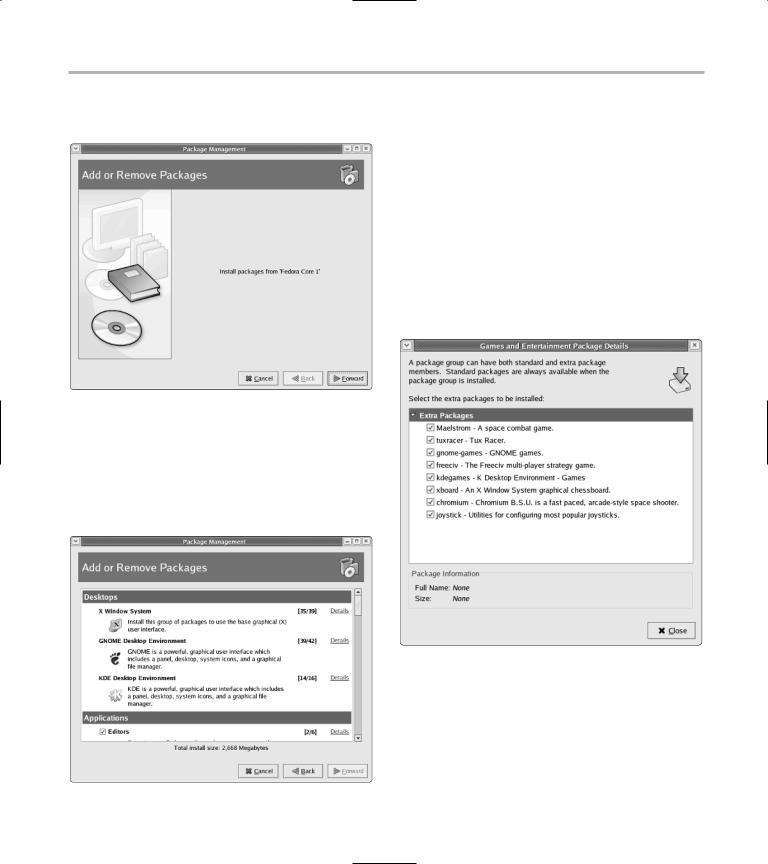
The Add or Remove Packages window opens, as shown in Figure 17-1.
•Figure 17-1: The Add or Remove Packages window.
2.Click Forward.
Fedora searches your system to see which packages are already installed. Then the Add or Remove Packages detail window opens, displaying the current status of your system packages, as shown in Figure 17-2.
• Figure 17-2: The Add or Remove Packages detail window.
3. To change the packages that are currently on your system, either check (to install) or uncheck (to remove) the box next to a package.
To the right of the checked package names is a fraction that represents the number of programs installed and how many programs are available in that package.
The packages with unchecked boxes to the left of their names aren’t installed, but contain programs that you can install. To view the contents of a package, click Details to the right of the package listing, and a dialog opens, showing the detailed contents of the package you’ve chosen (see Figure 17-3).
• Figure 17-3: The Package Details dialog.
The changes you make to the check boxes represent the status of your system packages after the update is complete.
4. After you’ve identified the packages you want to install (or remove), click Forward.
A list of changes is displayed, as shown in Figure 17-4.
112 Technique 17: Installing Made Easy with RPM
•Figure 17-4: The Package Installation Overview dialog.
5.Click Forward.
Fedora goes to work, upgrading your system. If everything goes well, you see a screen telling you the package update is complete.
6.Click Finish.
One of the nice features of the Add or Remove Packages tool is that it automatically resolves interpackage dependencies for you (the command line rpm command doesn’t). One of the not-so-nice features of Add or Remove Packages is that it only works with packages distributed on the Fedora distribution discs. In Technique 19, we show you how to automatically resolve interpackage dependencies, even for packages that you download from the Web.
You can also start Fedora’s Package Manager from the Main Menu. Open the Main Menu and choose System Settings Add/Remove Applications.
Using SuSE’s package manager to your advantage
The SuSE Linux distribution comes with a powerful package manager called YaST (Yet another Setup Tool). YaST makes adding software a snap. Follow
these steps to install an RPM package from the SuSE distribution media with YaST:
1. Open the Main Menu and choose System YaST.
Enter your root password if prompted.
2. Click Install and Remove Software.
3. Use the arrow to the right of the Filter field to open the drop-down list box and choose Package Groups.
The window displays a list of the available and installed RPM packages, as shown in Figure 17-5.
• Figure 17-5: The YaST package manager.
The package manager window features four panels:
The upper-left panel displays package groups. Use the tree control to browse through the groups and subgroups. When you highlight a group in the tree control, the panel in the upper right displays the packages within that group.
The filter selector enables you to change the views in the upper-left panel: You can choose from selections, package groups, search, and installation summary.
Use the Package Summary panel in the upperright corner of the window to view a list of packages.
Getting Graphic with RPM 113
To the left of the package name is a check box. This is not an ordinary check box: Each time you click the check box, it displays a new icon. A check mark in the box means that the package will be installed. A trash can means it will be removed. The (slightly cryptic) update symbol will check for package updates.
The lower-right corner of the screen displays a tab-controlled dialog with information about the currently highlighted RPM package. Choose from the tab controls to view information about the package and its dependencies.
The lower-left corner of the screen contains a handy bar graph, displaying your current disk usage.
To add a new RPM package, follow these steps:
1. Select the check box to the left of the package name in the Package Summary panel.
Want to install a package quick, just to test the technique? May we recommend tuxracer. It’s lots of good clean fun. You’ll find it in the Games category.
2. Click the Check Dependencies button.
A dialog opens, verifying that all package dependencies are okay.
3. Click the OK button.
4. Click the Accept button in the lower-right corner of the screen.
A screen opens, displaying the installation progress. YaST takes it from here, adding your new software and updating the system.
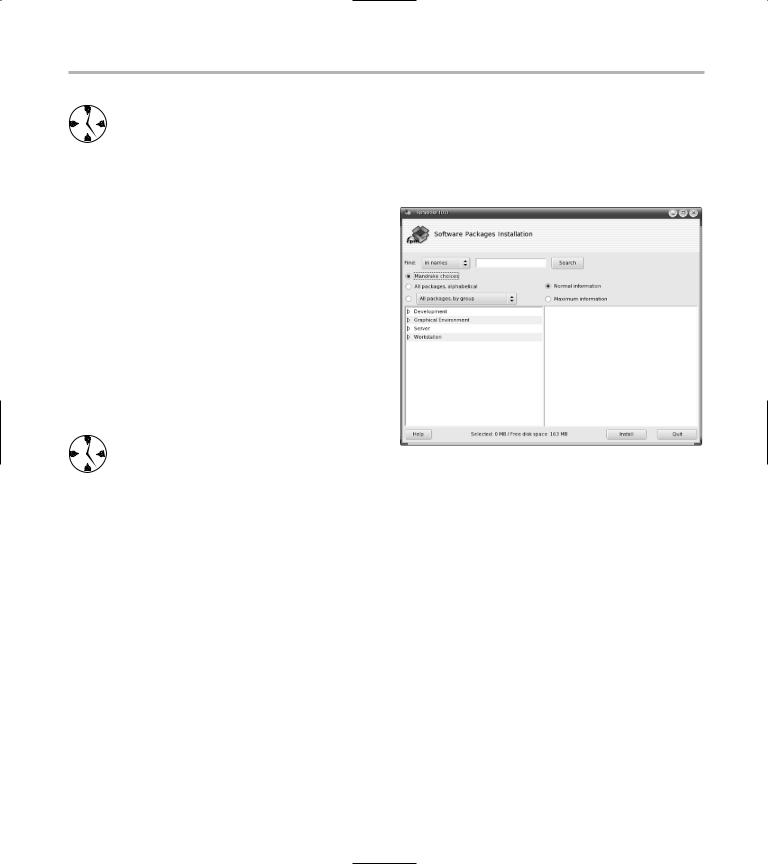
Using Rpmdrake to install from media
The Rpmdrake package installer included with Mandrake makes it easy to install RPM packages from the distribution media. Just follow these steps:
1. Open the main menu and choose System Configuration Packaging Install Software.
2. Enter your root password if prompted.
The Rpmdrake package installer opens (see Figure 17-6).
•Figure 17-6: The Rpmdrake package installer.
3.Click the All Packages Alphabetical option button to display a list of the packages on your installation media.
Highlight a package name in the list to see detailed information about the package in the right panel.
4.Click the check box next to the name of the package you want to install (see Figure 17-7).
If other packages need to be installed to satisfy the package’s dependencies, a dialog opens, asking you to verify their installation.
5.Click the Install button to add the new package.
Rpmdrake takes it from there, installing the new RPM package on your system.