

|
|
Managing Snapshots with the camera: Protocol |
9 |
Option |
What Is It? |
How to Use It |
|
MP3 |
A directory that contains audio tracks |
|
in MP3 format. |
Drag an .mp3 file to your desktop (or to another folder), and audiocd: converts the audio track to MP3 format.
By Name |
A directory that contains audio tracks (with song |
|
names) in WAV format (16 Burning Down The |
|
House.wav, 14 Once In A Lifetime.wav, . . .). This |
|
directory is similar to By Track, except that you get |
|
to see song titles in the By Name directory (By Track |
|
only shows you the track numbers). You won’t see a |
|
By Name directory if Konqueror can’t find your CD |
|
in the Web’s cddb database. |
Album Name |
A directory that contains one file for each audio track, |
|
in WAV format (identical to By Name except that the |
|
directory name is the album name). |
|
|
Managing Snapshots with the camera: Protocol
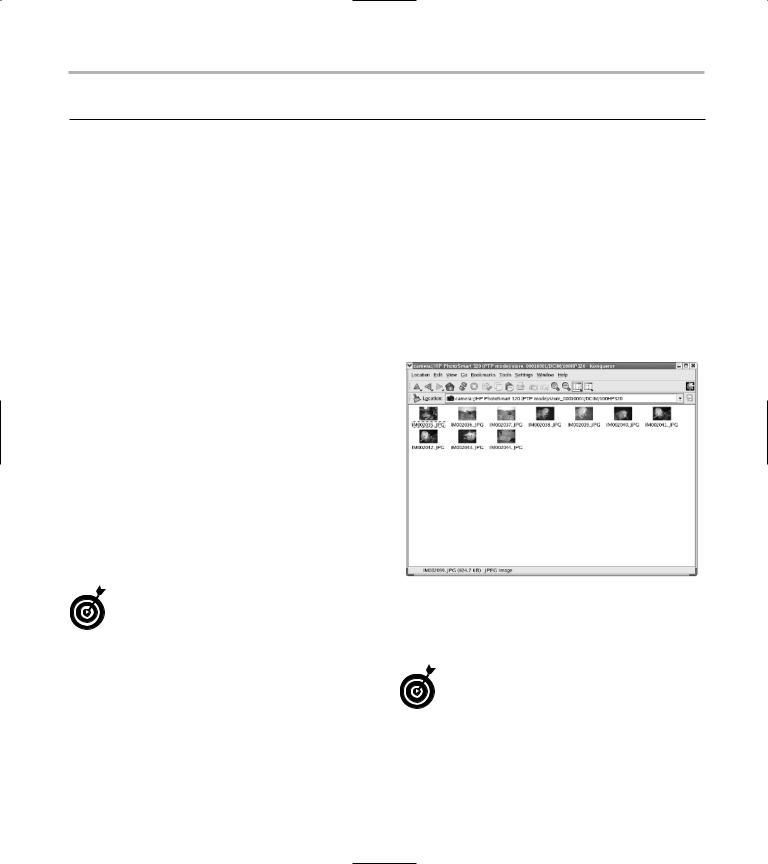
The camera: protocol treats your digital camera like it’s just another storage device, only this one is full of pictures. camera: gives you thumbnail previews of the photos on your camera, so you can easily identify and move your images to where you need them. Just drag the images to your desktop (or to another folder). Double-click an image file to open it with your favorite editor (see Technique 3 to find out how to choose an editor), and you’re working in a snap.
You can also use an image as your desktop wallpaper. Drag the thumbnail to the desktop and choose Set as Wallpaper from the menu that appears.
To use the camera: protocol, follow these steps:
1. Plug in your digital camera and be sure it’s turned on.
2. Open the Konqueror Web Browser.
3. Type camera:/ in the address line and press
Enter.
That’s all there is to it (see Figure 1-2).
• Figure 1-2: The camera: protocol, in action.
From here, finding your way around the inside of your camera is just a matter of exploring.
When we plug in our HP PhotoSmart 320 digital camera and use the camera: protocol, we see the single directory HP PhotoSmart 320 (PTP mode). Underneath the HP PhotoSmart 320 folder, our pictures are in a subdirectory named store_00010001/DCIM/100HP320. The directory structure used by your digital camera is likely to be different. Use Konqueror to find your way around the inside of your camera. After you know where your images are stored, you should be able to open those
10 Technique 1: Finding the Power in KDE Protocols
images directly from KDE-friendly applications like KuickShow and KView.
Don’t bother trying to remember a long, complex URL that corresponds to where your pictures are stored. Instead, drag the folder to your desktop and choose Link Here. Then, whenever you want to play with your camera, plug it in and click the shortcut.
One thing to note — your pictures reside only in your camera until you copy them onto your computer. Be sure to store the pictures on your computer before deleting them from your camera. After you copy the pictures you want to keep, it’s easy to erase the images from your camera; just delete them or drag them to the trash like any other file.
Remote File Management with fish:
fish: is a remote file access protocol. Using fish:, you can work with files stored on a remote Linux system as if they were located right on your desktop. To use fish:, open a KDE browser (Konqueror is a good choice) and enter fish:// followed by the host name (or IP address) of the machine you’re fishing for.
Under the hood, fish: uses SSH (Secure Shell) to do its work, so you must have an SSH server up and running on the remote machine before you can go fishing. fish: prompts you for a user name and password on the remote system before allowing you access to files. After you’ve connected, you can interact with the remote files and directories in
the same way you would deal with local files: Drag them to your desktop, drag them to other folders, drag them to the trash, or just edit them in place.
Here are some quick things you can do with the fish: protocol:
Manage files on another system with the Konqueror file manager/browser. Using fish:
archive, open, and browse remote files the same way you handle files stored on your computer.
Open fish: folders on two (or more!) systems and copy files or even entire directories from one machine to another by dragging from one window to another.
Create a secure link on your local desktop that points to a remote system. When you open the link, fish: prompts you for login information so not just anyone can get access via your com-
puter. To create a desktop link, right-click on your desktop and choose Create New File Link to Location (URL). Type in a name for your link and enter a URL in the form fish://computer-name/ directory, for example fish://bastille/home/ freddie/Desktop.
Edit remote files with KWrite. When you open a remote file (such as fish://versaille/. bash_profile), any changes that you make are automatically saved back to the remote system.
The KDE protocols are a part of KDE, not Linux. That means that any KDE-friendly application (Kate, Konqueror, KMail, and so on) can use them, but non-KDE applications won’t understand them. You can open a fish: URL in just about any KDE application, and the resource appears as if it were on your local system. Note that not all KDE applications are protocol-enabled, which means that they won’t understand fish: URLs. You’ll just have to try out each application.
Getting Help with help:, info:, and man:
KDE protocols give you fast access to help when you need it. KDE sports three documentation protocols: man:, info:, and help:. To use the protocols, open your Konqueror browser, enter the protocol name in the Location line, and press Enter. Konqueror will take you to the top-level index for the protocol you choose:
and Konqueror, you can easily move, copy,
Other KDE Protocols 11
man: When you browse through the man: proto- Konqueror address line and press Return to see the col, you see a short index that provides access SMB workgroups in your local network. Click an SMB
to the ten or so sections of the Linux man pages.
The man: protocol is a great way to read man pages because the documentation is pleasantly formatted and cross-referenced.
When you navigate down one level from the main index, the second level leaves a bit to be desired. For some reason (we assume that someone intends to fill in more information later), it says “no idea” in a column to the right of the topic list. Just ignore this and click your topic, and you’ll find the information you need.
info: This protocol gives you access to documentation written in the Texinfo format, a format popular with GNU software. Like man:, info: documentation is cross-referenced and displays a browsable menu with links that take you to the documentation you want to read.
help: This protocol lets you read documentation in KDE’s documentation format. To find subjects within help:, type help:/, followed by the topic name. (For example, help:/kate takes you to the Kate handbook.) If you need general information about your KDE environment, a good starting point is help:///khelpcenter.
Just like Web page bookmarks that you
can create when surfing the Web, documentation bookmarks are great navigational timesavers. Bookmark your favorite man pages so they’re easily accessible the next time you need them! To create a new bookmark, just choose Bookmarks Add Bookmark.
Viewing Your Local Network with the smb: Protocol
Use the smb: protocol to quickly browse other machines on your local SMB (Samba and Windows file/printer sharing) network. Enter smb:/ in the
workgroup to see all the computers in that workgroup. Click one of the computers, and you see the resources that computer is willing to share. Just drag and drop the data you need or make clickable links to resources — the time you save will amaze you.
Use smb: to create desktop shortcuts to your network locations. Just start your copy of Konqueror, enter smb:/ in the address line, and press Enter. Choose a workgroup and then a computer within that workgroup. Now drag a share name to your desktop. Next time you need data from that machine, you have it at the click of a button.
Other KDE Protocols
We haven’t covered all the KDE protocols in this technique. There are quite a few others you can explore. Check out the ones listed in Table 1-2.
TABLE 1-2: OTHER KDE PROTOCOLS
Protocol |
What You Do with It |
print: |
Manage printers, print jobs, and |
|
print queues from your Web |
|
browser. |
devices: |
Find all your storage devices |
|
here — hard drives, NFS and |
|
Samba file systems, and |
|
removable media. |
imap: |
Send, receive, or just play around |
pop3: |
with your mailbox as if it were a |
mailto: |
local file system. |
webdav: |
Modify a remote Web site or col- |
|
laborate with others over the Web. |
|
|
You can find more protocols on the Web. Search for KIO slave at your favorite search engine.
12 Technique 1: Finding the Power in KDE Protocols
KDE protocols versus GNOME VFS
KDE has protocols, and GNOME has the VFS (virtual file system). KDE protocols and GNOME VFS modules do pretty much the same thing: They make data available from unconventional sources. The name protocol may seem a bit misleading, but it’s called that because the name of the protocol goes in the protocol part of a URL. We think that virtual file system is a more straightforward name than protocol because a virtual file system basically creates make-believe file systems and lets you use them to quickly access your data.
Both the KDE protocols and the GNOME VFS work from within a Web browser, but the GNOME VFS works best at the command line. We have to admit that we’re fond of KDE for its usability and speed. However, sometimes GNOME can be a real timesaver, as you discover in Technique 2.