


Disabling Unused Services 141
Customizing runlevels at the command line
We mention earlier that Mandrake users must resort to the command line to customize individual runlevels; this section describes how.
The graphical runlevel editors are friendly and easy to use, but sometimes it’s faster to hit the command line. Regardless of whether you’re using Mandrake, Fedora, or SuSE Linux, you can use the chkconfig command to adjust the services available at a particular runlevel. You can also use chkconfig to view your service configuration. You must have superuser privileges to use the chkconfig command.
To view the configuration for a service, use the command: chkconfig --list service-name. For example, to view the runlevels for your Web server (httpd), type in
# chkconfig --list httpd
httpd: 0:off 1:off 2:off 3:on 4:on 5:on 6:off
If you leave off the service name, chkconfig will display all services.
To enable a service for a given runlevel, use the command: chkconfig --level runlevel service-name on. For example, to enable your Web server at runlevel 2, type in
# chkconfig --level 2 httpd on
To disable a service for a given runlevel, use the command: chkconfig --level runlevel servicename off. If you want to disable your Web server at level 5, type the command
# chkconfig --level 5 httpd off
Switching to a new runlevel
To change into your new runlevel, follow these steps:
1. Open a terminal window and give yourself superuser privileges with the su - command.
2. Enter the following command:
# telinit runlevel
For example, to switch to runlevel 2, use this:
# telinit 2
Your system reboots and presents you with a command line to log in.
Any runlevels lower than 5 aren’t graphical.
If you don’t like the new runlevel, use the telinit command to return to the previous runlevel and then fine-tune the service settings to better suit your needs.
Disabling Unused Services
Most services leave open ports that can be exploited by hackers. Shutting off the services that you don’t use regularly is a good way to close ports that hackers could use to gain access to your system.
If you use a service infrequently, just turn it off. It is still available when you need it — you can turn it on with a few clicks of the mouse, and off again when you’re done. If you never use a service, you’re better off removing it altogether. See the next section for details on removing services.
If you find a service that you don’t think you’ll need, we recommend disabling it for a while before you remove it, just in case you change your mind later. Here are some services that you might want to disable:
You may not see all of these services on your computer (depending on the software packages you’ve installed), or you may see a few that we haven’t listed here.
acpid: This service controls what happens when you press the power button on your computer. The configuration file for this service is empty by default, so acpid doesn’t actually do anything. (See info acpid for more information.)
142 Technique 22: Spring Cleaning Essentials
apmd: This service monitors the battery level on laptop computers. If you’re not using a laptop, you probably don’t need apmd.
atd: This service runs jobs that you’ve scheduled with the at command. If you don’t use the at command, disable this service.
autofs: This service automatically mounts file systems when you first use them. If you’re not using automount file systems (and unless you’ve configured them yourself, you’re not), turn off this service. autofs and the related automount system are frequently targeted by hackers.
chargen: This silly little network service simply generates a stream of characters whenever a client connects. You can safely live without this service.
chargen-udp: chargen’s cousin, this service sends a stream of characters to a UDP-connected client. If you disable chargen, disable chargenudp as well.
cups: This service is the Common UNIX Printing System. If you’re not printing anything, you don’t need cups. (You can always turn it back on later if you need it.)
cups-lpd: This service provides an lp-style interface to cups. (lp is an older printer protocol.) If you aren’t sharing printers with other UNIX systems (systems that use the lp protocol), disable this service.
daytime: This network service tells a client computer what time it is (at least, what time your computer thinks it is; if you’re like us, your VCR always thinks it’s 12:00 and so do your computers). daytime is rarely used — you can safely disable this service.
daytime-upd: This service is the same as daytime, except it works with UDP clients instead of TCP clients. Because this protocol is rarely used, you can safely disable this service.
echo: This is another silly network service that echoes client input back to the client. (It’s interesting to note that this service and the chargen service were both proposed by the same person
in 1972.) Unless you’re developing network software, you can safely disable this service.
echo-upd: This service is the same as echo, except it services UDP clients instead of TCP clients. Unless you’re developing network software, you can safely disable this service.
irda: If you have a laptop, it most likely has an infrared port built in. If you don’t use it (or you don’t have one), disable irda.
irqbalance: This service balances the workload on a multi-CPU computer. If you have only a single CPU, disable irqbalance.
isdn: This service manages ISDN network connections. If you don’t have an ISDN connection, you don’t need this service.
ktalk: This is the KDE talk server service. If you don’t chat with other users on your computer, disable ktalk.
lisa: lisa discovers SMB (Samba) computers on your local network, giving you a Linux equivalent to the Windows network neighborhood. If you don’t have any SMB servers (that is, Samba or Windows servers), you can do without lisa.
nfs: The NFS server service provides NFS file sharing to other NFS computers. NFS is a frequent target for hackers, so if you don’t use NFS sharing, disable NFS (and the nfslock service).
nfslock: This service provides file locking for the nfs service. If you’ve disabled nfs, disable nfslock too.
ntpd: This service synchronizes the date/time clock on your computer with network time servers. Enable this protocol if you want to standardize your computer’s clock with the rest of the world, or disable it if you’re happy setting the clock yourself.
rawdevices: This service is used by highperformance database servers to access your hard disk without going through the normal file system route. If you’re not using a program that needs raw disk access, disable rawdevices.

Removing Unneeded Services 143
rsync: rsync is a package that speeds up file transfers by sending only the differences between two versions of the same file. Disable this service if you aren’t running an rsync server.
saslauthd: SASL is an authentication protocol used by mail servers (and other network servers). If you know you don’t need it, disable it; if you’re not sure, leave it alone.
sendmail: The sendmail service moves e-mail from your machine to other machines (that is, it delivers the e-mail that you send). If you aren’t sending e-mail from your Linux computer or you’re using a different mail server, you can safely disable sendmail.
services: This service provides a listing of all the network services that your computer provides to other clients. Disable this service unless you know that you need it.
smb: If your computer acts as a Samba server (see Technique 11), you need the smb service. If not, you can safely disable this service.
snmp: This service is the Simple Network Management Protocol (SNMP) daemon. It services network management requests. If you’re unsure whether you need this, disable it for now (SNMP has been the target of some hack attacks).
snmptrapd: This is another component of SNMP. If you disabled snmp, you can disable snmptrapd too.
swat: SWAT is a mini–Web server that you use to configure the Samba server. If you aren’t running a Samba server, disable swat.
time: This service is similar to the daytime service. It sends the current date and time (in seconds, since midnight January 1, 1900) to any client that connects to it. You can safely disable this service.
time-udp: This service is the same as time, except it serves UDP clients instead of TCP clients. You can safely disable this service as well.
winbindd: This service pulls user account information from Windows servers, letting you use your Windows user name and password on a Linux computer. If you aren’t intimately sharing authentication information with a Windows server, disable winbindd.
Removing Unneeded Services
Having extra, unused services on your system can be a security risk. You may have a service disabled at the moment, but a hacker or Trojan horse can turn it on and exploit its open ports.
If you find an obscure service that you’ll never use, remove it so it’s not available for exploitation by a hacker or a Trojan horse.
Removing the services you don’t need is a good way to secure your system.
Don’t worry about removing the services you aren’t using now. Services are easy to reinstall if you find you need them.
If you’re a Fedora user, you can use the same Services Configuration Tool that you use to start or disable services (or configure a custom runlevel) to completely remove services.
To remove a service, Fedora users follow these steps:
1. Open the Main Menu and choose System Settings Server Settings Services.
You’re prompted to enter the root password.
2. Type in the root password and click OK.
The Service Configuration window opens.
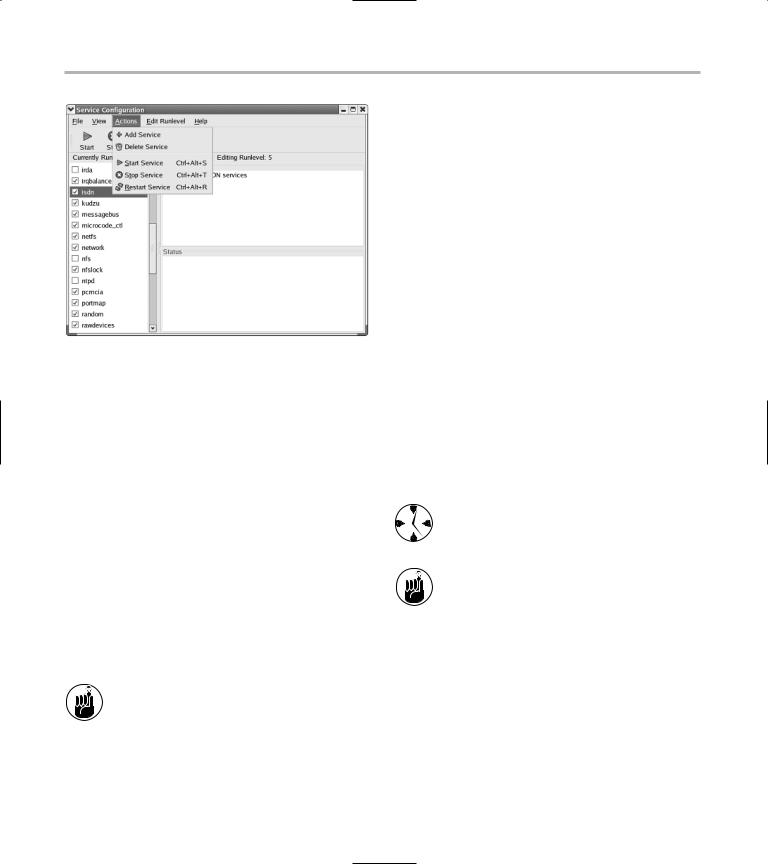
3. Highlight the service you want to remove and choose Actions Delete Service from the menu bar (see Figure 22-4).
144 Technique 22: Spring Cleaning Essentials
• Figure 22-4: The Actions drop-down menu.
A pop-up window appears asking you to verify that you want to remove the service.
4. Click Yes to remove the service, and in a snap, the service is gone!
If you’re a SuSE or Mandrake user, you can remove a service from the command line by following this procedure:
1. Open a terminal window and give yourself superuser privileges with the su command.
2. Type in the following command and press
Enter:
# /sbin/chkconfig --del service-name
You can also use the chkconfig command on Fedora systems if you don’t want to take the time to start the Services Configuration Tool.
When you delete a service with the Services Configuration Tool, the underlying programs remain on your system; you’ve deleted only the startup and shutdown scripts for the service. If you want to completely remove the service and its underlying programs and data files, erase the package with the rpm command (see Technique 17).
Removing Old Users
and Their Files
When users leave, the clutter they may be leaving behind can tie up valuable system resources. Why store all of their old files, which aren’t important anymore, when you can use the disk space for fresh data?
After you’ve made sure that you’ve saved any of the ex-users’ important documents, you can remove all traces of these users and their files with a few mouse clicks. Removing (and adding) user accounts is easy, and each distribution provides a graphical tool that allows you to manage users without resorting to a command line.
In this section, we show you how to remove user accounts with the Fedora User Manager. If you’re a Mandrake user, use the Mandrake User Management tool (found in the main menu at System Configuration Other User Administration). If SuSE is your favorite flavor, use the User and Group Administration tool in YaST (System YaST Security and User.
A quick follow-up with kfind will find any files that former users might have stashed on your system, but that are off the beaten path.
Before removing a user’s account, make note of his or her user ID. You’ll need it to clean up after deleting the account.
To remove an old user account, follow these steps:
1. Open the Main Menu and choose System Settings Users and Groups.
You’re prompted for the root password.
2. Enter the root password and click OK.
The Fedora User Manager opens, as shown in Figure 22-5.
3. To delete a user, highlight the user’s name in the list and click the Delete button (on the toolbar).

Removing Old Users and Their Files |
145 |
You’re asked to verify that you want to remove the user, as shown in Figure 22-6.
4. Check the Delete User’s Home Directory box if you want to remove the user’s old belongings.
Be sure that you don’t need any of the user’s old belongings. This is a good time to refer to Technique 50 and back up the user’s home directory before deleting it.
5. Click Yes to remove the user’s identity and home directory.
• Figure 22-5: The Fedora User Manager.
• Figure 22-6: Verify that you want to remove the user’s account.
After the user is removed from the user list, and his or her home directory is gone, you can use kfind to search for any orphaned files that the user may have left in other directories. To search for other files, follow these steps:
1. Open the Main Menu and choose Run Command.
2. Enter kfind in the Command field and click Run.
The KFind window opens (see Figure 22-7) to the Name/Location tab. The Name field should contain a *. Enter a / in the Look In field.
•Figure 22-7: The KFind window.
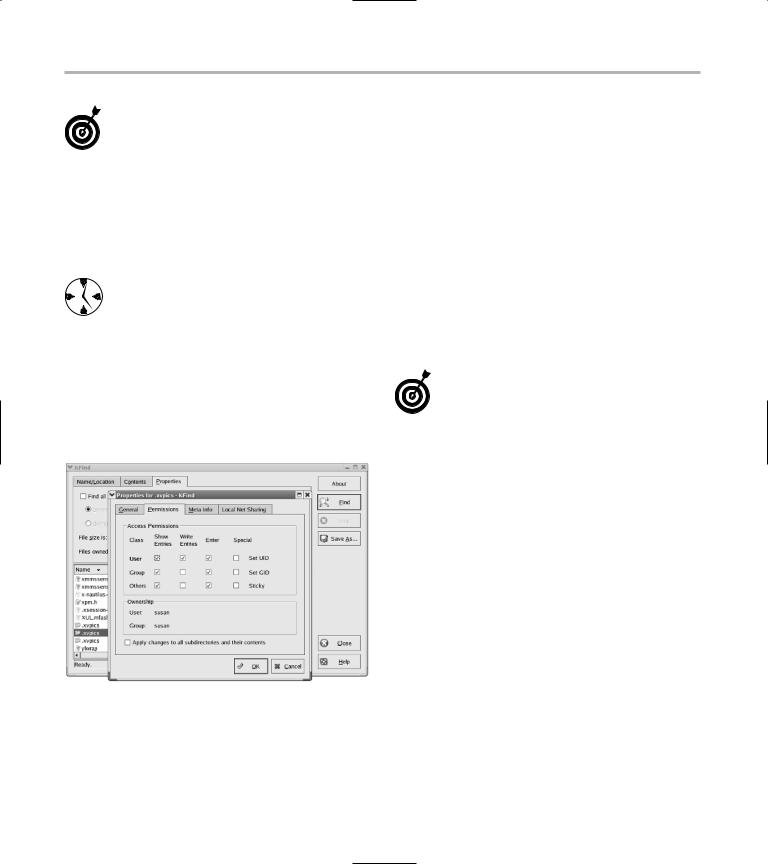
3.Click the Properties tab, and enter the user ID of your ex-user in the Files Owned by User field.
4.Click the Find button, and the search begins.
When the search is complete, the frame at the bottom of the window displays all the noworphaned files previously owned by the ex-user.
5.Right-click the filename to open a pop-up menu, displaying the filename at the top, followed by your file management choices:
Copy
Delete
Open Directory
Open With
Open
Properties
146 Technique 22: Spring Cleaning Essentials
You can delete old system files that contain configuration information and preferences for your ex-user without much concern for interfering with other users, but most other files should be investigated more closely.
6. To delete an old file, choose Delete from the pop-up menu.
You’re asked to confirm the deletion. Click Yes to delete the file.
You can select multiple files by holding down the Shift key and highlighting the files with a mouse click (or by using the arrow keys to select multiple files). Then right-click the file group and choose Delete from the pop-up menu. You’re asked to confirm the deletion. Click Yes, and the files disappear quickly!
7. If you see files in the list that may contain work or data important to others, right-click and choose Properties from the pop-up menu to open the Properties dialog (see Figure 22-8).
•Figure 22-8: The Properties dialog.
8.Click the Permissions tab to view the file ownership information, and note the name of the group that owns the file.
It might be prudent to consult with the other members of that group before deleting the file.
9. If the list includes files that you can’t recognize by filename or location, you can
Open the file and manually inspect the contents. Depending on how prolific the ex-user was, this might be the best option to start with. However, if the user left you with hundreds of files, you’ll probably want to use the other option.
Narrow the inspection a bit by deleting the things that aren’t important. Right-click the filename and choose Open from the pop-up menu. You’re treated to a view of the file, in the default viewer for that type of file.
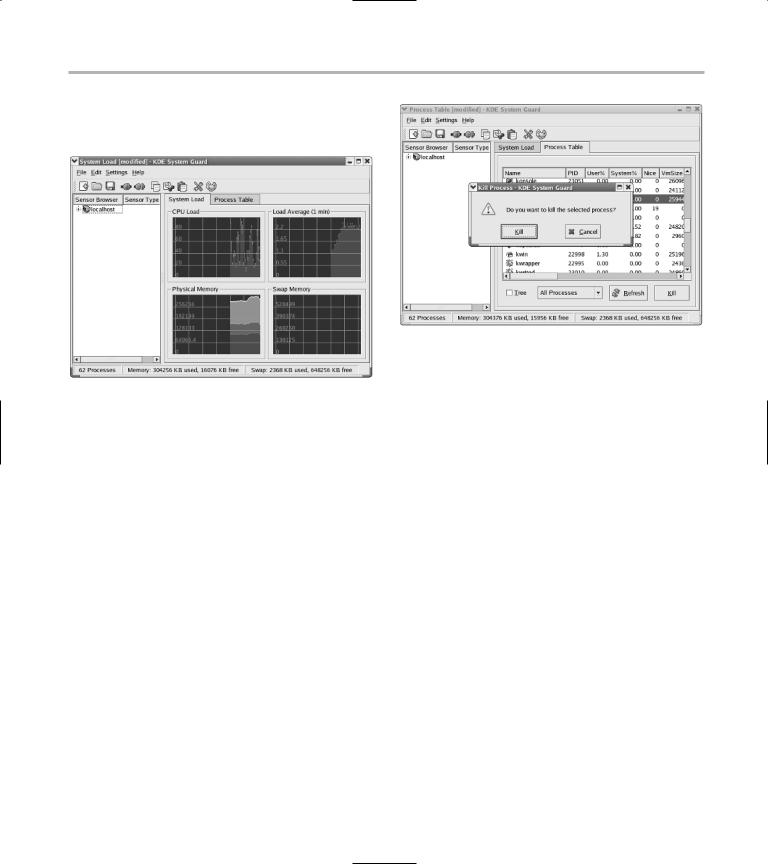
If you see a listing with /proc/processID in the In Subdirectory column of the result table, it means that the ex-user still has a process running somewhere on your system. Make a note of the process ID so you can use KDE System Guard to kill off the process. (See Technique 41 for complete details; see the following steps for the short version.)
To kill off abandoned processes, follow these steps:
1. Open a terminal window and gain superuser privileges with the su command.
2. Type the following command and press Enter:
# ksysguard
The KDE System Guard window opens, as shown in Figure 22-9.
3. Click the Process Table tab to move to a list of currently running processes, and look for the process ID in the PID column.
4. When you’ve found the process ID, highlight the entry for that process and click the Kill button.
A dialog opens asking if you really want to kill the selected process (see Figure 22-10).
Removing Old Users and Their Files |
147 |
5. Click Kill to confirm your choice.
The process is terminated.
• Figure 22-9: The KDE System Guard window.
• Figure 22-10: Confirm the process termination.
With a little vigilance, you’ll avoid the piles of files that ex-users can amass on your system and save the resources for the users that need them.


Part IV
Tweaking the Kernel on Your Linux System


23 Taking Good Care
of Your Kernel
Technique
Save Time By
Manipulating your kernel on the fly
Using your boot time parameters to customtailor your kernel
The kernel is the software core of your computer. Kernel modules make up the software interface between your system hardware and the system software. On a fresh Linux installation, over 900 kernel
modules are ready to load into your kernel. The actual number may vary depending on the specific hardware that Linux finds when it sets up housekeeping, but on our Fedora system, 968 modules exist.
You can also download and install new kernel modules. You can find many open-source modules bouncing around the Web that do everything from silencing annoying beeps to enabling wireless network cards. The beauty of the system is the flexibility that kernel modules provide the computer industry. Every time a new piece of hardware is invented, you don’t have to modify and rebuild the Linux kernel — you just add a new module.
Manipulating kernel modules is quick and simple, thanks to a series of commands that work at the command line to update your kernel without a complete rebuild. You can also find-tune your kernel by using the boot time parameters. Boot time parameters are the kernel options that are enforced every time you boot your system.
Not all features are modules, and you may want your kernel to be configured so that some features can’t be changed. If that is the case, a complete kernel rebuild is called for (see Technique 24 for information about building a kernel from scratch). If you can get by with a simple patch to the kernel, this is the technique for you. In this technique, we introduce you to the commands that let you customize your kernel — quickly and easily.