


158 Technique 24: Creating a Custom Kernel
Reconfiguring Your Kernel —
Ready, Set, Go!
The kernel that’s included with the Fedora release is a well-functioning and stable piece of software — versatile, dependable, and sturdy. But what if it doesn’t include the functionality you need?
No problem — you can just rebuild it. Stick with us, and we’ll show you how to make it bigger, better, and stronger . . . whatever you need.
The process of rebuilding your kernel involves several steps, and each step is covered in the following sections. Here’s an overview of the process:
1. Make a boot disk.
2. Find the source code.
3. Configure the new kernel.
4. Customize the kernel.
5. And, finally, build the kernel.
Peeling onions
The Linux operating system is like an onion. If you peel away the outer layers (the KDE desktop, the bash shell, and so on), you find a layer of operating system libraries. The libraries provide commonly used functions that enable applications to find things like the current date, the IP address of a given host, and so on.
Underneath the library layer is a set of system calls, which are functions that perform low-level operations like changing your user ID, allocating more memory, and opening a file.
At the core of the onion, you find the kernel. The kernel uses device drivers to manage system hardware. The kernel also schedules disk I/O and CPU usage, responds to external signals, creates and tears down processes, and performs other low-level operations. But the kernel itself is layered, too. The Linux kernel has a portable layer that runs on any computer. At the very center of the onion is a hardwaredependent layer that is customized for each CPU (Intel x86, PowerPC, StrongARM, and so on).
Step 1: Making an Emergency Plan, or Boot Disk
Before building a custom kernel, you need to make a boot disk. A boot disk gives you a way back into your system in a kernel emergency. If you’re running Mandrake or SuSE Linux, you can also create a rescue disk. A rescue disk is similar to a boot disk, but it also contains diagnostics that can tell you a little
more about your computer if you run into boot problems. The process of creating a boot (or rescue) disk varies by distribution.
To make a boot disk on a Fedora or Mandrake computer, follow these steps:
1. Insert a floppy disk in your drive, open the terminal window, and give yourself superuser privileges.
2. Type the following command:
# /sbin/mkbootdisk `uname -r`
After some whirring and clicking, your floppy is bootable.
3. To test the floppy (a good idea), shut down completely and restart.
To make a rescue disk on a Mandrake system, follow this procedure:
1. Insert a floppy disk in your drive, open the terminal window, and give yourself superuser privileges.
2. Type the following command and press Enter:
# /sbin/mkrescue
3.To test the floppy (a good idea), shut down completely and restart.
If you’re running SuSE Linux, use the YaST control center to create a boot disk or a rescue disk (or both):
1. Open the main menu and choose System YaST.

Step 1: Making an Emergency Plan, or Boot Disk |
159 |
2. When the YaST control center appears, click
System (in the left-hand pane).
3. Click Create a Boot, Rescue, or Module Floppy.
4. Follow the on-screen instructions to create a boot floppy, rescue floppy, and module floppy.
You may need to boot into your computer’s BIOS setup mode to change the boot sequence to test the floppy. How you enter setup varies with your machine, but instructions are typically displayed on-screen at boot time.
You can also use the first install disc of your distribution’s CD (or DVD) collection to boot into rescue mode.
To boot into rescue mode on a Mandrake system, follow these steps:
1. Place the first install disc in the CD/DVD drive.
2. Power up your system.
3. When you see the Press <F1> for more options prompt, press F1.
A screen full of help text appears, followed by the boot prompt (boot:).
4. Type rescue and press Enter.
Booting into rescue mode on a SuSE system is similar:
1. Place the first install disc in the CD/DVD drive.
2. Power up your system.
3. When the boot menu appears, use the down arrow key to highlight Rescue System and press Enter.
4. When prompted, choose your preferred language from the menu and press Enter.
To boot into rescue mode on a Fedora computer:
1. Place the first install disc in the CD/DVD drive.
2. Power up your system.
3. When the boot: prompt appears, type in the following command and press Enter:
boot: linux rescue
(Don’t type the word boot:, that’s the boot prompt — just type in linux rescue and press Enter.)
4. When prompted, choose your preferred language from the menu and press Enter.
5. Choose your keyboard type from the menu and press Enter.
6. At this point, Fedora asks if you want to start the network devices in your computer. Choose Yes or No (use the leftand right-arrow keys to select the option that you want) and press Enter to continue.
Fedora will try to find the root file system on your hard drive and mount that file system so that you can carry out any repairs that you need to make.
If you want to poke around a little without endangering anything on your hard drive, tell Fedora to mount the root file system in read-only mode.
7. Choose the mount mode you prefer (choose
Continue to mount your root file system in read/ write mode, Read-Only to safeguard your file systems, or Skip to tell Fedora not to mount your root file system).
If Fedora locates and mounts your root file system, you can find it in the directory /mnt/ sysimage. If you look in that directory, you’ll see subdirectories such as /mnt/sysimage/bin, /mnt/ sysimage/boot, /mnt/sysimage/dev, and so on. Those subdirectories correspond to the /bin, /boot, and /dev directories on your computer’s root file system.
Regardless of which distribution you’re using, after you’ve booted into rescue mode, you eventually end up at a command line. From there, you can mount your root file system (and any other file systems that you may need), make any repairs that you need, and reboot.
160 Technique 24: Creating a Custom Kernel
Step 2: Finding the Source Code
To rebuild the kernel, you first need to be sure that the source code for the kernel is on your system. Fedora distributes the kernel source in the form of an RPM package. You could use the Red Hat Package Manager to install the kernel source package by hand, but you’d also need to install a number of dependencies. Here’s an easier way:
Reusing the kernel that is included with the latest distribution saves time. It’s a lot faster to alter a kernel you already have handy than to go through the work of downloading, customizing, and building a whole new kernel from scratch.
1. Open the Main Menu and choose System Settings Add/Remove Applications.
2. Enter the root password when prompted.
The Package Manager checks the system for installed packages and opens the Add or Remove Packages window, showing both the installed and available packages.
3. Scroll down the list and check the box next to
Kernel Development.
4. Click the Update button.
The System Preparation dialog opens.
5. Click the Continue button.
If prompted, insert the required disc and click OK.
When the installation is complete, a confirmation window is displayed.
The Add/Remove Applications tool may get confused if you’re installing software from a DVD instead of a CD. If the disc you’re using gives you trouble, just insert it and let the autorun procedure start. Then follow the setup wizard to install additional packages.
Step 3: Configuring
a New Kernel
After making a boot disk and installing your source code, it’s time to configure a new kernel.
To build a custom kernel, follow these steps:
1. Open a terminal window and give yourself superuser privileges with the su command.
2. Type the following command and press Enter:
# cd /usr/src/linux-2.4
If you’re using a kernel version newer than 2.4, cd to that directory instead.
3. Type the following command and press Enter:
# make mrproper
This command cleans up any remnants of previous builds that might confuse your new build.
4. Identify the type of processor in your computer:
# uname -p
The command displays the processor type that you’re currently using (we assume i686 in the examples that follow).
5. Copy the configuration file that matches your processor type into your current directory:
#cp configs/kernel-2.4.22-i686.config
.config
By using a predefined configuration file, your new kernel starts out in a well-defined and functional state.
6. Type the following command and press Enter:
# make oldconfig
This step runs for a while and displays a ton of messages. Just ignore the messages and grab some caffeine.
Step 4: Customizing the Kernel 161
Step 4: Customizing the Kernel
When you’re done with the preceding steps, you’re ready for the fun part: customization. Here’s how it works:
1. Enter the following command:
# make menuconfig
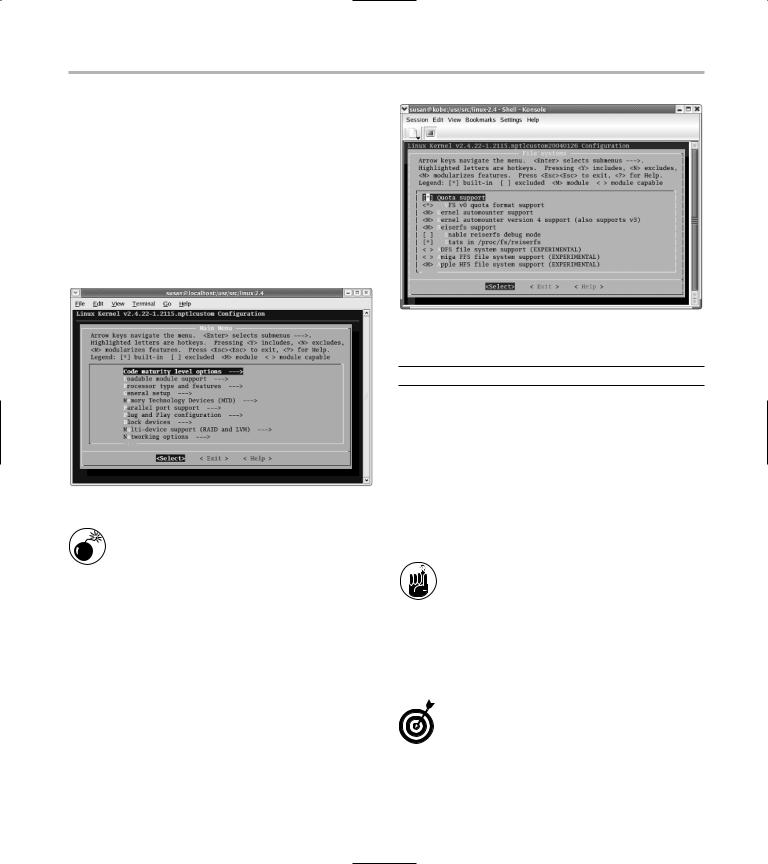
The Linux Kernel Configuration window opens, as shown in Figure 24-1.
• Figure 24-1: The Linux Kernel Configuration window.
If you run into some documentation that suggests make xconfig rather than make menuconfig, ignore it. xconfig has a nice user interface, but in the 2.4 kernel series, it has a serious flaw that will cause you all sorts of grief.
2. The menuconfig window (refer to Figure 24-1) displays a list of feature groups. Use the arrow keys to move up and down through the list and press Enter to select the highlighted group.
The leftand right-arrow keys move you through the <Select>, <Exit>, and <Help> choices at the bottom of the window. To return to the previous screen, choose <Exit>.
When you select a feature group and press Enter, you see the list of features within that group (see Figure 24-2). To the left of each feature, you see an indicator that shows the state of the feature (see Table 24-1).
• Figure 24-2: The File Systems submenu.
TABLE 24-1: MENUCONFIG INDICATORS
Indicator Description
[ ] The feature is not selected and won’t be included in the new kernel. You can build the feature as a loadable module.
[*]The feature will be included (and can only be compiled) in the new kernel.
< > |
|
The feature is not selected and won’t be |
|
|
compiled as a loadable module. |
<M> |
|
The feature will become a loadable kernel |
|
|
module. |
|
|
|
|
|
Indented lines show separate components of a |
|
|
feature. You can’t enable a component without |
|
|
the parent feature. |
|
|
|
|
|
The <Help> button displays a help screen that |
|
|
describes the highlighted feature. Most features |
|
|
are well documented and include links to more |
|
|
information, as shown in Figure 24-3. |
|
|
Finding features in the Kernel Configuration |
|
|
menu is like digging around in an old attic. |
|
|
You’ll find features for technologies that are |
|
|
long since retired or so obscure that the aver- |
|
|
age human will likely never know anyone who |
|
|
needs them. Still, if you do need them, they’re |
|
|
here — just look around. |