

The client-side framework |
369 |
|
|
Listing 10.2 Partial listing for commenting out the request lines for testing
//string strQuery = Request.Form.Get("q").ToString(); string strQuery = "a";
string strAny = "";
//if (Request.Form.Get("where").ToLower() == "true") //{
strAny = "%";
//}
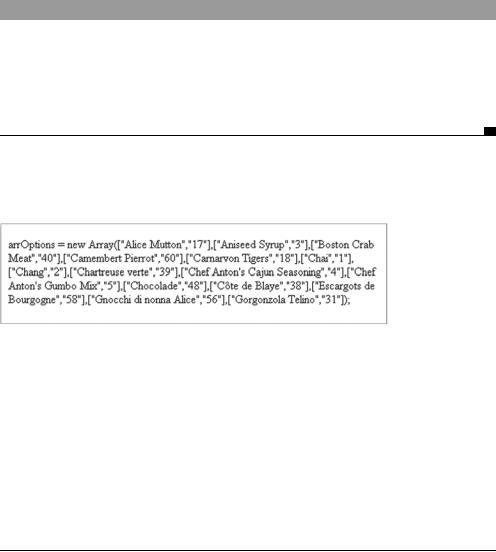
This code is looking for all the words that contain the letter a. Therefore, when this code is executed, the JavaScript array declaration appears as shown in figure 10.3.
Figure 10.3 JavaScript statement output of the server-side page for a test run
As you can see, the string in figure 10.3 is correct. Therefore, we can remove the comments and hard-coded values and continue building the type-ahead suggest. You may be wondering where all the caching of the data returned from the server is. The client-side code will handle this. The only time the server will be called is for the very first keystroke or when the results are greater than or equal to 15. There is no reason to keep requesting the same data if we are only going to get a subset of the returned results. Now that we’ve finished the server-side code, let’s develop the client-side framework.
10.3 The client-side framework
The client-side framework involves Ajax’s XMLHttpRequest object and a good amount of DHTML. The first thing we tackle is building the textboxes.
10.3.1The HTML
The HTML we’ll use is very simple since we’re dealing with only three form elements: two textboxes and a hidden field. The first textbox is the type-ahead suggest form element. The hidden field accepts the value of the selected item that

370CHAPTER 10
Type-ahead suggest
the user picks from our type-ahead suggest. The other textbox does nothing other than keep our form from posting back to the server when the Enter key is pressed. The default action of the Enter key in a form with one text field is to submit the form. Adding another textbox to the page is the easiest way to get around the default action of the form. If you’re adding the type-ahead suggest on a page that contains multiple form elements, then you don’t need to add it. The basic HTML layout is shown in listing 10.3.
Listing 10.3 The basic HTML layout for the type-ahead suggest
<form name="Form1" AUTOCOMPLETE="off" ID="Form1">
AutoComplete Text Box: <input type="text" name="txtUserInput" /> <input type="hidden" name="txtUserValue" ID="hidden1" />
<input type="text" name="txtIgnore" style="display:none" /> </form>
In listing 10.3, we added a form with autocomplete turned off. We need to do this to prevent the browser from putting values into the fields when the page is first loaded. It is a great feature when you need it, but in this case it disrupts the flow for our type-ahead suggest. Note that this is an Internet Explorer–specific fix, to prevent the built-in autocomplete drop-downs from interfering with our DHTML drop-down. Other browsers will ignore this attribute.
We added a textbox with the name txtUserInput, a hidden element with the name txtUserValue, and our dummy textbox with the name txtIgnore. The txtIgnore textbox, used to prevent automatic submission of the form, also has a CSS style applied to it to hide it from view, so the user cannot see it. There are other ways around this with coding, but this is the easiest and quickest solution. Now that we have added our text fields to the form, we can start coding the JavaScript.
10.3.2The JavaScript
The JavaScript for the type-ahead suggest performs three main tasks:
■Monitoring the user’s actions on the keyboard and mouse
■Sending and receiving data from the server
■Producing HTML content with which the user can interact
Before we start coding, it’s a good idea to see exactly what we’re going to be coding in action.
372CHAPTER 10
Type-ahead suggest
to the server, hiding any browser-specific code behind the easy-to-use wrapper object. This now allows us to send and retrieve the data from the server without refreshing the page. With this file attached to our project, we can start to develop the type-ahead suggest.
The output span
Figure 10.4 shows a gray box that contains all the available options. The box is an HTML span element that is dynamically positioned to line up directly under the textbox. Instead of having to add the span to the page every time we want to use this script, we can add the span to the page from the script.
In listing 10.4, we create a new span element with DOM on the page load event. We are inserting a span to the HTML page with an ID of spanOutput and a CSS class name of spanTextDropdown. The span is then added by appending the new child element to the body element. The CSS class reference that we added allows us to assign the rules so that we can position the span dynamically. Since we are going to be dynamically positioning the span on the screen depending on where the textbox is located, we set the CSS class of the span to absolute positioning.
Listing 10.4 The JavaScript code to output the positioned span
window.onload = function(){
var elemSpan = document.createElement("span"); elemSpan.id = "spanOutput";
elemSpan.className = "spanTextDropdown"; document.body.appendChild(elemSpan);
}
We are using the page onload event handler to allow us to dynamically add a span element to the page. This prevents us from having to manually add it to the page every time we want to use this script. The DOM method createElement is used to create the span. We then need to assign our new span an ID and a className attribute. Once we add those new attributes, we can append the element to the page. At this point, let’s create our CSS class (listing 10.5) so that we can dynamically position the element on the page.
Listing 10.5 CSS class for drop-down span
span.spanTextDropdown{ position: absolute; top: 0px;
left: 0px; width: 150px; z-index: 101;

The client-side framework |
373 |
|
|
background-color: #C0C0C0; border: 1px solid #000000; padding-left: 2px; overflow: visible; display: none;
}
The position of the span is initially set to arbitrary positions on the screen by adding the top and left parameters. We set a default width for our span and set the z-index to be the uppermost layer on the page. The CSS rule also lets us style the background and border of our span so it stands out on the page. The display property is set to none so that it is hidden from the user’s view when the page is initially loaded. As the user starts to input data in the type-ahead text field, the display property is changed so that we can see the results.
Assigning the type-ahead functionality to a textbox
Because we may want to use the type-ahead functionality on multiple fields, we should develop a way to have different properties assigned to the various elements. The properties are used to determine how the script reacts. We set properties to match text with case sensitivity, match anywhere in the text, use timeouts, and perform other features we will discuss shortly. One way to do this is to build an object that contains all the needed parameters that are unique to the individual textbox. Therefore, when we have the textbox in focus, we can reference the object that is attached to the element to obtain the correct settings. In listing 10.6, a new object is created so we are able to organize the list of parameters that we assign to the textbox.
Listing 10.6 Building a custom object
function SetProperties(xElem,xHidden,xserverCode, xignoreCase,xmatchAnywhere,xmatchTextBoxWidth, xshowNoMatchMessage,xnoMatchingDataMessage,xuseTimeout, xtheVisibleTime){
var props={ elem: xElem,
hidden: xHidden, serverCode: xserverCode,
regExFlags: ( (xignoreCase) ? "i" : "" ), regExAny: ( (xmatchAnywhere) ? "^" : "" ), matchAnywhere: xmatchAnywhere, matchTextBoxWidth: xmatchTextBoxWidth, theVisibleTime: xtheVisibleTime, showNoMatchMessage: xshowNoMatchMessage,

374CHAPTER 10
Type-ahead suggest
noMatchingDataMessage: xnoMatchingDataMessage, useTimeout: xuseTimeout
};
AddHandler(xElem); return props;
}
The first step in creating our objects for the type-ahead suggest is to create a new function called setProperties(), which can assign properties to the object. In this example, we are going to be passing in several parameters to this function. The list of parameters includes the textbox that the type-ahead is assigned to, the hidden element used to hold the value, the URL to the server-side page, a boolean to ignore case in the search, a boolean to match the text anywhere in the string, a boolean to match the textbox width, a boolean to show no matching message, the message to display, a boolean to determine if the options should hide after a given period of time, and the time span it should remain open.
This is a large list of parameters to pass into the function. We must take these parameters and assign them to our object. To do this, we use the JavaScript Object Notation (JSON), which we describe in more detail in appendix B. The keyword is defined before the colon, and the value afterward. Our treatment of two parameters, ignoreCase and matchAnywhere, is slightly more complex. Instead of storing the boolean value, we store the regular expression equivalent in the property. In this case, we use i to ignore case and ^ to match the beginning of a string in regular expressions. It is easier for us to set the regular expression parameters here instead of using if statements each time the functions are called.
The last step in our function is assigning the event handlers to the textbox. For this example, we’ll call a function that adds the event handlers automatically. We develop the code for the function in a moment, but first let’s call the function SetProperties() to create our object. The code in listing 10.7 is executed on the page onload event handler, enabling us to set the properties to the textbox.
Listing 10.7 Initializing the script
window.onload = function(){
var elemSpan = document.createElement("span"); elemSpan.id = "spanOutput";
elemSpan.className = "spanTextDropdown"; document.body.appendChild(elemSpan);
document.Form1.txtUserInput.obj = SetProperties(document.Form1.txtUserInput,

The client-side framework |
375 |
|
|
document.Form1.txtUserValue,'typeAheadData.aspx', true,true,true,true,"No matching Data",false,null);
}
The event handlers must be assigned when the page is loading. Therefore, we need to assign them to the window.onload event handler that we created earlier to add the new span element. In this example, we are using just one textbox for the type-ahead. We must reference the form element to which we want to add the type-ahead suggest and add a new property to it called obj. We will assign our custom object to this property so we can reference it throughout the script to obtain our values instead of using global variables.
We set the reference equal to the function SetProperties(). We then assign all the parameters that we created in listing 10.6. The important things to point out are that we are referencing the two form elements we created in listing 10.3 and we are calling the server-side page typeAheadData.aspx, which we created in listing 10.1. Now that the onload handler is initializing the process, we can add the event handlers, which our function SetProperties() is calling.
The event handlers
In order for us to determine the user’s actions within the textbox for the typeahead suggest, we need to add event handlers to the form. The two main things to consider are the user’s typing on the keyboard and whether the user has left the text field. In listing 10.8, we use event handlers to detect the user’s actions.
Listing 10.8 Attaching the event handlers
var isOpera=(navigator.userAgent.toLowerCase().indexOf("opera")!= -1); function AddHandler(objText){
objText.onkeyup = GiveOptions; objText.onblur = function(){
if(this.obj.useTimeout)StartTimeout();
}
if(isOpera)objText.onkeypress = GiveOptions;
}
Listing 10.8 begins with a browser-detection statement. The browser detection is going to be used in a few places in this example since Opera behaves differently with keypress detection. This is the easiest way to determine if the browser used is Opera, but it is not always the most reliable way since Opera can act like other browsers.

376CHAPTER 10
Type-ahead suggest
Our function AddHandler() is given a reference to the textbox. This reference allows us to add the onkeyup and onblur event handlers to the element. The onkeyup event handler fires a function called GiveOptions() when the key is released on the keyboard. Therefore, when the user types a five-letter word, the function GiveOptions is fired five times as the keys are released.
The onblur event handler that we attach to our textbox calls the function StartTimeout() when the user removes the focus from the textbox. Actions that can remove the focus from the textbox include clicking on another part of the screen or pressing the Tab key. We will be developing the StartTimeout() function in listing 10.19.
The reason we did the browser detection for Opera is that it does not fire the onkeyup event handler in the same manner as the other browsers do. When onkeyup is fired, Opera does not show the value in the textbox that includes that current keystroke. Adding the onkeypress event handler to Opera corrects this problem. You can see that we check for the browser using our boolean variable isOpera, and we then assign our onkeypress event handler to our textbox. With this event handler, Opera performs in the same way as other browsers. Since we now are able to detect the user’s typing, we can determine what actions need to take place in the function GiveOptions().
Handling the user’s keypress
The GiveOptions() function that we are about to create is called when keypress events are fired. This function has two main jobs: determining the action to take depending on the keystroke, and determining whether we need to use Ajax to obtain the data from the server or use the data we already have. Therefore, the GiveOptions() function is performing the same role as the data caching that we discussed in section 10.1.1. By using client-side code to handle the additional keystrokes, we are decreasing the bandwidth consumption of the type-ahead suggest. To implement our cache of options, let’s set some global variables on the client. The code in listing 10.9 contains a list of global variables that we need to start with.
Listing 10.9 Global variables used throughout the project
var arrOptions = new Array(); var strLastValue = "";
var bMadeRequest; var theTextBox; var objLastActive;
The client-side framework |
377 |
|
|
var currentValueSelected = -1; var bNoResults = false;
var isTiming = false;
The first global variable is arrOptions. This variable references an array that holds all the available options from the server query. The next variable is strLastValue, which holds the last string that was contained in the textbox. The variable bMadeRequest is a boolean flag that lets us know that a request has already been sent to the server so we do not keep sending additional requests. The flag is meant for very fast typists, so we do not have to worry about using timeouts as Google does.
The variable theTextBox will hold a reference to the textbox that the user has in focus, whereas objLastActive will hold the reference to the last active textbox. This is used to determine whether the data set needs to be refreshed if the user switches textboxes. While there is only one visible textbox on our example, if this solution is implemented on a window with multiple textboxes, we need to know which one has the focus. The next variable, currentValueSelected, will act like the selectedIndex of a select list. If the value is -1, nothing is selected. The final global variable that we need right now is a boolean bNoResults. This will tell us that there are no results, so we should not bother trying to find any. The variable isTiming allows us to determine whether a timer is running on the page. The timer runs to hide the options from the user’s view if there is a period of inactivity.
Even though you might not completely understand what these global variables’ roles are at this time, you’ll understand better when we start using them. With all our global variables referenced, we can build the GiveOptions() function, which is called from the keystrokes in the textbox. The GiveOptions() function in listing 10.10 lets us determine the action the user has performed in the textbox.
Listing 10.10 The JavaScript code that detects the user’s keypresses
function GiveOptions(e){ |
|
|
var intKey = -1; |
|
|
|
|
|
if(window.event){ |
|
|
intKey = event.keyCode; |
b |
Detect the |
theTextBox = event.srcElement; |
||
} |
|
keypress |
else{ |
|
|
intKey = e.which; |
|
|
theTextBox = e.target; |
|
|
} |
|
|


The client-side framework |
379 |
|
|
If the user is typing a word, either this function will start a new search, checking the server for matching data, or it will work with the cached result set. If we do not need to get new data from the server, then we can call a BuildList() function, which will limit the result set. We explain more about that in the section “Building the results span,” later in this chapter.
The GiveOptions() function is declared with the parameter e, which allows us to detect the source of the event. The first thing we need to declare is a local variable intKey. This variable holds the code of the key that the user pressed b. To determine which key was pressed, we must determine what method the user’s browser needs to function. If the window.event property is supported, then we know the browser is IE. We use event.keyCode to obtain the key code value, and we also use event.srcElement to get the object of the user’s textbox. For the other browsers, we use e.which to obtain the key code value and e.target to obtain the textbox object reference.
We then need to check whether the textbox is using a timer to hide the textbox c. To do so, we reference the textbox’s obj property (which we created earlier) and the boolean useTimeout. If the timer is running, we cancel it and then restart it by calling the functions EraseTimeout() and StartTimeout(), which we will code in the section “Using JavaScript timers.”
We then check to see if anything is in the textbox d. If nothing is there, we call a HideTheBox() function (which is developed in the section “Setting the selected value”), set the strLastValue to null, and return false to exit the function. If the textbox contains text, then we can continue. Before we can detect the Enter key and arrow keys, we need to verify that the current active textbox is the same textbox as the last textbox that was active.
The first key to detect is the Enter key, which has a key code of 13 e. The Enter key will allow us to grab the value of the selected drop-down item and place it into the visible textbox. Therefore, we call a GrabHighlighted() function (which we will also code in the section “Setting the selected value”). We then remove the focus from the textbox and exit the function.
The next two keys we want to capture are the Up and Down Arrow keys, which have the values 38 and 40, respectively. The arrow keys move the highlighted option up and down the list. In figure 10.4, the dark gray bar is the selected item. By using the Down Arrow key, you can select the next item in the list. This functionality will be discussed in the section “Highlighting the options.” The important thing to note is that the Down Arrow key sends a value of 1 to the function MoveHighlight(), while the Up Arrow key sends -1.