


364 C For Dummies, 2nd Edition
The command prompt should now reflect that you’re using the My
Documents folder, similar to:
C:\Documents and Settings\Dan\My Documents>
or:
C:\My Documents>
(The last part of the prompt reads “My Documents.”)
In Linux, FreeBSD, or Mac OS X, type the cd command to change to your home directory. That single command does the job.
3.Change to the learn directory.
Everyone, type:
cd prog/c/learn
except for older versions of Windows, where it’s cd prog\c\learn
(Note the backslashes, not forward slashes.)
4.Confirm that you’re in the proper directory.
You do this in Windows by typing the cd command; in Unix, type pwd.
The current directory is displayed, which should look like one of these:
C:\Documents and Settings\name\My Documents\prog\c\learn
C:\My Documents\prog\c\learn
/home/user/prog/c/learn /Users/user/prog/c/learn
Note that the common part is the last part, prog/c/learn. If you see that (or prog\c\learn), you’re ready to start work.
The learn directory is where you’re working while you use this book. That’s where you edit, create, compile, and manage files.
Running an editor
To concoct your C language source code, you need to use a text editor. In Windows, you can use the EDIT command to summon the MS-DOS Editor. It’s rather simple to understand and use, it works with the mouse, and it’s free and available.
For the various Unix operating systems, you have multiple editor choices. The simplest text editor is Easy Editor, activated with the ee command. Otherwise, you can use any of the Unix editors — and quite a few of them are available.

366 C For Dummies, 2nd Edition
Windows compilers aren’t designed to be friendly for command-line compil ing. Because of that, it’s up to you to make the compiler work at every com mand prompt and in every folder in your computer system. One way to make that happen is to create a batch file that runs the GCC (or whatever) command that runs the compiler. It isn’t the easiest thing to do, but, fortunately, it needs to be done only once.
These steps assume that you have installed the Dev-C++ environment on your PC. Furthermore, they assume that you have installed Dev-C++ into the C:\ Dev=C++ folder.
(If you installed Dev-C++ in another folder, you need to make a note of that folder’s path. For example, if you installed it in the Program Files folder, the path is C:\Program Files\Dev-C++. You must remember the path!)
Take a deep breath.
1. Start a command prompt or MS-DOS window.
You know what? Making a shortcut to the MS-DOS window and putting it on the desktop may be a good idea — especially for the duration of time that you use this book. See your favorite book on Windows for detailed instructions.
2. Change to the Windows folder:
cd \windows
(I’m assuming that Windows is the name of your Windows folder. If not — it’s WINNT or something — substitute the folder’s name for windows in the cd \windows command.)
Inside the Windows folder, you create a batch file program — a shortcut to the GCC command used by Dev-C++. You can then use the GCC com mand at any command prompt in Windows.
3.Carefully type copy con gcc.bat and press the Enter key.
4.Carefully type this line:
@c:\Dev-C++\bin\gcc %1 %2 %3 %4 %5 %6
The line starts with an at sign, @. That’s followed by the full pathname to Dev-C++’s GCC compiler, either c:\Dev-C++\bin\gcc. (If you have installed GCC into another folder, put its path there instead; remember to enclose the path in double quotes if it contains spaces!)
After gcc comes a space, and then %1, a space, %2, space, and so on.
This is important!

Appendix A: The Stuff You Need to Know before You Read All the Other Stuff 367
If you make a mistake, use the Backspace key to back up and correct.
If all this seems strange to you, get someone else who better under stands Windows (or DOS) to help you.
5.Review the line.
Double-check everything. Only when it looks like the example in this book do you do the next step.
6.Press the Enter key.
7.Press the F6 key.
A ^Z appears on the screen.
8.Press the Enter key.
You see 1 file(s) copied and the GCC.BAT file has been created.
Now you need to test the GCC.BAT file, to ensure that it’s working. Follow the steps listed earlier in this appendix so that you’re in the learn folder. (It may be easier to close the current Command Prompt window and open a new one). When you’re in the learn folder, type this command at the prompt:
gcc -v
If you see a whole lotta blech appear on the screen, congratulations! You got it to work!
If it doesn’t work, review the preceding steps. You probably didn’t copy the text properly in Step 4, or you could have created the file in the wrong folder. Repeat the steps, and press Y after Step 3 to overwrite the current GCC.BAT file with a new one.
Windows: Compiling, linking, and running
After setting up the GCC.BAT file, you’re ready to start creating programs. Eventually, you repeat the following steps often enough that you no longer need to refer to this appendix for help.
1.Ensure that you’re in the proper folder.
Refer to the section “Finding your learn directory or folder,” earlier in this appendix.
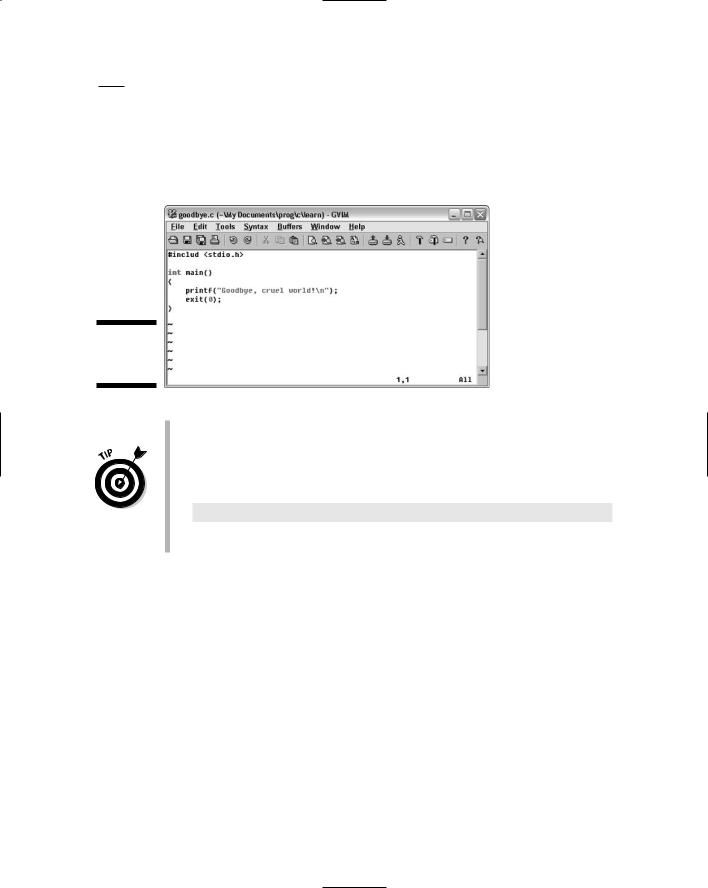
2.Use your text editor to create your source code file.
Refer to Chapter 1 for the listing of the GOODBYE.C program. Type that text into your editor per the instructions in Chapter 1.
3.Compile and link the source code.


372 C For Dummies, 2nd Edition
Code |
Character |
Hex |
Binary |
Notes |
20 |
^T |
14 |
0001 0100 |
|
|
|
|
|
|
21 |
^U |
15 |
0001 0101 |
|
|
|
|
|
|
22 |
^V |
16 |
0001 0110 |
|
|
|
|
|
|
23 |
^W |
17 |
0001 0111 |
|
|
|
|
|
|
24 |
^X |
18 |
0001 1000 |
|
|
|
|
|
|
25 |
^Y |
19 |
0001 1001 |
|
|
|
|
|
|
26 |
^Z |
1A |
0001 1010 |
End of file (DOS) |
|
|
|
|
|
27 |
^[ |
1B |
0001 1011 |
Escape |
|
|
|
|
|
28 |
^\ |
1C |
0001 1100 |
|
|
|
|
|
|
29 |
^] |
1D |
0001 1101 |
|
|
|
|
|
|
30 |
^^ |
1E |
0001 1110 |
|
|
|
|
|
|
31 |
^_ |
1F |
0001 1111 |
|
|
|
|
|
|
32 |
|
20 |
0010 0000 |
Space |
|
|
|
|
|
33 |
! |
21 |
0010 0001 |
|
|
|
|
|
|
34 |
“ |
22 |
0010 0010 |
|
|
|
|
|
|
35 |
# |
23 |
0010 0011 |
|
|
|
|
|
|
36 |
$ |
24 |
0010 0100 |
|
|
|
|
|
|
37 |
% |
25 |
0010 0101 |
|
|
|
|
|
|
38 |
& |
26 |
0010 0110 |
|
|
|
|
|
|
39 |
‘ |
27 |
0010 0111 |
|
|
|
|
|
|
40 |
( |
28 |
0010 1000 |
|
|
|
|
|
|
41 |
) |
29 |
0010 1001 |
|
|
|
|
|
|
42 |
* |
2A |
0010 1010 |
|
|
|
|
|
|
43 |
+ |
2B |
0010 1011 |
|
|
|
|
|
|
44 |
, |
2C |
0010 1100 |
|
|
|
|
|
|
45 |
- |
2D |
0010 1101 |
|
|
|
|
|
|
46 |
. |
2E |
0010 1110 |
|
|
|
|
|
|


374 C For Dummies, 2nd Edition
Code |
Character |
Hex |
Binary |
Notes |
74 |
J |
4A |
0100 1010 |
|
|
|
|
|
|
75 |
K |
4B |
0100 1011 |
|
|
|
|
|
|
76 |
L |
4C |
0100 1100 |
|
|
|
|
|
|
77 |
M |
4D |
0100 1101 |
|
|
|
|
|
|
78 |
N |
4E |
0100 1110 |
|
|
|
|
|
|
79 |
O |
4F |
0100 1111 |
|
|
|
|
|
|
80 |
P |
50 |
0101 0000 |
|
|
|
|
|
|
81 |
Q |
51 |
0101 0001 |
|
|
|
|
|
|
82 |
R |
52 |
0101 0010 |
|
|
|
|
|
|
83 |
S |
53 |
0101 0011 |
|
|
|
|
|
|
84 |
T |
54 |
0101 0100 |
|
|
|
|
|
|
85 |
U |
55 |
0101 0101 |
|
|
|
|
|
|
86 |
V |
56 |
0101 0110 |
|
|
|
|
|
|
87 |
W |
57 |
0101 0111 |
|
|
|
|
|
|
88 |
X |
58 |
0101 1000 |
|
|
|
|
|
|
89 |
Y |
59 |
0101 1001 |
|
|
|
|
|
|
90 |
Z |
5A |
0101 1010 |
|
|
|
|
|
|
91 |
[ |
5B |
0101 1011 |
|
|
|
|
|
|
92 |
\ |
5C |
0101 1100 |
|
|
|
|
|
|
93 |
] |
5D |
0101 1101 |
|
|
|
|
|
|
94 |
^ |
5E |
0101 1110 |
|
|
|
|
|
|
95 |
_ |
5F |
0101 1111 |
|
|
|
|
|
|
96 |
` |
60 |
0110 0000 |
|
|
|
|
|
|
97 |
a |
61 |
0110 0001 |
(Lowercase alphabet) |
|
|
|
|
|
98 |
b |
62 |
0110 0010 |
|
|
|
|
|
|
99 |
c |
63 |
0110 0011 |
|
|
|
|
|
|
100 |
d |
64 |
0110 0100 |
|
|
|
|
|
|

|
|
|
|
|
Appendix B: ASCII Table 375 |
|
|
|
|
|
|
||
|
|
|
|
|
|
|
|
Code |
Character |
Hex |
Binary |
Notes |
|
|
101 |
e |
65 |
0110 0101 |
|
|
|
|
|
|
|
|
|
|
102 |
f |
66 |
0110 0110 |
|
|
|
|
|
|
|
|
|
|
103 |
g |
67 |
0110 0111 |
|
|
|
|
|
|
|
|
|
|
104 |
h |
68 |
0110 1000 |
|
|
|
|
|
|
|
|
|
|
105 |
i |
69 |
0110 1001 |
|
|
|
|
|
|
|
|
|
|
106 |
j |
6A |
0110 1010 |
|
|
|
|
|
|
|
|
|
|
107 |
k |
6B |
0110 1011 |
|
|
|
|
|
|
|
|
|
|
108 |
l |
6C |
0110 1100 |
|
|
|
|
|
|
|
|
|
|
109 |
m |
6D |
0110 1101 |
|
|
|
|
|
|
|
|
|
|
110 |
n |
6E |
0110 1110 |
|
|
|
|
|
|
|
|
|
|
111 |
o |
6F |
0110 1111 |
|
|
|
|
|
|
|
|
|
|
112 |
p |
70 |
0111 0000 |
|
|
|
|
|
|
|
|
|
|
113 |
q |
71 |
0111 0001 |
|
|
|
|
|
|
|
|
|
|
114 |
r |
72 |
0111 0010 |
|
|
|
|
|
|
|
|
|
|
115 |
s |
73 |
0111 0011 |
|
|
|
|
|
|
|
|
|
|
116 |
t |
74 |
0111 0100 |
|
|
|
|
|
|
|
|
|
|
117 |
u |
75 |
0111 0101 |
|
|
|
|
|
|
|
|
|
|
118 |
v |
76 |
0111 0110 |
|
|
|
|
|
|
|
|
|
|
119 |
w |
77 |
0111 0111 |
|
|
|
|
|
|
|
|
|
|
120 |
x |
78 |
0111 1000 |
|
|
|
|
|
|
|
|
|
|
121 |
y |
79 |
0111 1001 |
|
|
|
|
|
|
|
|
|
|
122 |
z |
7A |
0111 1010 |
|
|
|
|
|
|
|
|
|
|
123 |
{ |
7B |
0111 1011 |
|
|
|
|
|
|
|
|
|
|
124 |
| |
7C |
0111 1100 |
|
|
|
|
|
|
|
|
|
|
125 |
} |
7D |
0111 1101 |
|
|
|
|
|
|
|
|
|
|
126 |
~ |
7E |
0111 1110 |
|
|
|
|
|
|
|
|
|
|
127 |
|
7F |
0111 1111 |
Delete (or “rubout”) |
|
|
|
|
|
|
|
|

376 C For Dummies, 2nd Edition