

PC Recording Studios for Dummies (Jeff Strong)
.pdf92 |
Part II: Choosing and Installing Computer Hardware |
Ribbon
Magnet
Ribbon
Output
Figure 4-15:
Ribbon mics use a ribbon suspended between two magnets to create their signals.
Polarity patterns
Microphones pick up sounds in different ways, which are known as polarity patterns. Here’s how the various patterns work:
Omnidirectional mics can capture sounds all around them.
Cardioid (or directional) mics pick up sounds just in front of them.
Figure-8 (or bidirectional) mics pick up sounds from both the front and back.
The polarity patterns on mics are represented on a chart that often comes with the mic (or as part of its spec sheet). This chart (often called a polar graph) shows how well the mic picks up various frequencies in front of or behind it.
TEAM LinG - Live, Informative, Non-cost and Genuine !

Chapter 4: Examining Audio Components |
93 |
You can say a lot about polarity patterns — in fact, you can find lots that I’ve said about polarity patterns in the second edition of my Home Recording For Musicians For Dummies — but I don’t have the space in this book to cover everything. (Besides, the editors told me to concentrate on the PC stuff.)
Choosing mics
Getting the right mic for the right recording situation is a bit of an art form — an art form I describe in some detail in Home Recording For Musicians For Dummies. The following highly condensed version of my What Microphone to Use When spiel sums it all up in just three simple questions:
What type of music will you record? If you play rock or pop music, you probably want to start with dynamic mics because they’re inexpensive and their limitations in high or low frequencies don’t matter as much as they would if (for example) you wanted to record your string quartet. In this case, a pair of condenser mics would do the trick.
What instruments will you record? Loud amps, drums, and screaming singers beg to be recorded with dynamic mics, whereas light percussion, vocals, and stand-up basses shine through with large diaphragm condenser mics.
How many mics will you use at once? If you need to record your whole band at once, budget constraints might dictate your choice between dynamic and condenser mics or a condenser or ribbon mic for vocals. If you need only a couple mics to record the occasional vocal or instrument, you can invest more in each mic.
Monitors
The last bit of audio component gear you need is some sort of monitor. This can be speakers or headphones. In fact, I recommend that you get both. Headphones allow you to hear yourself while you record, and speakers let you mix more effectively.
Without good monitors, you’re mixing in the dark because you don’t know what your music is going to sound like on someone else’s system. Good monitors let you hear your music clearly enough so that you can create mixes that translate well (meaning they sound good on many playback systems). I discuss this concept in more detail in Chapter 14.
TEAM LinG - Live, Informative, Non-cost and Genuine !

94 |
Part II: Choosing and Installing Computer Hardware |
If your budget is really stretched tight and you can’t yet afford a decent set of monitor speakers, I recommend that you get a good set of headphones and use them exclusively until you have the bucks for some decent monitors. Another option is to use your stereo speakers as your studio monitors until you can get a real set (still get the good headphones, though).
Headphones
Chances are that your first home studio will be in a spare bedroom or a corner of your garage or basement. All your recording, monitoring, and mixing will be done in this room. If that’s the case, you’ll find that a set of headphones is indispensable. When you use headphones, you can turn off your speakers and still hear what’s being (or has been) recorded. When you go to record a guitar by using a microphone in front of the guitar amp, you want to hear only the guitar — not the guitar amp and the guitar amp coming back through your monitors. Headphones allow you to do this.
Headphones can range in price from about $20 up to several hundred, so surely one is within your price range. Before you buy a set of headphones you need to consider one main issue: bleed.
Bleed is the sound from the headphones coming out into the room. This isn’t a big deal when you mix or monitor an already recorded track, but it can mess up your music when you record. If you’re going to use headphones while you track (record) with a mic, make sure you get headphones with a closed back, such as the AKG 240. Open-back headphones often bleed too much for this purpose. The problem is that you can’t always see the difference between openand closed-back headphones. You need to look at the specs of the headphones to find out.
Monitor speakers
For most home recordists, the first set of monitor speakers (often simply referred to as monitors) consist of the home stereo system, but sooner or later you’re gonna want a real set of monitors. Studio monitors come in many varieties, but the home recordist’s best bet is a set of near-field monitors. Near-field monitors are speakers that are designed to be positioned close to you (which is often the case anyway because most home recordists have very little room in which to work).
TEAM LinG - Live, Informative, Non-cost and Genuine !

Chapter 4: Examining Audio Components |
95 |
Near-field monitors come in two varieties:
Passive: Passive monitors are just the speakers themselves, which means that you’ll need to buy a separate amplifier to use them. If you go this route, make sure to save some bucks for the amps because they can cost as much as the speakers. Also keep in mind that the kind of amp you get will impact the sound of the speakers — not all amps sound the same.
Active: These monitors come with their own amplifiers. Going the active route has a couple advantages: First, the amps are matched to the speakers so you can (theoretically) get a better sound from them, and second, you don’t have to buy amplifiers separately. This keeps you from having to make yet another difficult decision when gearing up your studio. (Do you have any idea how many amps are out there? Yep, tons.)
Whatever monitors you get, they only work for mixing your music as well as you can hear them properly. I can’t stress enough how important it is to get used to your monitor (see Chapter 14) and to make sure your room sounds as good as possible (see Chapter 2).
TEAM LinG - Live, Informative, Non-cost and Genuine !

96 |
Part II: Choosing and Installing Computer Hardware |
TEAM LinG - Live, Informative, Non-cost and Genuine !

Chapter 5
Connecting Your Hardware
In This Chapter
Getting to know the various types of connectors
Plugging in your equipment
Understanding the signal chain
So, you’ve got a pile of shiny new gear sitting in your recording space and you’re ready to start plugging it all in. The problem is that there might be a bunch of cords and jacks that you don’t know what to do with. No problem.
In this chapter, I help you make sense of all those connectors that you end up using — and help you get them all plugged in properly.
Making Connections
No matter what type of home recording equipment you have, one thing’s for sure — you’re gonna have to plug in some cords somewhere. Exactly where depends on the particular system you own, so read through this section to make sense of all those different cords and connectors, whether analog or digital.
You probably have a lot of experience with analog connectors and cords, such as the ones on your stereo system. But you might never have come in contact with digital connectors, unless you’ve plugged in a DVD player to your TV or had a chance to go into a recording studio that uses digital gear.
Analog
No doubt you’ve had a chance to see and use a variety of analog connectors. If you play an electric guitar or keyboard (synthesizer), for example, you’re familiar with a quarter-inch analog plug. And if you’ve used a variety of different microphones, you’ve probably come across one with an XLR analog plug.
TEAM LinG - Live, Informative, Non-cost and Genuine !

98 |
Part II: Choosing and Installing Computer Hardware |
Keeping the different kinds of analog plugs straight can be a little confusing, however. Why do you have to use one plug for one thing and another for something else? And what’s a TRS plug, anyway?
Read on to decipher the secrets of the most common analog connectors: quarter-inch (TS and TRS), XLR, and RCA.
The quarter-inch analog plug
The quarter-inch plug is the most common audio connector and one of the most versatile as well. (You see it on cables strung all over the studio to connect instruments, amps, speakers, headphones, and mixers.) Quarter-inch plugs come in two varieties: TS or TRS.
TS
The humble plug at the end of the cord you use for your guitar or synthesizer is an example of a TS plug (short for Tip/Sleeve): The tip is the very tip of the plug, and the sleeve is the rest of the cylindrical metal part. A plastic divider separates the two sections, each of which is connected to a different part of the cable. Check out Figure 5-1 to see this familiar plug.
Figure 5-1:
A typical quarterinch plug used for guitars and other electric instruments.
TS plugs are used for a variety of purposes — to go from your guitar to your guitar amp, from your synthesizer to your mixer, from your mixer to your power amplifier (amp), and from your power amp to your speakers. You’d expect that one cord could work for all these applications. After all, a TS plug is a TS plug is a TS plug, right? Well, not really. The same plug can be wired differently, and it can carry different levels of power. For example, an instrument cord (the one you use for your synthesizer or guitar) contains one wire and a shield — the wire is connected to the tip, and the shield is connected to the sleeve. A speaker cord, on the other hand, contains two wires and no shield — one wire is connected to the tip and the other to the sleeve.
TEAM LinG - Live, Informative, Non-cost and Genuine !

Chapter 5: Connecting Your Hardware |
99 |
The speaker cord also carries a lot more current (power) than the instrument cable; that’s the reason it doesn’t have a shield. The high signal level covers up any noise present in the cord. Because there isn’t nearly as much current present in an instrument, you don’t want to use a speaker cord for your instrument; you need the instrument cable’s shield to keep the noise down. If you do use a speaker cord for your instrument, you might end up with some noise — a hiss, buzz, or even a radio broadcast coming out of your amp (or wherever you’ve plugged in your instrument).
When you buy cords with TS plugs, first be sure to look at (or ask) what purpose the cord is designed for. Then, when you get it home, be sure to make a note of what type of cord it is so that you use it correctly. You can mark your cord a number of ways: You can put colored tape on it (red for speaker or blue for instrument, for example), put a tag or label on it, or, gasp, dot it with nail polish.
You generally don’t need to worry about which end of the cord you plug in to your instrument — the signal will travel equally well in either direction. However, currently (so to speak), you can buy cords that are designed to send the current in one direction. (The cord has an arrow on it designating which
direction the signal should flow.) I call these designer cords, and two of the most common brands are Monster and Planet Waves. The theory behind these cords is that they do a better job of preserving the sound qualities of the instrument for which they’re designed. These cords are specifically designed for almost every instrument and application known to humankind.
Instrument cords are often called unbalanced lines because of the way they’re wired. An unbalanced cord has one wire surrounded by a braided shield; the wire is connected to the tip of the TS plug, and the shield is connected to the sleeve. The signal is sent through the wire, and the shield is used for the ground. (It keeps the noise down.) There are balanced lines as well, which I explain in the upcoming section on TRS plugs.
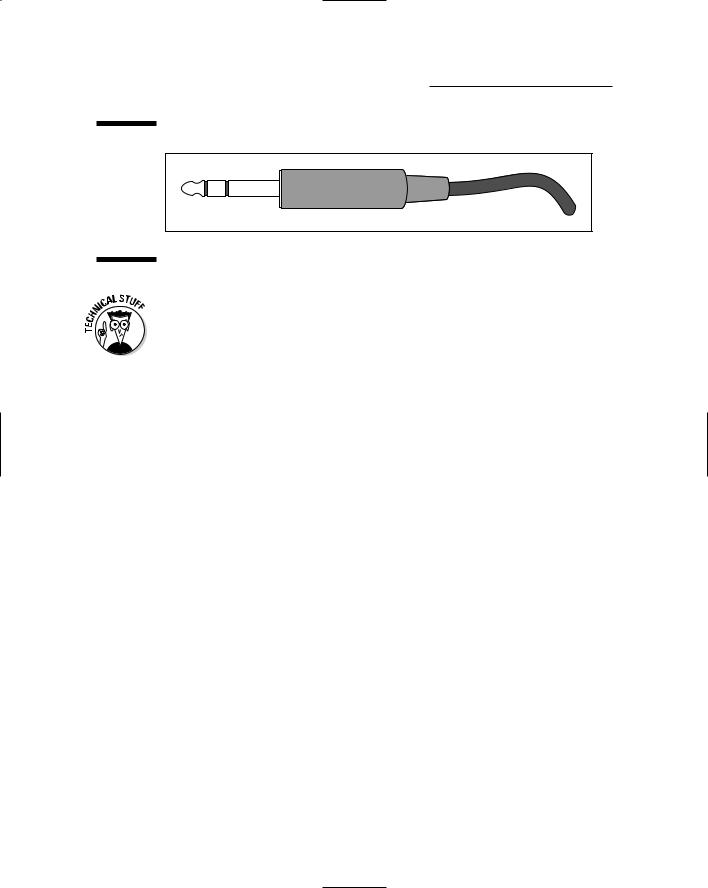
TRS
A TRS (short for Tip/Ring/Sleeve) quarter-inch plug looks like a stereo headphone plug (take a look at Figure 5-2). The tip is at the very end of the plug, the ring is the small middle section located between the two plastic dividers, and the sleeve is the rest of the cylindrical metal part of the plug. A TRS plug can be used several ways: as a stereo cord for headphones, a balanced cord or with a Y cord.
A balanced cord is used on professional audio gear to connect the various pieces of equipment (the mixer to the recorder, for example). The advantage with a balanced cord is that you can have longer cord runs without creating noise.
TEAM LinG - Live, Informative, Non-cost and Genuine !
100 Part II: Choosing and Installing Computer Hardware
Figure 5-2:
Use a balanced (TRS) plug to connect professional audio gear together.
Why is it that balanced cords are so conveniently noise-free? The balanced cord has two wires and a shield inside, and is wired with the same signal running through both wires. One is 180 degrees out of phase with the other (their waveforms are exactly opposite) — the crest of one wave occurs at exactly the same time as the trough of the other, so they cancel each other out. When they get to the mixer (or wherever they’re plugged into), one of the signals is instantly flipped and added to the other. Any noise that was built up in the signal is cancelled out. (Yep, it’s wave cancellation from highschool physics. Who knew it also rocks?)
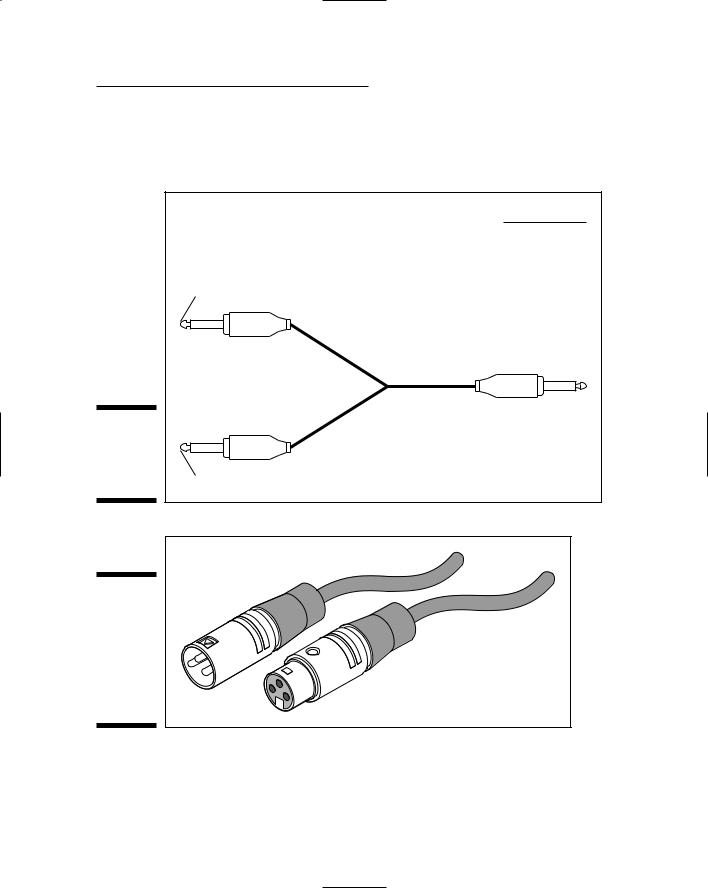
A Y cord consists of a TRS plug on one end and two TS plugs on the other, forming — you guessed it — a nice representation of the letter Y. The purpose of this cord is to allow you to insert an effects processor (a compressor or equalizer, for example) into the line-in insert jack of a mixer. The TRS plug both sends and receives a signal. The Y cord is wired so the tip sends the signal and the ring receives it (see Figure 5-3). The sleeve is connected to the shield of each cable.
XLR
The XLR connector is used for microphones and some line connections between professional gear. This cable has a female and a male end. (See Figure 5-4.) The cord is wired much like a TRS connector and is balanced to keep the noise down. The XLR microphone cable is also called a low-Z cable because it carries a low-impedance signal.
RCA
RCA plugs — named for good old RCA, also called phono plugs — are common on home stereo (and some semi-pro) audio gear. (See Figure 5-5.) They function much like a TS plug and aren’t very common in professional audio equipment.
TEAM LinG - Live, Informative, Non-cost and Genuine !
Chapter 5: Connecting Your Hardware 101
Some mixers include them, however, so you can connect a tape deck. They’re also used for digital S/PDIF signals. (See the next section for more on these babies.)
|
Speaker |
|
Tip wired to tip of TRS plug |
|
Plug into insert |
|
jack of mixer |
|
Sleeve wired to sleeve |
Figure 5-3: |
|
Use a Y cord |
|
to send and |
|
receive a |
|
signal. |
Tip wired to ring of TRS plug |
Figure 5-4:
An XLR connector: One end is male (left), and the other is female (right).
TEAM LinG - Live, Informative, Non-cost and Genuine !