

PC Recording Studios for Dummies (Jeff Strong)
.pdf112 Part II: Choosing and Installing Computer Hardware
Some monitors also have balanced XLR connectors, but you won’t find them on many of the interfaces currently available. They’re used primarily on professional gear such as separate high-end converters.
To make the connection, simply run the cord from the main outputs of your interface to the inputs of your speakers. Pretty simple, huh?
Unpowered
Unpowered (passive) monitors require an amplifier between your audio interface and the speakers. In this case, you run unbalanced TS or balanced TRS, depending on your interface and amp specifications (check your owner’s manuals for details), from the main outputs of your interface to the inputs
of your amp. Then run speaker cables from your amp to your monitors. The jack/plug configuration — and in turn the cords — will depend on your equipment. Some amps use banana plugs (two-pronged connectors used for professional speakers) for the outputs while others use TS plugs. Monitors might use either of these as well.
If you use your home stereo speakers as your studio monitors, you need to get some special cords because your interface will have either TS or TRS jacks, and your stereo receiver will have RCA jacks. In this case, get cords that have TS on one end and RCA on the other. Plug the TS end into the main outputs of your interface and the RCA end into one of the Aux inputs of your stereo receiver. Then just hook up your speakers (if they aren’t already hooked up), and you’re set to go.
If you use your home stereo to power your speakers, you need to turn the volume on your receiver up a bit to get sound from your interface. Because your interface also has an output level adjuster, you need to do some experimenting with the volume of both the interface output and the receiver volume to get a decent sound. If your stereo receiver’s volume is too low, you need to crank your audio interface output to get your music loud enough. This can result in a thin sound or in distortion. Likewise, if you have your stereo receiver’s volume too high, that can make the volume control on your audio interface too touchy, and you can easily end up with distortion. Finding the right balance between the two volume levels will take some time. You know when you’ve got it right when you can get a good solid sound without distortion at a volume that is comfortable to listen to.
TEAM LinG - Live, Informative, Non-cost and Genuine !

Part III
Choosing and
Installing
Recording
Software
TEAM LinG - Live, Informative, Non-cost and Genuine !

In this part . . .
Part III explores the software needed for audio and MIDI recording. Chapter 6 introduces you to the many
functions that audio and MIDI recording programs perform to help you decide what features you should look for in your system. In Chapter 7, you examine some of the most popular and powerful options available, and I help you choose the best option for your needs. Chapter 8 explains the process of installing your software — whether you use Windows XP or Mac OS X — and helps you get set up properly and as quickly as possible.
TEAM LinG - Live, Informative, Non-cost and Genuine !

Chapter 6
Understanding Computer
Recording Software
In This Chapter
Checking out recording features
Comparing editing toolsets
Getting to know MIDI features
Looking at looping features
Making sense of mixing options
Perusing processing capabilities
Examining mastering tools
One of the first things you’ll notice when you start digging through all the software options available for audio recording programs is that much of
this stuff pretty much performs the same basic functions. All the major programs let you record and edit audio, record and edit MIDI data, add effects, and process audio a number of ways, and they also let you mix and master your audio to make your music sound the way it does in your head. The difference is the degree to which you can perform the various functions in your chosen program and the ease at which you can perform these functions.
With so many different programs out there, it’s hard to keep them all straight. In this chapter, I offer what assistance I can by introducing you to many of the basic functions available in computer-based recording software and showing you what to look for so that you can choose the best program for your needs.
Even though you might find that certain programs share similar basic features, not all audio recording software is equal. In fact, as you look around and dig into the specifications of each program, you’ll discover some big differences among the various contenders. This chapter explores the many different functions that are available in audio recording programs so that you can determine which features are important to you when you buy a program. Chapter 7 details some of the most popular programs and explains what each can and can’t do. Between these two chapters, you can get a good idea of which programs you want to try out.
TEAM LinG - Live, Informative, Non-cost and Genuine !

116 Part III: Choosing and Installing Recording Software
Audio Recording and Editing Basics
Audio recording is one of the primary recording functions in a computer. With that fact out of the way, you should also know that you need to consider three main areas when looking at the audio capabilities of a program: track counts, recording formats, and editing functions. This section details these functions.
Track counts
Even though the overall number of tracks you can record and play in your computer system is dictated by the power of your processor and your hard drive speed, some programs constrain you even further by limiting the number of audio tracks that you can have active in a song. This limitation is generally seen on the lower-end programs offered by software manufacturers and is simply a way for manufacturers to give you an incentive to upgrade to one of their higher-priced versions. For example, Pro Tools LE has an active track limit of 32 tracks, whereas Pro Tools TDM extends this limit to 192 audio tracks.
If you plan to work on music that requires a lot of instruments and/or effects, you need to think long and hard about track limitations before purchasing. Although many people consider it excessive, pop tunes often have as many as 100 or more tracks (dozens of which are for just the vocals), so filling up 32 isn’t as difficult as you might imagine.
Recording
All audio recording programs record audio (if you find one that doesn’t, don’t buy it), but how they do it differs. These differences involve the following options:
Sample rate: The sample rate refers to the number of times per second that the audio is sampled. This relates to the frequency range that can be captured by your computer. Sample rates typically include 44.1 kHz, 48 kHz, 88.2 kHz, and 96 kHz. Some programs, such as Logic, can go as high as 192 kHz or higher. For audio work that ends up on CD, 44.1 kHz is fine, but if you want to record audio for DVD, you need to have the capability to record at 96 kHz. Some other reasons to record at a higher sample rate exist — the most relevant being that as your sample rate goes up, your latency (the delay between the sound entering your system and coming back out to your ears) goes down.
That said, most musicians still record at 44.1 kHz. This sample rate captures a sufficient frequency range — well beyond the human hearing limit — and keeps you from having to do a sample rate conversion (SRC)
TEAM LinG - Live, Informative, Non-cost and Genuine !

Chapter 6: Understanding Computer Recording Software 117
process to get your music to CD level. In addition, this lower sample rate puts less stress on your computer because half as much data is moving through your system at a given time compared to 88.2 kHz. As an added bonus, recording at 44.1 kHz means half as much hard drive space is needed for your audio files.
Bit depth: As I describe in Chapter 4, bit depth is the amount of information contained in each of the samples (see the sample rate bullet) taken of your audio. You find two different bit depths in current audio recording software: 16 bit and 24 bit. There is no comparison between these two — go with 24 bit. Even though 16 bit is the bit depth of CDs and your music most likely will end up there, having the extra 8 bits available to mess around with is important if you do any processing of your signal.
Audio recording programs also have what’s called internal bit depth. This is the bit depth that the programs use when performing digital signal processing tasks such as volume changes and EQ. This internal rate is set much higher than the bit depth you record at so that your system can process your audio when you do things like equalizing or changing the volume of your track. Typical rates you see in recording programs include 48-point fixed rate or 32-point float. Don’t buy into the hype about one approach being better than another. They all work similarly, and all the professional-level programs sound very much alike. Make your choice based on the computer platform you use and the features you want in a program.
File format: Most recording programs let you choose from a variety of file formats in which to record. Although no universal file format exists to ensure compatibility between different programs, most programs can record and play back Broadcast Wave (.bwav or .wav extension). This is an important function because as you grow in your music-recording skills — and as recording programs develop — you might find that you want to use a different program to continue recording or to mix your songs. By using a program that has the ability to work with Broadcast Wave files, you future-proof yourself (a bit anyway).
Editing
All audio recording programs can edit audio, but the way they do it and the degree to which you can make difficult edits (such as replacing a single note within a complex musical phrase) vary a lot.
Pro Tools, the heavy-weight champion of the audio editing world (in my experience, anyway), has some very thoughtful features that make editing audio very fast and easy. These include:
TEAM LinG - Live, Informative, Non-cost and Genuine !
118 Part III: Choosing and Installing Recording Software
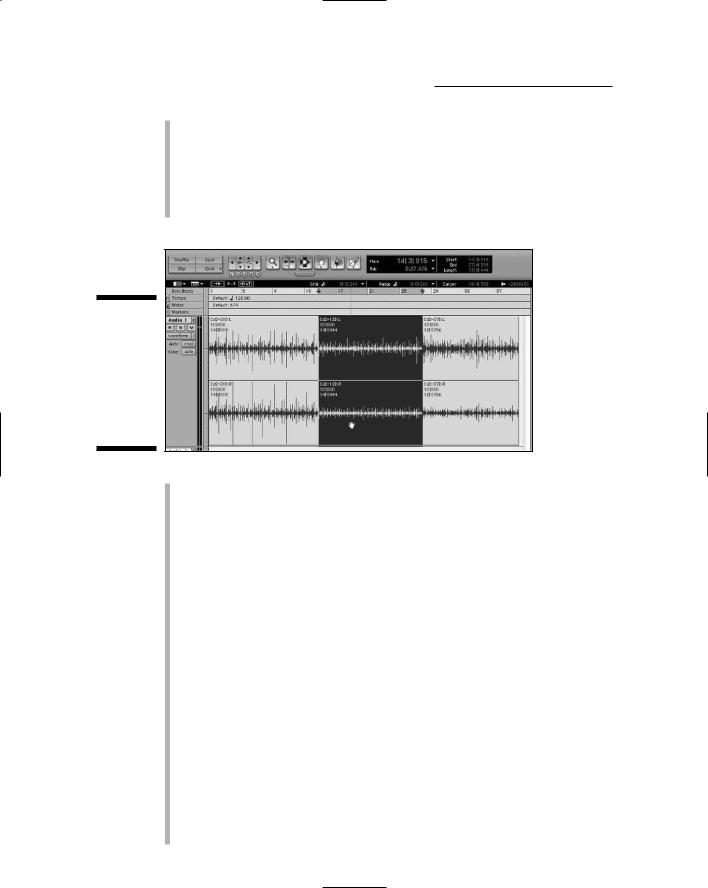
Shuffle: This is an editing mode that lets you move sections of audio around while keeping the beginnings and endings of adjoining sections lined up tightly. (See Figure 6-1.) This particular feature is showing up in more programs — Logic Pro 7 just added some features similar to the shuffle feature, for instance — and is useful for working on your song’s arrangements, especially the drum parts where there’s no break between sections.
Figure 6-1:
Being able to shuffle audio regions makes creating arrangements easy.
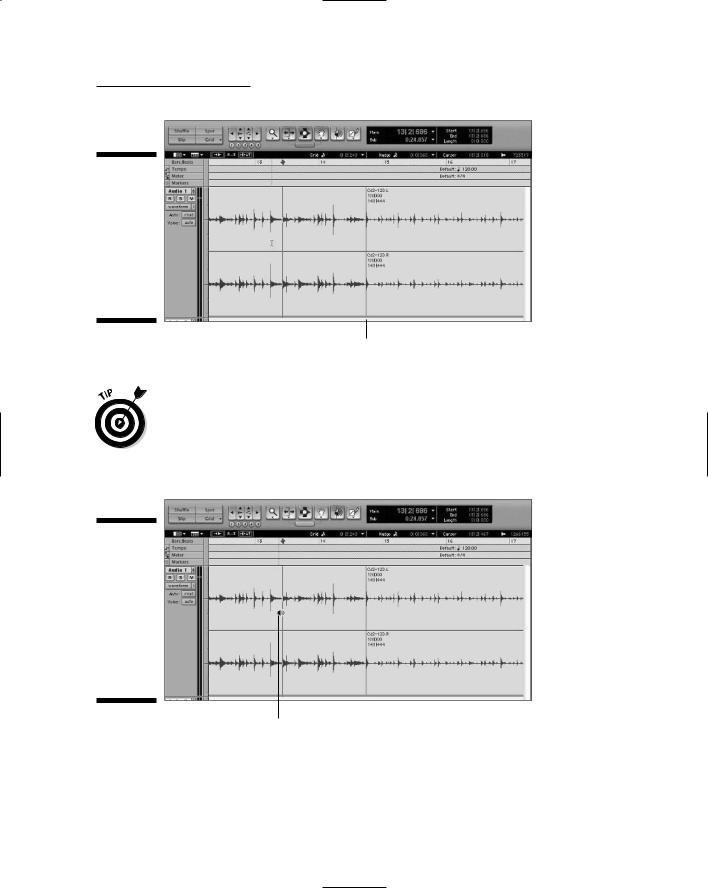
Tab to Transient: This is by far my favorite feature. It’s a real time-saver when you have to cut up sections of a recorded audio. Tab to Transient lets you move from one transient peak (the start of a vocal phrase or the initial crack of a drum hit, for example) to another, as shown in Figure 6-2. In programs without this feature, you have to zoom way in to the waveform display of your audio and manually locate the very start of a section. This can take a lot of time. The Tab to Transient feature makes it as easy as pressing Tab on your computer keyboard.
Spot: This is an essential feature if you want to link an event to a specific point of another event in your song. For example, if you have a piece of video that needs a sound effect added, you can place the start of the sound effect to the exact spot in the video using this feature. Then if you move the video over one way or the other, the spotted audio moves with it automatically. This feature is common in programs like Nuendo and Logic — ones that work well with video, in other words.
Scrub: In the olden days of tape decks, if you wanted to find a specific place in your song, you rocked the tape against the playback head of your tape deck to hear your audio. This action, called scrubbing, allowed you to find the start of a drum hit, for instance. Most self-respecting audio programs have a scrub feature. (See Figure 6-3.) Some scrub features are a bit cumbersome to use, but others mimic the process of scrubbing on a tape deck very well. If you plan on doing any audio editing, make sure that the program you’re considering has a scrub function and that it works well for you.
TEAM LinG - Live, Informative, Non-cost and Genuine !
Chapter 6: Understanding Computer Recording Software 119
Figure 6-2:
Some programs let you use the Tab key to find the beginning of a note or phrase.
Tabbing to a transient
You can find many other audio editing functions in the gazillion different audio recording (and editing) programs out there. If the multitrack recording program you like to use doesn’t have all the editing capabilities that you find you need, you don’t need to trash your current program. Instead, you complement it by getting a stereo audio editor program such as WaveLab or Cool Edit Pro.
Figure 6-3:
The Scrub feature lets you hear specific sections of audio, much like rocking the tape on a tape deck.
The Scrub feature lets you hear a certain section.
TEAM LinG - Live, Informative, Non-cost and Genuine !

120 Part III: Choosing and Installing Recording Software
Making Sense of MIDI Capabilities
Most recording programs have some sort of MIDI capability. Some are pretty rudimentary (Pro Tools, anyone?), but others (such as Logic or Sonar) are quite extensive. Regardless of what recording program you’re looking at, if it has MIDI capabilities it’s going to let you record MIDI data, play the data back, and edit it. So if you intend to use only an occasional soft-synth or keyboard in your music, just about any recording program that has MIDI capabilities will meet your needs. If you see yourself using a lot of MIDI or if you want to be able to do extensive edits or perform MIDI operations on your data, you need to look closely at your options to find the program that meets your needs (and desires).
Here are some things to look for in MIDI-capable recording programs:
Quantization: Quantization is the ability to adjust the timing (rhythm) of your performance to match a grid. Basic programs let you use a fairly simple grid — such as 16th notes — whereas more sophisticated programs allow you to quantize to a grid and keep the feel of your music by not adhering strictly to the grid lines. Instead, these programs can fix your timing mistakes while injecting a bit of human-type feel to your performance. If your sense of rhythm isn’t that great, being able to quantize with feel can mean the difference between a track that kinda works and one that rocks.
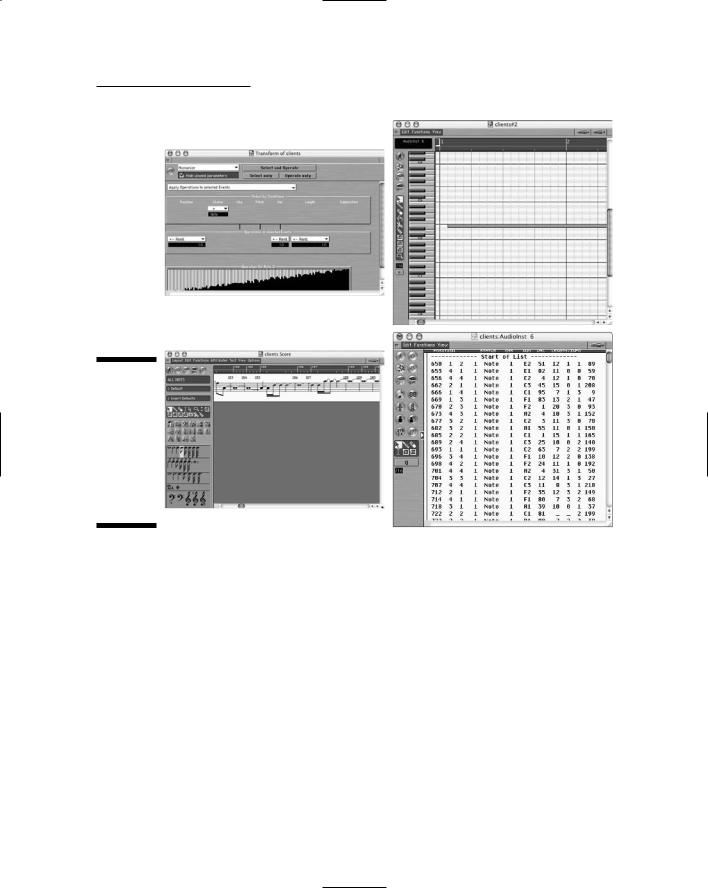
Multiple windows: The most rudimentary MIDI programs offer a simple piano roll window (the graphic looks like the roll of paper with holes punched in it that old-time player pianos used). This window shows the MIDI notes as small rectangles representing the pitch, time location in the song, and duration. You can edit within this window, but if you do much editing this is a cumbersome way of going about it. MIDI-intensive programs give you the ability to edit your MIDI data by using a window that looks like a piece of sheet music and/or has a list of MIDI events in column form. Having several windows to choose from allows you to use the one that best fits the type of editing you want to do, thus speeding up the process. Figure 6-4 shows a couple alternative windows in Logic — one of the most capable MIDI programs available.
Transposition: Being able to change (or transpose) the key of a performance is high on the list of must-have functions for many people. Most MIDI-capable programs offer this option. The difference you find between the various programs is in the ease with which you can do this and the specific steps you need to take to get it done.
Scoring: Scoring is the ability to take your MIDI data and print it out as a piece of sheet music. If you’re a composer that creates your music to be played by other musicians, being able to score your music from MIDI data might be an important feature.
TEAM LinG - Live, Informative, Non-cost and Genuine !
Chapter 6: Understanding Computer Recording Software 121
Figure 6-4:
Powerful MIDI programs tend to have several windows that you can work in.
Looking at Looping
Looping, simply put, is the ability to take a short snippet of music (called, logically enough, a loop) and arrange it with other loops in a song until you have a composition that you like. Loops can be snippets that you make from your recorded performances, or they can be pre-recorded files that you can buy from a large variety of loop makers.
I’ve got mixed feelings about looping. On the one hand, you can take a prerecorded snippet of audio and put it in your song and create a composition without having to actually play an instrument. This can be a real time-saver when composing. On the other hand, you don’t need to learn how to play an instrument to do this. This can result not only in not taking the time to learn how to play an instrument, but also in not taking the time to really understand music composition and theory. Don’t get me wrong. I’ve never been a rule follower (musically, anyway), but I’ve found that breaking the rules
TEAM LinG - Live, Informative, Non-cost and Genuine !