

PC Recording Studios for Dummies (Jeff Strong)
.pdf22 |
Part I: Computer Recording Basics |
Figure 1-6:
A computercontrol surface offers you real knobs and faders and still uses the mixer that’s part of your software.
Accessing the arranger
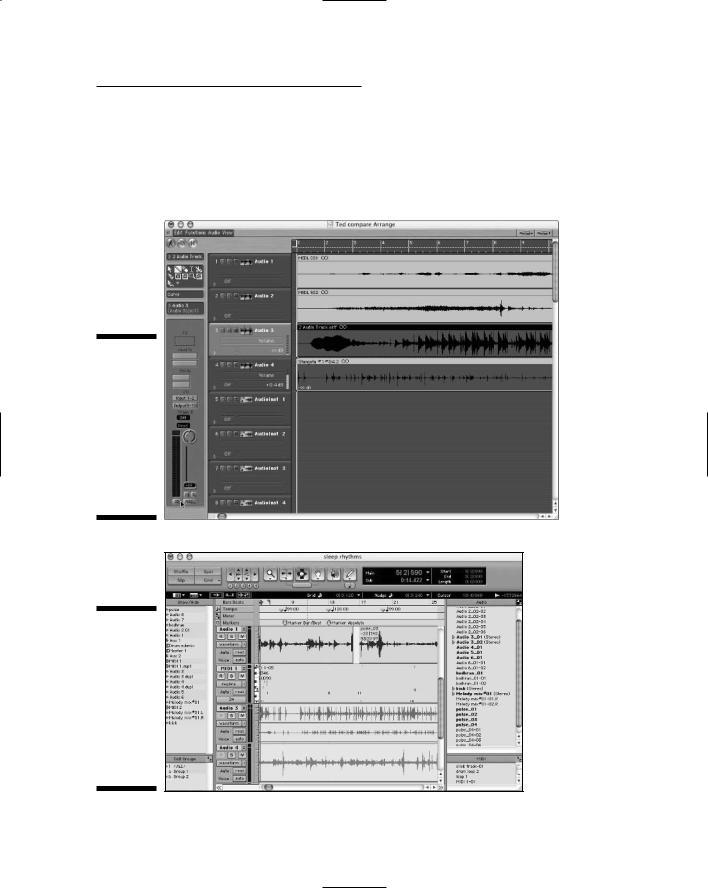
Audio software makes arranging your musical ideas very easy. Usually with just a click-drag of your mouse you can move sections of data around. Figure 1-7 shows a screen shot of a typical arrangement window. From this window you can perform any number of functions, including trying alternate arrangements for your song; taking the best parts of your performances and placing them exactly where you want them; and countless others.
Exploring the editor
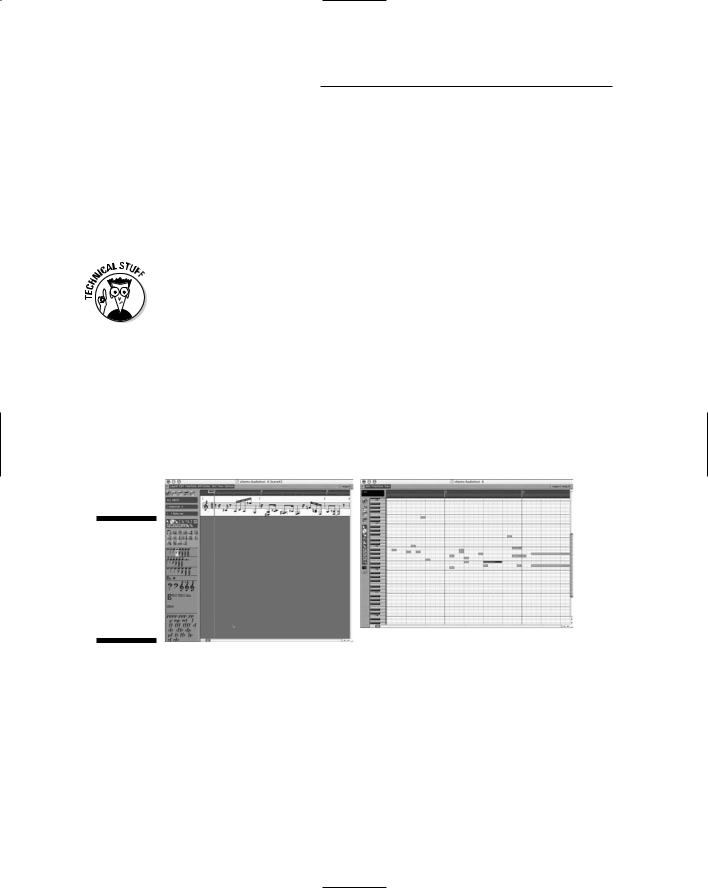
Being able to make miniscule edits to your recorded performances is one of the reasons many people want to record on a computer. Between the usually large video monitor that most people have and the functions of most audio recording programs, editing is a breeze. Check out Figure 1-8 for a look at the editing window for a popular brand of software. From this window you can improve the quality of your music dramatically with the help of a few editing tricks — getting rid of unwanted noise (those darned chair squeaks, for
TEAM LinG - Live, Informative, Non-cost and Genuine !
Chapter 1: Discovering What You Need |
23 |
example) or fixing the occasional bad note in an otherwise inspiring performance, to name a few. Of course the downside is editing too much and sucking the life out of a performance, but you wouldn’t do that (would you?). Chapter 6 talks about editing capabilities in some of the more popular brands of software, and Chapter 11 explores how to use these capabilities with your music.
Figure 1-7:
An arrangement window in audio software programs lets you perform many useful functions.
Figure 1-8:
Editing in audio software programs makes it easy to fix problems with your performances.
TEAM LinG - Live, Informative, Non-cost and Genuine !
24 |
Part I: Computer Recording Basics |
Managing the MIDI sequencer
A MIDI sequencer is where you can record MIDI performance data into your computer for playback and editing. MIDI sequencing allows you to record your performance and choose the sound that accompanies it later on. The MIDI data that you record is simply performance information, such as when a note is played, the velocity (volume) of the note, and when the note was released, to name a few.
MIDI (Music Instrument Digital Interface) is a protocol that musical instrument manufacturers (in a rare moment of cooperation) developed to allow one digital instrument to communicate with another. MIDI uses binary digital data, in the form of 1s and 0s, to tell an instrument to play or release a note, to change sounds, and a host of other messages. Chapter 4 explains more about the other gear you need to do MIDI in your studio, and Chapter 11 lays out how to use MIDI for your musical ideas.
Most audio recording software contains some sort of MIDI sequencing capabilities. Some are fairly simple and let you record, playback, and edit the data, but others offer much more advanced features that let you work with the data in intricate ways. Check out Figure 1-9 to see a couple MIDI windows in a MIDI powerhouse program.
Figure 1-9:
MIDI is easy to use in most audiorecording software programs.
Digging into digital signal processors (DSPs)
Part of the recording process involves making adjustments to a sound either before or after it’s been recorded. This is the job of the signal processor. Signal processors come in three varieties — equalizers, dynamic processors, and effects processors. They can be incorporated into the system or work as separate, standalone units. For most home recordists, the signal processors
TEAM LinG - Live, Informative, Non-cost and Genuine !
Chapter 1: Discovering What You Need |
25 |
of choice are integrated into the software as plug-ins, although you can also use external processors by sending the audio out of your computer and back in again.
Equalization (EQ)
Equalizers enable you to adjust the frequencies of a sound in a variety of ways. In effect, you tell the frequencies to
Go away: You can get rid of unwanted noise or an annoying ringing by reducing select frequencies.
Come hither: Add life or presence to an instrument by bringing the best characteristics of that instrument forward.
Scoot over: You can make room within the frequency spectrum for each of the instruments in your mix by selectively boosting or cutting certain frequencies.
You can find out more about EQ (and discover some great EQ tips and tricks) in Chapter 16. The three main types of EQ are graphic, shelf, and parametric. Here’s the rundown:
Graphic EQ
Use graphic equalizers to choose a specific frequency to increase or decrease by a certain amount, generally up to 6 or 12 decibels (dB). Doing so enables you to eliminate an offending frequency from the signal or make other adjustments to the tonal quality of the source signal. The graphic EQ will have a certain number of frequency bands that you can adjust. You’re limited to only those frequency bands that your EQ has available. Figure 1-10 shows a typical graphic EQ.
Figure 1-10:
A graphic equalizer.
LO CUT |
HIGH CUT |
LO CUT |
HIGH CUT |
|
LEVEL |
|
LEVEL |
Shelf EQ
A shelf equalizer affects a range of frequencies above or below the target frequency. Shelf EQs are generally used to roll off the top or bottom end of the frequency spectrum. For example, you can set a shelf EQ to roll off the
TEAM LinG - Live, Informative, Non-cost and Genuine !

26 |
Part I: Computer Recording Basics |
frequencies below 250 Hz (hertz) to reduce the amount of rumble (lowfrequency noise) in a recording. You can see how this looks in Figure 1-11. Notice how the shelf EQ gradually reduces the amount of energy (sound) below the set point and then levels off: hence, the shelf in its name.
Figure 1-11:
A shelf equalizer works this way.
0dB
−4dB
250Hz
Parametric EQ
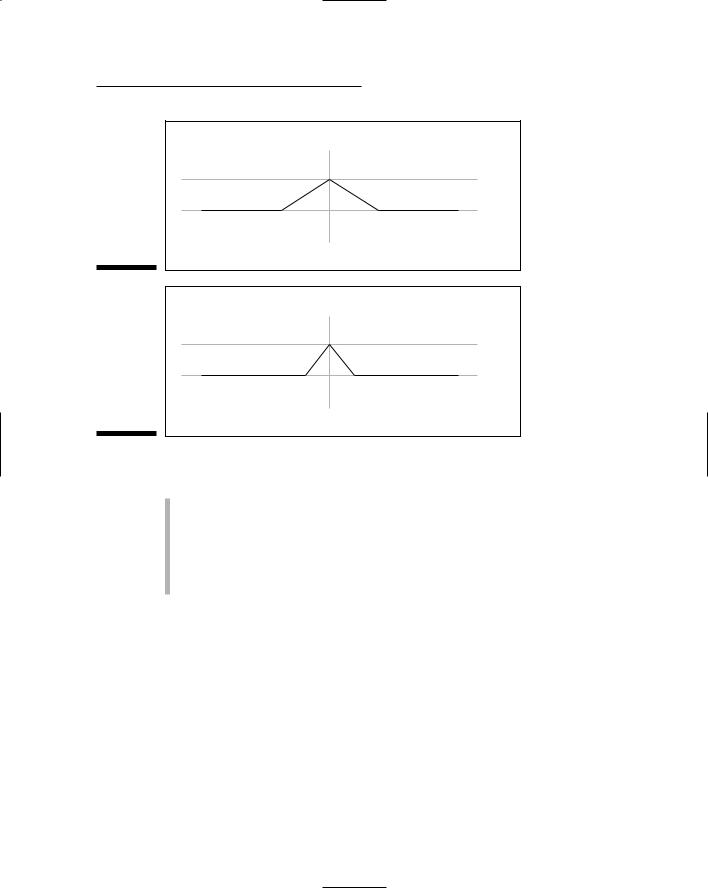
The parametric equalizer enables you to choose the specific frequency that you want to affect, as well as the range of frequencies to put around that frequency. With a parametric EQ, you dial in the frequency that you want to change, and then you set the range (referred to as the Q) — that is, the number of octaves that the EQ will affect. Check out Figure 1-12: The two diagrams show how the Q relates to the range of frequencies affected. (The higher the Q setting, the narrower the band of frequencies affected.)
The beauty of a parametric EQ is that you can take a small band (range) of frequencies and add or cut them. Doing this allows you to get the various instruments in a mix to fit in with one another (called carving out frequencies). For example, a lot of times the bass guitar gets lost behind the booming frequencies of the kick drum (200–500 Hz). By setting the Q to cover this frequency range and setting the level at about –6dB (reducing by 6 decibels), you effectively make room for the bass guitar to be heard in the mix.
You’ll find that the parametric EQ is one of your most useful tools when mixing all your individual tracks into a stereo pair (part of the mixing process covered in Chapter 14). I describe this tool in detail in Chapter 16.
Dynamic processors
Dynamic processors are devices that regulate the amount of sound (energy) that passes through them. This amount is defined as the dynamic range — the range between the softest sound and the loudest sound. Dynamic processors come in three varieties: compressors/limiters, gates, and expanders. I explain each variety in the following sections.
TEAM LinG - Live, Informative, Non-cost and Genuine !
Chapter 1: Discovering What You Need |
27 |
Q=1 |
+4dB |
0dB |
1.2 kHz
Figure 1-12: |
|
|
A parametric |
Q=8 |
|
equalizer |
||
|
||
in a digital |
|
|
system. Top: |
+4dB |
|
Using a |
|
|
small Q. |
0dB |
|
Bottom: |
|
|
Using a |
1.2 kHz |
|
large Q. |
Dynamic processors are useful in a variety of ways. Use them to
Control the signal going into the mixer and recorder.
Tame the levels and correct the effects of an erratic musical performance when mixing.
Optimize the levels of the finished stereo tracks when mastering — the final step in making your music. (Chapter 14 covers mastering in greater detail.)
Dynamic processors are some of the most useful tools that you have in your home studio. See Chapter 18 for more on dynamic processors.
Compressors/limiters
The compressor’s job is to compress the dynamic range of the sound being affected. The purpose of the compressor is to eliminate transients (unusually loud notes) that can create clipping (digital distortion). The compressor limits not only how loud a note can be, but it also reduces the difference between the loudest and softest note (compressing the dynamic range).
Compressors are used extensively on vocals; the device keeps transients at bay by gently reducing the highest level that goes through it. Compressors
TEAM LinG - Live, Informative, Non-cost and Genuine !

28 |
Part I: Computer Recording Basics |
are also used in mastering to raise the overall volume of a song without creating distortion. The device does this by reducing the overall dynamic range, and as a result, a compressor effectively raises the volume of the softer notes without allowing the louder notes to be too loud and distorting.
A limiter works much like the compressor, except that it severely limits the highest level of a sound source. The limiter is basically a compressor on steroids: It gives you beefed-up control over volume. Any signal above a certain level, called the threshold, gets chopped off rather than compressed (as with the compressor). A limiter is a good choice in extreme situations, such as when you want a really in-your-face snare drum sound. In this instance, the limiter essentially eliminates any dynamic variation from the drummer’s snare drum hits and makes them all as loud as possible.
Gates
A gate is basically the opposite of the limiter. Rather than limiting how loud a note can get, the gate limits how soft a note can get. The gate filters out any sound below a certain setting (the threshold) while allowing any note above that threshold to be heard.
Recordists often use gates on drums to keep unwanted sounds from the cymbals from bleeding through to the tom-tom or snare drum mics, or on guitars by refusing to allow the noise generated by guitar effects to be heard when the instrument isn’t playing.
Expander
The expander is basically the opposite of a compressor — instead of attenuating (reducing the volume of) the loudest notes in a performance, an expander attenuates the softest notes. For example, if you have a singer whose breath you can hear in the mic and you want to get rid of that particular blemish, just set the expander to go on at a level just above the annoying breath sounds, and it will subtly drop out the offending noise.
Effects processors
Effects are historically used to mimic real-world situations. As a home recordist, you’ll likely discover a great affinity toward your effects processors because they enable you to create sonic environments without having to rent some great recording room. For example, imagine dragging your drums and all your recording equipment into a large cathedral, setting them up, and spending several hours getting the mics placed just right. Sounds like a lot
of work, right? (I get tired just thinking about it.) Well, how about recording your drums in your modest home studio and simply choosing the “cathedral hall reverb” patch instead? Now that’s much easier.
I can practically guarantee that you’ll use effects processors all the time in your studio. Scope out Chapter 17 for how to use them effectively.
TEAM LinG - Live, Informative, Non-cost and Genuine !

Chapter 1: Discovering What You Need |
29 |
In the world of effects processors, you have many choices, and many more show up every year. The most common effects processors are (in no particular order) reverb, delay, chorus, flanger, and pitch correction. Read on for the lowdown on each type.
Reverb
Reverb is undoubtedly the most commonly used effects processor. With reverb, you can make any instrument sound as if it were recorded in almost any environment. Reverb, a natural part of every sound, is the result of the sound bouncing around inside a room. The larger the room, the more pronounced the reverb. The purpose of a reverb in audio production is to make an instrument sound more natural (especially because most instruments are recorded in small, non-reverberant rooms) or to add a special effect. Reverb can make almost any recorded instrument sound better — if used correctly.
Delay
Think of delays as the recording studio’s version of an echo. The delay can be set to happen immediately after the original sound or be delayed much longer. Delay can sound natural or be used as a spacey special effect. You can have a single echo or multiple delays (very common with the snare drum in reggae music, for instance). Delays are commonly used on vocals and guitar, although you can hear them on just about any instrument, depending on the style of music.
Chorus
A chorus effect can make one instrument sound like several. Chorus effects add very-slightly-off-tune versions of the unaffected sound, which results in a fuller sound. You find chorus effects used on vocals, guitars, and lots of other melodic instruments.
Flanger
A flanger (pronounced flanj-er) effect is similar to a chorus effect in sound except that the flanger gets its sound from delaying part of the affected sound in relation to the original, rather than altering its pitch. Recordists sometimes use flangers on background vocals and solo instruments to add an interesting texture. This is a unique sound that you recognize almost immediately upon hearing it.
The flanger effect comes from the early days in recording. You create the flanger effect the old-fashioned way by using a two-track recorder to record a duplicate track of the track that you want to flange. You then play the two identical parts back at the same time and gently press against the edge of the two-track tape (the one with the duplicate part) while it’s running. This delays certain parts of the sound slightly and drastically changes the character of the instrument.
TEAM LinG - Live, Informative, Non-cost and Genuine !

30 |
Part I: Computer Recording Basics |
Nowadays, you can just choose the flanger patch (sound) on your effects processor to get this sound. Isn’t technology great?
Pitch correction
Pitch correction, like its name suggests, is used to correct an out-of-tune note. You can use this effect to help a singer or an instrument player sound better by fixing those notes that are slightly out of tune. Pitch correction (also called auto-tune) has gotten a bad rap lately (mainly from its overuse and potential for abuse with a singer who can’t sing in key). When used sparingly and appropriately, pitch correction can make an otherwise decent vocal performance really shine. It can also be used to create some interesting effects, such as that robotic vocal sound that you hear on so many of the pop songs on the radio nowadays. An easily distinguished example would be the lead vocal on Cher’s “Believe.”
Monitors
To record and mix music, you need to be able to hear it. (Hey, obvious facts need love, too.) Monitors make this happen. You can use headphones or speakers as monitors; most home studios use both. Monitors are an essential part of a recording studio because you need to get what you’re recording and mixing into your ears for you to make sure that it sounds good.
Without good speakers, you won’t know what your mixes are going to sound like on other speakers. (Find out more about mixing in Chapter 14.)
Headphones
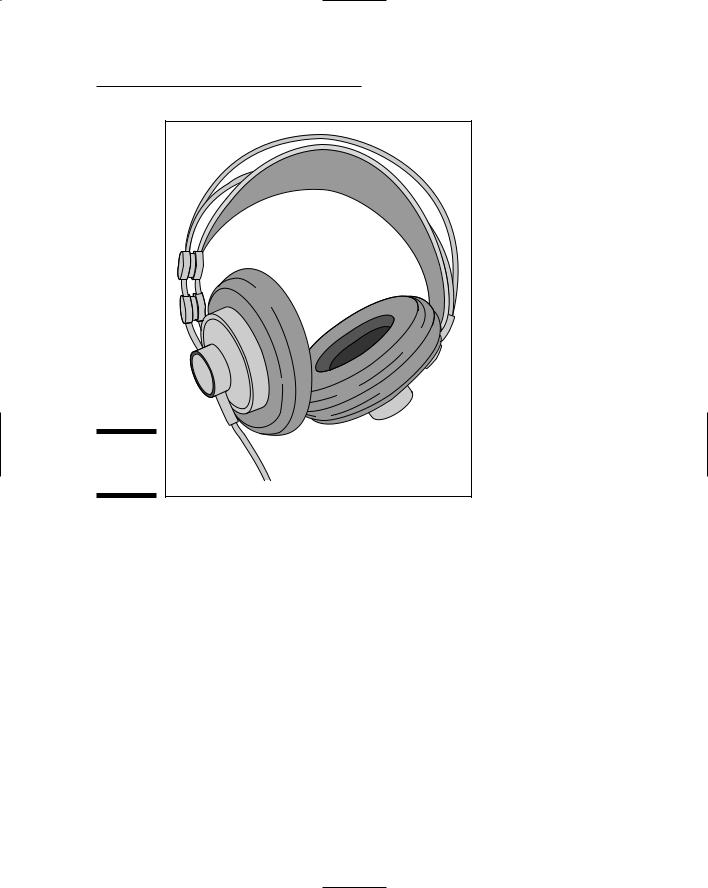
Chances are that your first home studio will be in a spare bedroom or a corner of your garage or basement. All your recording, monitoring, and mixing will be done in this room. If that’s the case, you’ll find that a set of headphones is indispensable. When you use headphones, you can turn off your speakers and still hear what’s being (or has been) recorded. When you go to record a guitar with a mic in front of the guitar amp, you want to hear only the guitar — not the guitar amp and the guitar amp coming back through your monitors. A good pair of headphones will allow you to do this. (See Figure 1-13.)
TEAM LinG - Live, Informative, Non-cost and Genuine !
Chapter 1: Discovering What You Need |
31 |
Figure 1-13:
Studio headphones.
Speakers
For most home recordists, the first set of monitors consist of the home stereo system, but sooner or later you’re gonna want a real set of monitors. Studio monitors come in many varieties, but the home recordist’s best bet is a set of near-field monitors. Near-field monitors are designed to be positioned close to you (which is often the case anyway because most home recordists have very little room in which to work).
Near-field monitors come with or without an amplifier. The amplified monitors are called active monitors, and the non-amplified monitors are referred to as passive monitors. Which type of monitor you choose depends on your budget and whether you like the idea of the amp coming with the speakers or prefer to purchase the amp separately. Figure 1-14 has a picture of an active near-field monitor. The amplifier is located inside the speaker cabinet.
TEAM LinG - Live, Informative, Non-cost and Genuine !