

PC Recording Studios for Dummies (Jeff Strong)
.pdf42 |
Part I: Computer Recording Basics |
Also keep these things in mind when trying to isolate your studio:
Dead air and mass are your friends. The whole concept of a room within a room is to create mass and still air space so that the invading or escaping sound gets trapped there. When you work on isolating your room, try to design in some space that can trap air (creating dead air) — such as a suspended ceiling or big, upholstered furniture — or use double layers of drywall on your walls (creating mass).
Don’t expect acoustical foam or carpet to reduce the noise. Using these can help reduce the amount of sound that bounces around inside the room, but it doesn’t do much to keep sound in (or out of) the room.
Isolate the instrument instead of the room. Isolating the sound of your guitar amp can be much less expensive than trying to soundproof your whole room. Most commercial studios have one or more isolation booths for recording vocals and other acoustic instruments. You can use that concept to create your own mini-isolation booths.
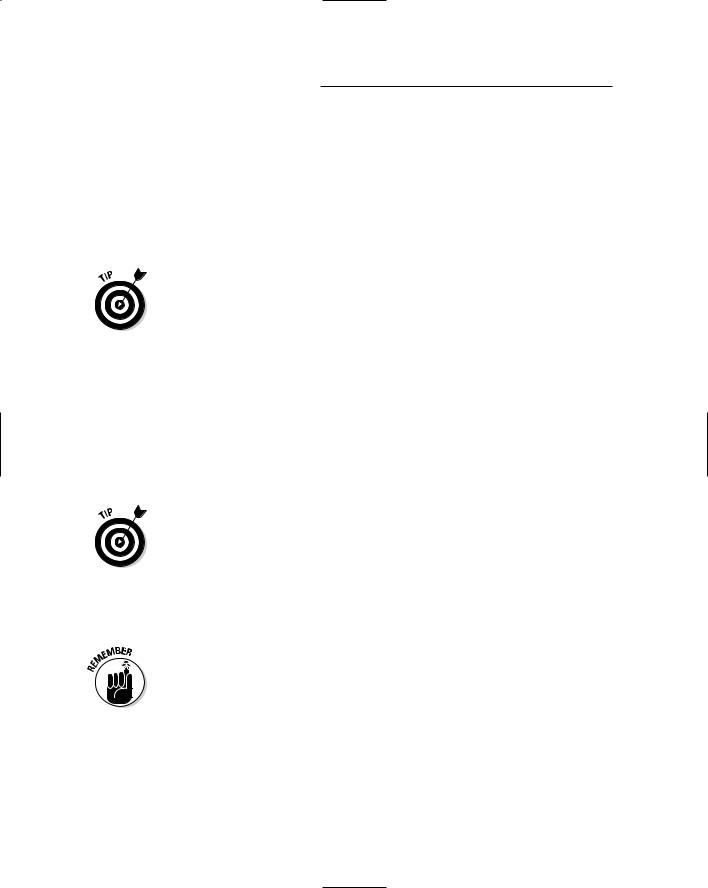
One idea for a truly mini-isolation booth is to make an insulated box for your guitar (or bass) amp. If you just have to crank your amp to get the sound you want, you can place it inside the insulated box to reduce the amount of noise that escapes to the outside world. Check out Figure 2-4 to see what I mean.
You can also create an isolated space in a closet by insulating it and closing the door when you record (I’ve known people who’ve put a window in the door and used the insulated closet for a vocal booth), or you can put your guitar amp (or drums) in another room and run a long cord from there to your recorder. If you do this, remember that for long cord runs you need to use balanced cords rather than unbalanced ones (see Chapter 5); otherwise, you might get a bunch of noise, and your signal might be too low to record very well.
Getting the sound in your room under control
After you create a room that’s as isolated from the outside world as possible, you need to deal with the way sound acts within your room.
Sound travels through the air in the form of waves. These waves bounce around the room and cause reflections (reverberations or echoes). One problem with most home studios is that they’re small — and sound travels very fast (1,130 feet per second, to be exact). When you sit at your monitors and listen, inevitably you hear the reflected sound as well as the original sound that comes out of your speakers. With big rooms, you can hear the original sound and reflections as separate sounds, meaning that the reflections themselves become less of a problem. For a good home studio, you have to tame these reflections so they don’t interfere with your ability to clearly hear what’s coming from the speakers.
TEAM LinG - Live, Informative, Non-cost and Genuine !

Figure 2-4:
An ampisolator box reduces the amount of noise you hear from your amp, even when it’s cranked.
Chapter 2: Setting Up Your Recording Space |
43 |
Top is 2 x 4 frame wrapped by 3/4-inch plywood and filled with fiberglass insulation
Amp sits inside
3/4-inch plywood inner shell
Hole for |
3/4-inch plywood outer shell |
mic cable |
|
|
2 x 4 frame |
|
Fiberglass |
|
insulation |
How all these reflections bounce around your room can get pretty complicated. Read up on acoustics (the way sound behaves) to discover more about different room modes: axial (one dimension), tangential (two dimensions), and oblique (three dimensions). Each relates to the way sound waves interact as they bounce around a room. Knowing your room’s modes can help you come up with an acoustical treatment strategy, but some very complicated formulas exist for figuring out your room’s modes, especially those dastardly tangential and oblique modes.
You can find out more on room modes and find some room mode calculators on the Internet by using your favorite search engine and entering room modes as a search term. Go to the Web site matches, and you’ll see quite a few places to start looking. (One great resource is Ethan Winer’s forum at www.music player.com/cgi-bin/ultimatebb.cgi?ubb=forum;f=26;DaysPrune=30.) I recommend that you research room modes; this topic alone could fill an entire book.
TEAM LinG - Live, Informative, Non-cost and Genuine !

44 |
Part I: Computer Recording Basics |
So, at the risk of offending the professional acoustical engineers in the world, I’m going to share some tricks that I’ve been using in my studios. My main goal has been to create a room with a sound I like and that gives me some measure of control over the reflections within the room. Because I record and mix in one room (as do most home recordists), I find it helpful to be able to make minor adjustments to the sound to accommodate what I’m trying to accomplish.
Sound control plays a major role in two aspects of recording: tracking and mixing. Each requires different approaches for you to get the best possible sound out of your recordings. I cover both these aspects in this section.
Sound control during tracking
Tracking is what you’re doing when you’re actually recording. Two things can make a tracking room a bad environment for tracking: not enough sound reflection and too much sound reflection. The goal when tracking is to have a room that’s not so dead (in terms of sound reflection) that it sucks the life out of your instrument and not so live that it colors the sound too much. The determining factor in how much reflection you want in your room is based on the instrument that you record and the way it sounds in the room.
If your room is too dead (not enough sound reflection), try adding some reflective surfaces to liven things up (the room, that is). On the other hand, if your room is too live (too much sound reflection), you need to add some absorptive materials to tame those reflections.
You could go out and buy a bunch of foam panels to catch the reflections, or maybe put in a wood floor or attach some paneling to the walls to add some life, but you’d be stuck with the room sounding only one way. It might end up sounding good for recording drums or acoustic guitar, but then it would probably be too live for getting a great vocal sound — which requires a deader space. One solution that I’ve found to work well is to get (or make) some portable panels that can either absorb or reflect the sound.
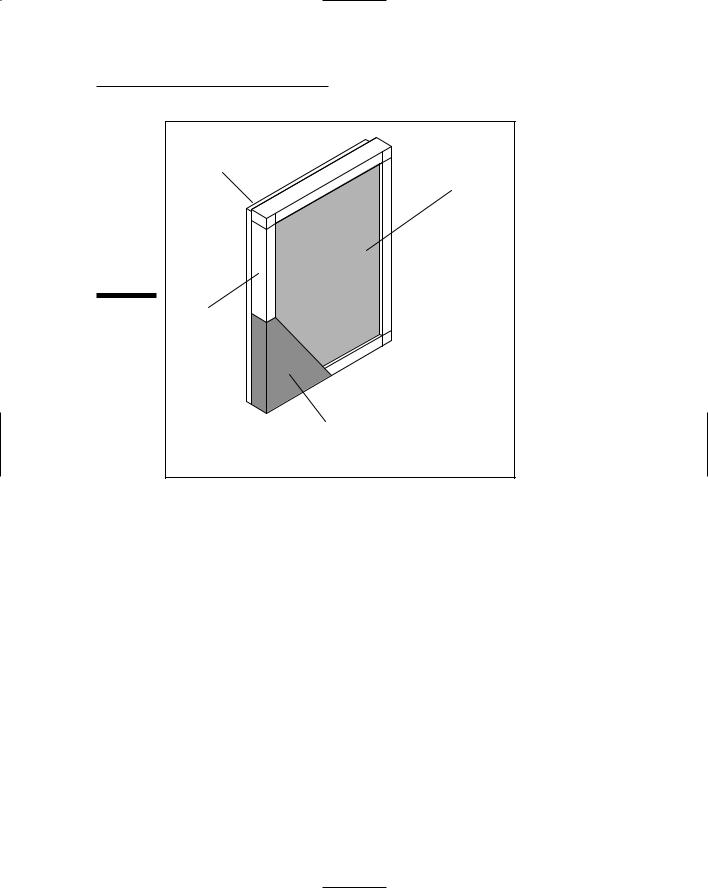
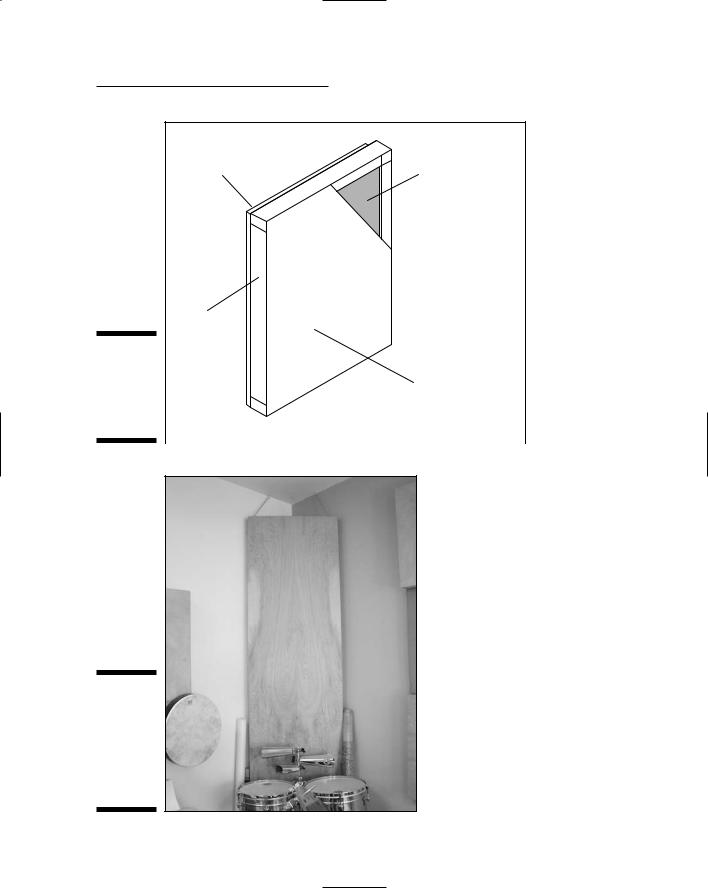
Figure 2-5 shows an absorber/reflector that I’ve used and have found to work quite well. (Go to my Web site, www.jeffstrong.com, for plans to build your own.) One side has an absorptive material (dense fiberglass insulation) and the other a reflective surface (wood). They’re put together in an attractive frame and designed to stack easily when you want them out of the way. Even with very little woodworking experience, you can crank out a set of them in a weekend for very little money (about $30 per panel). I guarantee that if you make them (or hire someone to make them for you), you’ll find dozens of uses for them around your studio.
TEAM LinG - Live, Informative, Non-cost and Genuine !
Chapter 2: Setting Up Your Recording Space |
45 |
3/4-inch plywood |
Space filled with |
|
|
|
fiberglass insulation |
Figure 2-5: |
2 x 4 frame |
Portable |
|
absorbers/ |
|
reflectors |
|
make |
|
changing |
|
the sound |
|
characterist |
|
ics of your |
Fabric wrapped around |
room quick |
insulation and frame |
and easy. |
(but not 3/4-inch plywood) |
|
|
|
|
Sound control during mixing
Your first step in getting control of the sound of your (probably less-than- perfect) room during mixing is to get a good pair of near-field monitors. Nearfield monitors are designed to be listened to up close (hence the near in their name), and they lessen the effects that the rest of the room has on your ability to hear them accurately and get a good mix.
The next step to mixing in an imperfect room is to mix at low volumes. I know; that takes the fun out of it, right? Well, as fun as it might be to mix at high volumes, it rarely translates into a great mix. Great mixing engineers often listen to their mixer at very low levels. Yes, they occasionally use high levels, but only after the mixing is pretty much done — and then only for very short periods of time. After all, if you damage your ears, you blow your career as a sound engineer. (Hey, that rhymes! Or is there an echo in here?) I don’t want to sound like your mother, but try to resist the temptation to crank it up. Your ears last longer, and your mixes sound better.
TEAM LinG - Live, Informative, Non-cost and Genuine !
46 |
Part I: Computer Recording Basics |
Even with these two things (near-field monitors and low mixing levels), you still need to do one more thing to your room to make it work better for you. The secret to a good mixing room is to tame the reflections of the sound coming out of your speakers.
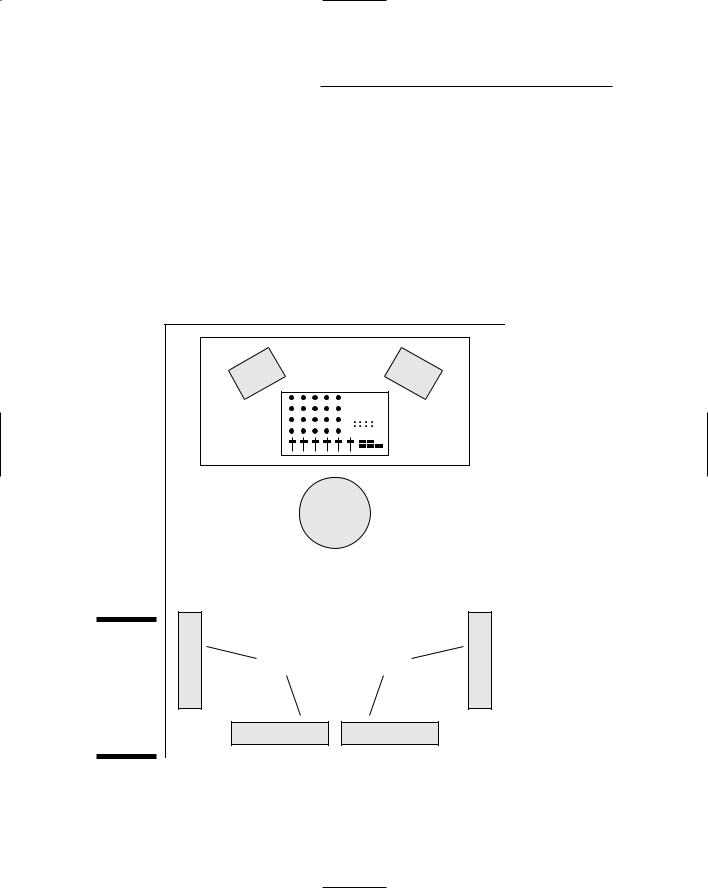
Dealing with highand mid-range frequencies is pretty easy — just put up some foam panels or the absorptive side of the panels you see in Figure 2-5. (See? I told you that you’d have a use for those panels.) Start by hanging two from the ceiling (or putting them on a stand or table) so they’re level with your speakers on the wall behind you. Also put one on each side wall right where the speakers are pointed, as shown in Figure 2-6. This positioning gets rid of the higher frequencies and eliminates much of the echo.
speaker |
speaker |
|
mixer/ |
|
recorder |
chair
Figure 2-6: |
|
Positioning |
Mount the absorber/reflectors |
the |
with the absorber facing out |
absorber/ reflectors like this helps with mixing.
TEAM LinG - Live, Informative, Non-cost and Genuine !
Chapter 2: Setting Up Your Recording Space |
47 |
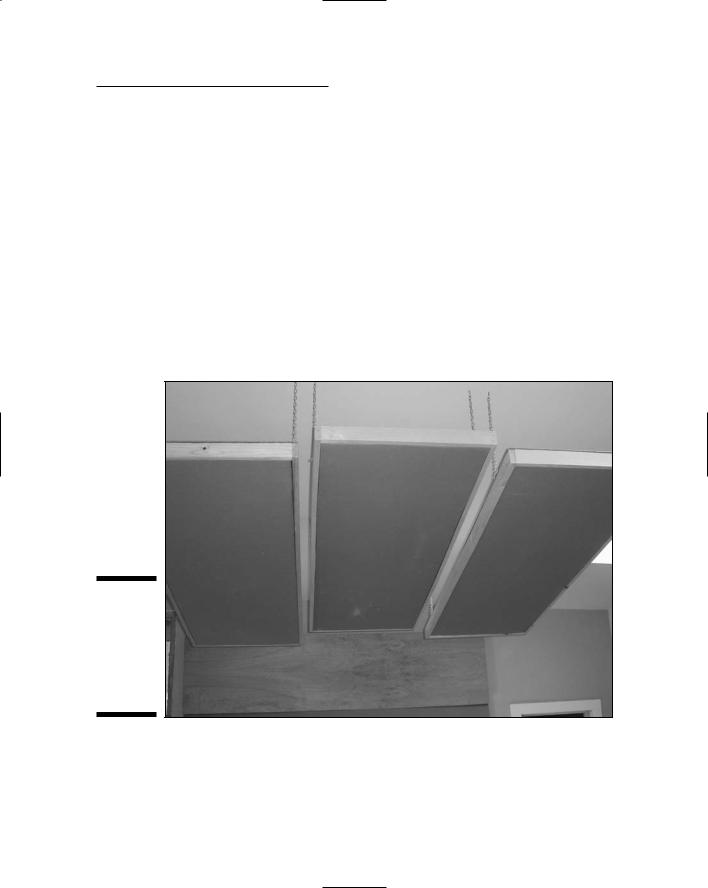
You might also need to put something on your ceiling right above your head, especially if you have a low (8 feet or less) or textured ceiling. (You know, one with that popcorny stuff sprayed on.) You might not want to mount one of the absorption panels over your head because they’re fairly heavy. (And accidents do happen.) Try wrapping up a couple of 2-x-4-foot panels made of dense fiberglass (the same ones used in the absorber/reflectors) in fabric and hang those instead; they would work just about perfectly. In fact, you can make some overhead diffusers like the ones shown in Figure 2-7 very easily. (The plans for these are also on my Web site at www.jeffstrong.com.)
You can also place a set of these overhead panels in the corners of your room behind the speakers. Just hang them at the same height of your speakers so that they cut off the corner of the room. If you don’t have enough room to fit the panels at an angle in the corner, you can eliminate the backing from the fiberglass and bend the fabric-covered panel to fit right in the corner. Either approach absorbs any sound that bounces around behind the speakers.
Figure 2-7:
Use overhead panels to get rid of reflections off the ceiling.
TEAM LinG - Live, Informative, Non-cost and Genuine !
48 |
Part I: Computer Recording Basics |
Another thing that you need to consider when you’re mixing is standing waves. Standing waves are created when bass tones begin reflecting around your room and bounce into each other. Standing waves have a weird effect on mix quality. They can over-emphasize the bass from your speakers (resulting in mixes that are short on bass) or cancel out some — or all — of the bass coming out of your speakers (resulting in mixes with too much bass). One of the problems with standing waves is that they can really mess up your mixes, and you might not even be aware that they’re there until you listen to your mix in another room and the bass is either too loud or too soft.
To find out whether you have a problem with standing waves in your studio, sit in front of your monitors and put on one of your favorite CDs. Now listen carefully. Okay, now lean forward and backward a little bit. Does the amount of bass that you hear change as you move? Next, get up and walk around the room. Listen for places within the room where the bass seems to be louder or softer. You might find places where the bass drops out almost completely. If either inspection gives you a variable experience of the bass, you’re the proud owner of standing waves. Don’t worry, though. You can tame that standing-wave monster with a pair of bass traps.
Bass traps absorb the energy in the lower frequencies so they don’t bounce all over your room and throw off your mixes. You can buy bass traps made of foam from some music stores or (yep, you guessed it) you can make your own out of wood and insulation. Check out Figure 2-8 for a look at some homemade bass traps. (The plans to make these are — you guessed it — located on my Web site: www.jeffstrong.com.)
The most common placement for bass traps is in the corners behind you when you’re sitting at your mixer (as in Figure 2-9). You might also find that putting a set in the other corners of the room helps even more.
After you place the bass traps, do the listening test again. If you notice some areas where the bass seems to get louder or softer, try moving the bass traps around a little. With some trial and error, you’ll most likely find a place where they seem to work best.
Try not to get stressed out about the sound of your room. As important as your room’s sound is, it has less impact on the quality of your recordings than good, solid engineering practices. I know, I keep saying this, but it’s important to remember. So do what you can and then work with what you’ve got.
TEAM LinG - Live, Informative, Non-cost and Genuine !
Chapter 2: Setting Up Your Recording Space |
49 |
Figure 2-8:
Use bass traps to get rid of standing waves.
Figure 2-9:
Put bass traps in the corners behind you to eliminate standing waves.
|
Space filled with |
|
3/4-inch plywood |
fiberglass or |
|
cotton insulation |
||
|
2 x 4 frame
1/4-inch or 1/8-inch plywood (thickness depends on the frequencies that you want to trap)
TEAM LinG - Live, Informative, Non-cost and Genuine !

50 |
Part I: Computer Recording Basics |
TEAM LinG - Live, Informative, Non-cost and Genuine !

Part II
Choosing and
Installing
Computer
Hardware
TEAM LinG - Live, Informative, Non-cost and Genuine !