

PC Recording Studios for Dummies (Jeff Strong)
.pdf62 |
Part II: Choosing and Installing Computer Hardware |
Making your choice
For the most part, any PowerBook, Power Mac G4 with the AGP graphics card, and of course the Power Mac G5s would do quite nicely. In addition to these models, an iMac, iBook or eMac could work well, but you’ll need to check out the compatibility documents for the hardware and recording program you intend to use.
The audio interface you have dictates what type of computer you can use. For example, if you have a Digi 001, you need a computer with an open PCI slot. This eliminates everything except the G4 or G5 because these are the only Macs with PCI slots. Come to think of it, with the Digi 001 you have to take the G5 off the list as well, because it uses a PCI configuration that’s incompatible with the Digi 001. Other PCI interfaces, such as the RME or MOTU brands, are compatible with both the G4 and the G5. If you want to use a FireWire interface, such as the MOTU 828, or a USB interface, such as the Mackie Spike, you can use any of the Macs because all new Macs have USB and FireWire ports.
Make sure that you have the necessary connectors (and that they’re compatible) in your computer to run the type of interface you want to use.
Getting a Handle on Hard Drives
To record audio effectively, you need to have more than one hard drive. This is pretty much non-negotiable if you intend to do any amount of recording, editing, erasing, and re-recording. You need at a minimum two hard drives in your system: one for your system files and applications and the other for all your audio and MIDI files. Here’s a look at how to organize them:
Drive one: The system drive. For your system drive, you can use the stock drive that came with your computer — but if you have a choice, I recommend getting one with a spindle speed (also known as rotational speed, the speed at which the hard drive spins) of 7,200 revolutions per minute (rpm). You’ll be much happier, and your audio recording program will be much happier, too. And get a big one — hard drive, that is.
There’s no need to partition your drive, even if you have other programs such as finance or word-processing software on your computer. In fact, doing so might slow down your system.
Drive two: The audio drive. Back in the old days, you needed a good high-speed SCSI drive to record and play back audio reliably, but this isn’t the case anymore. You can use both IDE and FireWire drives for storing audio, but make sure that you have a drive with the following (or better) specs:
TEAM LinG - Live, Informative, Non-cost and Genuine !

Chapter 3: Choosing Computer Components |
63 |
•Spindle speed: Also called rotational speed, this is the rate at which the hard drive spins. For the most part, a 7,200-rpm drive will work well for recording and playing back audio.
•Seek time: This is the amount of time that the drive takes to find the data that’s stored on it. You want an average seek time under 10 milliseconds (ms). Get as low as you can. (I prefer a seek time of 8 to 9 ms.)
•Buffer size: Often called a cache buffer, buffers are memory units that store data as it’s being transferred. You want a buffer size of at least 512K, but get one as big as you can. I recommend a drive with an 8MB buffer.
•Chipset: If you use a FireWire drive, make sure that it comes with at least the Oxford 911 bridge chipset. The chipset is necessary to get the most bandwidth out of the drive and results in more tracks in your session.
A drive with these specs in a good size (100GB or so) will run you about $100, so there’s no reason not to spring for the second drive.
If you use a FireWire interface for your system, you’re best off using an ATA/IDE drive as your audio drive because a FireWire drive will compete with the interface’s FireWire connection for bandwidth. If you want to use a PowerBook or other Mac that doesn’t have room for a second internal ATA/IDE drive, you might need to get either a PCI (for desktops) or Cardbus (for laptops) FireWire adapter. Using an adapter will let you record and play back more tracks and essentially make your sessions run smoother.
I don’t recommend the older USB drives for your audio drive. The connection speed is too slow to record or play back lots of tracks smoothly. The newer USB 2 drives have a connection speed similar to FireWire, so this might be an option if your computer has a high-speed USB-2 port.
Recognizing Your RAM Needs
Most audio recording programs require at least 384MB of RAM (random access memory), but I say go for broke here. Get as much RAM as your system can hold. And don’t buy the cheap stuff — get high-quality RAM.
I recommend getting at least 1GB of RAM for music, more if you want to use software samplers or soft-synths because they use a lot of RAM to run efficiently.
TEAM LinG - Live, Informative, Non-cost and Genuine !

64 |
Part II: Choosing and Installing Computer Hardware |
Opting for Optical Drives
An optical drive is a drive that can read from or write to CDs or DVDs. These types of drives are important for backing up data and burning a CD of your finished music.
I recommend that you get a combination drive — one that can read and write from both CDs and DVDs. Even though you won’t be putting your music on DVD, the capacity of a DVD-ROM disc makes backing up your audio files much easier because you can get a lot of data on one DVD. (How much data? Well, you can cram all the data from six CDs onto just one DVD.)
Viewing Video Monitors
When it comes to choosing a monitor, almost any one will do in a pinch, but I recommend the newer LCD monitors because they don’t emit any electromagnetic fields (EMFs) that some recordists have complained interfere with
recording. I personally haven’t had any problems with the audio while using a standard cathode ray tube (CRT) monitor, but I do find that my eyes get tired a lot quicker with them than when using an LCD monitor.
One final consideration concerns your choice of graphics cards: You might want to consider a dual-head AGP (Accelerated Graphics Port or Advanced Graphics Port) graphics card. These work just like any other graphics card, but support the use of dual monitors. Because many audio recording programs use two main display screens, having a dual-display-capable graphics card allows you to hook up two monitors so that you can see both screens without having to toggle between them. Okay, it’s certainly not a requirement, but many people find that it’s a nice convenience.
TEAM LinG - Live, Informative, Non-cost and Genuine !

Chapter 4
Examining Audio Components
In This Chapter
Understanding audio interfaces
Discovering MIDI gear
Getting to know microphones
Exploring monitoring options
Because of all the hoopla that computer-based recording has been getting in the press over the last couple of years, more people figure that because
they have a computer they might as well use it to record. Unfortunately, many of these people go to their local musical instrument superstores or favorite online retailers, buy the cheapest recording doohicky possible (after all, the specs are all the same, right?), get home, install it, and proceed to spend countless hours trying to figure out why they can’t record anything with it or find out that what they do manage to record sounds worse than the 20-year-old cassette deck they’ve been using to put their musical ideas down on.
Well, this chapter is designed to save you the frustration (and expense) of not getting the right bits of hardware you need to successfully record with your computer. In this chapter, I guide you through the overwhelming options in audio interfaces and help you find the right one for your needs (and not the seller’s need for a big, fat commission). I also explain the other audio components you might want for your home studio, such as MIDI gear, microphones, and monitors (speakers, to you newbies).
Examining the Audio Interface
The audio interface is the key to being able to record into a computer. The interface takes all your analog sources (this includes all your instruments and mics) and turns them into digital bits that your computer can understand and work with. Without the interface, your instruments and computer are speaking two entirely different languages with no hope of understanding one another.
TEAM LinG - Live, Informative, Non-cost and Genuine !

66 |
Part II: Choosing and Installing Computer Hardware |
Understanding the interface
Audio interfaces come in a variety of configurations that might or might not contain the following components:
A sound card: A sound card — also called a PCI card because it fits in the PCI (Peripheral Component Interface) slot in your computer — allows your computer to read and understand the digital information coming from and going to the converters (see next bullet). Without a sound card, your computer doesn’t know what to do with the musical data that it receives (or that your hard drive stores).
Analog-to-digital (AD) and digital-to-analog (DA) converters: These converters allow you to get the sound from your instrument, direct box, or preamp to the sound card (the AD converter’s job) and from your computer back out to your monitors (the DA converter’s job).
The division between sound card and AD and DA converters is very slight. In fact, these two components are often bundled together and collectively called a sound card. However, because you can buy these components separately — if and when you get really hard core about recording audio — I list them separately.
Analog inputs: These let you plug your instruments into the interface without needing a mixer or any other gear. The analog inputs include:
•Microphone preamps: A microphone preamp is necessary for you to plug your microphone into your recording device. A preamp amplifies the signal coming from your microphone so that it can be recorded. Microphone preamps in most audio interfaces can also accept your guitar or bass without having to go through your amp first — much like a direct box would. (For more on direct boxes, see Chapter 1.)
•Instrument inputs: In addition to microphone preamps, most interfaces also have 1⁄4-inch TS or TRS inputs that you can plug your keyboards, drum machines and other instruments into. (Not sure about this TS or TRS business? Chapter 5 has more on these and other types of connectors.) Many interfaces also let you plug your guitars directly into these inputs as well so you don’t need a direct box. (Again, Chapter 1 has more on direct boxes.)
Analog outputs. Audio interfaces all come with at least two analog outputs as well as a headphone jack. These outputs let you plug in your monitors and headphones so that you can hear your recordings. Many interfaces also have additional outputs that allow you to plug your unmixed tracks into an external mixer if you choose. (Though most home recordists don’t bother — they choose to mix inside the computer’s software instead. Chapter 14 covers mixing in more detail.)
TEAM LinG - Live, Informative, Non-cost and Genuine !

Chapter 4: Examining Audio Components |
67 |
Even though it’s really handy to have all the pieces of equipment making up your audio interface housed together in one unit, there’s a downside — such all-in-one audio interfaces aren’t going to perform as well as higher quality components that you can buy separately. For example, the preamps that come in most interfaces might be serviceable, but they don’t offer the clarity that a well-made external preamp can.
Quality is the price you pay for having everything in one unit and having that unit cost less than the individual components would cost separately. The reason I mention this is that, as you build up your engineering skills, you might find that you hit the limits of your equipment. When this happens, you might want to consider adding separate components to improve the quality of your audio chain. (The chain is the line of gear that your signal has to travel to get to the hard drive — your voice to the mic to the preamp to the AD converter to the sound card to the hard drive, for example.)
Exploring digital audio specifications
When you start looking at audio interfaces, you’ll notice all the specifications thrown around like beaded necklaces at a Mardi Gras celebration. To keep you from getting confused by all the hype produced by the companies trying to sell their particular interface, here’s a quick description of the two specs — bit depth and sample rate — that you need to get your mind around if you want to intelligently compare competing products.
Bit depth
When you start looking at audio interfaces, you’ll hear jargon such as 16-bit (the bit depth of audio CDs), 20-bit, 24-bit, and so forth. This is the bit depth, which is described in terms of bits. (A bit, short for BInary digiT, is the basic unit of information in the binary numbering system used by computers.) The numbers 16, 20, and 24 relate to the amount of digital information that can be contained in each of the sample rates that I describe in the next section. The higher the number, the more dynamic range — the difference between the loudest and softest sound you want to record and the level of noise in your recording — you can have. Most professional audio gear now records at a 24-bit resolution, which translates to 144dB of dynamic range. (Theoretically, at any rate. In the real world, this dynamic range is slightly lower, ranging around 112dB or even 106dB). With that higher number, however, the sound is going to take up more of your digital storage space. This usually isn’t a big deal, though, considering the low cost of huge hard drives.
TEAM LinG - Live, Informative, Non-cost and Genuine !

68 |
Part II: Choosing and Installing Computer Hardware |
Sampling rate
The sampling rate refers to the frequency at which the converter samples the incoming and outgoing sound source. When a converter samples a sound, it actually takes a small snapshot of the audio signal. Typical sample rates for digital recorders are 44.1 kHz (the sample rate for audio CDs), 48 kHz, 88.2 kHz, and 96 kHz (the sampling rate for DVD audio). The higher the number, the more samples that are taken each second, and the larger the frequency range that’s captured.
This is one of the key aspects of using higher sampling rates and is called the Nyquist frequency. The Nyquist frequency (named after Harry Nyquist, the guy who discovered this) is the highest frequency that a digital sample can represent — and that frequency works out to be exactly half the sample rate. For instance, a 48-kHz sampling rate (the most common rate for professional audio equipment at the time of this writing) can accurately represent frequencies up to 24 kHz. (Not bad, considering that humans can only hear a maximum of 20 kHz — and for musicians who’ve played in a loud band for a while, that figure might be as low as 17 kHz.) Any frequencies higher than 24 kHz just aren’t audible to us, so they’re cut off. This range of frequencies is called the bandwidth — 48-kHz sampling rate has a bandwidth of 24 kHz.
If this were the only issue, your sampling rate choice would be a no-brainer: Simply use 44.1-kHz sample rate for audio that you’ll eventually put on a CD because CDs use a 44.1-kHz sample rate and humans can’t hear beyond about 20 kHz anyway. Unfortunately, the real issue with the sample rate has to do with the way the converter filters the audio above the Nyquist frequency. Cheap converters don’t have great filters, so the audible sound (the stuff below 20 kHz) can be distorted by the filter even though the converter can capture music beyond what you can hear. For some people, the workaround for this problem is to record at a higher rate, thus putting the filter higher up into the inaudible range where it can’t mess with your audible music, and then converting the sample rate later on before you put your music on a CD. And if you do a lot of DSP (digital signal processing, as I describe in Chapter 1), having a higher sample rate can help reduce any degradation in the sound of your music from all the math your computer has to do to process the audio. (Math is inherently hard work — remember Algebra in high school? — but the math that your computer has to do during audio processing is especially a bear because it often has to deal with very small errors [called rounding errors] that can eventually add up.) One other advantage with higher sample rates is that the latency — the delay caused by digital conversion of DSP functions — is reduced as the sample rate increases.
To take your analog sound — the signal from your mics, guitars, or keyboards — and turn it into digital information, your AD converter takes small snapshots of the incoming signal (at whatever sampling rate the converter uses) and then applies a number to that sample (based on the bit depth).
TEAM LinG - Live, Informative, Non-cost and Genuine !
Chapter 4: Examining Audio Components |
69 |
For example, suppose that you have a 24-bit converter with a 48-kHz sampling rate. When it senses an auditory signal — a vocal perhaps — the AD converter takes a snapshot (measurement) of that signal 48,000 times per second (48 kHz). Each of these snapshots is given a value between –8,395,008 and +8,395,008 (a 24-bit resolution has 16,790,016 possible levels), which puts the vocal sound somewhere on a chart corresponding to a waveform shape. The recorder in turn reads these numbers, and the DA converter translates these numbers back into an analog waveform again (whew!).
Converting an analog signal into digital data and back again is a highly technical process. You could spend months or even years reading about the intricacies of audio conversion. (Check out Principles of Digital Audio by Ken C. Pohlmann, or The Art of Digital Audio by John Watkinson if you’re into this techy stuff.) The most important thing to remember when considering AD and DA converters is how well you like the sound. Even though the digital information might be treated the same way in different converters, the sound might be different for reasons beyond the scope of this book.
Taking a look at interface types
You can get an interface to connect with your computer by using one of three basic interfaces: PCI, FireWire, or USB. Although I cover these types in Chapter 1, here’s a rundown on the differences between the three:
PCI: PCI interfaces are inserted into one of the PCI slots located inside your computer’s case.
FireWire: FireWire interfaces connect to one of the FireWire ports in your computer.
USB: USB interfaces connect to your computer — you guessed it — through one of the USB ports in your computer.
PCI interfaces
PCI is the old standard for getting audio in and out of a computer and has an advantage over the other interface types because of the fast transfer speed of PCI technology. This type of interface isn’t without its problems, however. First, many computers don’t have a PCI slot (laptops, for example, and all Macs except the Power Mac) and second, because PCI technology is changing not all cards fit in all computers. This can make finding the right PCI interface more challenging. (Though finding it certainly isn’t impossible — besides, I help you out later in this chapter.)
TEAM LinG - Live, Informative, Non-cost and Genuine !
70 |
Part II: Choosing and Installing Computer Hardware |
The advantage with PCI interfaces is that the PCI (the river in which the data flows) is the fastest of the currently available ways to get audio into and out of your computer. This means that there is less delay (called latency) between the origin of the sound (when you hit a drum, for example) and when it gets into the computer and then back out again to your monitors. This is why many pros still prefer PCI to FireWire or USB.
This doesn’t mean that the delay you can get with FireWire or USB has to be noticeable or can’t be dealt with. You can in fact deal with it in a number of ways, as you find out in FireWire and USB sections later in this chapter. The latency issue, therefore, isn’t the reason to go with PCI. Your decision is going to come down to what interface you find that you like.
PCI interfaces come in the following varieties:
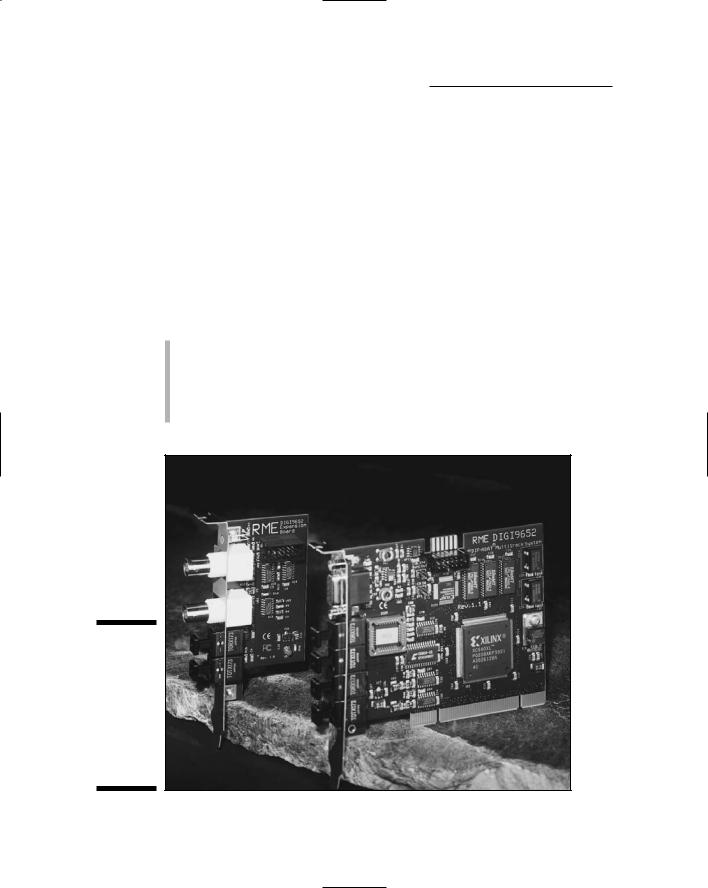
Separate sound card with no analog inputs and outputs: In this case, you need to buy separate preamps, direct boxes, and AD and DA converters. For most home recordists, the separate sound card route isn’t the best solution. In fact, even for the pros this isn’t the most popular choice — so much so that this option is quickly falling from the marketplace.
(See Figure 4-1.)
Figure 4-1:
Some PCI sound cards, such as the RME Hammerfall, have only digital inputs and outputs.
TEAM LinG - Live, Informative, Non-cost and Genuine !

Chapter 4: Examining Audio Components |
71 |
Analog inputs and outputs within the card: It used to be the case that having the analog connection located in the card caused interference with the other components in the computer’s housing (such as fans and hard drives) which caused low-level hums in the recorded audio. (Not a sound you’d want, I can assure you.) This generally isn’t the case anymore unless it’s a really inexpensive card, but the bad rep led buyers to shy away from this approach, and it has become uncommon
as a result. You can find some less expensive audio interfaces configured this way, but the higher end of the market has pretty much abandoned it. (See Figure 4-2.)
Analog inputs and outputs housed in a separate box, called a breakout box: Because of the low-level hum problems in the early interfaces (see the preceding bullet point), most manufacturers of PCI-based audio interfaces put their analog circuitry in a separate box with a cord attached to the PCI card. One advantage to this — besides eliminating the hum in early models — is that you can tweak the input and output levels without having to go into a software menu. The dials for the levels are placed on the break-out box within easy reach. (See Figure 4-3.)
Figure 4-2:
PCI interfaces like the M-Audio Audiophile 2496 often come with analog connectors.
TEAM LinG - Live, Informative, Non-cost and Genuine !