

PC Recording Studios for Dummies (Jeff Strong)
.pdf32 |
Part I: Computer Recording Basics |
Figure 1-14:
An active near-field monitor: The amplifier is located inside the speaker cabinet.
If you end up getting passive monitors, you need to buy an amplifier to send power to the speakers. The amplifier connects to the outputs of the mixer and boosts the signal to the speakers. A good power amp should be matched in power to work well with whatever speakers you have.
Mastering Media
After you mix your music, you need to put your final music on something. The two most common media for home recordists are CDs and raw computer files. Which medium you choose depends on what your goals are. For instance, if you intend to send your finished mix out to a mastering house, you’re better off saving it as raw audio data in a computer file. On the other hand, if you master your music yourself and just want to have it duplicated (or you want to give copies for your friends to play), you would want to use a CD.
TEAM LinG - Live, Informative, Non-cost and Genuine !

Chapter 1: Discovering What You Need |
33 |
CD
With the cost of CD-R (write) and CD-RW (rewrite) drives plummeting, CD mastering is the only choice for most home recordists. With CDs, you can back up large amounts of data at a very low cost and burn audio CDs that can play in any CD player. You can even send out your mastered CD to be duplicated and packaged for retail sale. (Chapter 14 explains the process for burning CDs.)
Computer files
Sometimes you won’t want to master your music directly to CD. You might decide to have a professional mastering house do it, or maybe you want to put your music on the Internet. In those situations, store your recordings as computer files. The following sections describe the most commonly used file formats for storing recorded music.
WAV and AIFF
WAV and AIFF (Audio Interchange File Format) files are the formats for audio files found with most professional audio software. The advantage to saving your music to WAV or AIFF is that when you hand over a CD containing your WAV and/or AIFF files to a mastering house, the recorded sound is actually in a higher-quality format than that of the finished CD (provided your recorder records in 20 or 24 bit, which most do). You can also take your music files to any other studio that supports these file formats and work with them there.
MIDI
A MIDI file isn’t an audio file; rather, it’s a data file that contains MIDI information that can be transferred from one computer to another. An advantage to MIDI files is that they take up less room than an audio file. The disadvantage is that they contain only the MIDI information and no sound. To play a MIDI file, you have to have a sound module. And the sound you get from the file depends entirely on what sound source you use, such as the particular keyboard or soft-synth.
MP3
MP3 is a file format that has become quite popular on the Internet. Its advantage over audio CDs and other computer files is that it takes up less room. Its disadvantage is that the data is compressed, and the sound quality isn’t nearly as good as that of commercial CDs (contrary to what MP3 proponents claim).
TEAM LinG - Live, Informative, Non-cost and Genuine !

34 |
Part I: Computer Recording Basics |
TEAM LinG - Live, Informative, Non-cost and Genuine !

Chapter 2
Setting Up Your Recording Space
In This Chapter
Creating an efficient space in which to work
Making your room sound good
Making great-sounding recordings requires many things: good music and musicians, decent gear, solid engineering skills, and a room that sounds
good. Let me repeat that last one because this is the most overlooked aspect of making great-sounding music for home recordists — a decent-sounding room. Although most professional studios spend tons of money on making their rooms sound great, you don’t have to (as if you could). With a little elbow grease, some rudimentary carpentry skills, and the tips contained in this very chapter, you can make whatever room you set up as your recording space sound pretty decent. In fact, the ideas and strategies I offer here can make your room sound as good as a professionally-designed studio (well, almost). Because it’s unlikely that your room is perfect for all your recording needs, I also offer some ideas to get great sounds without the big budget found in professional circles.
Professional studios also take great care to create an environment that is conducive to working efficiently. Most home recordists, on the other hand, put their computer in the corner of a bedroom, hook up a mic or instrument, and call it a studio.
The “pile it up in a corner and call it a studio” approach isn’t the only way to go. In this chapter, I help you set up your space so that it has the ergonomic feel that’s needed to get a lot done (and get a lot done quicker). Regardless of whether you set up in your bedroom, in your basement, or in the corner of your living room, you’ll be able to work as efficiently as possible.
Preparing Your Room
Whether your studio is in the corner of your bedroom, in a spare room, a basement, or a garage, getting it set up so that you can work there efficiently will save you tons of time and aggravation down the road. This section offers
TEAM LinG - Live, Informative, Non-cost and Genuine !
36 |
Part I: Computer Recording Basics |
some tips for getting the most out of the limited space that you have available. (I’m assuming your space is limited. I know mine is — it seems that no matter how much I have I still don’t have enough.)
Creating an efficient working environment
I hope you’ll spend a great number of hours in your studio creating some excellent music (possibly to the dismay of the rest of your family). One important thing to keep in mind is that you need to be comfortable.
Setting up your workstation
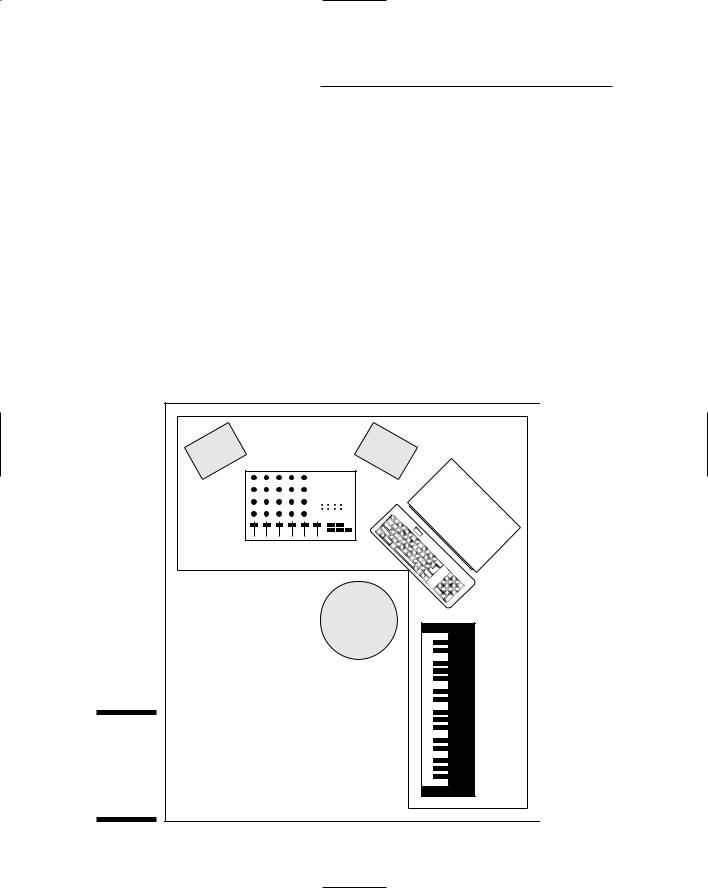
First, get a good chair and set up your workstation to be as easy to get around as possible. Figure 2-1 shows a classic L setup. Notice that everything you need is within arm’s reach. If you have enough room, you might want to consider a U-shaped setup instead. You can see that in Figure 2-2.
speaker |
speaker |
|
mixer/ |
|
recorder |
|
computer |
|
chair |
|
r |
|
thesizey n |
Figure 2-1: |
|
A classic |
|
L setup: |
|
Everything |
|
is easy to |
|
reach. |
|
TEAM LinG - Live, Informative, Non-cost and Genuine !

Chapter 2: Setting Up Your Recording Space |
37 |
speaker |
speaker |
|
mixer/ |
|
recorder |
|
r |
|
chair |
computer |
thesizeyn |
|
|
Figure 2-2: |
|
The U- |
|
shaped |
|
setup works |
|
great if you |
|
have the |
|
room for it. |
|
Monitoring your monitor placement
If you have a set of near-field monitors — the kind that are designed to be placed close to you — set them up so that they’re the same distance from each other and from you, at a height that puts them level with your ears. Figure 2-3 illustrates the best placement for your monitors. Placing your monitors this way ensures that you hear the best possible sound from them and can accurately hear the stereo field. (For more on the stereo field, see Chapter 14.)
Working efficiently
Aside from creating a basic equipment layout that works for you, here are some additional things to consider when setting up your studio (and working in it):
Get organized. Spend some time finding (or creating) places for all your gear and put the gear in those places. Make labels for items like mic and instrument cords (colored tape or tags work well).
TEAM LinG - Live, Informative, Non-cost and Genuine !

38 |
Part I: Computer Recording Basics |
Eliminate distractions. Turn off the phone, get off the Internet, close the door, and don’t answer if anyone knocks. These are a few of the many things you can do to get rid of distractions that will inevitably pop up when you try to do some work in your studio.
Keep essential gear handy. For example, I record a lot of drums (and I mean a lot), and they need to be miked properly to get the best sound. Because I’m also composing as I work, I keep several mics up on stands and plugged in so that if I’m inspired to lay down a bodhran part all I have to do is grab the drum off a rack, get in front of the right mic, make a minor adjustment to the preamp level (and turn on phantom power to power up the mic if it’s not already on), and play. Compare this sequence with having to dig around for the right mic, locate a cord, plug it in to the mic, find a stand and attach the mic to it, connect the cord to the preamp, dial in the preamp level, adjust the mic placement, readjust the preamp level, and so on.
Distinguish between the producing, engineering, and creating tasks.
Because most home recordists take on all these roles in their studios, you need to be diligent in keeping tabs on which one you perform at a given time. For example, on some days you want to work out ideas for your next song. On these days, take off your engineering hat and stop tweaking knobs. If you don’t, before you know it the time you set aside for working out ideas has been spent, and all you have to show for it is a perfectly dialed-in preamp.
speaker |
speaker |
|
mixer/ |
Figure 2-3: |
recorder |
|
|
Your |
|
monitors |
|
sound best |
|
when |
|
placed at equal
distances |
chair |
|
from each |
||
|
||
other and |
|
|
you. |
|
TEAM LinG - Live, Informative, Non-cost and Genuine !

Chapter 2: Setting Up Your Recording Space |
39 |
Inspiring creativity
It’s easy to forget in the midst of all this recording-gear talk that making music is a creative endeavor. It’s also easy to forget that creative juices need to flow in order to actually get anything done. As any artist worth his or her salt will tell you, the muse is fickle, and accessing inspiration can be tough. The last thing you need is to create an environment or approach to recording that saps your creativity.
I can’t tell you how many home studios I walk into that are about as inspiring to work in as a prison cell (not that I know anything about the aesthetic of prison cells, mind you). Anyway, I highly recommend that you spend some time and money creating a place that you want to go into, a place that helps get you in touch with your muse. For some people, it’s candles, incense, and lava lamps. For someone else, it might be stark white walls and angular metal furniture. Get in touch with your own inner interior designer and get creative in making a special place that says, “Creativity happens here.” This way you’ll want to go to your studio and you’ll feel inspired when you get there.
Taming heat and dust
The number-one enemy of electronic equipment is heat. Dust is a close second. Try to set up your studio in a room that you can keep cool and fairly dust-free. Air conditioning is a must for most studios. Be careful with a window air conditioner, though; it can make a lot of noise, requiring you to shut it off when you record. Depending on where you live, this could heat up your room really fast. To deal with dust, try to cover up your equipment when you’re not using it, especially your mics. A plastic bag placed over the top of a mic on a stand works well.
Quieting your computer
Unless you work on a laptop that doesn’t have a fan, you’re going to find that your computer makes quite a bit of noise. In fact, why don’t you go give it a listen right now. I’ll wait. . . .
It’s noisy isn’t it? This is a problem because most people are used to putting their computer’s CPU unit either on or under their desks. If you record with a microphone in your room, all the computer noise is going to end up on your track. This can cause problems even if you don’t use mics when you record. The constant whirring of the fans and hard drives will make it difficult for you to properly hear what’s coming out of your monitors. This can result in you recording tracks that don’t sound right or mixing your music less than optimally.
TEAM LinG - Live, Informative, Non-cost and Genuine !

40 |
Part I: Computer Recording Basics |
You can reduce the sound from your computer in three basic ways:
Put the computer’s CPU unit in another room. If you have a closet or an adjoining room that you can put your CPU unit in, this is the easiest and safest solution. For most computers, all you have to do is get extension cords for your video monitor(s), keyboard, and mouse and run the cords through a hole in the wall. The cords cost only a few dollars. (I have a Mac tower with an LCD screen — the most expensive configuration for extending video cables — and it cost me under $100 to run two video monitors an extra 8 feet.)
Put the main CPU unit in an isolation box. You can create a box (much like the amp isolator box that I describe later in this chapter) to put your computer into. This approach isn’t quite as simple as putting an amp in a box because you need to make sure that computer gets cool air to keep it from overheating. This requires insulated ducts and fans that are sized properly for your computer. It can and has been done, so if you don’t have the option of putting your CPU in another room, you can use this approach. Just make sure that you don’t let your computer overheat — otherwise, you might fry the internal components such as hard drives, motherboard, or CPU board. You can find some links to articles about boxing a computer on my Web site at www.jeffstrong.com.
Liquid cool it. For many hardcore users, liquid cooling is preferable to boxing the computer. (Using a separate room is still the preferred option if it’s at all possible.) Liquid cooling means eliminating the fans in your computer and replacing them with components that allow you to run cool water over your computer’s critical components such as hard drives, motherboards, and processor chips. For some computers, that process is relatively easy because the parts are readily available. For others — computers such as the Mac G4 or G5 towers — finding the parts can be a hassle. You can expect to spend a few more dollars on liquid cooling than you would spend on running longer cords and drilling small holes into an adjoining room. For some links to resources on liquid cooling, go to my Web site at www.jeffstrong.com.
Whichever option you choose, you’ll benefit because your music will sound better, so I encourage you to adopt one of these three approaches.
Optimizing Sounds in Your Room
Chances are that your studio occupies a corner in your living room, a spare bedroom, or a section of your basement or garage. All these spaces are less- than-ideal recording environments. Even if you intend to record mostly by plugging your instrument or sound module directly into the mixer, how your room sounds will have a big effect on how good your music turns out to be.
TEAM LinG - Live, Informative, Non-cost and Genuine !

Chapter 2: Setting Up Your Recording Space |
41 |
As a home recordist, you’re unlikely to have easy access to the resources that create a top-notch sound room. Commercial studios spend serious cash — up to seven figures — to make their rooms sound, well, professional. You don’t need to spend near that amount of money (you mean you don’t want to sell off your private jet?) to get great-sounding recordings. All it takes is a little understanding of the way sound travels, some ingenuity, and a little bit of work.
Keeping the sound in or out of your room
One of the concerns that you (and your neighbors) are probably going to have when you start recording in your home is the amount of sound that gets in and out of your room. Sound waves are nasty little boogers. They get through almost any surface, and there’s not a lot you can do to stop it from happening.
You’ve probably noticed this phenomenon when somebody with a massive subwoofer in his car drives by blasting some obnoxious music. (Ever notice how someone else’s music is obnoxious whereas your music never is, no matter how loud you play it? Amazing.) Your windows rattle, your walls shake, and your favorite mug flies off the shelf and breaks into a thousand pieces. Well, this is one of the problems with sound: It’s physical energy.
The best (and classic) way to isolate your studio room from everything around it is to build a room within a room. This essentially involves building a six-sided box just inside the floor, ceiling, and walls of your existing room. The trick with this approach is that the box you build in your room has to be isolated from the structure of the room itself. If it’s not, the vibration simply travels from your inner room to the outer one — or vice versa. Most pros use rubber membranes to create this isolation. The process can get pretty involved, so I don’t go into detail here, but you can go to my Web site (www.jeffstrong.com) to find some links to resources to get you started.
For the purpose of most home recordists — folks who usually don’t have the money or space to build a room within a room — the best thing you can do is to try to understand what noises are getting in and getting out and deal with those. For example, if you live in a house or apartment with neighbors close by, don’t record live drums at night. You could also consider using a drum machine or electronic drum set (plugged directly into the recorder) instead.
Another idea is to try to choose a room in your house or apartment that is farthest away from outside noise (an interior room, for instance). Basements also work well because they’re underground, and most of the sound gets absorbed by the surrounding dirt and earthworms. Installing a little fiberglass batting insulation in the ceiling — typical house insulation that you can find at your local home center — can isolate you pretty well from anyone above the basement. Detached garages are generally farther away from other buildings, so sound has a chance to dissipate before it reaches your neighbors (or before your neighbors’ noise reaches your garage).
TEAM LinG - Live, Informative, Non-cost and Genuine !