- •Features
- •1. Pin Configurations
- •1.1 Disclaimer
- •2. Overview
- •2.1 Block Diagram
- •2.2 Pin Descriptions
- •2.2.3 Port B (PB5..PB0)
- •2.2.4 RESET
- •3. About Code Examples
- •4. AVR CPU Core
- •4.1 Introduction
- •4.2 Architectural Overview
- •4.4 Status Register
- •4.5 General Purpose Register File
- •4.6 Stack Pointer
- •4.7 Instruction Execution Timing
- •4.8 Reset and Interrupt Handling
- •4.8.1 Interrupt Response Time
- •5. AVR ATtiny25/45/85 Memories
- •5.2 SRAM Data Memory
- •5.2.1 Data Memory Access Times
- •5.3 EEPROM Data Memory
- •5.3.1 EEPROM Read/Write Access
- •5.3.5 Atomic Byte Programming
- •5.3.6 Split Byte Programming
- •5.3.7 Erase
- •5.3.8 Write
- •5.3.9 Preventing EEPROM Corruption
- •5.4 I/O Memory
- •6. System Clock and Clock Options
- •6.1 Clock Systems and their Distribution
- •6.2 Clock Sources
- •6.3 Default Clock Source
- •6.4 Crystal Oscillator
- •6.6 Calibrated Internal RC Oscillator
- •6.7 External Clock
- •6.8 128 kHz Internal Oscillator
- •6.9 Clock Output Buffer
- •6.10 System Clock Prescaler
- •6.10.2 Switching Time
- •7. Power Management and Sleep Modes
- •7.1 Idle Mode
- •7.2 ADC Noise Reduction Mode
- •7.4 Power Reduction Register
- •7.5 Minimizing Power Consumption
- •7.5.1 Analog to Digital Converter
- •7.5.2 Analog Comparator
- •7.5.4 Internal Voltage Reference
- •7.5.5 Watchdog Timer
- •7.5.6 Port Pins
- •8. System Control and Reset
- •8.0.1 Resetting the AVR
- •8.0.2 Reset Sources
- •8.0.3 Power-on Reset
- •8.0.4 External Reset
- •8.0.6 Watchdog Reset
- •8.1 Internal Voltage Reference
- •8.2 Watchdog Timer
- •8.3 Timed Sequences for Changing the Configuration of the Watchdog Timer
- •8.3.1 Safety Level 1
- •8.3.2 Safety Level 2
- •9. Interrupts
- •9.1 Interrupt Vectors in ATtiny25/45/85
- •10. External Interrupts
- •11. I/O Ports
- •11.1 Introduction
- •11.2 Ports as General Digital I/O
- •11.2.1 Configuring the Pin
- •11.2.2 Toggling the Pin
- •11.2.3 Switching Between Input and Output
- •11.2.4 Reading the Pin Value
- •11.2.5 Digital Input Enable and Sleep Modes
- •11.2.6 Unconnected Pins
- •11.3 Alternate Port Functions
- •11.3.2 Alternate Functions of Port B
- •12. 8-bit Timer/Counter0 with PWM
- •12.1 Overview
- •12.1.1 Registers
- •12.1.2 Definitions
- •12.2 Timer/Counter Clock Sources
- •12.3 Counter Unit
- •12.4 Output Compare Unit
- •12.4.1 Force Output Compare
- •12.4.2 Compare Match Blocking by TCNT0 Write
- •12.4.3 Using the Output Compare Unit
- •12.5 Compare Match Output Unit
- •12.5.1 Compare Output Mode and Waveform Generation
- •12.6 Modes of Operation
- •12.6.1 Normal Mode
- •12.6.2 Clear Timer on Compare Match (CTC) Mode
- •12.6.3 Fast PWM Mode
- •12.6.4 Phase Correct PWM Mode
- •12.7 Timer/Counter Timing Diagrams
- •13. Timer/Counter Prescaler
- •13.0.1 Prescaler Reset
- •13.0.2 External Clock Source
- •14. 8-bit Timer/Counter1
- •14.1 Timer/Counter1
- •14.1.1 Timer/Counter1 Control Register - TCCR1
- •14.1.2 General Timer/Counter1 Control Register - GTCCR
- •14.1.3 Timer/Counter1 - TCNT1
- •14.1.4 Timer/Counter1 Output Compare RegisterA - OCR1A
- •14.1.5 Timer/Counter1 Output Compare RegisterB - OCR1B
- •14.1.6 Timer/Counter1 Output Compare RegisterC - OCR1C
- •14.1.7 Timer/Counter Interrupt Mask Register - TIMSK
- •14.1.8 Timer/Counter Interrupt Flag Register - TIFR
- •14.1.9 PLL Control and Status Register - PLLCSR
- •14.1.10 Timer/Counter1 Initialization for Asynchronous Mode
- •14.1.11 Timer/Counter1 in PWM Mode
- •15. 8-bit Timer/Counter1 in ATtiny15 Mode
- •15.1 Timer/Counter1 Prescaler
- •15.2 Timer/Counter1
- •15.2.1 Timer/Counter1 Control Register - TCCR1
- •15.2.2 General Timer/Counter1 Control Register - GTCCR
- •15.2.3 Timer/Counter1 - TCNT1
- •15.2.4 Timer/Counter1 Output Compare RegisterA - OCR1A
- •15.2.5 Timer/Counter1 Output Compare Register C - OCR1C
- •15.2.6 Timer/Counter1 Interrupt Mask Register - TIMSK
- •15.2.7 Timer/Counter Interrupt Flag Register - TIFR
- •15.2.8 PLL Control and Status Register - PLLCSR
- •15.2.9 Timer/Counter1 in PWM Mode
- •16. Dead Time Generator
- •16.0.1 Timer/Counter1 Dead Time Prescaler register 1 - DTPS1
- •16.0.2 Timer/Counter1 Dead Time A - DT1A
- •16.0.3 Timer/Counter1 Dead Time B - DT1B
- •17.1 Overview
- •17.2 Functional Descriptions
- •17.2.2 SPI Master Operation Example
- •17.2.3 SPI Slave Operation Example
- •17.2.5 Start Condition Detector
- •17.3 Alternative USI Usage
- •17.3.4 Edge Triggered External Interrupt
- •17.3.5 Software Interrupt
- •17.4 USI Register Descriptions
- •18. Analog Comparator
- •18.1 Analog Comparator Multiplexed Input
- •19. Analog to Digital Converter
- •19.1 Features
- •19.2 Operation
- •19.3 Starting a Conversion
- •19.4 Prescaling and Conversion Timing
- •19.5 Changing Channel or Reference Selection
- •19.5.1 ADC Input Channels
- •19.5.2 ADC Voltage Reference
- •19.6 ADC Noise Canceler
- •19.6.1 Analog Input Circuitry
- •19.6.2 Analog Noise Canceling Techniques
- •19.6.3 ADC Accuracy Definitions
- •19.7 ADC Conversion Result
- •19.7.1 Single Ended Conversion
- •19.7.2 Unipolar Differential Conversion
- •19.7.3 Bipolar Differential Conversion
- •19.7.4 Temperature Measurement (Preliminary description)
- •19.7.7.1 ADLAR = 0
- •19.7.7.2 ADLAR = 1
- •20. debugWIRE On-chip Debug System
- •20.1 Features
- •20.2 Overview
- •20.3 Physical Interface
- •20.4 Software Break Points
- •20.5 Limitations of debugWIRE
- •20.6 debugWIRE Related Register in I/O Memory
- •21. Self-Programming the Flash
- •21.0.1 Performing Page Erase by SPM
- •21.0.2 Filling the Temporary Buffer (Page Loading)
- •21.0.3 Performing a Page Write
- •21.1.2 EEPROM Write Prevents Writing to SPMCSR
- •21.1.3 Reading the Fuse and Lock Bits from Software
- •21.1.4 Preventing Flash Corruption
- •21.1.5 Programming Time for Flash when Using SPM
- •22. Memory Programming
- •22.1 Program And Data Memory Lock Bits
- •22.2 Fuse Bytes
- •22.2.1 Latching of Fuses
- •22.3 Signature Bytes
- •22.3.1 ATtiny25 Signature Bytes
- •22.3.2 ATtiny45 Signature Bytes
- •22.3.3 ATtiny85 Signature Bytes
- •22.4 Calibration Byte
- •22.5 Page Size
- •22.6 Serial Downloading
- •22.6.1 Serial Programming Algorithm
- •22.6.2 Serial Programming Characteristics
- •22.7 High-voltage Serial Programming
- •22.8.2 Considerations for Efficient Programming
- •22.8.3 Chip Erase
- •22.8.4 Programming the Flash
- •22.8.5 Programming the EEPROM
- •22.8.6 Reading the Flash
- •22.8.7 Reading the EEPROM
- •22.8.8 Programming and Reading the Fuse and Lock Bits
- •22.8.9 Reading the Signature Bytes and Calibration Byte
- •23. Electrical Characteristics
- •23.1 Absolute Maximum Ratings*
- •23.2 External Clock Drive Waveforms
- •23.3 External Clock Drive
- •25. Register Summary
- •26. Instruction Set Summary
- •27. Ordering Information
- •27.1 ATtiny25
- •27.2 ATtiny45
- •27.3 ATtiny85
- •28. Packaging Information
- •29. Errata
- •29.1 ATtiny25/45/85 Rev. A
- •30. Datasheet Revision History
- •Table of Contents
4. AVR CPU Core
4.1Introduction
This section discusses the AVR core architecture in general. The main function of the CPU core is to ensure correct program execution. The CPU must therefore be able to access memories, perform calculations, control peripherals, and handle interrupts.
4.2Architectural Overview
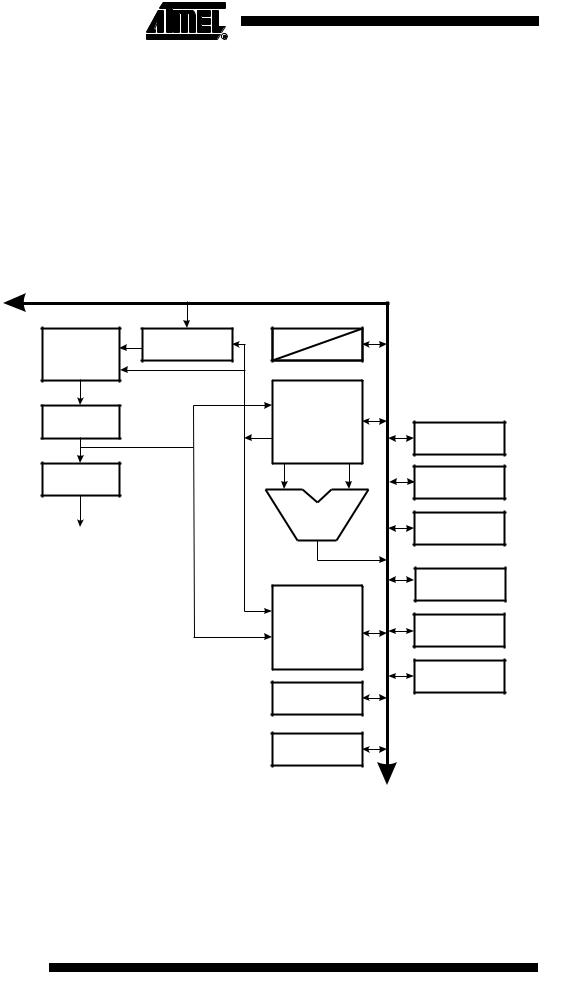
Figure 4-1. Block Diagram of the AVR Architecture
|
|
|
Data Bus 8-bit |
|
Flash |
Program |
|
Status |
|
Counter |
|
and Control |
|
|
Program |
|
|
||
|
|
|
|
|
Memory |
|
|
|
|
|
|
|
32 x 8 |
|
Instruction |
|
|
General |
|
Register |
|
|
Purpose |
Interrupt |
|
|
|
Registrers |
|
|
|
|
Unit |
|
|
|
|
|
|
Instruction |
|
|
|
Watchdog |
Decoder |
AddressingDirect |
AddressingIndirect |
|
Timer |
|
ALU |
Analog |
||
|
|
|
||
|
|
|
|
|
Control Lines |
|
|
|
Comparator |
|
|
|
|
I/O Module1 |
|
|
|
Data |
I/O Module 2 |
|
|
|
SRAM |
|
|
|
|
|
|
|
|
|
|
I/O Module n |
|
|
|
EEPROM |
|
|
|
|
I/O Lines |
|
In order to maximize performance and parallelism, the AVR uses a Harvard architecture – with separate memories and buses for program and data. Instructions in the Program memory are executed with a single level pipelining. While one instruction is being executed, the next instruction is pre-fetched from the Program memory. This concept enables instructions to be executed in every clock cycle. The Program memory is In-System Reprogrammable Flash memory.
6 ATtiny25/45/85
2586A–AVR–02/05
ATtiny25/45/85
The fast-access Register File contains 32 x 8-bit general purpose working registers with a single clock cycle access time. This allows single-cycle Arithmetic Logic Unit (ALU) operation. In a typical ALU operation, two operands are output from the Register File, the operation is executed, and the result is stored back in the Register File – in one clock cycle.
Six of the 32 registers can be used as three 16-bit indirect address register pointers for Data Space addressing – enabling efficient address calculations. One of the these address pointers can also be used as an address pointer for look up tables in Flash Program memory. These added function registers are the 16-bit X-, Y-, and Z-register, described later in this section.
The ALU supports arithmetic and logic operations between registers or between a constant and a register. Single register operations can also be executed in the ALU. After an arithmetic operation, the Status Register is updated to reflect information about the result of the operation.
Program flow is provided by conditional and unconditional jump and call instructions, able to directly address the whole address space. Most AVR instructions have a single 16-bit word format. Every Program memory address contains a 16or 32-bit instruction.
During interrupts and subroutine calls, the return address Program Counter (PC) is stored on the Stack. The Stack is effectively allocated in the general data SRAM, and consequently the Stack size is only limited by the total SRAM size and the usage of the SRAM. All user programs must initialize the SP in the Reset routine (before subroutines or interrupts are executed). The Stack Pointer (SP) is read/write accessible in the I/O space. The data SRAM can easily be accessed through the five different addressing modes supported in the AVR architecture.
The memory spaces in the AVR architecture are all linear and regular memory maps.
A flexible interrupt module has its control registers in the I/O space with an additional Global Interrupt Enable bit in the Status Register. All interrupts have a separate Interrupt Vector in the Interrupt Vector table. The interrupts have priority in accordance with their Interrupt Vector position. The lower the Interrupt Vector address, the higher the priority.
The I/O memory space contains 64 addresses for CPU peripheral functions as Control Registers, SPI, and other I/O functions. The I/O memory can be accessed directly, or as the Data Space locations following those of the Register File, 0x20 - 0x5F.
4.3ALU – Arithmetic Logic Unit
The high-performance AVR ALU operates in direct connection with all the 32 general purpose working registers. Within a single clock cycle, arithmetic operations between general purpose registers or between a register and an immediate are executed. The ALU operations are divided into three main categories – arithmetic, logical, and bit-functions. Some implementations of the architecture also provide a powerful multiplier supporting both signed/unsigned multiplication and fractional format. See the “Instruction Set” section for a detailed description.
4.4Status Register
The Status Register contains information about the result of the most recently executed arithmetic instruction. This information can be used for altering program flow in order to perform conditional operations. Note that the Status Register is updated after all ALU operations, as specified in the Instruction Set Reference. This will in many cases remove the need for using the dedicated compare instructions, resulting in faster and more compact code.
The Status Register is not automatically stored when entering an interrupt routine and restored when returning from an interrupt. This must be handled by software.
7
2586A–AVR–02/05