


90 Part I — Customizing Your System
ourselves. Back in April of 2003, Microsoft released a series of creativity fun packs that included all sorts of neat things, such as different types of themed templates as well as a few new PowerToys. One of those PowerToys was called the Wallpaper Changer. This PowerToy is an application that will automatically rotate your wallpaper over a given period of time that you set. Additionally, you can specify a folder of images to use so that you can control which images are rotated.
I like to use the Wallpaper Changer to change my wallpaper weekly, although it is possible to set it up to change your wallpaper every 15 minutes. If the Wallpaper Changer is something that interests you, visit www.microsoft.com/windowsxp/experiences/downloads/ create_powertoy.asp to download a copy yourself. Then, follow these steps to configure it.
1.Once you have installed the Wallpaper Changer PowerToy, you can start it up by clicking the Start Menu, navigating to All Programs, expanding PowerToys for Windows XP, and then selecting Wallpaper Changer.
2.When the Wallpaper Changer has loaded, select the folder that you want to use as your source of the images using the browsing box.
3.Then, just set the interval between wallpaper changes by sliding the marker across the line, as shown in Figure 3-11.
4.Once you have the interval set, just click OK and your settings will be saved.
The Wallpaper Changer will allow you to customize your desktop like never before. Now you will always have a nice-looking desktop that is always new.
Summary
Through this chapter, you have learned how to customize the icons on your desktop in many different ways as well as make the desktop a little better. The icons on your desktop are by far the most important part, but the desktop itself can be customized. I have shown you three different ways to customize your desktop and make it function even better.
The next chapter will be one of the most important chapters on customizing. I will be showing you how to change the visual style of Windows XP to make it look completely different. There are many high-quality visual styles to be found on the Web, produced by many talented artists. I am going to show you how to take advantage of those visual styles and put them to use on your computer. But that’s not all. I’m also going to show you how to make your very own visual styles. The next chapter will be a must for anyone that wants to customize the most visible part of Windows XP.
Customizing the
Appearance of the
Windows Interface
In the last few chapters, you customized little parts of the operating system starting with the boot screen. Then you moved onto customizing the logon screen, which led to customizing the Start panel/menu.
After the Start panel/menu was customized, you found out how to customize the taskbar and the desktop. This next chapter will show you how to customize the entire user interface by changing the theme or visual style.
The material in the paragraphs that follow show you how to make major alterations in the way your computer looks—more so than all of the material that has been presented thus far. First to be examined is the difference between a theme and a visual style, to clear up any possible confusion that you might have. Next comes a discussion of the use of themes and how you can make your own. Then, you will learn how to use visual styles, as well as how to make your own. You will find out about some alternatives to using themes and visual styles so that you know about all of your customizing options.
Working with Themes
Themes have been a part of Windows for a very long time. Ever since Windows 95 was released, themes made it possible to save the configuration of the fonts, colors, visual style, wallpaper, mouse cursors, and even the sounds that are used. Throughout the years, not a lot has changed in the theme world. Originally, you had to have Microsoft Plus to use themes, but now, the ability to use themes is included in all of the latest Microsoft operating systems. Additionally, when themes were first developed, they did not keep track of visual styles, just because they didn’t exist. Now, the theme format has expanded to allow for the new Windows feature.
chapter
in this chapter
Working with Themes
Making Your Own Themes
Changing the Visual Style
Making Your Own Visual Styles
Visual Style Alternatives

92 Part I — Customizing Your System
Why are themes still important to talk about even though they have been around so long? Because they provide a unique way to save all of your computer’s visual settings as well as audio settings so that you can easily change all of them at once. You don’t have to customize each of the different elements of the windows such as the font and colors every time you use them. Themes make your life easier. These next few sections are going to show you how you can use themes and make your own so that you too can benefit from the convenience they offer.
Changing the current theme
When you install Windows XP, Microsoft includes two themes: Windows XP and the Windows Classic theme. By changing the themes, you can turn on and off the new Windows XP look. Also, remember that you can make your own themes, which I will get to in the next section, so that you can easily switch between your own theme sets. When you do so, after you spend time customizing the look of XP, making changes to window metrics, sounds, visual style, cursors, wallpaper and so on, they can be saved to a theme file so that you will never lose your changes.
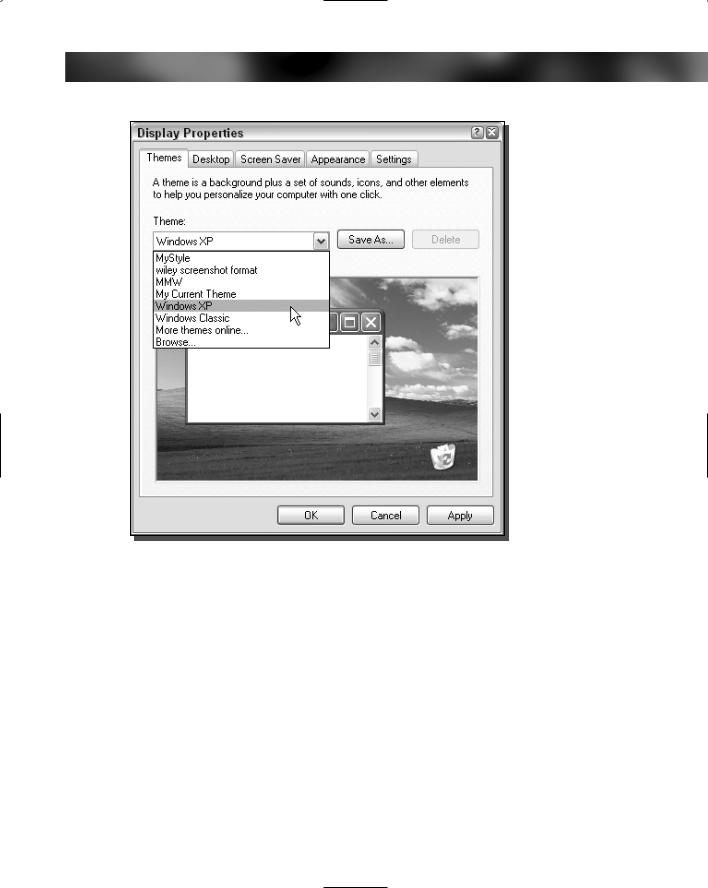
Changing the themes is actually pretty simple. It is all done through the Display Properties Control Panel applet. To change themes, follow these steps:
1.Right-click the desktop and select Properties.
2.Display Properties will then load and will be displaying the Themes tab.
3.Next, just expand the drop-down box under Theme, as shown in Figure 4-1, and select the theme that you want to use.
4.When you have selected the theme, click OK to save your changes.
Once you have hit the OK button, the new theme will be applied. This process may take a few seconds while the changes are being made.
Now that you know how to change a theme, it is time to make your own.
Making your own themes
Making your own theme will allow you to easily back up your visual changes to XP so that you can distribute your settings to other computers or on the Internet. Making your own theme is actually just like changing the theme. The most difficult part of the process is customizing all of the little aspects of the visual elements that make up the user interface. The next few sections will walk you through the process of fine-tuning the user interface and will then show you how to save your changes and make your own theme file.
Modifying the window metrics and fonts
What the heck are window metrics? Well, it is the fancy way of talking about how big everything is. There is actually a whole lot that you can adjust that will affect the size of user interface elements such as the title bar of a window and other window elements such as buttons. Almost everything on a window has a size that can be adjusted. This section will show you how to alter your visual style or classic Windows interface look by fine-tuning the different components of the window.
Chapter 4 — Customizing the Appearance of the Windows Interface |
93 |
FIGURE 4-1: Changing the active theme.
Another possibility is to fine-tune the fonts that are used. You can change the size of the font displayed, the style, and even the actual font that is used.
To get started, you will be using Display Properties again to make the changes:
1.Right-click the desktop and select Properties.
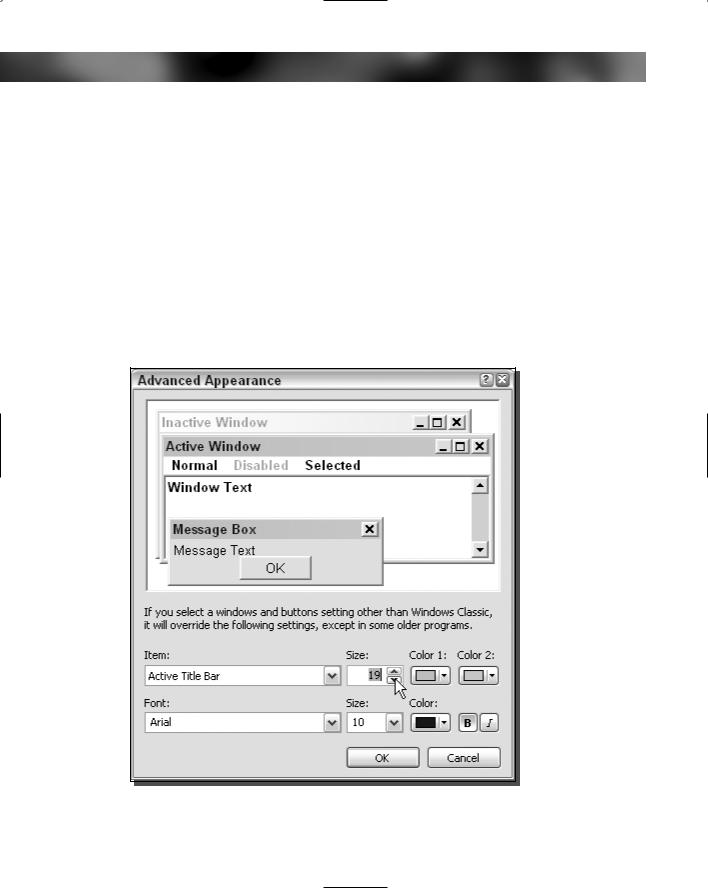
2.Click the Appearance tab and hit the Advanced button located on the bottom-right of the window.
3.The Advanced Appearance window will show up. This location is where you can change the size as well as the font for all of the different aspects of a window. You can make changes in two different ways. The first way is to use the Item drop-down box. Just expand it and select the item that you want to modify. The other way is to click the object that you want to customize on the Preview picture. This will automatically select the item from the Item drop-down box for you. Either way, select an item that you want to change. For purposes of demonstration, I suggest that you click or select Active Title Bar.
94 Part I — Customizing Your System
4.Once you have selected an object that you want to change, use the Size, Font, and Color settings to customize your window, as shown in Figure 4-2. The Active Title Bar is a good item to experiment with the size. Try playing around with this one and see how you can change the way a visual style looks by adjusting this value.
5.When you are finished changing the sizes of the window items, try changing the fonts and colors as well. If you are using the new Windows XP look, then adjusting the colors on this screen will not matter, because visual styles ignore these color settings and use their own that are built into the visual style file. However, if you are using the classic Windows XP look, then these color settings are critical to customizing the look of Windows XP because this is where the classic look gets its color information. Once you are done, click OK to save your changes.
6.You will have to click OK once more to activate your changes and close the Display Properties window.
FIGURE 4-2: Customizing the sizes and fonts of the user interface.

Chapter 4 — Customizing the Appearance of the Windows Interface |
95 |
You can do a lot of interesting things to make your computer look unique. One thing I always like to do is decrease the size of the Active Title Bar so that it is as small as it will allow me to make it. Doing so makes the Maximize, Minimize, and Close buttons smaller too. It is a nice look that makes your windows look like they have lost some weight. Of course, you could increase the size as well and make the buttons so big you could operate your computer 10 feet away from your monitor.
Modifying the system sounds
The sound file Windows plays when you log in, log out, minimize and maximize a window are saved inside a theme file. Because I am taking you through all of the different things that a theme file will save the settings for, I will go over how to change the settings for the sounds that Windows XP uses so that you can customize this aspect of your computer as well.
Changing the event sounds is very simple. Just follow these steps to launch and configure the Sound Properties:
1.Click the Start Menu and select Run.
2.Type mmsys.cpl in the box and click OK to launch the system Sounds and Audio Devices Properties.
3.Once the Sounds and Audio Devices Properties loads, click the Sounds tab.
4.Next, to adjust the sound clip for a specific event, click the event that you want to modify, as shown in Figure 4-3, by navigating though the Program Events box.
5.Once you have an event selected, the Sounds drop-down list will become enabled and you will be able to select the sound clip that you want to use. You can select (None) from the top of the list if you do not want to use a sound for a specific program event. If you cannot find a sound that you like on the list, you can use the Browse button to pick a specific sound file on your computer to use.
6.When you are finished with your changes, just click OK to save your work.
You are now finished with customizing the sound events on your computer. The next step is to customize the cursors of the mouse so that they too will be included in your theme file.
Customizing the mouse cursors
The mouse cursors are yet another item that is saved in the Theme file. Many different pointer schemes are included with Windows XP. Although not all of them may be the nicest-looking cursors, they can really help out in some situations. Additionally, Windows XP includes special large mouse cursors so that the cursors will be easier on the eyes of some people.
To get your cursors set perfectly for your Theme file, do the following:
1.Click the Start button and select Run.
2.Type main.cpl and click OK to open up Mouse Properties.

96 Part I — Customizing Your System
FIGURE 4-3: Modifying the sound for the Start Windows event.
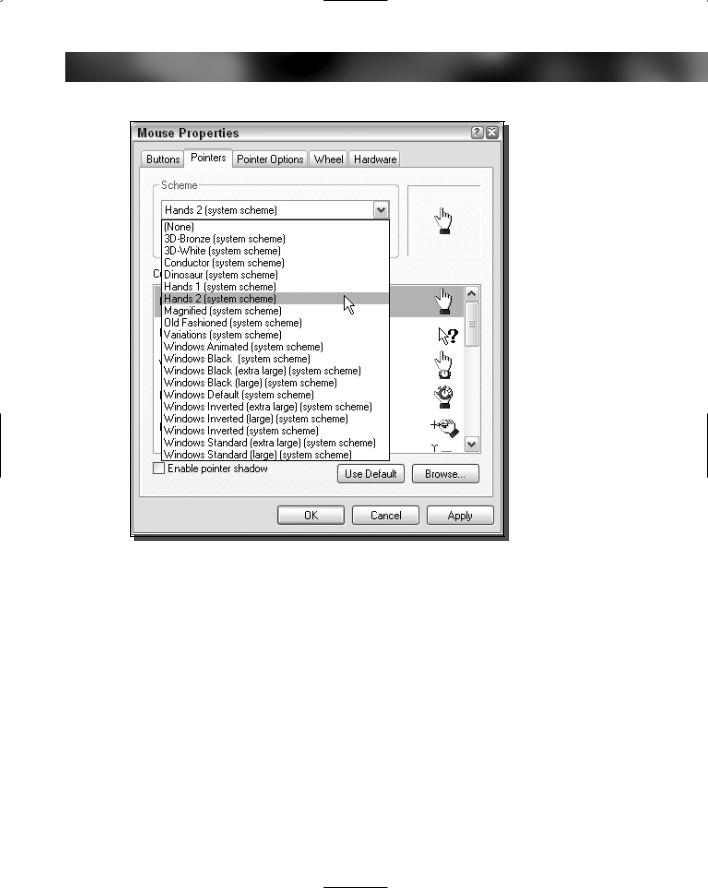
3.Next, click the Pointers tab.
4.Once you are there, you have two options to customize the cursors: You can use the drop-down Scheme box to change all of the pointers at once to different styles, by selecting a different cursor scheme from the list shown in Figure 4-4. When you select the different schemes, all of the cursors will change automatically. Alternatively, if you do not like the cursor schemes, you can individually select a cursor from the customize box list by scrolling through the list and selecting the cursor you want to change. Then, hit the Browse button to change it.
5.When you are finished customizing your cursors, just hit the OK button and you are finished.
Now you are ready to move on to customizing the visual style that the theme will be using.
Chapter 4 — Customizing the Appearance of the Windows Interface |
97 |
FIGURE 4-4: Changing the pointer scheme.
Choosing the visual style the theme will use
Windows XP introduces the new way of skinning the Windows interface (applying a new skin/look to the interface) with files called visual styles. The visual style files are like one file with all of the different images in it that make up the way the interface looks. Windows XP only includes one visual style, which is called the Windows XP style. The second half of this chapter, which is all about visual styles, will show you how you can get more visual styles.
Each visual style usually contains different color schemes. The Windows XP style that comes with Windows XP has three: Blue, Olive Green, and Silver. The color schemes of the Windows XP style do not change the shape of the windows, just the color, since this is what a color scheme is designed to do. Unlike the classic windows interface, changing the colors of the window elements is not as simple as selecting a new color. Instead, a visual style has to have a whole new set of graphics created and then imported into the file. Because of that, each of the different color scheme options of a visual style are actually completely separate visual styles. Because each of the color scheme options of a visual style require a whole new set of graphics,
98 Part I — Customizing Your System
authors of visual styles on the Web often use the color scheme settings to store slightly different versions of their visual style. Not only do the different versions often have new colors, but they also have minor physical tweaks and differences.
Now that you know the basics of the visual style, it’s time to tweak the visual style settings so that when you make your Theme file in the next sections, it will be included with your sound and mouse settings:
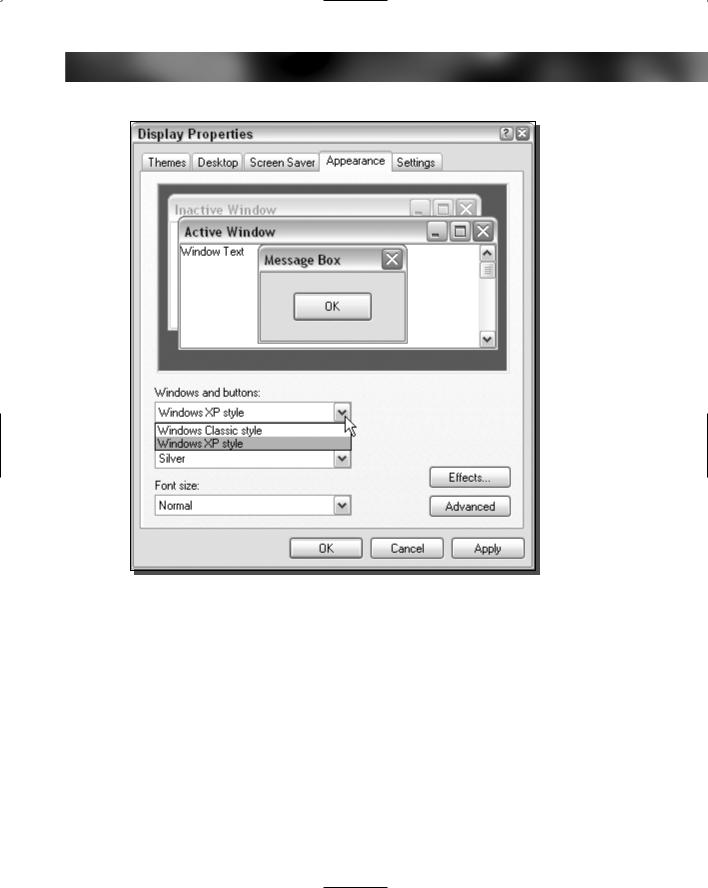
1.Right-click the desktop and select Properties to bring up the Display Properties window.
2.When this is displayed, click the Appearance tab.
3.In the bottom half of the window, you should see the Windows and Buttons drop-down list. This will include all of the visual styles properly installed on your computer. By default, with a new Windows XP install, you will have two choices: Windows XP Style and Windows Classic Style, as shown in Figure 4-5.
4.Once you have your visual style picked out, play around with the color schemes and see which one you like best. Remember, if you have already installed some visual styles that you downloaded from the Web, changing the color scheme may reveal different variations of a visual style that can look completely different from one another.
5.The font size settings are also fun to play with, but most users have little use for them because the author of a visual style usually picked what looks best with the style of the skin. However, if you do not like the author’s choices, this is where you can customize the look to suit your taste. When you are finished customizing your visual style settings, click OK to save your changes.
Changing the wallpaper
You all know how to change wallpaper on your desktop, but I am going to show you a great little trick that you can do to change your wallpaper even faster and also one that will allow you to easily change it on multiple computers without having to go to Display Properties all the time.
The trick? Just create a registry file that you can import into the registry that will overwrite your current wallpaper information. Doing so is actually very easy; just follow these steps to create your very own file:
1.Open up Notepad (located in Start Menu in the Accessories folder).
2.Type in the following code:
Windows Registry Editor Version 5.00
[HKEY_CURRENT_USER\Control Panel\Desktop] “Wallpaper” “C:\\windows\\MyWallpaper.bmp” “WallpaperStyle” “1”
3.You will want to replace the C:\\windows\\... with the path and filename to the bitmap that you want to use. Note that in the path, wherever there is a \, you have to put two of them in the registry file you are creating because the registry editor requires all paths to be in that format. You can change the wallpaperstyle property that will allow
Chapter 4 — Customizing the Appearance of the Windows Interface |
99 |
FIGURE 4-5: Adjusting the window style.
you to control how the bitmap image is displayed on your computer. Setting the value equal to 0 will center the image on the screen. Setting the value to 1 will display the image as if it was tiled or repeated across the entire screen. Setting the wallpaperstyle value to 2 will stretch the image to fit the entire screen.
4.When you have the text in Notepad looking like the code in Step 2 but with your changes included, you are ready to save the file. Go to the File menu bar item and select Save As, then select Save As Type. In the File Name box, type wallpaper.reg. Keep in mind: You need to have the .reg at the end of the filename so your computer knows to import the file into your registry using the Registry Editor.
5.Once you save the file, just go to the location where you saved it, and double-click the file. A screen will come up asking you if you want to import the file into the registry;