


54 Part I — Customizing Your System
 A registry import file can be found to automate the preceding process in the Chapter 2 folder of the companion CD-ROM, called website_link.reg. Just right-click the registry file and select import to automatically merge the file with your registry. If you do not like the effect, I have created an easy undo file that will remove the link in your Start panel, called remove_website_link.reg.
Also, as I mentioned before, if you own a Web site, creating a Start panel button would be a cool feature to give your visitors. You can create a registry file of your registry that you can distribute to other users. Then, all they have to do is double-click the file and click Yes on the import screen. To make a registry file, just select the {2559a1f6-21d7-11d4-bdaf-00c04f60b9f0} folder and right-click it. Then select Export from the menu and save the file. The file should only be a few bytes, so it will be easy to distribute the file on the Web. Keep in mind that this registry file will only work on Windows XP machines, so be sure to relay that information to visitors of your Web site if you choose to offer your registry file up for download.
Customizing the Classic Start Menu
The classic Start Menu, also known as the Windows 2000/98 style, has its advantages and also its share of downfalls. It provides a clean and small interface to your programs but does not offer nearly as much access to your computer as the new Start panel does. Some users like the old Start Menu and dislike the big bulky Start panel. If you are one of those users, these next few sections are for you.
Turning the classic Start Menu back on
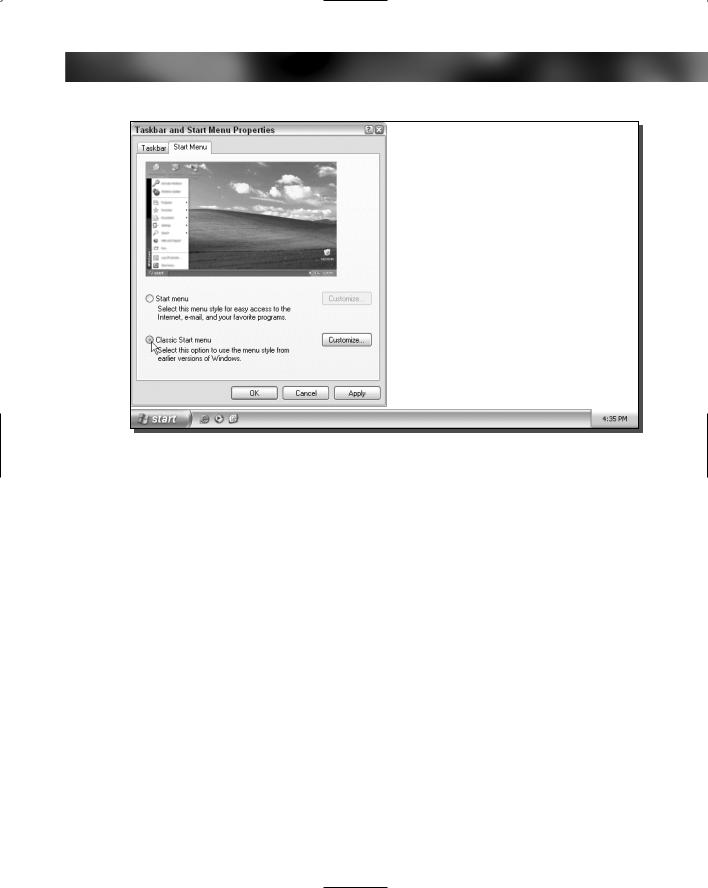
Don’t like the new Start Menu? The new Start panel can be overwhelming for some users and is just not as clean looking as the old Start Menu. Getting the old Start Menu back is actually very simple. There must have been mixed emotions within the Windows XP team about the new Start Menu because they still included the classic Start Menu and made it so easy to change. To get started, just follow these steps:
1.Right-click the Start button and select Properties.
2.Then select Classic Start Menu as shown in Figure 2-8 and click OK.
Now that you have the classic Start Menu back, you can begin customizing the way it looks and what it includes.
Customizing the classic Start Menu
Just as it is possible to customize the new Start panel, it is possible to make changes to the classic Start Menu to make it look the way you want. Not as many things can be done to customize the classic Start Menu as can be done to customize the Start panel, but still a handful of features can be customized.
To get started, assume that you want to display your expanding Internet Explorer Favorites menu directly on your Start Menu. I will walk you through how to turn this feature on or off and will then provide you with more information on all of the different features that are available on the same screen. Follow these steps to start customizing:
Chapter 2 — Customizing User Navigation |
55 |
FIGURE 2-8: Turning on the classic Start Menu.
1.Use your mouse to right-click the Start Menu and select Properties. This will bring up the Taskbar and Start Menu Properties screen.
2.Click the lower Customize button to bring up the Customize Classic Start Menu properties.
3.Now you will see a list of all of the different features available in the Advanced Start Menu options box. You can scroll through this box to view all of the different features. Locate the Display Favorites option and check it to enable it.
4.Click the OK button to save your changes.
5.Click the OK button once more to exit the Properties window.
That’s it. As you can see, customizing the Start Menu is very easy. If you want to disable a feature, just uncheck it.
Table 2-3 gives a list of all of the different features and a description of what they can do.
Customizing the Start Menu/Panel Program Listings
Now that you have selected what you want your Start Menu to display as well as customized it to suit your needs, you are ready to move on to customizing the way the programs are listed. There are a variety of features that will impact the way the programs are listed on the screen.

56 Part I — Customizing Your System
Table 2-3 Customizable Features of the Start Menu |
|
Feature Name |
Description |
Display Administrative Tools |
The administrative tools provide users with even more control |
|
over their system. I suggest that you enable this feature by |
|
checking the box so that you will be able to take advantage of |
|
the easy access to your system controls |
Display Favorites |
The favorites can be useful depending on how often you use |
|
them in Internet Explorer. If you are like me, and do not use |
|
your favorites very often, then consider leaving this one off. If |
|
you would like to add your favorites to your Start Menu, then |
|
this will place an expanding menu that will display all of your |
|
links |
Display Run |
This feature will display the Run command on the Start Menu. I |
|
do not recommend that you remove this from the Start Menu |
|
because it is used throughout this book in almost every chapter |
|
to start up hidden programs |
Expand Control Panel |
I like this feature the most out of all of the features that you can |
|
customize. Enabling this feature will make the Control Panel |
|
automatically expand and show you each of the Control Panel |
|
applets. This way, you can get almost anywhere in your computer |
|
controls easily without even having to load the Control Panel first. |
|
You can jump directly to where you want to go instead |
Expand My Documents |
I personally do not use this feature because I have way too many |
|
documents in the My Documents folder. Trying to find the correct |
|
document is a waste of time when you have to scroll through the |
|
list. It is must faster to leave this one alone and then just browse |
|
through the icons when you open up your documents |
Expand My Pictures |
As I mentioned before when I covered this option as a feature |
|
on the Start panel, this feature is pretty much useless when you |
|
have more than a few photos. Because most pictures that you |
|
take are saved in a numbered fashion, it is very hard to find a |
|
particular photo. Instead, don’t enable this one so that it |
|
remains just a link. That way, you will be able to take advantage |
|
of the new filmstrip view when browsing your photos |
Expand Network Connections |
I recommend that you enable this feature because it will allow |
|
you to easily access and connect to your various communications |
|
devices. If you use a dialup connection, your dialup connection |
|
will be displayed and you can connect by right-clicking the name |
|
and selecting Connect. If you have a network adapter, you can |
|
access your network properties and status easily from this menu |
|
as well |

Chapter 2 — Customizing User Navigation |
57 |
Feature Name |
Description |
Expand Printers |
Have a lot of printers installed on your computer? Or, do you |
|
use a lot of network printers? This is an easy way to access all |
|
of the different printers that you use. You can view the print |
|
queue as well as delete jobs for a specific printer |
Show Small Icons in Start Menu |
This is my favorite feature on the list. This basically shrinks your |
|
whole Start Menu by removing the Windows XP banner from |
|
the left and replacing the large icons with small icons. This |
|
allows the Start Menu to take up far less space than before. |
|
Take a look at Figure 2-9 for a comparison between when this |
|
feature is on and off |
FIGURE 2-9: Comparison between the normal and small Start Menu, with the Show Small Icons setting enabled.
These next few sections will help you get rid of some of the new annoying features, such as the personalized menus and the scrolling program listings.
There are basically two slightly different program listing methods. When you are using the new Start panel, the programs listing is slightly different in the way it looks and acts when compared to the classic Start Menu listing. Follow the corresponding sections below for the menu option that you are running.
58 Part I — Customizing Your System
Changing program listing display options for users of the Start panel
As I mentioned earlier, the Start panel All Programs listing works a little differently than its classic counterpart. The new program listing has some features that the classic version does not and that is why it is necessary to have two different sections. In the following sections, you will find two very common topics that users are interested in changing.
Disabling new program highlights
One of the features I thought was a great idea when I first started to use Windows XP was the program highlight feature. This feature will automatically highlight any new programs that you install so that you can easily find them on the Start Menu the first few times that you want to run the application. After I started to use XP for a few months, I noticed that this feature did not always work correctly. Some programs that I install never get highlighted, although others seem to be highlighted for weeks after I have installed them.
After a while, I decided that I had enough of this highlighting, so I decided to turn the feature off. Thankfully, Microsoft has made turning off this feature fairly simple. Just follow these steps to get rid of those annoying highlights:
1.Right-click the Start button and select Properties.
2.Click the top Customize button for the Start panel.
3.Click the Advanced tab.
4.Uncheck Highlight Newly Installed Programs, as shown in Figure 2-10.
5.Click OK to save your changes.
6.Click OK once more to close the Properties window.
Now you will not have to worry about the programs that sometimes seem to be highlighted randomly.
Fun with the Scroll Programs feature
Some people love the program scroll feature, and others hate it. Personally, I don’t like this feature that much. I like to see all of my programs installed on my screen at once instead of having to move the mouse to the bottom of the list and clicking the down arrow or waiting for the list to move up automatically when the feature is enabled.
If you do not like having your menus take up a lot of space on your screen, enabling the scroll programs feature will cut your programs list down in size dramatically if you have a lot of programs installed.
Some computer manufacturers ship their machines with this feature automatically enabled; other don’t have it enabled. So if this feature sounds interesting to you, feel free to try it out by following these steps. If you hate this feature, then follow these steps to remove it:

Chapter 2 — Customizing User Navigation |
59 |
FIGURE 2-10: Customize Start Menu window showing how to turn off program highlights.
1.Right-click the Start button and select Properties.
2.Click the top Customize button for the Start panel settings.
3.Next, click the Advanced tab.
4.Locate the Start Menu items scroll box in the middle of the window and scroll down all the way to the bottom until you locate the Scroll Programs entry.
5.Check the box to enable; uncheck to disable.
6.Click OK to save your changes.
7.Click OK once more to exit the Start Menu settings.
Now you will have full control over your scrolling program list.
Changing program listing display options for users of the classic Start Menu
The classic Start Menu has some of the features that were in older versions of the Windows operating system, such as the personalized menus feature. This feature can be more of an annoyance than a convenience, so I have dedicated a whole section to it. Also, you will learn

60 Part I — Customizing Your System
how to manage the scroll programs feature for the classic menu users because it is slightly different than for users of the Start panel. Before you get started, make sure that you have the classic Start Menu enabled in order to use the following hacks.
Disabling personalized menus
Personalized menus is a feature in Windows that has been around for a little while. It uses your program run history to hide all of the other programs in your Start Menu program listing that you don’t use or don’t use often. After a user has used his computer for a short while, Windows will hide all of the programs that the user does not run so that he can find his most frequently run programs more easily.
Personalized menus sound like a great feature, but really think about it. Why would you have programs in your Start Menu that you don’t use? If there is a program that is installed and never used on my computer, I uninstall it. You don’t need to be wasting your storage space with useless programs.
Additionally, I have had experience with some beginning computer users complaining that Windows deleted all of their programs because they are no longer showing up in the Start Menu programs listing. Well as you probably know, they are still listed; the user just didn’t realize that if they click the down arrow, it will expand the Start Menu back to its original size so they can view all the programs.
When considering all of these issues with personalized menus, I can’t see why you would want to have this feature enabled. Follow these steps to take back your computer:
1.Right-click the Start Menu and select Properties.
2.Click the bottom Customize button to bring up the Customize Classic Start Menu window.
3.Locate the Advanced Start Menu options box, and scroll down all the way to the bottom.
4.You should now be able to see the Use Personalized Menus setting. Just uncheck the box to disable the feature.
5.Click OK to save your changes.
6.Click OK once more to close the Taskbar and Start Menu Properties window.
Now you will no longer have to deal with your programs disappearing. I highly recommend that you disable this feature on any beginner computer user’s computer as well, to save yourself a headache explaining to them that Windows didn’t really delete everything.
Working with the scroll programs feature
The scroll feature works the exact same as when it is enabled for users of the new Start panel. Instead of showing all the programs on your list on-screen at once, it will show only one column of programs that you will be able to scroll through.

Chapter 2 — Customizing User Navigation |
61 |
Some computer manufacturers ship their systems with this feature enabled, although some have it disabled. Follow these steps to modify this feature for your computer:
1.Right-click the Start button and select Properties.
2.Click the Customize button at the bottom.
3.Then locate the Advanced Start Menu Options box and scroll all the way to the bottom again.
4.Locate the Scroll Programs feature and check it to enable; uncheck it to disable.
5.Click OK to save your changes.
6.And click OK once more to close the Properties window.
Now your program scrolling is under your control.
Removing pop-up Help for users of both the Start panel and Menu
Ever notice that when you hover your mouse over a program listing in the Start Menu, a little yellow Help box will pop up? This Help feature is called balloon help. If a user does not know what a program does, she can hold the mouse over the program for a second or so and a little message will fade in telling her what it is, if the programmer has set up this feature of the user’s program. For other programs that do not have this feature set up in their shortcut, it will just tell the user where the program is located on her computer.
This feature can be very useful for a beginning computer user. Sometimes the pop-up Help can become an annoyance and just blocks your screen. If you do not need this feature, why not disable it? Follow these steps to get rid of this feature:
1.Click the Start Menu and select Run and then type regedit in the box and click OK.
2.Once the Registry Editor is loaded, navigate though HKEY_CURRENT_USER, Software, Microsoft, Windows, CurrentVersion, Explorer, and Advanced.
3.Right-click the entry called ShowInfoTip and select Modify.
4.Set the value equal to 0 to disable this feature, and click OK.
5.Close the Registry Editor and log off and back so the feature can be removed.
You are now finished with the last section on customizing the Start Menu and program listing. Now on to customizing the taskbar.
 A registry file can be found in the Chapter 2 folder on the companion CD-ROM that will allow you to easily undo the pop-up Help hack. It is called restore_popup_help.reg.