


Chapter 14 — Protecting Your Privacy 325
1.Open up a copy of Internet Explorer.
2.Click the Tools menu bar item and then select Internet Options.
3.Select the Advanced tab and scroll down to the bottom of the screen.
4.Locate and check Empty Temporary Internet Files Folder When Browser Is Closed, as shown in Figure 14-6.
5.Click OK to close Internet Options and activate your changes.
Enabling Automatic Empty is a great way to easily maintain a clean PC. Keep in mind that this will only delete your Temporary Internet Files and not your cookies. You will still have to delete the cookies using the method mentioned previously in this chapter.
Windows Interface
Once you have Internet Explorer under control, you can move on to cleaning the rest of the Windows interface. Just like Internet Explorer, Windows Explorer keeps track of the applications that you run and files that you open. It does this so it can tailor your computer to your personal use with features such as the frequently run programs list on the Start panel. Features like this are designed to speed up the use of your computer. However, the side effect of the convenience is a loss of privacy. These next few sections will show you how to recover your privacy, albeit at the expense of convenience.
Clearing Frequently Run Programs list
One of the great new features of Windows XP can also be a pain when you are concerned about your privacy. Being able to select the program that you use frequently directly on the Start panel instead of navigating through the entire Start Menu can save you some time. However, over time, this list can become cluttered with programs that you do not want. Additionally, anyone who uses your computer can easily see what programs you use.
If you are concerned about your privacy or just want to clear the list and start fresh, follow these steps :
1.Right-click the Start button and select Properties.
2.Click the Customize button next to Start Menu.
3.Under the Programs section, click the Clear List button, as shown in Figure 14-7.
4.Once you click the button, nothing seems to have happened. Don’t worry; it has cleared your list so you do not need to keep clicking the button. Click OK when you are finished to close the Customize Start Menu window.
5.Then, click OK once more to close Taskbar and Start Menu Properties.

326 Part III — Securing Your System
FIGURE 14-7: Clearing the program list on the Start panel.
The program list is now clear and you can start from fresh building your list of frequently run programs.
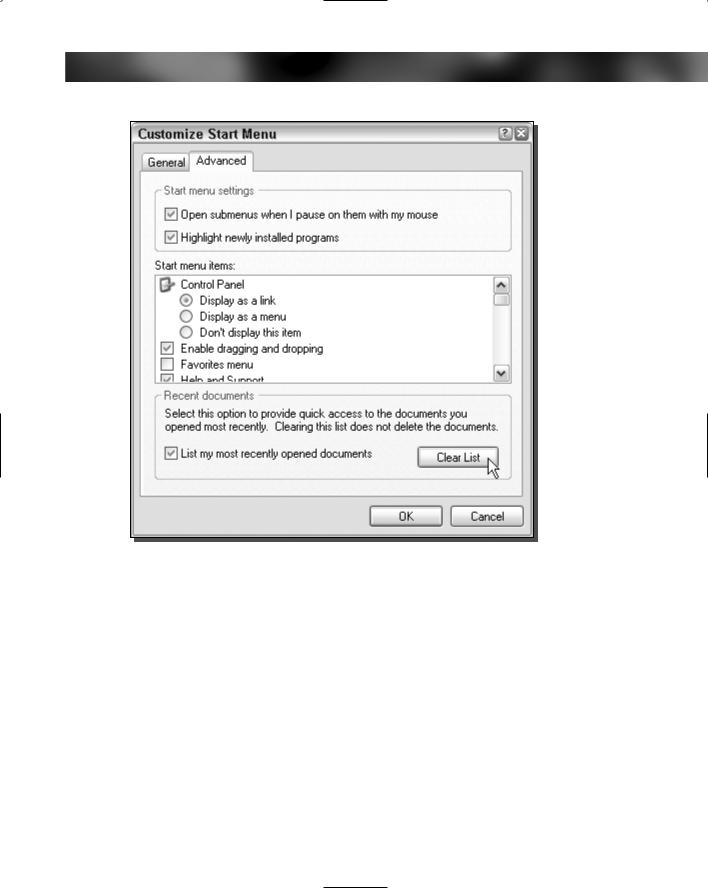
Clearing the recently opened document list
Windows XP monitors all of the files that you open on your computer so it can construct the recently opened document list. This is designed to allow you to easily open up files that you have been working on. All types of documents are listed in this list. Every time you open up a Word document or a digital image, an entry is created within the list. Although this feature exists, I never find myself using it and the only value that it adds to my computer is a privacy concern.
Clearing the recently opened document list every once in a while is a good idea, so your documents are kept confidential and your privacy high. Clearing the list is very easy. Just follow these steps:
Chapter 14 — Protecting Your Privacy 327
FIGURE 14-8: Clearing the recently opened document list.
1.Right-click the Start button and select Properties.
2.Then click the Customize button next to the Start Menu radio button.
3.Once the Customize Start Menu window appears, click the Advanced tab.
4.Under the Recent Documents section, click the Clear List button, as shown in Figure 14-8.
5.Once you have cleared the list, click the OK button to close the Customize Start Menu window.
6.Then, click OK once more to close Taskbar and Start Menu Properties.
Removing temporary files from your hard drive
Over time, your hard drive can become cluttered with temporary files left behind from applications and the operating system. These files not only take up space, but they can be tracks of
328 Part III — Securing Your System
activity on your computer. Removing the temporary files is a great way to clean up any garbage information that was left behind; you’ll then increase your privacy and also free up some disk space.
Windows has advanced greatly over the course of its existence. Back in the early versions of Windows, there was just one temp folder that all temp files were located in. With Windows XP, there are temp folders all over the place. To remove the files, you could go to all of the different folders and manually erase the files. This would work, but there is a better way.
To clear my temporary files from my hard drive, I like to use a program called TempCleaner. TempCleaner is a free application, written by Paul Wesson, that will automatically detect your temporary directory and delete all the files. With TempCleaner, you do not have to worry about where to navigate on your hard drive to delete the files. Instead, just execute the program. To get started using TempCleaner to clean your hard drive of temporary files, follow these directions:
1.Visit TempCleaner’s Web site, located at www.ipaw.net/product_tempcleaner.php and download a copy.
2.Expand the archive and run the installer.
3.Once the installer has finished, just start up TempCleaner by clicking the Start Menu, expanding All Programs, and expanding the TempCleaner folder.
4.TempCleaner has a very simple interface. When it is running, you will just see a simple window that says Cleaning Up Your Temp Folder, as shown in Figure 14-9.
5.Once TempCleaner has finished, the screen will disappear. If you would like TempCleaner to remove files from other folders, such as the temp folder used by certain applications, this can be done within TempCleaner’s options. The TempCleaner Options screen can be viewed by using the TempCleaner Options shortcut in the TempCleaner Start Menu folder.
6.Once the TempCleaner Options screen is loaded, just click the Folder button next to Add Folder and select the folder in which you want the files to be deleted. Click OK when you are finished.
7.Click OK and the TempCleaner Options window will close.
The next time you run TempCleaner, the folder(s) that you added will also be cleaned on top of the Windows temp folders. If you like to keep your computer clear of temp files for
FIGURE 14-9: TempCleaner removing temp files.

Chapter 14 — Protecting Your Privacy 329
maximum privacy and disk space, add the TempCleaner shortcut to your startup folder in the Start Menu so that it is run every time you turn your computer on.
Removing saved passwords
When you visit a Web site that requires authentication or attempt to connect to remote computers, you are given the option to save your password so that the next time you visit the page or attempt to access a remote resource, you do not have to reenter your password. This feature can be a huge convenience, especially if you access a particular Web site or resource frequently. The downside to this convenience is the potential for horrible security and privacy problems.
Essentially, you are taking the password off all of the sites and resources for which you saved a password. Anyone who has physical access to your computer can get in using your username and password, even if they do not know your password.
Removing your saved passwords from your computer is a very good idea, because doing so will protect your accounts and also increase your accounts privacy. Removing the password is a little tricky in Window XP because there is no easy way to access a list of all the accounts that have passwords stored for them within Control Panel or any other user interface element. Fortunately, there is a great hack that will do just that.
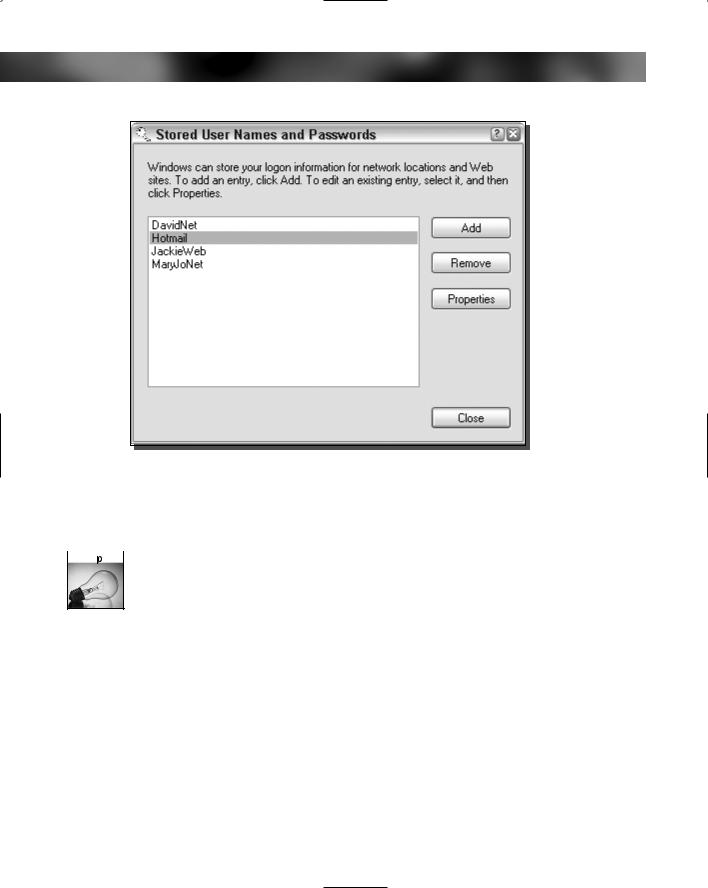
Hidden away in the keymgr.dll system file is an interface for viewing stored usernames and passwords. To use this interface, follow these steps:
1.Click the Start Menu and select Run.
2.Type in rundll32.exe keymgr.dll,KRShowKeyMgr.
3.The Stored User Names and Passwords window will load, showing you a list of all of the accounts that are saved on your computer, as shown in Figure 14-10.
4.To remove a saved password, select the account on the list and click the Remove button.
5.Click OK on the Confirm screen and the account will be removed from the list, erasing your stored password.
6.Repeat the previous steps for any other accounts that you want to remove.
7.When you are finished, just click Close.
You can also use the Stored User Names and Passwords window to add more usernames and passwords to your computer. If you have a Web site or resource and you do not care about your privacy, such as some news Web site, and you are running Windows XP Professional, then just click the Add button when the Stored User Names and Passwords window is loaded.
Setting file and folder permissions
Windows XP Professional boxes running the NTFS file system have the capability to set individual file permissions on both files and folders. File and folder permissions allow you to
330 Part III — Securing Your System
FIGURE 14-10: The Stored User Names and Passwords administration screen.
specify exactly who will be able to read, write, execute, and even list or access a folder. So, file and folder permissions can be a very powerful tool to protect your data from others’ eyes.
 If your file system is FAT32, then you will not be able to set permissions. Fortunately, an easy way exists for you to convert your FAT32 file system to NTFS. Do a search in the Windows Help and Support Center for Convert to NTFS and you will be shown directions on how you can go about converting your drive’s file system.
Setting the permissions on with a lot of control requires you to disable simple file sharing and security. To do so, follow these steps:
1.Open up any folder on your computer and expand the Tools menu and select Folder Options.
2.Click the View tab and scroll to the bottom of the Advanced Settings box.
3.Uncheck the Use Simple File Sharing option at the bottom of the list.
4.Click OK, and you are finished restoring full control over your file permissions.
Now that you have disabled simple file sharing, you can proceed and easily configure the permissions on any file or folder that you desire. Setting the permissions is very easy once you do it a few times. Follow these directions to set the permissions to maximize your privacy:
Chapter 14 — Protecting Your Privacy 331
1.Right-click any file or folder for which you want to modify permissions and select Properties.
2.Then, click the Security tab. (When simple file sharing was enabled, this tab did not exist.)
3.First, remove all users from the group or username list to whom you do not want to give access. It is a good idea to remove the Everyone group because this does include everyone that can access your computer. However, make sure that you do not accidentally remove your username from the list. Also watch out for the SYSTEM account. This is one account that the operating system uses to access files. Removing it may cause unexpected results. But, fortunately, if the system actually does need it, you can always add it again if you remove it and it causes problems.
 If you are having difficulties removing users from the username list, this could be because the user is inherited from a parent folder. Permissions are passed down to all subfolders and files. If you want a user to have access to a folder but not its subfolders, then you will have to click the Advanced button on the security tab of the Properties window. Once the Advanced Security Settings window loads, uncheck the option that says Inherit from Parent the Permission Entries that Apply to Child Objects. A Security notification box will pop up. Click the Remove button to remove all of the inherited permissions so that you can have full control of the folder.
4.Now that you have the list of users and groups taken care of, set the specific permissions that the user has on the file or folder. Select the name of the user that you want to modify, then check the corresponding boxes in the Permissions For list for the activities that you want them to be able to do, as shown in Figure 4-11.
5.When you have finished setting the permissions for all of the users, click OK to exit the Permissions screen.
Once you have set the permissions for all of sensitive directories, you will have greatly increased your security and privacy. Also keep in mind that file permissions are inherited. Every folder within a folder inherits the permissions of the parent folder unless they are specifically removed. Therefore, if you set the file permissions for a folder, all of the subfolders and files will be automatically set with the same permissions. File and folder permissions can be very useful. If you have a program on your computer that you do not want anyone else running, simply set the permissions on that folder so that only you can read and execute.
Encrypting Files
Another cool feature of Windows XP Professional’s NTFS file system is its ability to encrypt files. Permissions on files and folders work well to protect them when the operating system is running. However, if special software and hardware are used, the raw data can be accessed on the hard drive. With the absence of the operating system running to protect its data, anyone can very easily lift the data off the drive no matter what permissions were set on the file. Such software and hardware is usually expensive and primarily used by data recovery companies and law enforcement agencies.
To protect your computer’s files and folders from conventional recovery methods, you can encrypt the files. Doing so will scramble and encode the data within the files so that the only

332 Part III — Securing Your System
FIGURE 14-11: Adjusting the permissions for Jason. Jason now only has permission to read files in the incoming folder.
data lifted off the hard drive with recovery tools when the operating system is not running will be scrambled garbage.
Encrypting files is not just for personal use. If you work for a company that has very sensitive information on their computers and laptops, you would be wise to encrypt the folders and files that contain important and confidential data. If you do so, the confidential information is a lot less likely to get out in the open should the hardware ever be stolen.
Before I go any further, I should mention that encrypting files is not always 100 percent secure. All files that are encrypted can eventually be cracked. It is only a matter of time before a highspeed computer that is trying every possible encryption key finds the correct key. Nevertheless,
Chapter 14 — Protecting Your Privacy 333
there are millions, if not billions, of possible keys. As you can imagine, even with the fastest computers in the world, cracking the key will take some time (several, if not hundreds of years). But there always is the chance that someone could randomly pick the correct key, although the odds of that happening are about equal to winning the lottery twice in your lifetime.
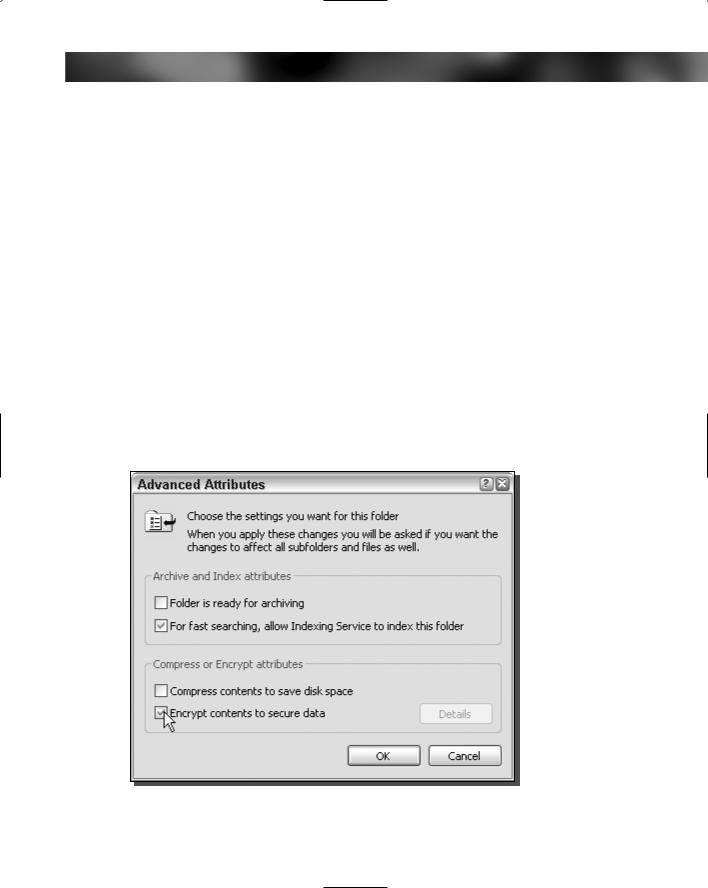
Now that you know about how encrypting files can help your privacy and security, get started encrypting files. Encrypting a file is as simple as changing a file attribute. Follow these steps to tell Windows to encrypt a file:
1.Right-click a file or folder and select Properties.
2.Then, click the Advanced button next to Attributes.
3.The Advanced Attribute window will load. Check the box to enable encryption, as shown in Figure 4-12.
4.Click OK to return to save your change.
5.Select OK once more to close the Properties window and activate encryption.
Once all of your sensitive files are encrypted, your privacy and security are greatly increased. Setting your file permissions and enabling encryption is the perfect combination for protecting your sensitive files.
FIGURE 14-12: Enabling encryption.