


314 Part III — Securing Your System
If you do not want to spend $40 or more on getting some antivirus software, you can avail yourself of the many free antivirus applications. My favorite free antivirus app is called AVG by GriSoft. AVG is a very good antivirus program that is free for home use. Follow these steps to get AVG up and running on your computer:
1.Visit GriSoft’s Web site at www.grisoft.com/us/us_dwnl_free.php.
2.Scroll the bottom of the page and click the Download AVG Free Edition button. Be sure to enter a valid e-mail address on the form after the License Agreement page, because they will send you a serial number that you will need to use when installing AVG.
3.Once you have downloaded and installed AVG, make sure to update the virus definitions with the Update Wizard that is shown the first time you run AVG.
4.When you get your virus definitions updated, you are advised to do a full system scan by clicking the Run Complete Test button.
Summary
Now your computer has been cleaned and protected from spyware, spam, adware, and viruses. The tools and techniques discussed in this chapter will help you maintain a computer that is free of all computer menaces. Make sure you scan your computer using the spyware and adware tools at least once a month, as well as with your antivirus application. Also, take care that you read the fine print when you sign up for things on the Internet to make sure you know what a company will do with your personal information. Create two or more e-mail accounts so you do not have to give out your personal e-mail account to Web sites. Doing so will greatly reduce the amount of spam that you receive with your personal messages.
The next chapter will shift over to protecting your privacy further. Internet Explorer and Windows Explorer both keep track of a lot of the things that you do on your computer. Events such as opening a file and visiting a Web page are all logged in various parts of Windows XP. Chapter 14 will show you how to clean all of the various user histories of Windows XP and how you can turn off certain features. It also will show you how to use some nifty apps that will make maintaining your computer privacy very easy.

Protecting Your
Privacy
Windows XP keeps track of activities that you do on your computer. It records the Web sites that you visit, the addresses that you type in, the applications that you launch, and even the files that you
open. Why does it do this? The majority of the information is used to tailor your computer experience and power features such as the frequently run programs or recently run documents lists. These features can be very useful and save you time. Other activities, such as typing in addresses for Web sites, are also logged. This information is used to save you time when you are typing in addresses at a later time. As you type in part of the address, possible suggestions based on your history will appear. However, this is not always the best. This information, combined with the useless browser history, will allow anyone to see what you browse on the Web.
Because of the vast amounts of information that Windows XP records, your privacy can become at stake when others are using your computer. This chapter will show you how to clean all of the recorded data from your computer. Additionally, you will learn to protect your privacy further by taking advantage of some interesting features of XP.
Internet Explorer
Internet Explorer is one of the most difficult parts of Windows to clean because it stores its data all over your drive, which makes clearing the data a little more tricky because you can’t just clear one folder. Basically, four different parts of Internet Explorer need to be cleaned to ensure that you maintain your privacy: clearing recent addresses, removing history files, erasing temporary Web files, and removing cookies. The first part of this section will show you exactly how to clean those parts.
The second part of this chapter will show you how you can protect your privacy further by using a great utility and disabling some extra unnecessary features.
Removing address bar suggestions
Windows XP, like other versions of Windows, includes a feature called AutoComplete that is always activated for the address box. This can be a
chapter
in this chapter
Clearing Internet Explorer’s Hidden History
Working with Cookies
Protecting IE
Clearing Temp Files
Encrypting Files
Clearing Recent Run Programs
Removing Saved Passwords

316 Part III — Securing Your System
convenient feature because it can help you when typing in an address by presenting you with various suggestions. The suggestions are based upon your address box history. As you can see, because of this feature, your privacy can be at risk. When I start typing www.Twea in my address bar, it automatically suggests www.tweakxp.com, because I have visited that site. Anyone who uses my computer and starts typing addresses in manually can see sites that I have visited. If they just type in www.c or www.t, they will be presented with a small list of all the sites that I have visited that have URLs that start with c or t.
How do you stop the suggestions? You have to go after the source. Unfortunately, this effort can be a little tricky. The file that stores this information is called the URL cache and is named index.dat. This file resides in your Cookies directory within Documents and Settings. To remove information that Windows records, you just have to delete the file. However, deleting this file is not as easy as deleting normal files. The URL cache file is always in use when the operating system is running. And because it is impossible to delete files that are in use, the only way to delete this file is to delete the file in Safe mode or when the system is loading. One solution to this dilemma is to use a nifty utility called Dr. Delete, which will help you schedule the file to be deleted the next time that your computer restarts. Follow these steps to delete the index.dat file with Dr. Delete:
1.Visit Dr. Delete’s Web site, located at www.docsdownloads.com/dr-delete.htm, and download a copy of Dr. Delete.
2.Once you have downloaded a copy of Dr. Delete and have it running, click the Browse button to specify the file that you want to delete.
3.Navigate to the C:\Document and Settings folder.
4.Then expand the folder that is named after your User Name.
5.Expand the Cookies folder and then select the index.dat file.
6.Click Open when you have the file selected.
7.Once you see the path of the file in the text box, click the Delete! button, as shown in Figure 14-1.
8.Click Yes on the confirmation screen.
9.You will be shown a message that says that the file will be deleted after the next reboot. Reboot your computer now to delete the file.
Once your computer reboots, the file will be deleted and the URL cache will be cleared.
Clearing visited Web sites history
Internet Explorer, by default, is configured to record all of the Web sites that you visit for a 30-day period. If you are concerned about your privacy, your browsing history should be cleaned frequently and history settings configured best for privacy. Doing so will ensure that any user of your computer will not be able to easily see what you have been doing. Keep in mind, however, that if you get rid of the browser history, you will eliminate the ability
to use the history to go back to Web sites for which you might have forgotten the URL.

Chapter 14 — Protecting Your Privacy 317
FIGURE 14-1: Using Dr. Delete to delete the URL cache file.
That use is really the only reason I can think of that makes the browser history useful. If you can live without that convenience, then follow these steps to clear your history from your PC:
1.Open up a copy of Internet Explorer by using either the icon on the desktop or on the Start panel.
2.Once Internet Explorer is open, click the Tools menu bar item and select Internet Options.
3.Then, just click the Clear History button, as shown in Figure 14-2.
4.Your history will now be cleared. Because you still have Internet Options open on your screen, adjust the amount of days that your browsing history is stored.
5.As mentioned earlier, the default setting for this value is normally 30 days. Highlight the number in the days to keep pages in history box and type in 0 to maximize your privacy.
6.Then, click OK to save your changes and exit the Internet Options screen.
After you have cleared your browser history and modified the history setting, your privacy will be much easier to protect.
318 Part III — Securing Your System
FIGURE 14-2: Clearing the browser history.
Clearing temporary Internet files and cookies
Every time you visit a Web site, the files for the Web page, such as the HTML and the images, are downloaded and stored in a temporary directory known as Temporary Internet Files. Over time, this directory can become full of images and HTML from various Web sites that you have visited. This directory can end up taking up a lot of space on your hard drive. Additionally, a user can browse your Temporary Internet Files directory and find out exactly what site you have been visiting just as if they were looking at your browser history. If you are concerned about your privacy, or just concerned about disk space, then clearing the Temporary Internet Files is a must.
Cookies are another item that is created on your computer when you visit a Web site. Contrary to popular belief, cookies are really not that bad. Most Web sites use them to save user data to a

Chapter 14 — Protecting Your Privacy 319
browser. One example of this is site preferences or automatic logon when you visit a Web site. The Webmaster of the Web site can detect if their Web site has already given you a cookie that has your user ID stored in it. If it finds one, then it knows exactly who you are and logs you on automatically. Advertisers also use cookies to store personal data. Instead of showing you the same advertisement 50 times, they use cookies to keep track of how many times an advertisement is displayed on your screen.
A common myth about cookies is that they allow Web sites to track other sites you visit. That is just not true. The only cost of having cookies on your computer is a privacy concern for local users. Any user that has physical access to your computer can browse to the directory that the cookies are stored and view what Web sites you visit because the cookies are named after the Web site that instructed your browser to put them on your computer.
Clearing the Temporary Internet Files and removing the cookies is a very simple task. Just follow these steps to clear these files:
1.Open up another copy of Internet Explorer.
2.Click Tools and then select Internet Options.
3.Under the Temporary Internet Files section, click the Delete Files button.
4.You will be prompted to confirm if you would also like offline files to be deleted. For maximum privacy, check the box and Click OK.
5.Once the files are erased, you will be shown the Internet Options screen again. Taking care of the cookies for your privacy is just as easy. Just click the Delete Cookies button.
6.Click OK on the confirmation screen.
7.Select OK once more to close Internet Options and you are done.
Now users will no longer be able to see what Web sites you visit from the cookies and Temporary Internet Files that are stored on your computer. Additionally, you will have freed up some disk space by deleting these files.
Adjusting your cookie security policy
As mentioned, cookies are not as bad a thing as some people in the computing world would like you to believe. Instead, the only real risk they present is a loss of some privacy, as mentioned earlier. If you allow your browser to be instructed to create cookies on your computer, then over time your PC would have quite a collection of them. Anyone who used your computer would then know what sites you visited, if they knew where the cookie files were located.
The latest version of Internet Explorer includes many new enhancements. One of the enhancements includes a new way of accepting cookies. Now, you have the ability to specify if you would like your browser to block all cookies or just certain types. To be able to use this new feature, you will have to understand what the two different types of cookies are: firstand third-party cookies. First-party cookies are placed on your computer by the current site that you are visiting. Third-party cookies are placed on your computer by remote sites such as advertisement servers.
320 Part III — Securing Your System
If you do not want your computer to accept third-party cookies so that marketing companies cannot identify what ads they have shown you, or if you just want to adjust your cookie acceptance settings, then follow these steps:
1.Open up a copy of Internet Explorer.
2.Click the Tools menu bar item and select Internet Options.
3.When Internet Options loads, click the Privacy tab.
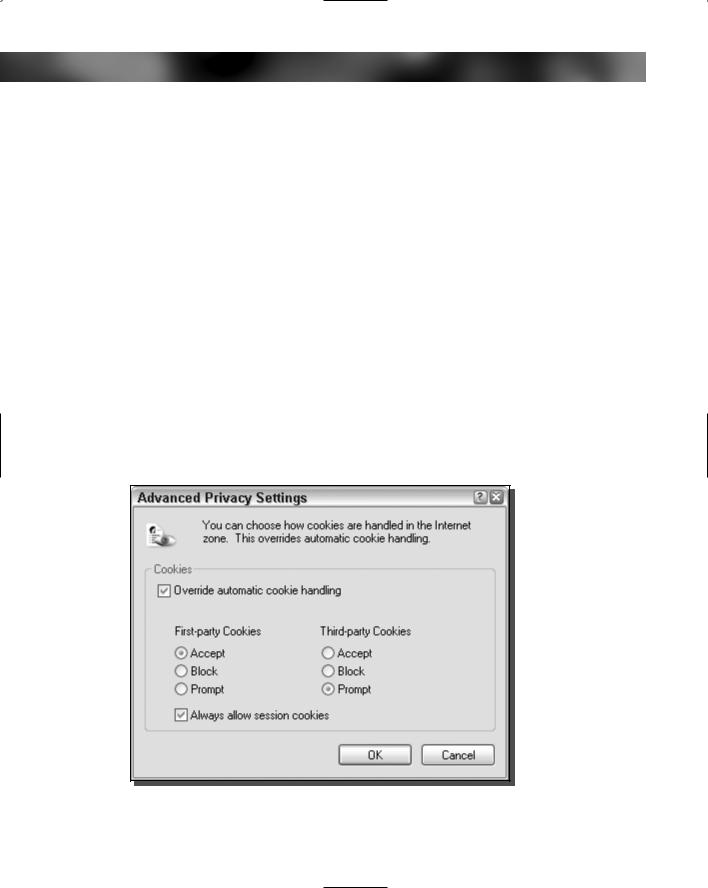
4.You will see the up-and-down slider that allows you to select different levels of cookie security. I recommend that you bypass this and just click the Advanced button instead.
5.Once you click the Advanced button and see the Advanced Privacy Settings window, check the box that says Override Automatic Cookie Handling.
6.Your settings for firstand third-party cookies will now be available for adjustment, as shown in Figure 14-3. I recommend that you always accept first-party cookies. You can decide if you want to block or select the prompt to accept third-party cookies. Prompt will pop up a dialog box notifying you that a cookies request has been received.
7.Once you are finished with your settings, click the OK button to save your changes and return to Internet Options.
8.Click OK once more to close Internet Options.
FIGURE 14-3: Adjusting the cookie privacy settings.

Chapter 14 — Protecting Your Privacy 321
Now that you have set the cookie privacy setting manually, you can eliminate cookies from being stored on your hard drive in the first place. Doing so will allow you to protect your privacy and still be able to use Web sites that need cookies.
Saying no to encrypted Web pages
If you manage your finances or shop online, then you have probably had experience with using secure Web connections, otherwise known as SSL. These secure connections encrypt the data that is transferred from a Web server to your computer. Once the data gets to your computer, your browser has a special key that decrypts the information and displays it on your computer. During this process, when the file is decrypted, it is saved in the Temporary Internet Files directory so that the browser can display it.
This default appears to be harmless because the Web page is only saved on your computer. If no one has remote access to your computer, the data would be safe, right? Not necessarily, because your data is now vulnerable to anyone who has physical local access to your computer. If that person is clever and lucky enough, he or she can sort through your Temporary Internet Files directory to find confidential information, such as your online banking information. All of this information is saved by default on your hard drive for anyone to look at. They do not even need to know your password or even log into your account on the bank’s Web site, because a snapshot of the Web page is stored locally on your computer.
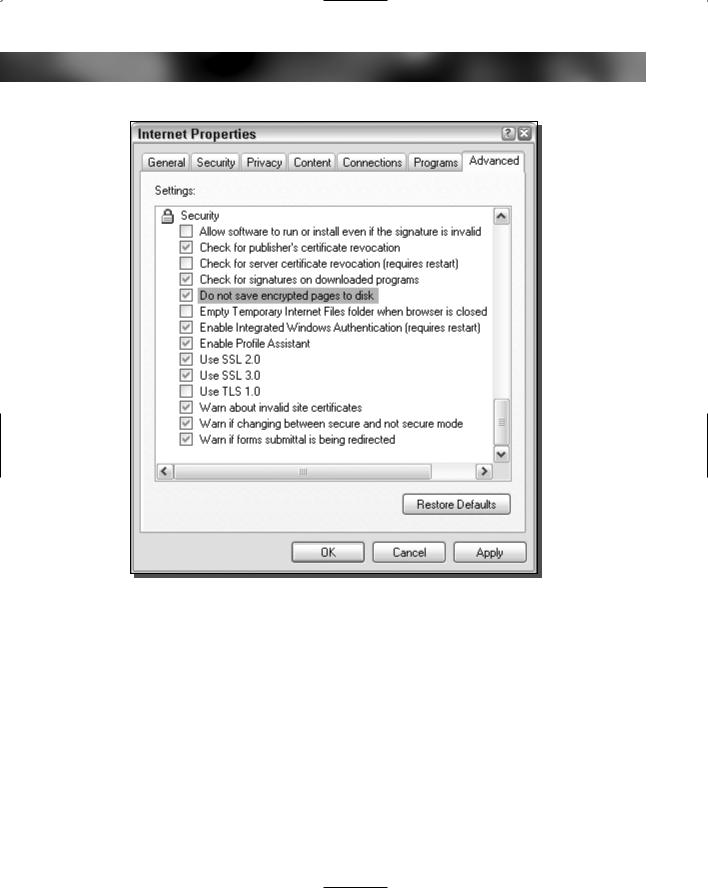
What can you do to protect your computer from this vulnerability besides setting up better computer security such as complex passwords? There is a cool feature of Internet Explorer that you just have to turn on that will eliminate the problem completely. Simply called Do Not Save Encrypted Pages to Disk, this feature, when enabled, will solve your problems. To enable it, follow these steps:
1.Open up a copy of Internet Explorer.
2.Click Tools and select Internet Options.
3.Then, select the Advanced tab.
4.Scroll down through the list toward the bottom of the window until you see the Security section, as shown in Figure 14-4.
5.Locate Do Not Save Encrypted Pages to Disk, and check the box to the left of it.
6.Click OK to save and activate your changes.
Now you will no longer have to worry about pages that were encrypted being saved to your drive for anyone who has access to your computer to see.
Disabling AutoComplete
You already know about AutoComplete from the address bar. We have taken care of that privacy problem by clearing the file that stored the information, as was shown in the section about removing the address bar suggestions. However, that is not the only situation where AutoComplete attempts to provide assistance. Another situation where AutoComplete tries to
322 Part III — Securing Your System
FIGURE: 14-4: Changing IE’s security settings.
give a helping hand is when you are filling in text boxes on Web pages. AutoComplete in this situation works exactly the same as AutoComplete with the address bar. As you begin to fill in the text box, several suggestions will appear, based on information that you have already typed in.
To get an idea how this works in action, visit a search site such as Google (www.google.com) and start to type in words for which you want to search. When you do so, words similar to the ones you have typed in the box on other visits to the site will appear. This capability allows anyone that uses your computer to be able to see what other users of the computer have searched for on the site, even if the browser history was cleared.
Clearly, having this feature enabled would be a big concern if you were concerned about your privacy. Disabling the AutoComplete feature is not very difficult and will completely take care of this privacy concern. Follow these steps to put an end to AutoComplete:
Chapter 14 — Protecting Your Privacy 323
FIGURE 14-5: Adjusting the AutoComplete settings by entering AutoComplete settings.
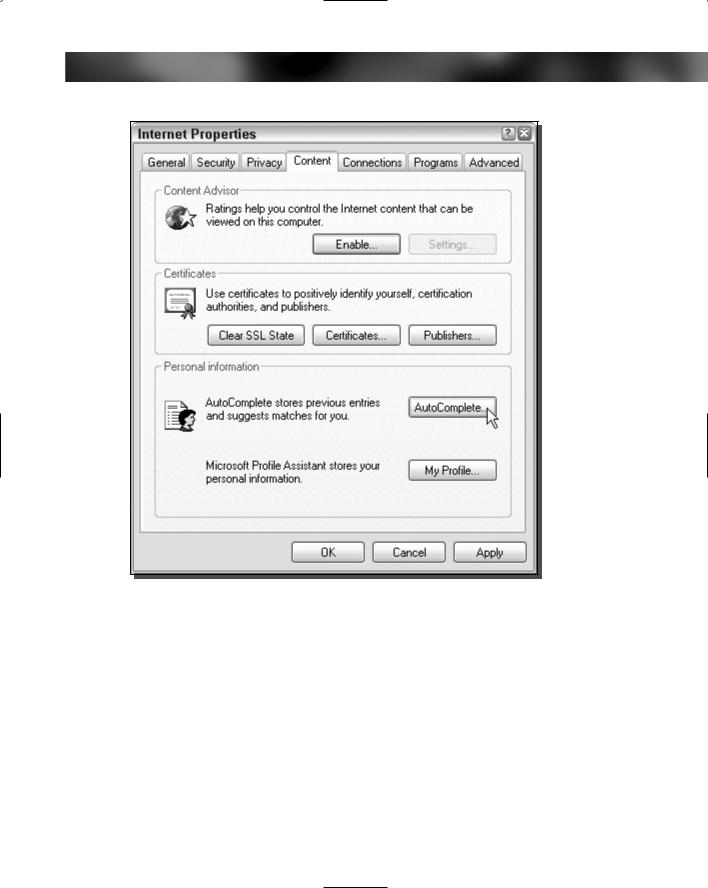
1.Open up an instance of Internet Explorer.
2.Click Tools and select Internet Options.
3.Select the Content tab and click the AutoComplete button, as shown in Figure 14-5.
4.Once the AutoComplete Settings window has loaded, just uncheck all of the boxes that are listed under Use AutoComplete For. This will disable this privacy concern completely.
5.Although you have the AutoComplete window open, you can also click the two clear buttons at the bottom of the window to clear any data that is in the file stores for this data.
6.When you are finished, just click the OK button to save your changes.
7.Select OK once more to close Internet Options and activate your changes.
324 Part III — Securing Your System
AutoComplete is now a thing of the past. You will not have to worry about people using your computer being automatically shown all of the things that you type into your address and text boxes.
Clearing Temporary Internet Files automatically
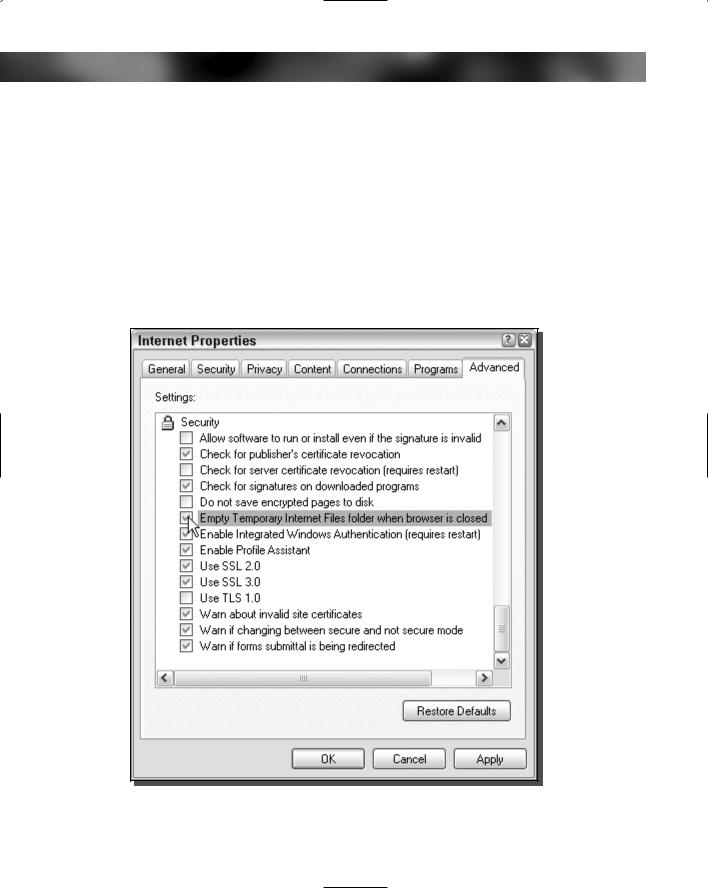
Earlier, you learned how to clear your Temporary Internet Files so they will not be a privacy concern. Over time, your Temporary Internet Files folder will fill up again and once again become a privacy concern. One easy way to fix this is to use an interesting hidden feature of Internet Explorer that will automatically delete these files every time you close Internet Explorer. This way, you will not have to worry about clearing all of the files every time you use IE. Follow these steps to activate this great feature:
FIGURE 14-6: Setting up IE to automatically clear the Temporary Internet Files.