

38 Part I — Customizing Your System
3.Next, locate the InitialKeyboardIndicators entry, right-click it, and select Modify. You can enter various codes into this property, but all of them except for the code for Num Lock are pointless. For example, would you want your computer to start up caps-lock, which is code 1? Of course not. To enable Num Lock, you will want to enter 2 into the box.
4.Then click OK to save the changes, and that’s it!
If you are on a laptop and you attempted to enable Num Lock even though I told you not to and need to fix your system, repeat the above directions but replace the value of InitialKeyboardIndicators to 0 to disable the feature.
Summary
This first chapter can be thought of as the first step in the complete customization of every aspect of your Windows XP. It started from the very beginning with the boot screen and worked through the different logon methods and how to customize each one. Then, it showed you how to make your computer even better by using a few nifty features to make it look and act great.
The next chapter will pick up on the next part of customizing your computer. First, you will learn all about customizing the new Windows XP Start panel. This chapter will show you how to get the most out of this new feature. Then, it will show you how you can revert to the old Start menu style and customize that as well.
After you have customized the heck out of your Start menu, you will be shown many cool ways to customize and improve the taskbar. Changing the makeup of the taskbar and the text of the Start button are a few sample topics from this section.
Customizing User
Navigation
Customizing user navigation is the next stop on the Windows XP customizing road trip. In the last chapter, with the help of some cool hacks, you were able to change and improve the boot and logon
screens. This chapter will pick up where Chapter 1 left off and will show you how to customize and improve the visual navigation elements of Windows XP.
This chapter starts off with customizing the look and contents of the cool new Start panel. This new screen can show a lot more than just your recently run programs. If you do not like the new Start panel, you can find out how to get the old classic Start Menu back. Then, you will learn some cool hacks to improve and customize the classic Start Menu. You cannot customize the Start panel and then leave out customizing the program listings. I will show you some cool hacks that will customize this as well.
To finish this chapter up, you’ll learn how to customize the taskbar on the bottom of your screen. The taskbar is a very essential part of navigating your computer. I will show you how to customize and improve its features and will give you some new ideas on how you can use it that may dramatically improve your experiences with Windows XP.
Customizing the Start Panel
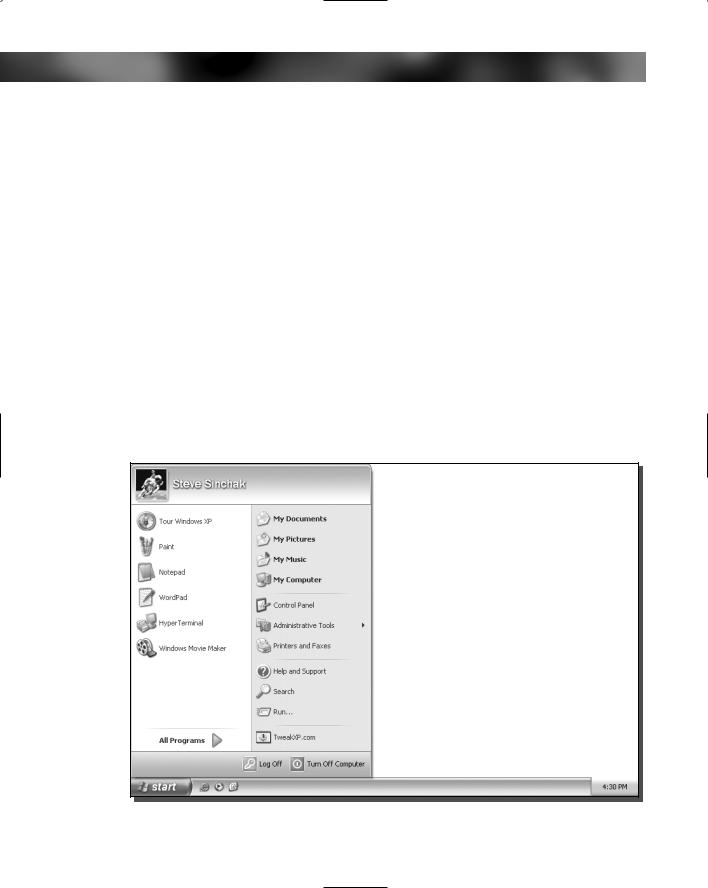
The Start panel is what I call the new replacement for the traditional Start Menu that we are all familiar with from using previous versions of Windows. I call this the Start panel because it is not just a menu anymore. It is now a collection of various links and features all thrown onto one panel that pops up. It offers many new features, such as a dynamic list that places your most frequently run programs on the panel so that you can easily access them without having to navigate throughout the entire program listings. Additionally, the Start panel has replaced all of the icons on the desktop except for the Recycle Bin so that your desktop will look much cleaner and uncluttered.
Different tools and hacks are available that will allow you to customize the Start panel. Almost everything on it is customizable. You can add and remove items that are displayed, and you can even change the way it looks. With
chapter
in this chapter
Customizing the Start Panel
Customizing the Start Menu
Customizing the Program List
Customizing the Task Bar

40 Part I — Customizing Your System
the many different options available, you can customize the way that different parts of the panel works. For example, you can change the number of frequently run programs that are displayed.
When you have finished reading these next few sections, you will have transformed your Start panel into something that is even more useful for your everyday tasks.
Using Group Policy Editor to customize the Start panel
The Group Policy Editor is a great tool that makes customizing the Start panel a snap. It is a very powerful tool that was not originally designed to be a tool that can customize but a tool for workplace management. Group policies were originally designed so that administrators can limit what a user can do on their computer. Let’s say you are responsible for hundreds of Windows machines at work. Most likely, you will want to limit what users can do on their computers so that they don’t accidentally install a harmful program or change a system setting that renders their computer useless. Group policies make it possible to limit a user’s access to critical areas of the operating system.
The most common use of the Group Policy Editor is to edit policy information on a domain controller. The domain controller can be thought of as a computer on a corporate network that is in charge of security. It is like a database of usernames, passwords, and configuration information. The Group Policy Editor is used by administrators to modify the user configuration data. The next time a user logs onto their computer, new policy information is downloaded and applied. Now the user is limited in what they can do on their computer.
Although the Group Policy Editor is primarily used for computer management in a business, it can also be used to customize an individual computer running Windows XP Professional. Because Microsoft wanted to support both small and large businesses, they have included a copy of the Group Policy Editor with every copy of Windows XP Professional. With that inclusion, even if a company was not large enough to have a domain controller, they could still limit and fine-tune a user’s experience. Unfortunately, Windows XP Home does not come with a copy of the Group Policy Editor. This exclusion was not by accident. Microsoft chose not to include a copy of this utility with XP Home because the Group Policy Editor was designed to be a business utility. And, well, XP Home is meant for use in the home.
Think you can get the Group Policy Editor to work by copying over the program file to a computer running Windows XP Home? Sorry, but I tried doing so, and the program would not start. So, the discussion in this section will only apply to those working with Windows XP Professional. If you are running XP Home, you will not be missing out on too much; the next section about adding and removing the different navigation icons will be compatible with your version.
Now that you know all about the Group Policy Editor, it is time to learn how you can use it to customize the Start panel. The Editor will enable you to enable and disable various different features. First, you’re going to find out how to get the Editor up and running. Then, you can check out a list of all of the relevant features you can use to customize the Start panel.
To begin customizing, follow these steps:
1.Click the Start Menu and select Run. Then type gpedit.msc into the box and click OK. This will start up the Group Policy Editor. If you get an error, make sure that you have typed the name of the file correctly and that you are running Windows XP Pro.

Chapter 2 — Customizing User Navigation |
41 |
2.Now that you have the Group Policy Editor up and running, you will want to navigate to the Start Menu and Taskbar settings. This can be done by expanding the User Configuration, Administrative Templates, and the Start Menu and Taskbar folder.
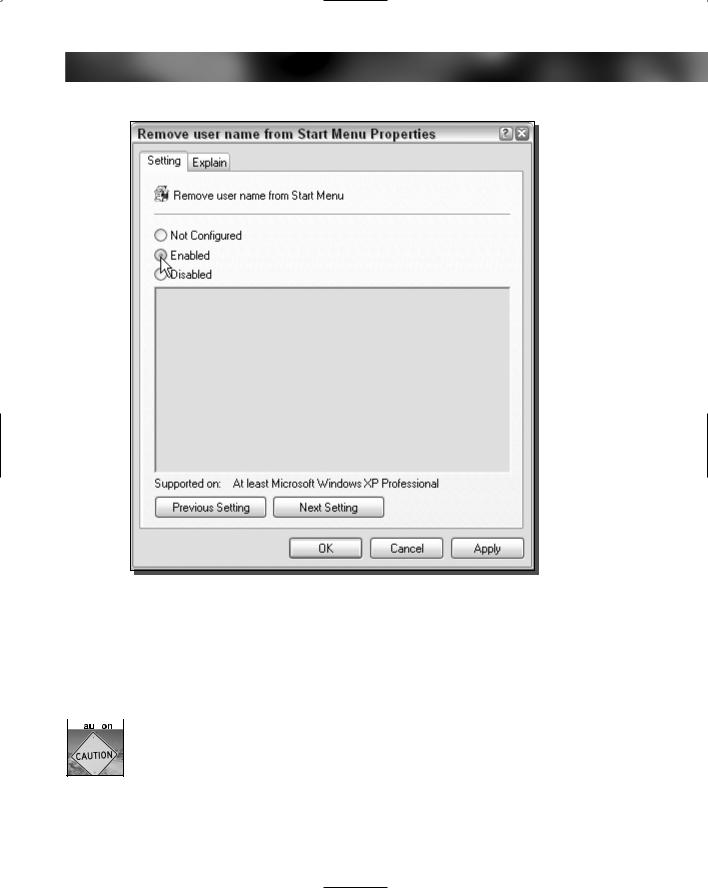
3.Once you have navigated through the Editor, you will see a list of all of the different features of the Policy Editor, as shown in Figure 2-1. A number of features listed will only apply to the taskbar. Table 2-1 lists all of the relevant features and provides a description of what they will do. For the sake of demonstrating how to use the Editor, let’s assume that you want to remove the username from appearing on the top of the Start panel. Use your mouse to locate Remove User Name from the Start Menu list. Right-click it and select Properties.
4.The Remove User Name from the Start Menu Properties window will load. Then, to turn the feature on, just click the circle (known as a radio button) next to Enabled, as shown in Figure 2-2.
5.Then, just click OK and you are finished.
FIGURE 2-1: The Group Policy Editor displaying a list of all of the different features it provides for customizing the Start panel.
42 Part I — Customizing Your System
Table 2-1 Group Policy Features to Customize the Start Panel
Feature Name |
Description |
Add Log Off to Start Menu |
If you do not have the Log Off button on your Start panel, this |
|
feature will display it when you set it to Enable. Some |
|
installations of Windows XP do not have this feature enabled by |
|
default. With these, the only way to log off your computer |
|
when the button is not displayed is to first click the Shutdown |
|
button and then click the Log Off button from the Shutdown |
|
menu that pops up. It is much easier and faster to just click the |
|
Log Off button in the first place |
Remove All Programs list |
This feature will take out the All Programs link that displays the |
from the Start Menu |
list of all of the applications installed on your computer. This |
|
feature is useful if you want to limit the programs someone has |
|
access to on your computer, or if you just want to do away with |
|
the old menu altogether. Set this feature to Enable and say |
|
goodbye to your program list |
Remove Logoff on the Start Menu |
This feature will remove the Logoff button from the Start panel. |
|
If you are one of the lucky users and your installation of |
|
Windows XP includes the button to log off, you can enable this |
|
feature to get rid of the button, if you have no use for it |
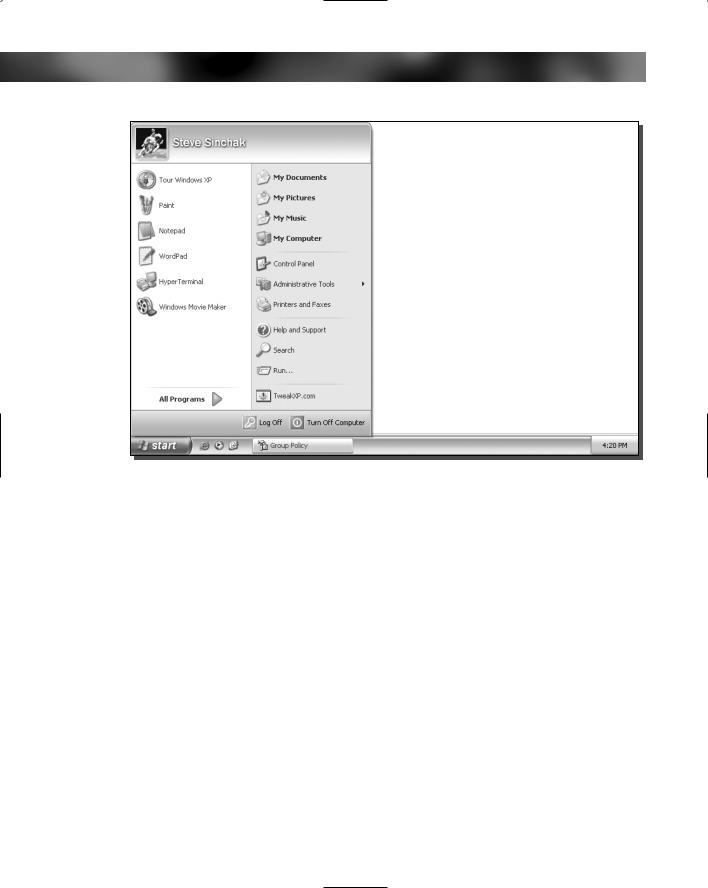
Remove pinned programs |
Pinned programs are the list of programs that appear in the top |
from the Start Menu |
left corner of the Start panel. By default, programs such as |
|
Internet Explorer and either Outlook Express or Microsoft |
|
Outlook are displayed in this area, which shows the list of |
|
frequently run programs. If you would like to remove these |
|
links to programs so that you will have more room to display |
|
frequently run programs, as shown in Figure 2-3, set this |
|
feature to Enable and you are set |
Remove user name |
You already have experience with this setting from the procedure |
from Start Menu |
I walked you through. If you do not want your username to be |
|
shown on the top of the Start panel, then enable this feature. |
|
This may seem like a useless hack at first, but it may be useful |
|
in a variety of cases (such as if you are concerned about the |
|
security of your computer). Anyone that clicks your Start button |
|
will be shown your username. If you operate an Internet café or |
|
manage public computers, you are strongly advised to enable |
|
this feature |
Prevent changes to Taskbar |
Once you get your Start panel and taskbar (see Customizing the |
and Start Menu Settings |
Taskbar) looking the way you want, a good way to lock in your |
|
changes is to enable this feature |
Chapter 2 — Customizing User Navigation |
43 |
FIGURE 2-2: Enabling Remove User Name from the Start Menu Properties feature.
If you want to get your username back, just repeat the above directions but select the Disable Radio Button instead and then click OK.
Table 2-1 shows a list of all of the great features that will help you customize your copy of Windows XP Pro.
 Wait to enable the feature that allows you to prevent changes to the taskbar and Start Menu until you have finished reading Part 1 of this book. Otherwise, you may run into unexpected programs as you are customizing various parts of your computer.
44 Part I — Customizing Your System
FIGURE 2-3: The Start panel with the pinned programs removed from the left side of the panel.
Adding and removing navigation icons
Many icons on the new Start panel will help you navigate through Windows in a way you have never done before. All of the icons that are displayed can be customized to fit your needs so that you can have one-click access to several different parts of your computer. Icons such as My Computer, My Music, Network Connections, and many more are now placed right on the Start panel. Windows XP gives you the capability to add even more. Additionally, these icons can be transformed into pop-up menus that expand and show the details. For example, instead of just displaying the My Computer icon, when you move your mouse over the icon, it can pop up a menu that will display shortcuts to each of the separate drives on your computer.
These new features allow you to be much more efficient when working with your computer. You can save yourself a lot of time by enabling the auto-expanding pop-up menu feature on many of the utility icons such as Control Panel. This way, you can have access to all of your Control Panel applets with just one click on the Start Menu.
Windows XP makes it possible to edit most of the navigation icons right from within the user interface so you don’t have to worry about hacking the registry in this section. To get started, follow these steps:

Chapter 2 — Customizing User Navigation |
45 |
FIGURE 2-4: How to view Start Menu properties by right-clicking the Start button.
1.Right-click the Start button and select Properties, as shown in Figure 2-4.
2.You should now see the Taskbar and Start Menu Properties window. Next, click the top Customize button, and the Start Menu settings will load.
3.The Customize Start Menu is where you can change many aspects of the Start panel; for now, click the Advanced tab. You will learn about some of the items on the General tab in the next few sections.
4.Once you have the Advanced tab displayed, you will see the Start Menu items scroll box. In this box you will see a list of all of the different features for the icons that can be displayed on the Start panel. Table 2-2 lists in detail all of the different features and their separate options. For demonstration purposes, let’s make the My Computer icon expand automatically to show all of the drives. Scroll down in the box until you see the My Computer title.
5.Then select the Display as a Menu option, as shown in Figure 2-5, to enable the Auto Expand feature.
6.Click OK twice, and your change is now complete.
As you can see, making changes to the items on the Start panel is quite simple. Take a look at Table 2-2 for more information on all of the navigation icons that you can customize with the method just described.
Switching to small icons for frequently run apps
The new Start panel includes a neat little feature that will keep track of all of the programs that you run and will place the most frequently run programs directly on the Start panel. I use this list of programs on the Start panel even more often than I use the All Programs pop-up menu because it is just much faster. One way that I like to customize my Start panel is to decrease the size of the icons on the left so that you can fit more icons on the screen. This way, more frequently run programs can be displayed. Figure 2-6 shows the difference between a Start panel that has been switched to use small icons compared to the normal Start panel.

46 Part I — Customizing Your System
Table 2-2 Start Panel Features |
|
Feature |
Description |
Control Panel |
By default, the Control Panel shortcut is shown and is selected |
|
to Display As A Link. I like selecting the Display As A Menu |
|
option, because it turns on the auto-expanding menu feature |
|
that displays all of the Control Panel applets without even |
|
having to open up the Control Panel. Doing so saves me a lot of |
|
time and is well worth it. If you do not want the Control Panel |
|
to be displayed, just click the Don’t Display This Item option |
Help and Support |
There’s not a lot that you can do with this one. If you use Help |
|
and Support frequently, let this one be; otherwise, uncheck it to |
|
free up some space on your Start panel |
My Computer |
The My Computer icon is one of the best candidates to enable |
|
the Display as a Menu feature so that it automatically expands |
|
to show you all of your drives. If you do not have any drives on |
|
your computer, feel free to disable the My Computer icon by |
|
selecting Don’t Display This Item |
My Documents |
By default, the My Documents shortcut is displayed just as a |
|
link. I suggest that you leave this feature set this way if you |
|
have a lot of documents in your My Documents folder. Enabling |
|
the Display As A Menu option when you have a lot of |
|
documents is just not worth it, because it gets so hard to find |
|
what you want. If you do not like the My Documents menu on |
|
the Start panel, just click the Don’t Display This Item option |
My Music |
The My Music folder is great, but most of us that have music |
|
on our computers have a lot more than just a few songs. I |
|
recommend that you leave this one alone as well, because |
|
enabling the Display As A Menu feature is counterproductive |
|
when you have more than a few songs. If you are like me and |
|
do not use the My Music folder, then click the Don’t Display |
|
This Item option and you will have made some more room on |
|
your Start panel |
My Network Places |
This is the icon that you can use to browse your local area |
|
network if your computer is on any type of local area network |
|
(LAN). If you want to connect to a remote computer to view |
|
their shared files, you will want to have this option selected. If |
|
you do not have a network card, and just use a modem, then I |
|
suggest that you uncheck this item because you will never use it |
My Pictures |
My Pictures is a nice link if you use the My Pictures folder to |
|
store your photos. But forget about enabling Display As A Menu |
|
on this one. Doing so will just give you a list of file names. With |
|
today’s digital cameras’ number schemes, you will never find the |
Chapter 2 — Customizing User Navigation |
47 |
Feature |
Description |
|
photo you want unless you can see a thumbnail. If you don’t |
|
use the My Pictures folder, click Don’t Display This Item and the |
|
shortcut will be removed |
Network Connections |
The Network Connections item can be very useful. If you have |
|
a dialup connection or even if you have a network adapter and |
|
are on a LAN, the network connection shortcut, when set to |
|
Display As A Menu, will allow you to easily access all of your |
|
connections to view and set properties as well as connect right |
|
from the Start panel |
Printers and Faxes |
No Printer? Uncheck this box |
Run Command |
I recommend that you leave this box checked, as you will be |
|
using this button in various directions throughout this book |
Search |
Search for files a lot? If not, get rid of this shortcut to save |
|
yourself some room |
Set Program Access and Defaults |
You all probably know about Microsoft’s antitrust problems |
|
with the government. Part of their settlement required |
|
Microsoft to provide users an easy way to switch between |
|
default applications on their computers such as the default Web |
|
browser and Mail Client. This shortcut is useful, but it does not |
|
deserve to be on your Start panel. Uncheck this box to free up |
|
some room. You can access this feature later from within the |
|
Add and Remove Programs Control Panel applet |
System Administrative Tools |
The System Admin tools are the most useful tools besides the |
|
Control Panel. I highly recommend that you include this item on |
|
your Start panel in both the All Programs menu and the Start |
|
Menu by selecting the middle, all-inclusive option |
Changing the icons is very easy. You just need to change one setting within the Start Menu properties. To do so, follow these steps:
1.Move your mouse over the Start button and right-click it with your mouse and then click Properties.
2.This will bring up the Start Menu Properties menu that you used in the last section. Here, you will want to click the Customize button.
3.On the General tab, you will see two options under Select An Icon Size For Programs. This is where you can change the icon size. Select Small Icons and then click OK.
4.Click OK once more and you are finished.
Now you will have made some more room so that you can display more frequently run programs on the Start panel. When you click the Start Menu, you may notice that there aren’t any
48 Part I — Customizing Your System
FIGURE 2-5: Customizing the Start panel by enabling the Display as a Menu feature for the My Computer icon.
more programs showing up. That is because you also have to adjust the number of programs that will appear. The next section will show you how to adjust how many program shortcuts are displayed.
Increasing number of recently run programs displayed on the Start panel
By now, you have changed the icon size of the frequently run programs list so that you can fit more icons on the screen. Now, you can increase the number of programs that will be displayed so that your list of programs will become even more useful. If you decided that you did not want to change the size of the icons, don’t worry—you can still change the number of programs that are displayed. You just won’t be able to display as much.

Chapter 2 — Customizing User Navigation |
49 |
FIGURE 2-6: The difference between the two Start panel icon sizes.
Changing the number of programs depends completely on personal preference. Do you like having a huge Start panel that stretches from the taskbar to the top of the screen? Do you like a Start panel with a small footprint? By design, the Start panel cannot contain more than 30 programs on the list. Very few users can display 30 items at once, because they must have their screen resolution set at a minimum 1280 1024, assuming that they are using the small icons. That high resolution is usually only used by owners of screens larger than 17 inches. The most common computer screen resolution is 1024 768. At that resolution, 22 programs can fit on the Start panel when the small icons are used. If you have an older computer or just a small display and your screen resolution is set for 800 600, then you will only be able to display 15 programs on your Frequently Run Programs list.
The resolution settings of your screen will determine the maximum number of programs that can be displayed. If you accidentally choose too many programs, Windows will let you know by giving you a friendly error message once you try to click your Start Menu after the change.
Now that you have an idea of the number of programs that your computer can display, you are ready to get started. To increase the number of programs, do the following:
1.Right-click the Start button and select Properties to bring up the Taskbar and Start Menu Properties settings.
2.Next, click the Customize button to show the Customize Start Menu options.
50 Part I — Customizing Your System
3.On this screen, locate Number of Programs on Start Menu on the text box. You can adjust this value by clicking the up and down buttons or just by selecting all of the text and entering in a new number.
 If you ever want to clean your list of frequently run programs, just click the Clear List button on the Customize Start Menu screen. This will reset all of your program run counts so that your list will be rebuilt over time just as it was the first time you used your computer.
4.Once you have entered the number of programs you want displayed, click the OK button to save your changes.
5.Then click the OK button once more and you are finished.
The best way to set the number of programs is to experiment with several different values until you get your Start panel looking the way you want it. After you find the value that is just right, you will have a much-improved Start panel.
Hiding programs from appearing in the Start panel
So you have a top-secret program that you do not want anyone else to know you have. Every time you run a program on your computer, Windows XP keeps track of it and will place it on your frequently run programs list as a convenience to you. Sometimes, this feature is not always a convenience and is, instead, like a chronic medical problem that will not go away.
For example, let’s use the situation of a guy named Larry. Larry plays Solitaire all the time on his computer when he is at work. It is not the best game, but it will help him pass time and it’s a great alternative to actually doing work. Every time Larry plays Solitaire, Windows XP automatically puts the game into the frequently run programs list. This tracking is a problem for Larry because he is concerned that one of his fellow employees might see the program on the list and report him. What should he do? First, Larry should buy a copy of Hacking Windows XP and then he should follow these steps:
1.Click the Start Menu and select Run. Type in regedit and click OK to start up the Registry Editor.
2.Next, expand the HKEY_CLASSES_ROOT folder.
3.Search through the list of folders until he finds the folder called Applications and expand that as well.
4.Now he will see a list of every executable file for the programs installed on his computer. To hide a program from the frequently run programs list, he will want to expand the folder that is the executable for the program. To hide Solitaire, he will want to expand the sol.exe folder.
 If you do not know the name of the executable file that a program shortcut points to, you can easily look this up by right-clicking the shortcut and selecting Properties. In the Properties box, you will see a full path to where the file is located as well as the name of the file. When you right-click the shortcut in the Start Menu for Solitaire, you will discover that the name of the executable for the game is sol.exe.

Chapter 2 — Customizing User Navigation |
51 |
5.Can’t find a folder called sol.exe? That’s because some Windows applications are not listed. If his application was listed, he needs to skip this step. Otherwise, he will need to create a folder. To do so, he selects the Applications folder with the mouse. Then he right-clicks and selects New and then Select Key. Then he types in the name of the executable for the name of the key. For Solitaire, he will want to name the key sol.exe.
6.Now that he has found the folder for the application or has created one, he expands it so that he can see all of its values. Then, he right-clicks the executable’s folder that he just created or found in the registry. Select New and then select String. Next, he types in NoStartPage as the name of the string variable.
7.He closes the Registry Editor and logs off and then back in. He will never see Solitaire in his frequently run programs list again.
Now Larry can play as much Solitaire at work as he wants without having to worry about it showing up in his frequently run programs list. Don’t get too confident after completing this hack. Remember, people can still look over your shoulder and see your computer screen. To solve that problem, I recommend using a cardboard box to build a shelter over your cubicle to block spying eyes. This will also limit the number of people that can ask you questions, which will allow you to better concentrate on your game of Solitaire.
Pinning your programs
I use the Calculator application all the time when I am using my computer. My desk calculator is always lost somewhere in my drawers and I don’t even want to waste my time looking for it when I just want to do a quick calculation. Every time I want to use the Calculator application, I have to click the Start Menu, then select All Programs, and then navigate up through the Accessories menu until I finally can click the Calculator app. There is a much better way that I can access this program.
Instead of navigating through the programs listings, I can just pin the program to the Start panel. Pinning a program is a very simple task that allows the program that you pin to appear on the Start panel just above the frequently run programs. If you pin a program shortcut, it will appear just below the Internet Explorer and e-mail icons in the Start panel.
Navigating through the entire Start Menu to launch a program you use all the time is a waste of time. Pin your most commonly used programs today!
Are you excited yet? No? Okay, well let’s get started:
1.Start your pinning adventure by navigating through the Start Menu as you normally do to launch a program. Navigate to a program that you use all the time, such as the Calculator application in the Accessories menu.
2.Once you have the item highlighted with the mouse, right-click the item and select Pin to Start Menu. That’s it, your program will now appear directly on the Start panel.
Now let’s say that you got a little too excited and pinned too many applications and want to remove some. What should you do? Just click the Start button once more to bring up the Start
52 Part I — Customizing Your System
Menu and highlight the program you want to un-pin from the Start panel. Next, just rightclick the item and select Unpin from Start Menu.
Pinning your favorite programs is a simple solution to speeding up your access to your programs.
Adding Web site links to your Start panel
Do you have a Web site that you visit frequently? How would you like to place a link to that Web site directly on your Start panel? With the help of a registry hack, it is possible to place a shortcut on the bottom-right side of your Start panel, as shown in Figure 2-7.
Adding a link to a Web site is a great way to get to your favorite Web site fast. Also, if you run your own Web site, you can make your own registry file that you can distribute to your visitors so they can add your site to their Start Menu. I will show you how to make a quick script from your registry once you have made the changes on your computer.
Now that I have told you the basics of this hack, let’s get started:
1.Click the Start Menu and select Run. Then type regedit to launch the Registry Editor.
2.When the Registry Editor has launched, you will want to expand the HKEY_CLASSES _ROOT folder and then the CLSID folder.
3.Next, you will want to scroll through the list of Class IDs until you find {2559a1f6- 21d7-11d4-bdaf-00c04f60b9f0} and expand it as well.
FIGURE 2-7: A hacked Start panel showing a new link to TweakXP.com.

Chapter 2 — Customizing User Navigation |
53 |
4.Start your modifications by naming this class. Right-click the (default) entry within the {2559a1f6-21d7-11d4-bdaf-00c04f60b9f0} folder and select modify.
5.Then type TweakXP.com in the value data box and click OK to save your changes.
6.Now you are going to set up the icon that will be displayed on the Start panel next to the name. To do this, you will need to create a new folder. Select the {2559a1f6-21d7-11d4- bdaf-00c04f60b9f0} folder again and right-click it. Then select New and then Key. This will create a new subfolder that you should call DefaultIcon.
7.Right-click the DefaultIcon folder that you just created and create a new string value by expanding new and selecting string value. Name this new value (Default). The value of this string will be the location of the icon that you want to use.
8.I like using the system icons which are stored in the shell32.dll. To use these icons, right-click the new (Default) string value that you created and select modify. Then type
%SystemRoot%\\system32\\shell32.dll,-47 in the value box and click OK to save. The 47 in that line is the index of the icon that I wanted to use for my link to TweakXP.com. If you want to use a different icon, replace the 47 with the icon index number you want. You are free to use any icon that you want, including icons that are not in the shell32.dll file. If you want to use an icon that you downloaded or made, just enter the full path to that icon in place of the line mentioned above.
 If you do not know what icons are in the shell32.dll file, take a look at a program called IconXpert created by Xpert-Design to browse through the system icons located inside the file. This free application can be downloaded from their Web site, located at www.XpertDesign
.de/English/. Once you have IconXpert installed and running, browse over to the Windows and then the System32 folders to find shell32.dll. Once you select Shell32.dll, you will be shown all of the icons stored within the file. If you want to use a specific icon, just note its index number and use that in place of the 47 in the (Default) entry that you created above.
9.Now that the shortcut is set up, specify what it is supposed to do. To do this, expand the Instance folder that is inside the {2559a1f6-21d7-11d4-bdaf-00c04f60b9f0} folder and then expand the InitPropertyBag folder.
10.Inside the InitPropertyBag folder, you will be making the last changes for this hack. To start off, you will want to create a new string value and call it Command. You can create this by right-clicking the InitPropertyBag folder and selecting New, and then String Value.
11.Right-click the new string value that you created and select modify. Key in TweakXP.com in the value data box and click OK. This value will be the text that is displayed on the Start Panel.
12.Now you are almost finished. Create one more string value in the InitPropertyBag folder and name it Param1. Then right-click the string value, select Modify, type www.TweakXP.com, and click OK to save.
You are now finished! Once you log off and log back on, the changes will be activated. If you wish to make a shortcut that points to a different Web site, just replace all of the TweakXP.com’s to the name of the site that you want it to point to. Also you will have to modify the value of the Param1 string value to hold the address of the new Web site. Be sure to always include http:// in front of your URLs so that the shortcut works properly.