


Chapter 2 — Customizing User Navigation |
71 |
Removing the notification area
The notification area is the right side of the taskbar, where all of the little system tray icons are located. This item is not critical to the operation of the system and can be removed if you want more room for your open programs and other toolbars. However, any program such as an instant messenger program, that might minimize itself to the notification area will be a little more difficult to get to. The only way to remove the notification area is to use the Group Policy Editor. Unfortunately, this will only work if you are using Windows XP Pro. If you are running Windows XP Pro, then follow these steps to remove the notification area:
1.Launch the Group Policy Editor by clicking the Start button and then selecting Run. Type gpedit.msc in the box and click OK.
2.Once the policy editor has loaded, expand Administrative Templates, and then select Start Menu and Taskbar.
3.Locate and select Hide the Notification Area. Right-click it and select Properties.
4.Then, just click Enable and click the OK button to save your changes.
The next time you log on, your notification area will be gone. If you want to free up even more room, consider removing the clock by reading the next section.
Removing the clock from the taskbar
The clock can be very useful if you don’t have any other clocks in the same room as your computer. Otherwise, it is just taking up space. After all, how many clocks do you really need? If you want the maximum amount of space for your toolbars and open programs on the taskbar, I suggest that you also remove the clock.
Removing the clock is extremely simple. Follow these quick instructions:
1.Right-click the system clock and select Properties.
2.Then, under the Notification Area on the Taskbar and Start Menu Properties window, uncheck Show the Clock.
3.Click OK to save your changes and the clock will be gone.
Summary
This chapter has taken you through the steps of customizing the Start Menu and then onto the task bar. You made your Start panel work the way you want it to and made it even more convenient. If you liked the classic Start Menu, you were shown how to change the settings so that you could use it. Then you were shown how to customize and improve the way the taskbar works.
The next chapter will concentrate on customizing the desktop. You’ll find out how you can use great tools, such as the multiple desktop PowerToy, to create several different desktops for one user. Then, you will learn how to change other desktop settings to customize your desktop.

Hacking the
Desktop
tudies have shown that customizing your desktop will result in a 64 Spercent increase in productivity as well as a 248 percent increase in
happiness levels of computer users. I was unable to contact the institute where these numbers purportedly came from to confirm this information, but even if these numbers are slightly off (or completely made up), customizing the desktop is still very beneficial.
This chapter will show you some cool tricks and tools to make your desktop look and work much better so that you can also benefit from a customized desktop. Starting with the icons, it will show you how to remove, enlarge, replace, and adjust the special effects, such as the drop shadows. Then, it will move on to customizing the way your desktop behaves and operates by using Active Desktop and a cool desktop PowerToy.
The desktop seems like a pretty simple part of the operating system, but there is a lot you can do to it to make using your computer more efficient as well as fun.
Customizing Desktop Icons
The first time I started up Windows XP, I was shocked to find only the Recycle Bin icon on the desktop. Where were the rest of the icons? Did the install screw up? Microsoft is starting to transition away from the desktop that we are all used to with previous versions of Windows. With the introduction of the Start panel, the same icons on the desktop are just not needed. Now, the desktop looks much cleaner and more visually appealing because there are not 50 icons on the screen blocking your view of the wallpaper.
I have to admit, I like the clean interface, but I miss some of the icons that used to be on the desktop. Thankfully, you can do a number of different things to customize the desktop to bring back some of the old icons and also customize them so that you can preserve the clean look while restoring functionality. The next several sections will show you how you can get your desktop looking the way you want it to by taking advantage of hidden features and tricks.
chapter
in this chapter
Customizing Desktop Icons
Working with Shortcuts
Changing Visual Effects
Customizing the Behavior of the Desktop

74 Part I — Customizing Your System
Removing all icons from the desktop
No matter how hard I try, I always end up with a lot of junk on my desktop. From programs that I download and documents that I was too lazy to save elsewhere as well as new program links that seem to pop up from nowhere, there is never an end to the war that I fight with my desktop to keep it clutter-free. I like to be able to see my desktop wallpaper and not have my view of the wallpaper blocked by useless icons. One great way to win the never-ending desktop war is to just disable the desktop’s ability to show the icons and instead place the most common desktop icons, such as My Computer and the Recycle Bin, on the Quick Launch bar.
Disabling the icons on the desktop is actually a very simple task. Most people never know about this feature, because it is placed where you would really never expect it. To get started, just right-click Desktop. Then expand Arrange Icons By and select Show Desktop Icons to unselect it. After a few seconds, the icons will disappear.
Don’t worry, the icons and folder on your desktop were not deleted. If you ever want to turn the icons back on, just repeat the preceding steps once more.
This is a very simple way to quickly clean up the desktop. It’s sort of like sweeping the dirt under a rug. The desktop clutter is still there, but you just can’t see it.
Customizing the icon drop shadow effect
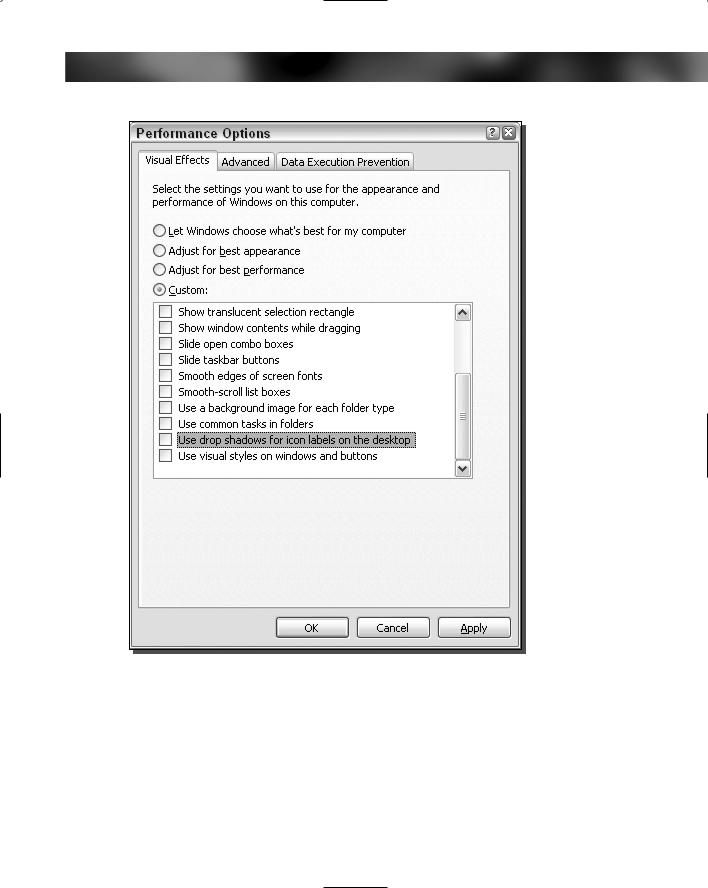
One cool new feature of Windows XP is the Use Drop Shadows for Icon Labels on the Desktop. This new effect really makes the icons stand out from your wallpaper and makes them much easier to read when you are using a background, such as a photo, that has both light and dark spots. Unfortunately, depending on your computer’s hardware configuration, you may or may not be able to experience this cool new effect. If you have a newer computer that has an average graphics card, you will have no problem using this feature. But if you have an older graphics card, then you may be out of luck.
The Use Drop Shadows for Icon Labels on the Desktop can be turned on or off. Depending on the wallpaper that you are using, you may like or dislike the feature. I really like the new effect, but if you like having a clean and crisp interface, I recommend disabling the effect. Follow these steps to turn the feature on or off:
1.Click the Start button, and select Run.
2.Key in sysdm.cpl and click OK to launch system properties.
3.Click the Advanced tab, and then click the Settings button under the Performance section.
4.While on the Visual Effects tab, scroll down to the bottom of the box.
5.Locate Use Drop Shadows for Icon Labels on the Desktop, as shown in Figure 3-1, and check or uncheck the value, depending on what you would like to do.
6.Click OK to save your changes.
7.Click OK once more to close the System Properties window.
Chapter 3 — Hacking the Desktop 75
FIGURE 3-1: Turning the drop shadow effect on and off for icons on the desktop.
If you enable the effect by checking the box and the effect still does not show up after you reboot your computer, this is a sign that your computer does not support the feature.
Displaying the traditional Windows icons
Now that Windows XP includes the new Start panel with shortcuts to My Computer, My Documents, My Network Places, and Internet Explorer, the shortcuts on the desktop are less important and Microsoft decided to remove them. If you are a user that doesn’t like clutter on

76 Part I — Customizing Your System
FIGURE 3-2: Selecting which icons to display on the desktop.
your desktop, then this feature is great for you. But if you like the old way of using Windows, and like the desktop to be the center of your navigation instead of the Start panel, then you are out of luck.
However, just as with other new features in Windows XP, with the desktop you can revert to the old way of doing things. Turning the desktop icons back on involves a little more effort than just switching back to the classic Start Menu, but doing so still is not very difficult. Follow these steps and you will be able to select which icons you want back:
1.Right-click the desktop and select Properties.
2.Click the Desktop tab and then click the Customize Desktop button at the bottom of the window.
3.Then, on the General tab, just select the check box next to the icons you want to display, as shown in Figure 3-2.

Chapter 3 — Hacking the Desktop 77
4.Click OK to save your changes.
5.Click OK once more to close display properties.
You will see the icons on your desktop immediately after you complete the steps.
Enabling large icons on the desktop
Windows XP has support for larger and more colorful icons than any other previous Windows version. The support for high-quality graphics is one of the reasons why Windows XP looks so much better than previous versions of Windows. This section will show you how to take advantage of the new graphical enhancements to make your desktop look cool.
Two different sizes of icons are used on the Windows XP desktop. The normal size for icons in Windows XP is 32 32 pixels. Windows XP also has support for larger icons, which are 48 48 pixels. Figure 3-3 shows the difference in size between the two icons. Use of the larger icons will not only help your vision but will also make your desktop look more visually pleasing, because the larger icons are more detailed.
I recommend that you turn the large icons on, to see how you like it. If you have a large monitor, chances are that you will love the large icons. Some of you, however, may not like them because they take up more space than the smaller icons and decrease the amount of icons that can fit on your desktop. Although this is a tradeoff, I feel the high-resolution icons are worth it. To get started, follow these steps:
1.Right-click the desktop and select Properties.
2.Click the Appearance tab and then click the Effects button.
3.Check the Use Large Icons box, as shown in Figure 3-4.
4.Click OK to save your changes.
5.Click the OK button again to close display properties.
FIGURE 3-3: Large and normal size icons.
78 Part I — Customizing Your System
FIGURE 3-4: Enabling large icons.
The large icons should be displayed immediately after the change. You will notice that some other icons will also enlarge. This is a side effect of using this tip, because it is impossible to adjust just the size of the icons on the desktop. However, only the icons that you see when you browse your computer and use the Control Panel are slightly larger. None of the other icons are changed.
To revert to the normal-sized icons, just repeat the preceding step and uncheck Use Large Icons.
Removing the text below the icons
Icons and text always go together. Every single icon on your desktop has to have a label below it. If you have a lot of icons on your desktop, the text under the icon is very valuable. However, if you have few icons on your desktop, you can get away with just using the icons alone. Doing so will result in a much cleaner interface. Amazingly, your desktop will look much simpler and cleaner without the labels below the icons.
How is it possible not to display the text? Well, it is actually just a trick. You are not really removing the text under the icons. Instead, you are replacing the name of the icon with some characters that the computer will not display. Renaming the icons would be very easy if all that was involved was clicking the name and pressing the spacebar a few times. Unfortunately, that is not the case, because Windows does not allow you to enter in a space with the spacebar. Instead, you can use the ASCII code for a space. Every character that is used in the computer is stored in the PC as a code for a character. For example, the ASCII code for an s is 0115, the ASCII code for a copyright sign is 0169, and so on. You will be interested in the ASCII code
Chapter 3 — Hacking the Desktop 79
for a character that shows up as a blank space, which is 0160. Now that you know the basics of ASCII, let’s rename some files.
1.Start with the first icon that you want to rename: right-click it and select Rename.
2.Select all of the text, and erase it with the Backspace key.
3.Now, enter in the ASCII code for the space, so make sure your Numlock is on, and just press and hold the Alt key while typing in 0 1 6 0 on the numpad on the right of the keyboard.
4.When you have finished typing in 0 1 6 0, let go of the Alt key and the blank space will be inserted.
5.Then, just press Enter to save the new name.
If you want to remove the text of multiple icons, then you will have a problem with the instructions because each shortcut or item must still have a unique name. One easy workaround is to enter in the ASCII code as the previous directions indicate, and then add a space using the spacebar after it. The first icons will have the ASCII space code + one space, the second icon will have the ASCII space code + two spaces, and so on.
Removing the text below the icons also allows you to do some fun things with the placement of your icons. Try removing the name of several icons. Then, turn on large icons, if you have not already done so, and line them up just above the taskbar, as shown in Figure 3-5. This will give you a setup that is similar to the bar on Apple’s OS X. Although your icons won’t be animated and bounce around, you will be able to set up your interface so that it looks like the OS X setup.
Renaming the Recycle Bin
The Recycle Bin is a great feature of Windows, but it is very difficult to customize the name. Unlike other system icons on the desktop, you cannot just right-click it and select Rename. The only way to rename the Recycle Bin is to hack the Registry. This is not as simple as the method for the other icons, but you can easily get through it. To get started, let’s assume that you want to rename the Recycle Bin as Trash Compactor:
1.Click the Start button and select Run.
2.Then type regedit in the box and click OK.
3.When the Registry Editor is started, you will want to expand the HKEY_CURRENT _USER, Software, Microsoft, Windows, CurrentVersion, Explorer, CLSID, and {645FF040-5081-101B-9F08-00AA002F954E} folders.
FIGURE 3-5: Icons placed to look like the OS X bar.

80 Part I — Customizing Your System
4.When you have expanded the last folder, you should see an entry called (Default) that has no value. Right-click that entry and select Modify.
5.Next, just type Trash Compactor, or any other name, in the box and click OK. If you want to hide the text under the Recycle Bin icon, you will still have to specify a name. Instead of typing in a word, just click the spacebar once and then click OK. You do not have to worry about entering in the ASCII code for a space when editing the registry.
6.Close the Registry Editor and press F5 when viewing your desktop to see your changes. If that does not work for your computer, then you will have to log out and log in to activate the changes.
Now your Recycle Bin is no more. Hello Trash Compactor!
 If you want to undo this hack, just import the registry file on the companion CD-ROM located in the Chapter 3 folder called undo_recycle_rename.reg.
Removing the shortcut arrow from icons on the desktop
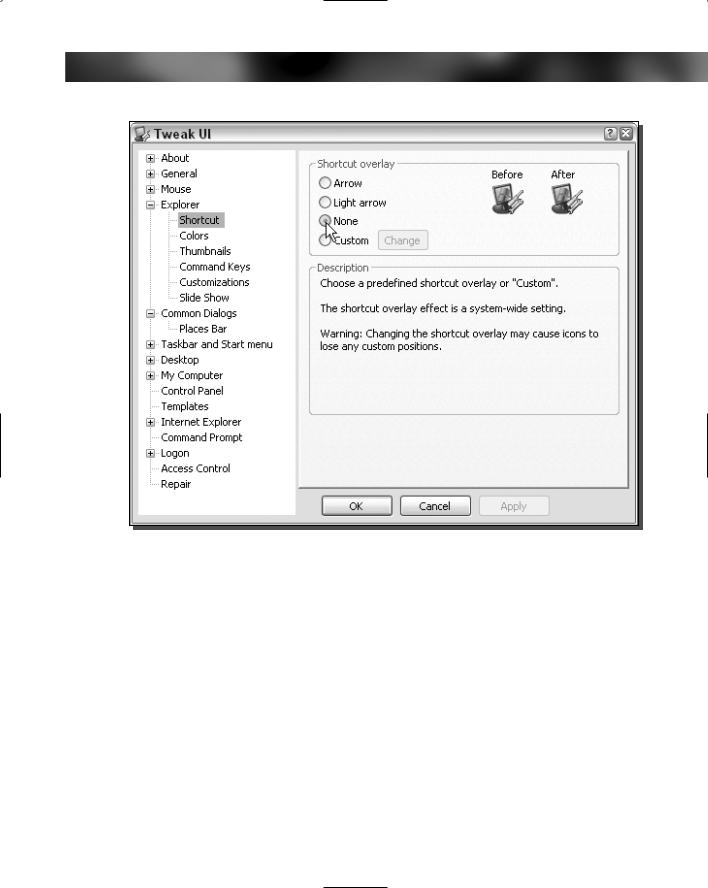
One thing that I always hate about Windows is the shortcut arrow. Sure, it is good to be able to tell if a shortcut is actually a shortcut, but I think I know that the applications that I put on my desktop are already shortcuts. This feature can be annoying as well as problematic. One example of this is when you use the large icons. Any icon that is a shortcut has a stretched version of the arrow in the lower-left corner of the icon, making the icon look pixelated.
A number of different solutions to the shortcut arrow problem are available. You can replace the big white square with a smaller semi-transparent arrow, use your own icon file, or you can disable it completely. The best way to change the shortcut arrow setting is to use the most popular Microsoft PowerToy, Tweak UI. You should already have a copy of Tweak UI installed on your computer, if you followed my suggestions and instructions from Chapter 2. But
just in case you don’t, you can get a copy of it from the PowerToys Web page, located at www.microsoft.com/windowsxp/pro/downloads/powertoys.asp. Follow these steps to change the shortcut arrow settings:
1.Click the Start Menu and expand All Programs, PowerToys for Windows XP, and then select Tweak UI to start it up.
2.Once Tweak UI is started, expand the Explorer entry and select Shortcut.
3.You will now see four different icon Shortcut Overlay options. I recommend you try using the light arrow options first. Then if you still don’t like it, click None, as shown in Figure 3-6, to remove the shortcut arrows.
4.Once you have made up your mind and selected the Overlay option, click OK to save your changes.
You may now close Tweak UI. Your changes will show up after you reboot.
Chapter 3 — Hacking the Desktop 81
FIGURE 3-6: Using Tweak UI to customize the shortcut overlay.
Changing the icons on the desktop
The new icons that come with Windows XP provide a much-needed change from the boring low-resolution icons of previous Windows versions. The new icons have started a whole breed of icons, known as the XP-style icons. There are now hundreds of Web sites started by artists where you can download their personal XP-style icon creations. My favorite site is www.foood
.net, which offers hundreds of very well-designed XP icons for free. Now that there are so many cool XP icons floating around on the Web, why not replace your desktop icons for a fresh new look?
Changing the desktop icons is very simple in Windows XP. The most difficult part of the process is finding good XP icons. To help you out on your hunt for cool XP icons, I have created the following list of some of my favorite icon Web sites:
Iconica: www.marvilla.us
I heart NY: www.iheartny.com/xicons

82 Part I — Customizing Your System
WBC Icons: www.wbchug.com
Foood’s Icons: www.foood.net
I-cons: http://i-cons.tk/
xIcons: http://xp.xicons.com
Now that you have a few good sites to start your search, it is time to actually change the icons on the desktop. As already noted, changing the icons is easy. But if you want to change the icon of one of the system shortcuts, such as the My Computer, My Documents, and My Network Places icons, as well as the Internet Explorer and Recycle Bin icons, then you have to follow a special procedure. Follow these steps to change any of the system icons:
1.Right-click the Desktop and select Properties.
2.When Display Properties loads, click the Desktop tab and click the Customize Desktop button at the bottom of the window.
3.Just click the icon that you want to change, as shown in Figure 3-7, and then click the Change Icon button.
4.When the change icon screen shows up, click the Browse button and navigate to the icon that you want to use.
5.Once you have selected the icon that you want to use, just click OK and your icon should change in the preview box.
6.When you are finished changing all of the icons, click OK to save your icon modifications and return to the Display Properties window.
7.Now, just click OK once more to save your changes.
Changing the system icons is pretty simple, but changing other icons on your desktop, such as program shortcuts and folders, is even easier. Just follow these steps:
1.Right-click the item for which you want to change the icon and select Properties.
2.If you right-clicked an application shortcut, then you will see the Change Icon button at the bottom of the window. If you are trying to change the icon of a folder on your desktop, you will have to click the Customize tab first and then you will see the Change Icon button at the bottom of the window as well.
3.Once you are finished changing the icon, click OK to save your changes.
 If you want to change other system icons, such as the Internet Explorer icon, Drive icons, or the Folder icons, you will have to use a special utility. Many programs on the Web will allow you to do so, but the two that I like to use are called Microangelo (www.microangelo.us) and Icon Packager (www.stardock.com/products/iconpackager/).