


Chapter 8 — Speeding Up the System Boot 187
FIGURE 8-2: BIOS setup screen displaying the quick boot feature.
Modifying the Operating System Boot
Other hacking methods are still available that will shave a few more seconds off the boot time. For example, you can cut timeout values and slim down the system to get rid of all of the extra features and services that you do not use or need. Check out the following ways to do so.
Lowering OS timeout values
If you have more than one operating system installed on your computer, you’ll have to deal with the OS Selector that the Microsoft installer configures during installation of another operating system. By default, the OS Selector gives you 30 seconds to select an operating system before it reverts to the default operating system. The only way not to wait 30 seconds is to select the operating system you want to use right away. If you use one operating system most of the time, you would definitely save time if you set that operating system as the default and lowered the timeout value to 1 or 2 seconds. That way, you would not have to
188 Part II — Increasing Your System’s Performance
select an operating system every time you turned on your system or wait 30 seconds before doing so.
With Windows XP, both Professional and Home, changing the timeout value is simple if the operating system that you use primarily is already the default. If it is, just follow these directions:
1.From the Start Menu, select Run and type MSCONFIG and press OK. This will load the System Configuration utility.
2.Once the System Configuration utility has loaded, click the tab labeled BOOT.INI, as Figure 8-3 shows.
3.Locate the Timeout text box and replace 30 seconds with 1 or 2 seconds––or any number that gives you enough time to select the other operating systems on your system. The amount of time that you select to be your timeout value is not the amount of time you have to select the operating system. Rather, it is the amount of time you have to click any key and then select the operating system. So don’t be afraid of setting this timeout value too low.
4.Once you have made the change, click the OK button, and you are finished.
FIGURE 8-3: Microsoft System Configuration Utility boot settings.

Chapter 8 — Speeding Up the System Boot 189
If, after testing out your change, you feel that you gave yourself too much or too little time to select the other operating system, repeat the directions above to fine-tune your timeout time.
If you don’t have your primary operating system as your default timeout operating system and you want to do so, load Notepad from the Accessories menu in the All Programs section of the Start Menu. Once Notepad is loaded, do the following to set the default:
1.Select File from the menu bar and select Open, and navigate to your root system drive. Type Boot.ini in the File Name text box and click the Open button.
2.Under the [operating systems] heading, you will see your operating systems listed. You will notice some disk and partition information that has an equal sign after it that then has the title of the operating system in quotes. Copy all of the disk and partition information to the left of the equal sign (such as “multi(0)disk(0)rdisk(0)partition(1)\WINDOWS”) to the clipboard by highlighting the text with the mouse and then pressing Ctrl C.
3.Then locate where it states default in the boot configuration file. Paste the new disk and partition information over the old information to the right of the equal sign by highlighting the old information and then pressing Ctrl V.
4.Save the file and close Notepad. That’s it!
You can also change the default timeout value editing the boot.ini file in Notepad. But using the System Configuration Tool is much easier for doing so. The System Configuration Tool has a lot of other useful features. I’ll go into more detail about them in Chapter 9.
Disabling the system boot screen
So, are you enjoying the fun blue bars moving across your screen when your system starts up? Not? Are you finding that you can live without the daily reminder that you are running Windows XP? If so, then you might want to consider removing the boot screen. One added advantage to doing so: You will be getting a boost of performance in return.
Disabling the boot screen might only save you a fraction of a second off your boot time. But keep in mind, every fraction of a second counts. And when you apply all of the performance hacks listed in this part of the book, you will see a definite performance increase.
This performance improvement works on a very simple principle. It takes time for the computer to do anything. Taking away some work that it has to do, such as loading the boot screen, will free time that it can spend loading your system files instead.
The process for disabling the system boot screen is similar to the process for modifying the default operating system in the boot file. If you do not have any other operating systems installed on your system, then you will have to create your own boot.ini file to place in your drive root (that is, the c:\ drive). I am going to show how to create a file first, and will then show how to modify the boot.ini file if you already have one in your drive root or have multiple operating systems installed.

190 Part II — Increasing Your System’s Performance
Creating the boot.ini file
This section will show you how to create a boot.ini file for your computer if you have just one operating system installed and you do not already have a boot.ini file in your drive root. To get started, let’s go over what the boot.ini file looks like.
The boot.ini file that disables the boot screen looks like the following:
[boot loader] timeout 0
default multi(0)disk(0)rdisk(0)partition(1)\WINDOWS [operating systems]multi(0)disk(0)rdisk(0)partition(1)\WINDOWS "Microsoft Windows XP Professional" /fastdetect /noguiboot
The above boot.ini file is pretty standard except for the addition of the /noguiboot to the last line of the file. That is the parameter that tells Windows to start up without using the graphical user interface boot screen. To get started, open up a copy of Notepad, found in the Accessories menu of the All Programs entry, in the Start Menu and follow these steps:
1.On the first line of the file, type in [boot loader].
2.On line 2 of the file, key in timeout 0 so Windows does not show the boot selection screen at all. You don’t want this anyways because you only have one operating system installed on your computer.
3.On line 3 of the file, type in default multi(0)disk(0)rdisk(0)partition(1)\WINDOWS so that Windows knows where to look on your hard drive to start the operating system.
4.On line 4, type in [operating systems].
5.On line 5, type in multi(0)disk(0)rdisk(0)partition(1)\WINDOWS ”Microsoft Windows XP Professional” /fastdetect /noguiboot to start up Windows with the
/noguiboot parameter to disable the boot screen.
 If you upgraded your computer from Windows 2000 or any other NT-based product and your root Windows directory is not Windows, then you will have to make one change to the boot.ini file to correct where the path of the Windows files are located. On Lines 3 and 5, replace all references to \WINDOWS to \WINNT or the name of the directory to which you installed Windows. This will set your system to boot from the right folder.
6.Click the File menu bar item and select Save As.
7.Type Boot.ini in the File name box and change the Save as type to All Files.
8.Then, change the Save in directory to your drive root, which is usually Local Disk (C:).
9.Click the Save button and you are now finished.
You can now close Notepad. The next time you reboot your computer, you will not see the boot screen.

Chapter 8 — Speeding Up the System Boot 191
 A sample BOOT.INI file can be found on the companion CD-ROM in the back of the book in the Chapter 8 folder.
Modifying an existing boot.ini file
If you have a multi-boot system or already have a boot.ini file, then all you have to do is open up your boot.ini file in Notepad and follow these steps:
 You should make a backup copy of your existing boot.ini file just in case you make a mistake editing the file. To make a backup, just open up My Computer to your root drive where the boot.ini file is located, then right-click it and select Copy. Next, right-click the white background of the folder and select Paste. This is an easy way to make a backup copy of the file that will be automatically named copy of boot.ini.
1.Locate the Windows XP line in your boot.ini file that will look similar to “multi(0)disk(0)rdisk(0)partition(1)\WINDOWS “Microsoft Windows XP Professional” /fastdetect”.
2.Type /noguiboot at the end of the line one space after /fastdetect.
3.Click File and select Save.
These instructions will remove your boot screen. But should you change your mind after you made the change, it is very easy to get the boot screen back. Simply remove the /noguiboot from the boot.ini file. If you are working from the file that you created yourself or copied from the CD-ROM, just delete it.
Disabling unneeded hardware devices
Every time you turn on your computer, it has to load and initialize all of your computer hardware. Keep in mind: Your computer has a lot of devices that you do not always use. These extra devices are loaded and initialized during every boot. When it does so, your computer’s performance is slowed down.
Windows XP is now a lot more efficient and smarter during the boot-up cycle. In previous versions of Windows, the system would load one hardware device driver and then load another device driver in a series. The only problem with loading the hardware this way was that it could slow down the boot dramatically if one hardware device was taking a long time to initialize. One well-known culprit of this is the network card which pauses to wait to get an IP from a DHCP server.
Windows XP has a new way of initializing the hardware devices when the system boots up. Instead of loading the hardware device drivers in series, it now loads some of them in parallel. This allows the boot to be much faster. Although the hardware devices are loaded in parallel instead of series, the addition of more devices that the system has to load drivers for will probably still slow down the boot.
192 Part II — Increasing Your System’s Performance
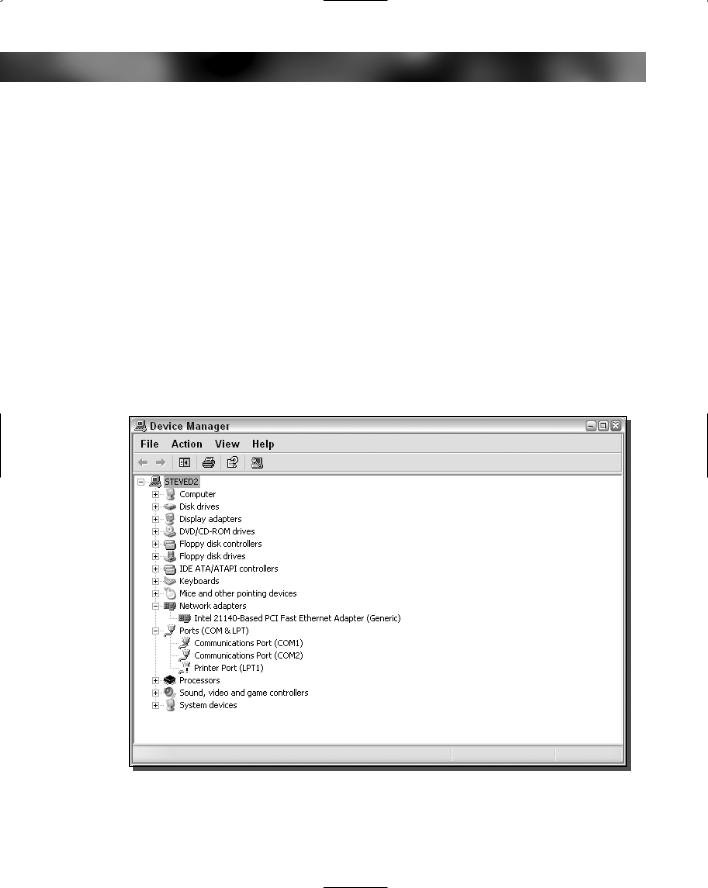
To disable hardware devices, you will want to use the Device Manager. Figure 8-4 shows the Device Manager and all of the different categories of devices. To get to the Device Manager, do the following:
1.Go to the Control Panel using the shortcut on the Start panel or menu if you are using the classic Windows interface.
2.Once you are in Control Panel, locate the System icon and run it. If you cannot find the System icon, most likely you are using the Control Panel Category View. If you are using the Category View, click the Performance and Maintenance icon and then you will see the System icon under the “or pick a Control Panel icon” heading.
3.Once the System Properties window has loaded, click the Hardware tab. Under the Device Manager section, click the button that says Device Manager.
4.Now that you are inside of the Device Manager, you can browse through your devices that are connected and currently running or disabled by browsing through the device type sections. To disable a device, right-click the device name, and then select Disable.
5.To re-enable a device, right-click the device name, and select Disable. This will remove the check from the menu and will re-enable the device.
FIGURE 8-4: Windows Hardware Device Manager displaying one device that is disabled (COM1) and one device that has a problem (LPT1).

Chapter 8 — Speeding Up the System Boot 193
 To quickly determine the status of a device, check out the icon next to its name. All devices that are disabled have a red X over the icon. All devices that have a question mark or an explanation point on them are not set up correctly or are having problems. All devices with none of the above additions to the icon are running––and doing so without any problems.
What hardware devices should I disable?
Each user uses (or doesn’t use) devices differently, depending on the system setup. Nonetheless, some classes of devices are more commonly disabled than others. Knowing which ones will help you make a decision as to what devices you should disable. The following classes of devices are frequently disabled:
Network Adapters: Especially on Notebook computers, there are often more than one network device. Disabling the network devices that you do not use will definitely save you some booting time.
Fire wire: If you have 1394 connections, otherwise known as fire wire, you might consider disabling them. Unless you are using your fire wire port to connect your digital video recorder to your computer, or have other external fire wire devices, you have no need to have this device enabled.
Modems: Do you have a broadband connection? If so, then consider disabling your modem. If you rarely use it, disable it. If you ever need to use it again, just re-enable it.
Multimedia devices: Your computer has lots of multimedia devices. Take a look at the “Sound, video, and game controllers” section in Device Manager. You will find a lot of device drivers that are loaded during your boot. Some are used by all users, but others will find a few that they do not use. For example, I do not use my game port or my MIDI device, so I disabled both of those.
PCMCIA: If you are a laptop user, consider disabling your PCMCIA card controller, located under “PCMCIA adapters.” The PCMCIA (Personal Computer Memory Card International Association ) slot is a special expansion slot that is rarely used today on laptops except for wireless and wired network cards and card reader attachments for compact flash and other solid state memory cards. Most laptops now have built-in network adapters and some even have built-in wireless adapters. If you do not use your PCMCIA adapter, it is yet another device that can be safely disabled.
 Do not disable any hardware devices that are located under the Disk Drives, Computer, Display Adapters, IDE Disk Controllers, and the System sections (except for the system speaker) because these hardware devices are critical to the operation of your computer.
Removing extra fonts for speed
Windows XP has over 250 different font variations that it loads for use when the system boots up. Of these 250 variations, only a handful are used on a regular basis. Most likely, you really only use the core Windows fonts, such as Tahoma, Times New Roman, Arial, Verdana, Trebuchet, and

194 Part II — Increasing Your System’s Performance
MS Sans Serif. All of the other fonts can be removed form the fonts folder. As you can imagine, loading over 250 fonts is something that will take the system more time to do. Users who have installed a fonts CD, which usually has hundreds of fonts, on their systems are increasing the amount of work their computer has to do during startup. Simply put, loading a lot of fonts will take more time, because the system has to load and index each font. Thankfully, there is a very simple answer to this: Just remove the fonts that you do not use from your font directory.
You can go about removing the unneeded fonts from your font directory in a number of different ways. The best way is to move the unused fonts to a separate folder on your system so that if you ever want to use one of those extra fonts again, you just have to copy it back to the fonts folder.
 When you remove fonts from your computer, you will no longer be able to use them in any software application, including Microsoft Word and Excel.
Before you start removing fonts from your fonts folder, take at look at Table 8-1. These fonts are commonly used, for reasons that the table explains. Be careful not to remove any fonts on which the system normally depends.
Now that you know which fonts you should not remove, you also need to be aware of one more thing before starting your adventure in the fonts folder. Inside the fonts folder, there are several fonts with similar names. The fonts are broken up not only by font name but also by type style. For example, there is an Arial Bold, Arial Bold Italic, Arial Italic, etc. When sorting through the fonts to delete, you also can choose to delete only specific types of fonts.
Deleting fonts is fairly easy. But removing the fonts is a little more tricky because the fonts folder is not like a normal folder. In order to remove the fonts, you need to start off by creating a folder to put the old fonts in.
Table 8-1 Recommended Fonts to Keep |
|
Font Name |
Reason |
Verdana |
Often used on Web pages and applications |
Arial |
Often used within applications such as Outlook |
Trebuchet |
Used in the Windows interface on the Title Bar |
Tahoma |
Used in the Windows interface on the Menu |
|
Bar as well as in many applications and |
|
Web pages |
Times New Roman |
The default font for Web pages as well as |
|
applications such as Word |
MS Sans Serif |
Used in some applications and Web pages |

Chapter 8 — Speeding Up the System Boot 195
1.Open up My Computer through the icon in your Start panel or from the icon on your Desktop. Navigate to the C: drive or whatever drive on which you have Windows installed.
2.Next, navigate to the Windows folder (or WINNT folder for some). If along the way you are prompted with a screen telling you that “this folder contains a file that keeps your system working properly; you should not modify its contents,” ignore this message and click the text that says “show the contents of this folder.”
3.Now that you are inside the Windows root folder, create a folder to store the fonts that you are going to remove from the fonts folder. Right-click the white space that lists the folder and files and select New and then select Folder. Call your folder Fonts Backup or something similar so that you will be able to identify that this is the place that your old fonts are.
4.Once you have created the new folder, open it.
5.Next, go back to the My Computer icon in your Start panel or Desktop and open another window. Navigate to the drive you have Windows installed on and then navigate to the Windows folder. Once you are inside the Windows folder, navigate to the Fonts folder.
6.Now that you have both the Fonts folder open and your backup folder open, arrange the two windows on your screen so that they look like the two windows in Figure 8-5.
FIGURE 8-5: The Windows Fonts folder and a backup folder are arranged side by side on the screen.

196 Part II — Increasing Your System’s Performance
7.Now that the two font folders are side by side, to remove a font from the system, all you have to do is click the icon in the Fonts folder that you do not want installed any more, and drag the icon over to the backup folder. This will automatically uninstall the font and will copy it to your backup folder.
In the event that you want to reinstall a font, all you have to do is drag the font file from the backup folder back to the Fonts folder. You will see an installation dialog box that will flash just for a second as it adds the font back to the library. Once you drag the file back to the Fonts folder, the file will still remain in the backup directory because it just copies it there. After you have confirmed that it was actually installed again, feel free to delete the font file from the backup folder.
Disabling unneeded services
A service is a software application that runs continuously in the background while your computer is on. The Windows operating system has numerous services that run in the background that provide basic functions to the system. Network connectivity, visual support, and external device connectivity such as printer services are all examples of the types of services that the Windows services provide. Each of the services running in the background take up system resources, such as memory and CPU time. Also, during the booting of the operating system, the service has to be loaded. On most computers, there are nearly 20 services that are loaded upon startup. Of these 20 services, only a handful are system-critical services. All of the others can be disabled. In order to disable a service, first you will need to know more about what the most common services do. Table 8-2 will help you understand what the most common services are, what they do, and if they can be disabled.
Table 8-2 Common Windows Services in Use |
|
Service Name |
Service Use |
Automatic Updates |
Used to download and then install updates |
|
automatically without the user going to Windows |
|
Update manually. This service is not system-critical |
|
and can be disabled, but unless you check for updates |
|
regularly, it is not recommended to disable this service |
Background Intelligent Transfer Service |
A service that transfers data in the background |
|
when the connection is not in use. One use of this |
|
service is to download updates automatically in the |
|
background. This service is not system-critical but can |
|
impair other services, such as automatic updates, if it |
|
is disabled |
Com Event System |
Basically controls the notification of certain system |
|
events, such as log on and log off. The system event |
|
notification is dependent on this service. This service is |
|
system-critical |

Chapter 8 — Speeding Up the System Boot 197
Service Name |
Service Use |
Computer Browser |
Keeps track of the other computers on your network running |
|
the Microsoft Client for networking. This is what provides the |
|
list of computers when you are browsing your workgroup |
|
computer in My Network Places. This service is not system- |
|
critical and can be disabled if you do not need the network |
|
browsing function |
Cryptographic Services |
Basically manages system security certificates as well as |
|
provides a database of signatures of key Windows files. This |
|
service is not system-critical but it is required to install many |
|
Microsoft programs that want to check system file signatures. |
|
It is not recommended to disable this service because doing |
|
so would not allow Windows Update to run and install new |
|
updates |
DCOM Server Process Launcher |
Basically is in charge of starting various other services. This |
|
service is required for RPC, which is required for over 39 |
|
other services to run. Because of that, it is not a good idea to |
|
disable this one |
DHCP Client |
Provides support for dynamic network configuration. This |
|
service is not system-critical but is needed for those that do |
|
not set their IP address manually |
Distributed Link Tracking Client |
Keeps track of links to files on a NTFS volume on your |
|
computer or across a network. This service is not system- |
|
critical and can be disabled. |
DNS Client |
Resolves domain names into IP addresses, as well as |
|
caches lookup results. This service is not system-critical |
|
but you will not be able to browse the Internet without it |
|
started |
Error Reporting Service |
Allows users to report failures of applications directly to |
|
Microsoft so that Microsoft may fix bugs in its software if it is |
|
the culprit. This service is not system-critical and can be safely |
|
disabled |
Event Log |
Allows event messages to be recorded to be viewed in |
|
Event Viewer. This service is system-critical and cannot |
|
be disabled |
Fast User Switching Compatibility |
Allows users to switch to other users on the same system |
|
without logging off. This service is not system-critical and can |
|
be safely disabled |
Help and Support |
Used for the Help and support center. This service is not |
|
system-critical and can be safely disabled |
Continued
198 Part II — Increasing Your System’s Performance
Table 8-2 (continued) |
|
Service Name |
Service Use |
HTTP SSL |
Allows the personal Web server built into Windows XP (IIS 6.0) |
|
to provide secure data transfers over HTTP. This service is rarely |
|
used because most people never even set up the personal Web |
|
server on Windows XP. This service is not system-critical and |
|
can be safely disabled |
Indexing Service |
Creates a searchable database of, the items on your hard |
|
drive. This service is not system-critical and can be disabled if |
|
you do not search your drive often or can wait a few extra |
|
minutes to find a file |
IPSEC Services |
Provides IP security for certain secure connections over IP. |
|
This service is not system-critical and can be safely disabled. |
Logical Disk Manager |
Detects and monitors new hard disk drives. This service is not |
|
system-critical but it is used when you are upgrading your |
|
hardware and installing additional storage devices or using |
|
USB storage devices. If you do not plan on using any of the |
|
items above, the service may be safely disabled |
Machine Debug Manager |
Provides support for program and script debugging. This |
|
service is not system-critical and can be safely disabled for |
|
most users. |
Messenger |
Allows users to send text popup messages to computers on |
|
the network. This service is abused by spammers to send you |
|
advertisements. It is highly recommended that you disable |
|
this service |
Network Connections |
Provides, support for network connectivity. This service is not |
|
system-critical but it is recommended that it is not disabled |
Network Location Awareness (NLA) |
Provides services to computers that share your Internet |
|
connection. If you do not use the Internet connection |
|
feature, then, you may safely disable this service because it is |
|
not a system-critical service |
Plug and Play |
Allows your computer to detect hardware. This service is |
|
system-critical and cannot be disabled |
Portable Media Serial Number |
Detects the serial number of an external media device. This |
Service |
service is not system-critical and can be safely disabled |
Print Spooler |
Provides services to print. This service is not system-critical |
|
but it is necessary to print from your computer |
Protected Storage |
Provides basic security over certain system files. This service is |
|
system-critical and should not be disabled |

Chapter 8 — Speeding Up the System Boot 199
Service Name |
Service Use |
Remote Procedure Call (RPC) |
Provides services for other services. This service is system- |
|
critical and cannot be disabled |
Remote Registry |
Allows the System Registry to be connected to remotely. |
(Not included in XP Home) |
This service is not system-critical and it is recommended that |
|
it be disabled |
Secondary Logon |
Allows programs, to be started under different accounts. This |
|
service is system-critical |
Security Accounts Manager |
A database of local account information. This service is |
|
system-critical and should not be disabled |
Security Center |
Monitors your system security settings to notify you if your |
|
settings are insecure. You should keep this service running |
|
unless you are confident about your computer’s security. |
|
No other services depend on this service and it can be |
|
safely disabled given you have a good handle on your |
|
security |
Server |
Provides the ability to share files and your printer over |
|
your network. This service is not system-critical and |
|
can be safely disabled if you do not share files over a |
|
network |
Shell Hardware Detection |
Used to detect external storage devices automatically. If you |
|
do not use any external storage devices, such as external |
|
hard drives or memory cards, this service can be safely |
|
disabled |
SSDP Discovery Service |
Looks for Universal Plug and Play drives on your network. |
|
This service is not system-critical and can be safely |
|
disabled |
System Event Notification |
Tracks more system events. This service is system-critical and |
|
should not be disabled. |
System Restore Service |
Keeps track of changes made to your system to make |
|
restore points. This service is not system-critical but it is |
|
recommended that it is not disabled |
Task Scheduler |
Allows users, to schedule and configure tasks. This service is |
|
not system-critical and can be disabled if you do not need to |
|
schedule any tasks to run |
TCP/IP NetBIOS Helper |
Allows the NetBIOS network protocol to run over the |
|
TCP/IP Protocol. This service is not system-critical and |
|
can be disabled if you have no use for the NetBIOS |
|
protocol |
Continued

200 Part II — Increasing Your System’s Performance
Table 8-2 (continued) |
|
Service Name |
Service Use |
Terminal Services |
Allows users to connect to the computer with a remote |
|
desktop. This service is not system-critical but is used by |
|
the remote assistance Help feature. It can be safely |
|
disabled if you do not need the remote assistance |
|
feature |
Themes |
This is the service that gives Windows the new look. It allows |
|
visual styles to be applied over the normal gray Windows |
|
2000 style windows. This service is not system-critical and |
|
can be disabled |
WebClient |
This service adds support for Web-based file management for |
|
technologies such as WebDav. Most users will never need to |
|
use this service. It is not system-critical and can be safely |
|
disabled |
Windows Audio |
Provides audio support for the operating system. This service |
|
is not system-critical and can be safely disabled if you would |
|
like to give up your sound |
Windows Firewall / Internet |
Protects your computer from intruders and malicious |
Connection Sharing (ICS) |
programs attacking your computer via your Internet |
|
connection. It also provides the ability to share your Internet |
|
connection among other computers on your local network. |
|
This service is not system-critical but I do not recommend |
|
that you disable it unless you have another personal firewall |
|
application installed on your computer |
Windows Image Acquisition (WIA) |
Used to acquire data from optical devices such as a scanner |
|
or a camera. This service is not system-critical and it can be |
|
safely disabled if you have no use for it |
Windows Management |
Provides system information to applications. This service is |
Instrumentation |
system-critical and should not be disabled |
Windows Time |
This service is in charge of synchronizing the Windows time. |
|
If you do not need to have your time synchronized, this |
|
service can be safely disabled |
Wireless Zero Configuration |
Configures wireless 802.11 devices. If you do not have any |
|
wireless hardware installed, you may safely disable this |
|
service |
Workstation |
Allows your computer to make connections to other |
|
computers and servers. This service is not system-critical but |
|
it is needed for any basic networking |
Chapter 8 — Speeding Up the System Boot 201
Now that you know which services can be disabled and which services are important to your system, you can safely speed up your boot by disabling the extra services using the services management tool.
 Before you begin changing your service setup, set a System Restore Point to easily restore your system to an earlier configuration. However, be careful when you restore from restore points. Any applications or files that were created after the system restore point will be deleted when reverting to an earlier restore point.
The Services utility is included in all versions of Windows XP and is hidden away. Do the following to disable a service using the Services utility:
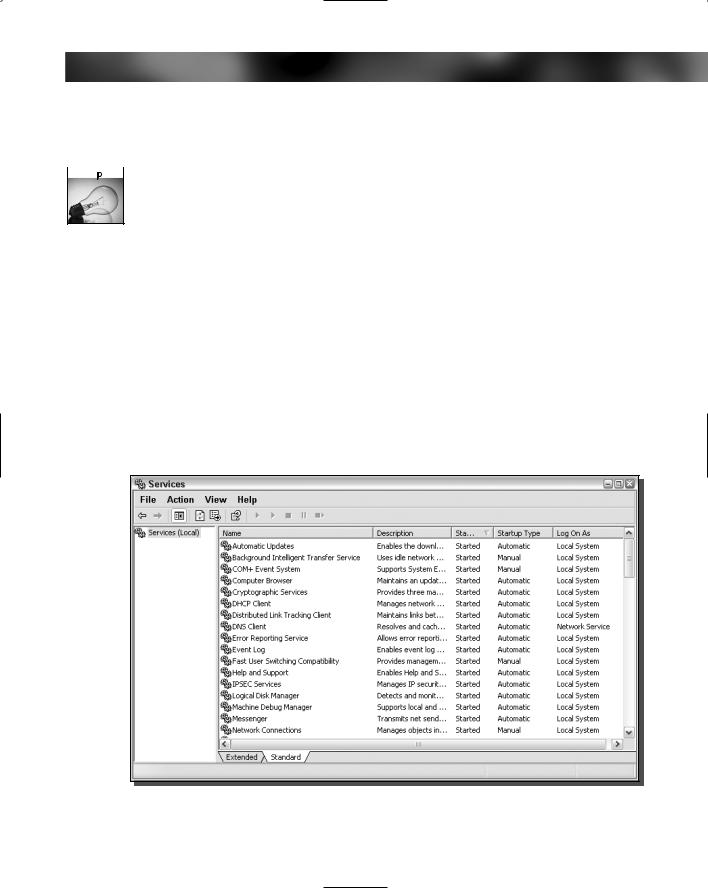
1.Click the Start Menu and select Run. In the text box, type services.msc and click OK. This will start the Services utility, as shown in Figure 8-6.
2.Now that you are in the Services utility, you will see a list of a lot of services on your computer. First, you will need to stop the service that you want to disable. Right-click the service name and select Stop on the pop-up menu.
3.When the service is stopped, right-click the service again and select Properties. Located on the General tab, look for the Startup Type drop-down box. Click the arrow on the drop-down box and select Disabled.
4.Click the OK button and from now on, the system will not start the service any more during boot, speeding up your system start.
FIGURE 8-6: The Windows XP Services utility.

202 Part II — Increasing Your System’s Performance
Bare-bones system service setup
To get the maximum amount of performance out of your system, you have the option of disabling all of the services on your computer that are not critical to the system. This would take away a lot of the nice features and conveniences of Windows, but you would have a much faster machine. The following is a list of system-critical services that should not be disabled. Feel free to disable all other services.
Bare Minimum Services:
Com Event System
Cryptographic Services
DCOM Server Process Launcher
DHCP Client
DNS Client
Event Log
IPSEC Services
Workstation
Shell Hardware Detection
System Event Notification
Protected Storage
Network Connections
Plug Play
Print Spooler
Remote Procedure Call
Secondary Logon
Security Accounts Manager
Recommended service setup
The bare-bones system service setup is a good setup for optimal performance. However, don’t you want to have some of the conveniences of Windows XP? Check out the recommended services to disable shown in the following list. If you follow these recommendations, you will cut down on your boot time but you will also have the nice features and conveniences of Windows XP.
Disable the following services:
Background Intelligent Transfer Service
Distributed Link Tracking Client

Chapter 8 — Speeding Up the System Boot 203
Error Reporting Service
Fast User Switching Compatibility
Help and Support
Indexing Service
Messenger
Machine Debug Manager
Network Location Awareness (NLA)
Portable Media Serial Number Service
Remote Registry (Only included with Windows XP Pro)
SSDP Discovery Service
Terminal Services
Windows Image Acquisition (WIA)
Wireless Zero Configuration (If you have a wireless network card, do not disable this one)
Windows Time
WebClient
Task Scheduler
Optimizing the location of the boot files
The speed at which your files are read depends on where the files are located on your hard drive. Also, when a file is fragmented (which is when one file is scattered all over the disk), it takes more time to access that file than if all of the pieces of the files were side by side.
Using tools that are available in Windows and other third-party utilities, you can defragment and place the Windows boot files on the disk where they will be accessed faster.
Windows XP has a new feature called the Prefetcher, which determines what files on the hard drive are used during the boot process and where they should be placed on the disk for optimal speed. Although this is not the only benefit that the Prefetcher provides, it makes optimizing the location of the boot files easy.
Using disk defragmenter
Windows XP includes a boot defragmenter, but it is a little tricky to get it to run. By default, it is run only in the background and cannot be started directly by a user. After your computer has been idle for some time, between 5 and 30 minutes, the system will read the Prefetcher’s boot data and start the defrag. The system defrag is run in the background and is invisible to the user. Eventually, if you leave your computer on long enough, it will defragment the boot files.

204 Part II — Increasing Your System’s Performance
Microsoft has a very talented team working for them and they even took into consideration that often your system boot changes. For example, you might install an updated device driver or add new hardware. To solve this problem, the system will re-defragment the boot files every three days.
 Windows keeps track of the last time it optimized the boot file so it can calculate how often it should run the boot defrag. If you are interested in finding out when the last time the boot defrag was run, open up regedit and navigate to: “HKEY_LOCAL_MACHINE\SOFTWARE\ Microsoft\Windows NT\CurrentVersion\Prefetcher” and then look for the key named “LastDisk LayoutTimeString”.
An operating system that takes care of itself? Yes, Windows is getting smarter and smarter. However, there is still one problem: There is no possible way to directly initiate a boot defrag. The only way is to leave your computer on for a little while without using it at all. If you are impatient and do not want to wait, then I have a solution for you.
As I mentioned earlier, the system will only initiate the boot defrag when the system is idle. Typing in a command that will start the boot is not possible. However, you can tell your computer, even when it is not idle, to process the idle tasks. This will indirectly start the boot defrag. Although because the boot defrag is most likely not the only idle task waiting to be run, there will be other processes run as well, which can cause your computer to appear to be doing a lot of hard work as it completes all tasks. During this time, your computer should not be used for any intensive activities, such as playing games. If you try to use your computer while the idle tasks are being processed, you will notice slow performance until the tasks are completed.
Do the following to tell the system to start to process all idle tasks:
1.Click the Start Menu and select Run.
2.Type Rundll32.exe advapi32.dll,ProcessIdleTasks in the text box and select OK.
3.Your computer will now begin working on the tasks.
Performing these steps will allow your system to defrag the boot files. However, because the boot defrag is done every three days, processing the idle tasks more frequently than three-day periods will do nothing to help you boot because the boot defrag will not be on your idle tasks lists all the time.
Using other shareware boot defrag programs
The built-in boot defragmenter is pretty darn good. However, there are a few things that other, third-party programs, feel they do better. And in fact, there actually are a few applications, such as Diskkeeper and O&O Defrag, that actually do more in their boot defragmentation process.
During the boot-up process, there are a lot of different things going on at once. Among others, drivers are loaded, system files are loaded, settings are read from the system registry, the builtin boot defragmenter starts to lack in support when talking about the registry files, the file table records, and other system files. Just like any other system data files, the registry files can

Chapter 8 — Speeding Up the System Boot 205
become fragmented with their daily use. In order to cut down on hard drive seek time for the registry and other system files, which can become quite large over time and more prone to fragmentation, it needs to be defragmented. This is where the third-party applications come in.
Boot time system defrag with Diskeeper
In order to defragment system files, and other files that are normally in use, the defragmentation must be done during the early stages of the system boot. This will allow the defrag program to have full access to all files so that it can place them together on the disk. One of the programs that allows this to be done is called Diskeeper, which is developed by Executive Software. A shareware copy of Diskeeper can be found on Executive Software’s Web site, located at www.executive.com/downloads/menu.asp. If you have not already installed Diskeeper, please do so now before proceeding any further.
Do the following to run a boot time defrag:
1.Before you can run a boot time defrag, there needs to be continuous free space on your drive. To accomplish this, simply run a normal online defrag through the Diskeeper utility.
2.After you have completed the online defrag, click the Action menu bar item, expand Change Your Settings and select Boot-Time Defragmentation.
3.Once a new windows pops up, you will have the option to select the drive, as well as several other defrag options. Make sure that you check: Put all folders together on volume, Run the system CHKDSK utility, Defragment the paging file, and Defragment the MFT (Master File Table), as shown in Figure 8-7.
4.Once you have set the correct options and made sure that you selected On Next Manual Reboot, reboot your computer when you are ready for the defrag.
Boot time defrag with O&O Defrag
Just as with Diskeeper, with O&O Defrag there is a boot-time defragmentation option. This allows the system files that are in use to be defragmented, as well as other special files such as the master file table. O&O Defrag is developed by O&O Software and uses different defragmentation algorithms than the Diskeeper program. I have included a section on this program to give you a chance to try both programs and find the program that works better for your system. A shareware copy of O&O Defrag can be found on O&O Software’s Web site, located at www.oo-software.com/en/download/.
Do the following to start a boot-time defrag in O&O Defrag:
1.Launch the O&O defrag application and select Add Job from the Jobs menu bar item.
2.Once you are in the Edit Job window, click the Volumes tab.
3.Next, click the drive letter of the drive you wish to defragment and the drive that your boot files are located on. Most likely this is your C: drive.

206 Part II — Increasing Your System’s Performance
FIGURE 8-7: Diskeeper Boot-Time Defragmentation configuration window.
4.Select the Defragmentation Method for the Selected Volume you want to defragment. It is recommended that you select COMPLETE/Access for this defragmentation.
5.Once you have selected the method, make sure to check the box for Activate BootTime Defragmentation and then click the Set button.