


62 Part I — Customizing Your System
Customizing the Taskbar
The Windows XP taskbar has many new features, such as the ability to group programs and the new system tray that automatically hides icons that are not active. On top of these new features, there were enhancements such as new animations and graphical refinements that make the taskbar look so much better.
The taskbar normally is used to switch between active programs and provides some system information, such as the current time and other system events in the system try. Now it can be used for so much more, as you will see in the next few sections.
Using and adjusting program grouping
The program grouping feature can be very useful, or it can be an annoyance. When you have more than just a few programs open, the taskbar can become cluttered. To fight this, as the taskbar fills up, programs that have more than one window open are grouped together. If you have a bunch of Internet Explorer windows open, they will all be grouped together into one entry on the taskbar. Then, if you want to switch between them or close one, you have to select the entry on the taskbar and a new menu will pop up showing you all of the different windows open for the specific application.
One great feature of grouping is it gives you the ability to close several windows at once. When all of the Internet Explorer windows are grouped together, you can just right-click the entry on the taskbar and select Close Group. Doing so will automatically close all of the browser windows at once.
The downside to this is it takes an extra step to navigate through the grouped program items. Some people do not like this option very much and would rather have a taskbar that is more cluttered, because they will be able to switch between programs faster.
You can do a number of different things to customize this feature. Using a program called Tweak UI, which is a PowerToy released by Microsoft for Windows XP, you can easily change the behavior of how programs are grouped. But first, I am going to show you how to enable program grouping, if it is not set up on your computer. You’ll also find out how to disable it, if you do not like it. Follow these steps to enable/disable program grouping:
1.Right-click a blank part of the taskbar and select Properties.
2.This will bring up the Taskbar and Start Menu Properties window that you used previously. This time, you are going to be concerned with what is on the Taskbar tab. Locate the Group Similar Taskbar Buttons item in the taskbar appearance section.
3.Check the box to enable this feature and uncheck to disable.
4.Click OK to save your changes.
Now that you have the feature turned on, you are ready to use Tweak UI to customize the way it behaves. First, download a copy of Tweak UI from Microsoft’s PowerToys Web site, located at www.microsoft.com/windowsxp/pro/downloads/powertoys.asp. Make sure
Chapter 2 — Customizing User Navigation |
63 |
that you download the normal version of Tweak UI and not the version for Itanium-based systems unless you have a 64-bit system. When you have Tweak UI installed, follow these steps:
1.Launch Tweak UI by clicking the Start button, selecting All Programs, and then PowerToys for Windows XP.
2.When Tweak UI is started, expand Taskbar and Start Menu and select Grouping.
3.You will be shown three different options that determine the behavior of the grouping feature. Group Least Used Applications First will group the applications that are the oldest on the taskbar and have more than one window open. Group Applications With The Most Windows First will just group programs that have the most windows open when the taskbar starts to become cluttered. Group Any Application With At Least X Windows is the setting that gives you the most control over grouping. Select this behavior and then enter the number of windows an application must have open before they are grouped. I personally prefer this feature and set it to a value of 4 so that when I have a lot of Internet Explorer windows open, I can still switch between them quickly when I have a few open, but it groups them when I have a lot open so my taskbar is not all cluttered.
4.Once you have selected the behavior you prefer, click the OK button on the bottom of the window to save your changes.
Once you log off and back on or reboot, your changes will be active.
Quick Launching your programs
The Quick Launch bar is a great way to start up your programs. You can completely bypass the Start Menu and launch your programs with just one click. By default, the Quick Launch bar is not enabled. This section will show you how you can enable the Quick Launch bar and how you can make it very useful. First, enable the Quick Launch bar and then customize it by doing the following:
1.Right-click an open space on your taskbar and expand Toolbars and then select Quick Launch. This will make the Quick Launch bar appear.
2.By default, there are three icons on it: Internet Explorer, Show Desktop, and Windows Media Player. You can easily add more icons to the Quick Launch bar by just dragging them onto the toolbar. You can even specify where you want the icon to be placed by dragging the icon between two icons. The best way to add programs to your Quick Launch bar is to browse through your Start Menu and drag icons to the bar while holding down the Alt key. Holding down the Alt key will ensure that you create a copy of the shortcut in the Start Menu to be placed on the Quick Launch bar. Otherwise, when you drag a shortcut from the Start Menu, it will be removed from the Start Menu and placed only on the Quick Launch toolbar. I like to add my drives from My Computer to my Quick Launch bar as well for easy access. Just open up My Computer and drag them on down to the toolbar.
3.Once you have all of the icons set up on your Quick Launch bar, have some fun changing the position of the bar. To do this, you will have to unlock your taskbar. Right-click an

64 Part I — Customizing Your System
FIGURE 2-11: Taskbar properties, showing the taskbar locked.
open part of the taskbar and select Lock the Taskbar only if there is already a check next to it, as shown in Figure 2-11. If there is not a check, then your taskbar is not locked and you are ready to proceed.
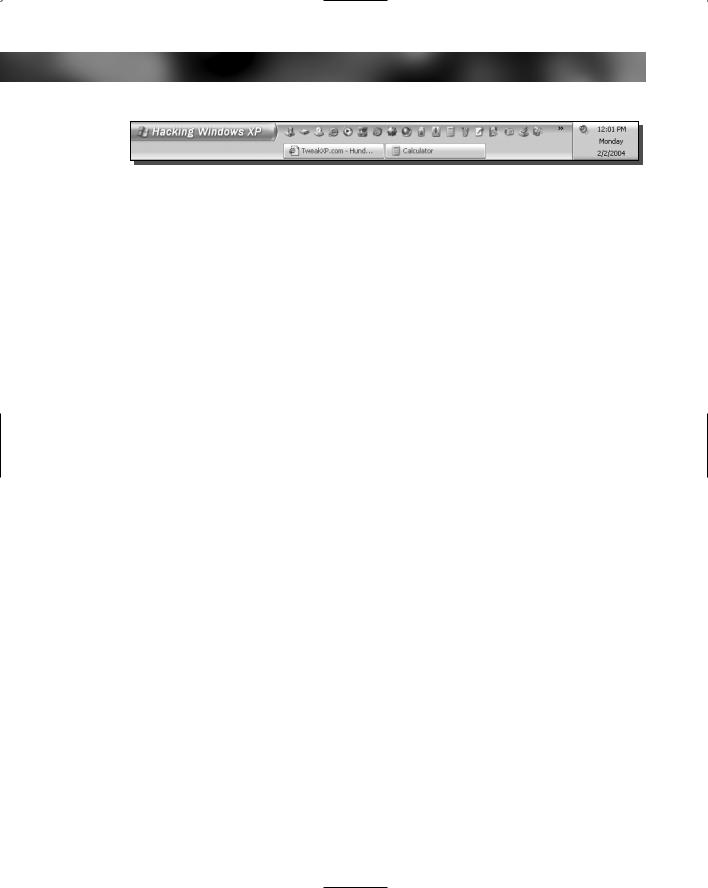
Now that you made sure that the taskbar is not locked, you are ready to move the bar around. Let’s expand the taskbar up so that you can have one row of Quick Launch icons and then your open programs will be listed below. You can do this by placing and holding down the left mouse button on top of the taskbar, as shown in Figure 2-12, and moving the mouse up, while still holding the button down on the mouse, until the taskbar expands upward.
Once the taskbar moves up one notch, you can move the Quick Launch bar up. You can do this by grabbing the left side of the menu on the dotted vertical line with the mouse and moving the mouse up while holding down the left mouse button. When you are finished, your taskbar should look like what’s shown in Figure 2-13. Notice that when you have expanded your taskbar up one notch, the system clock expands to show the date as well as the day.
4.When you have the taskbar unlocked, you can easily change the size of the icons that are placed on the Quick Launch bar. This can be done by right-clicking somewhere on the bar that is taken up by an icon, and selecting View. You will then see two choices: large and small icons. By default, the Small Icons are shown. The Large Icons look pretty cool because they make your taskbar look very different. I suggest you play around with this feature and get your icons looking the way you like them best.
5.Once you are finished making all of your changes to the taskbar, I suggest that you lock it again so that you won’t accidentally move things around the taskbar.
Now you have customized your Quick Launch bar and have greatly improved your navigation by creating your own list of programs. This will speed up the amount of time it takes to start up any program.
Hacking the Start button to replace the Start text
One of my favorite hacks for Windows XP is the Start button hack. It is possible to use resource editing tools such as Resource Hacker as well as a bunch of other adjustments to

Chapter 2 — Customizing User Navigation |
65 |
FIGURE 2-12: Expanding the taskbar by placing the mouse on top of the taskbar and moving the mouse up when the left button is held down.
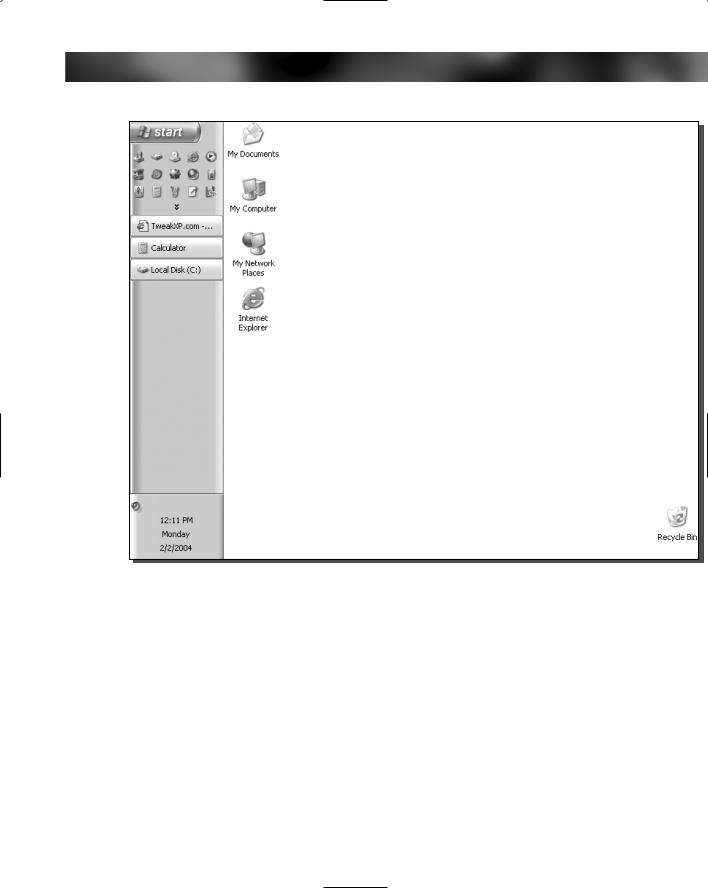
replace the Start text to anything that you want. I changed my Start Menu button on Hacking Windows XP, as shown in Figure 2-14.
You can edit the text on the Start button in a number of different ways. The most popular method is to use a hex editor. First, open up the Windows Explorer file and edit the string (a string is computer lingo for text), if you can find it in the file. Then, you will have to make some changes to the system file protection to allow you to run a hacked version of Explorer. After you have made those changes, you have to boot into Safe mode and swap the Explorer
FIGURE 2-13: What the taskbar can look like when you have finished moving it to the Quick Launch bar, adjusted the taskbar size, and added more programs to your Quick Launch bar.
66 Part I — Customizing Your System
FIGURE 2-14: The Start button text changed.
file with the version that you hacked. Additionally, with that method, you are limited to only five characters on the Start Menu button.
That method is just too complicated and has a lot of unnecessary steps. After experimenting with several different ideas that I came up with, I discovered an even better way to change the Start button text. Using my method, you will not have to mess with the system file protection at all, boot into Safe mode, or even be limited to five characters on the Start button. Sound good? Okay, let’s get started:
1.First, you will need to start up the Resource Hacker that you used in Chapter 1. If you no longer have a copy of Resource Hacker, you can download another copy from www.users.on.net/johnson/resourcehacker. Once you have Resource Hacker started up, go to the next step.
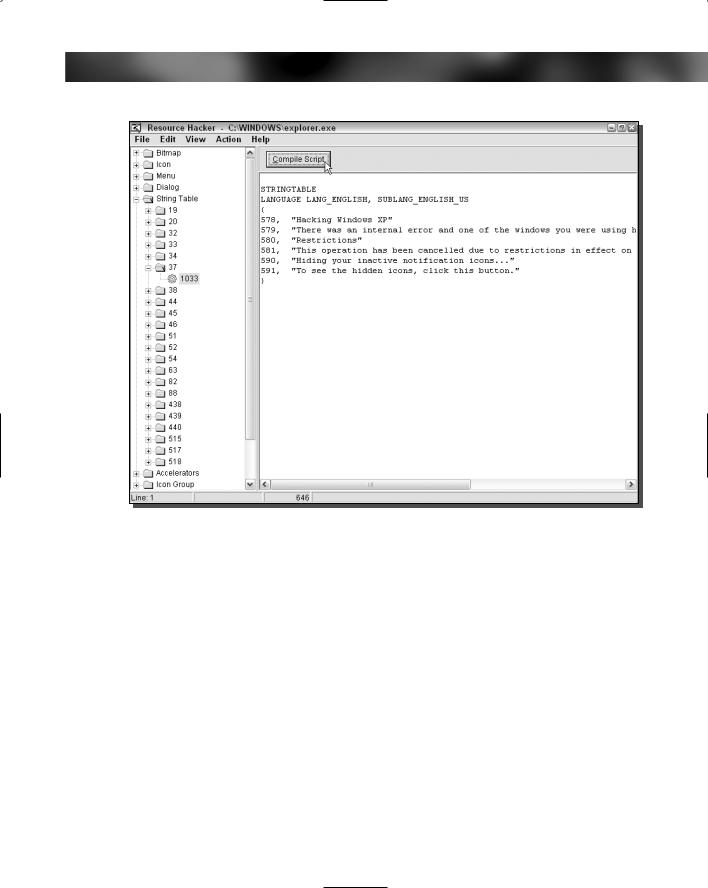
2.You are going to want to open up the Windows Explorer main file, called explorer.exe. This file is stored in the C:\Windows directory. To open the file up, click the file menu bar item and select Open, then just navigate over to the Windows directory and select explorer.exe.
3.When explorer.exe is loaded, you should see a bunch of folders on the left side of the screen. Expand the String Table folder and then expand the 37 folder and select 1033.
4.You will not see a bunch of text on the right side of the screen. Locate where it says Start, and replace it with the text that you want to use. I am going to replace it with “Hacking Windows XP.” Make sure that you only enter your text between the quotes; see Figure 2-14 for more clarification.
5.Next, you will have to click the Compile Script button, as shown in Figure 2-15.
6.Now, you have to save the file that you just edited and recompiled. Click the File menu bar item again and this time select Save As. Then save the file with a name other than explorer.exe. I suggest you call it “ExplorerHacked.exe.” Make sure that you add the
.exe to the end of the file name or else it will not work.
7.You are now finished hacking the Explorer file. You can close the Resource Hacker. Now you just have to tell Windows to use your new Explorer file the next time you log in. To do this, click the Start button and select Run.
8.Type regedit in the box and click OK.
9.Next, when the Registry Editor is loaded, expand HKEY_LOCAL_MACHINE, SOFTWARE, Microsoft, Windows NT, CurrentVersion, and Winlogon.
10.Inside the WinLogon folder, you will want to look for the Shell entry. Right-click it and select Modify, as shown in Figure 2-16.
Chapter 2 — Customizing User Navigation |
67 |
FIGURE 2-15: Using Resource Hacker to recompile explorer.exe to rename the Start Menu button.
12.Type in the name of the file that you saved in Step 6. I used “ExplorerHacked.exe,” so that is what I will replace all of the text with.
13.When you are finished, click OK to save your changes. You may now close the Registry Editor because you are finished with the hack.
Just log off and log back on or restart to see the new changes in effect. If you did not edit the registry correctly, such as specifying the exact correct file as the value for shell, you will not be able to use your computer properly because Explorer will not load. If that is the case, after you log on, eventually you will be shown just your background image. You will need to start up Explorer manually by pressing Ctrl Alt Delete to bring up the Task Manager. Once the Task Manager is displayed, click the New Task button on the Applications tab and type in regedit. This will launch the Registry Editor again so that you can edit the shell entry again. Go back through Step 9 to get back to the shell entry. Make sure that you type in the full correct file name with the extension as the value. If you want to revert to the original Windows Explorer with Start as the text on the Start button, just change this value back to explorer.exe. Then just log off your computer by using the shutdown menu bar item in the Task Manager and you will be back to normal when you log back on.
68 Part I — Customizing Your System
FIGURE 2-16: Using the Registry Editor to replace the original Explorer shell.
Modifying the taskbar location
You always see the taskbar appear on the bottom of your screen. That does not always have to be the case. It is possible to move the taskbar to every side of the screen. This allows you to really change the look of Windows XP. Figure 2-17 shows what your screen could look like if you moved your taskbar to the left side of the screen.
Moving the taskbar is very simple. There are just three basic steps:
1.You will want to unlock the taskbar if it is already locked. Right-click an open part of the taskbar and select Lock the Taskbar, if there is a check next to the entry.
2.Click and hold your mouse on any part of the taskbar where there are no icons, such as the system clock, and drag the taskbar to different sides by moving your mouse in the general direction.
3.When you have the taskbar where you want it, you may want to readjust your toolbars inside the taskbar, such as the Quick Launch bar. Then lock it back up again by rightclicking it and selecting Lock the Taskbar.
Chapter 2 — Customizing User Navigation |
69 |
FIGURE 2-17: Windows XP with the taskbar on the left side of the screen.
Using the Taskbar Magnifier PowerToy
Microsoft has released many different PowerToys, some of which we have already used (Tweak UI). Another PowerToy that is pretty cool is the Taskbar Magnifier. The Taskbar Magnifier turns the mouse into a magnifying glass. When you activate the Taskbar Magnifier, a new bar will be displayed in your taskbar that is like a little TV screen, as shown in Figure 2-18. It will display a magnified image of what the mouse is currently over. If you know someone whose eyes are not as good as they used to be, the Taskbar Magnifier is a good aid for them. Also, if you do a lot of graphic work and care about the details of your work, instead of having to zoom in all the time, you can use the Taskbar Magnifier to see a zoomed-in view that will reveal details.
Getting the Taskbar Magnifier PowerToy setup is easy; just download it from Microsoft’s PowerToys Web site, located at www.microsoft.com/windowsxp/pro/downloads/

70 Part I — Customizing Your System
FIGURE 2-18: The Taskbar Magnifier PowerToy.
powertoys.asp and follow these steps:
1.Once you have the PowerToy installed, you just have to enable the toolbar on the taskbar. First, you will have to unlock your taskbar.
2.Next, right-click an open part of the taskbar and expand Toolbars and then select Taskbar Magnifier. This will cause the Taskbar Magnifier to show up on the taskbar.
3.You may want to resize the taskbar a little, such as dragging the t of the bar up to make it a little larger so your magnifier screen is bigger.
4.Also, you can remove the text next to the magnifier by right-clicking the magnifier object on the taskbar when the taskbar is unlocked and selecting Show Title to unselect it.
If you ever want to remove the Taskbar Magnifier, just right-click an open part of the taskbar and expand the toolbars menu again and select Taskbar Magnifier to uncheck the item.