


Chapter 9 — Making Your Computer Load Faster 229
3.Locate the Program Events scrollbox. Look for Start Windows by scrolling through the list and click it to select it, as shown in Figure 9-15.
4.Then, locate the Sounds drop-down box and click the down arrow on the right to expand it. Scroll to the top of the list and select (None).
5.Click OK and you are finished.
That wasn’t too bad. Plus, you just shaved another second or two off your loading time.
Summary
Throughout this chapter, you found out how to remove unnecessary steps from your startup procedure and method to cut the fat from the system load and make your computer load faster. You also learned how to automatically log users on and how to remove their passwords. Also touched on was the topic of removing startup programs as well as the sneaky programs that will further decrease loading time. Also discussed were other time-saving tips that offer even more ways to get that loading time down.
Ever wonder what the XP in Windows XP stands for? It stands for “experiences.” This next chapter is completely dedicated to enhancing your experiences with Windows XP. It will concentrate on making the system more responsive. You will be working with making changes to the way the file system works, as well as changing settings for the user interface to improve your Windows eXPerience.


Making Your
Computer More
Responsive
Now that the first two parts of the system startup are optimized, it is time to work on making your Windows experience better. This chapter will concentrate on different ways to make your computer
more responsive and faster. First, it will talk about ways that the file system can run faster. This section will show you how to hack the System Registry and disable some extra features of the file system.
Once you have mastered the file system, the next section will show you how to make your menus pop up quicker, which will make your computer appear to be running significantly faster.
The next section will concentrate on all of the performance settings that are built into Windows XP. A handful of settings will, when disabled, provide you with a much faster experience. Although these options often take away visual effects and aspects of Windows XP, this section will help you find the right balance between the visual effects and a fast experience.
The last section of this chapter will show you how to remove one of the extra features built into Windows XP that does more harm than good, the indexing service. The service was designed to make it faster to search for files on your hard drive. This sounds great, but for users that rarely search their drive for files, this service becomes unnecessary and eats up a lot of system resources too.
Now that you know what this chapter will cover, you are ready to dive in.
Speeding up file browsing and access
You can speed up system access to a file and the system’s browsing time through the files in several ways. So far, this book has already talked about defragmenting your drive, which will speed up accessing and browsing time. In addition, a few other things can be done to speed up how the file system works.
chapter
in this chapter
Removing Unneeded File System Features
Changing Menu Delays
Fine-Tuning Performance Options
Removing Other Unneeded Features

232 Part II — Increasing Your System’s Performance
Making the file system run faster is easy. All you have to do is follow the next two sections, which will guide you through the steps of hacking the System Registry to change the file system settings. These settings will disable aspects of the file system that are not critical to the system and will help you with your system performance.
Before you go any further, be aware that the following speed tips for the file system will work only for the NTFS file system. If you do not know what file system your system is running on, you can go to My Computer and right-click your hard drive and select Properties. This will bring up the Local Disk (C:) Properties window, which will tell you the type of file system your hard drive is running. If your hard drive is running FAT32, these tips will not work for you.
In my opinion, NTFS is a far better file system. It has many advanced security features and also performs better on many machines. If you are still running FAT32, or for some odd reason your computer came preinstalled with FAT32, consider converting your hard disk to NTFS.
 Converting your drive to NTFS is a snap. Open up Command Prompt by clicking the Start button and selecting Run. Type cmd in the box and click OK to start up it up. Then at a prompt, type in convert c: /fs:ntfs and press Enter to start. If you want to convert a different drive letter, just replace the c: with the drive letter that you want. For example, if you want to convert your d drive, then you will have to type convert d: /fs:ntfs. The actual conversion process will take a little while, especially on large drives. Keep in mind that once you convert to NTFS, you cannot convert back to FAT32.
Now that the requirements are cleared up, you are all ready to get started.
Disabling the file access timestamp
Every time you access a file, or a program on the system accesses a file, the file system keeps track of when it was accessed. This feature can be useful if you are interested in finding out when a file was last read. Sometimes a program might find this information useful. For example, the Defragmenting application could use the access timestamps; it would be able to decide what the most frequently accessed files are and would then be able to put them on a fast part of the disk.
So, disabling the file access timestamp would obviously not be beneficial to the Defragmenting app. But the loss would not be a big one. Usually, when you defragment your drive, you will want the entire application files placed together on a disk for optimal speed. Defragmenting based solely on access timestamp will not give you a sizeable performance increase.
For systems that have many (several thousand) files and folders, disabling the access timestamp will give you a noticeable performance increase. Every time you open a file, the system has to write to the file and update its access timestamp. According to Microsoft, disabling the file access timestamp will help most systems with more than 70,000 folders. Nevertheless, based on my experiences and the experiences of others that have used this tip, it can still help users that have a fraction of that number.
Chapter 10 — Making Your Computer More Responsive 233
The process for disabling the file access timestamp is quite easy. All that is required is one quick change in the System Registry. To do so, follow these steps:
1.Click the Start button and select Run. Then type regedit in the textbox and click OK.
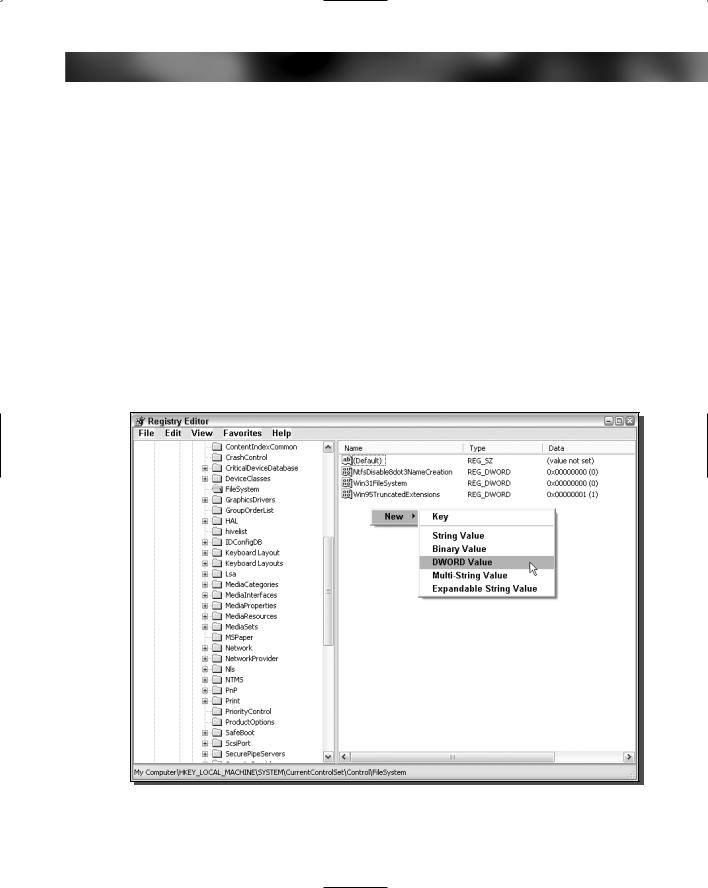
2.This will start up the Registry Editor and will allow you to edit the file system settings. Once the Registry Editor has loaded, navigate to the file system settings by expanding HKEY_LOCAL_MACHINE, SYSTEM, CurrentControlSet, Control, and then FileSystem.
3.Depending on your system, you may see an entry called NtfsDisableLastAccessUpdate. If your system has this entry already listed, skip to the next step. If you do not see
this entry, don’t worry; just create it by right-clicking and selecting New and then DWORD Value, as shown in Figure 10-1. Key in NtfsDisableLastAccessUpdate for the name.
4.Now, modify the DWORD value. Right-click the name of the entry and select Modify. Then type a 1 in the box to disable the last access update feature.
5.Then click OK and restart your computer. The changes will be in effect.
FIGURE 10-1: Registry Editor adding a new DWORD value.

234 Part II — Increasing Your System’s Performance
This setting will allow you to experience much faster file browsing. This hack is not without a price, as was mentioned at the beginning of this section. Disabling this feature may cause problems for certain applications, such as hard disk defragmenters and other programs. If you notice any strange behavior with your applications, try reverting to an earlier system restore point, or apply an undo script to the app.
The undo script is found in the Chapter 10 folder on the companion CD-ROM at the back of the book, called lastaccessupdate_undo.reg.
Disabling legacy filename creation
Backward compatibility allows users to upgrade to the latest version of Windows but still run many older programs that were designed for an earlier operating system. This feature is something that is very crucial to the success of Microsoft Windows. Without backward compatibility, users would be very reluctant to upgrade to the latest versions. Instead, they would be forced to wait until all of the applications that they use are rewritten to run on the new operating system.
Unfortunately, this backward compatibility is one of the reasons why Windows has become so large on the hard drive. Although it is getting packed with new features and technologies, the old features and technologies have to be included as well, even those that can slow the system down, for compatibility purposes. One example of the old features that can slow your system down is legacy filename support.
Over the years, the file system structure has changed dramatically. One of the first things that changed in the file system was the limited nature of the old MS-DOS 8.3 file system standard. The old file system would limit filenames to a maximum length of 8 characters plus a 3-charac- ter extension and also restricted what characters could be included in the name. This was something that needed to be changed to allow for greater user flexibility. Eventually, these limitations were expanded with the release of Windows 95, which bumped up the maximum filename limit to 255 characters, with a modified version of the FAT16 file system.
With the implementation of the new, longer filename support and the ability to have more characters in the filename came the added task of making sure that older applications that were written to run only with the 8.3 standard still worked on the new file system structure. This was accomplished by an extra entry in the file table. Now, for every file, there are two names saved. One is a real long filename and the other is a short 8-character version so that older programs will still be able to access the file.
The extra filename that has to be saved can cause decreased performance when you are working with the file system. Disabling this old feature can give you an extra boost that will make browsing through your files faster.
Keep in mind that disabling the old compatibility feature comes with one downside. Applications on your computer that depend on the old 8.3 standard to run will stop running and will give you errors when you try to run them. Although this technology is more than

Chapter 10 — Making Your Computer More Responsive 235
10 years old, several popular applications, mentioned in the following paragraphs, still depend on the old standard. Unfortunately, in the software world, some companies don’t bother fixing things if they aren’t broken to increase the performance of the user’s computers. For the most part, they do not have to worry about it because Microsoft supports the lazy programmers by leaving these old, inefficient features in the operating system.
Even though a few applications will have difficulties when this feature is disabled, the majority of users can still disable this feature and have no problems. Basically, you just have to watch out for problem applications. One type of program that has the most problems when the 8.3 standard
is disabled are installer applications that many software developers use to get their programs up and running on your computer. For some reason, a few installers are still programmed using old 16-bit technology, which depends on the short filename compatibility feature to function.
Users frequently run into this error with Symantec’s AntiVirus software. According to Symantec, users may receive an error stating “1639. Invalid command line argument” when they install certain versions of Symantec’s software. For users of Symantec software who want to disable the old support for greater performance, the company recommends that they enable the 8.3-standard filename compatibility support when the software is being installed and then disable it once the software is installed. The software should then work fine.
That basic Symantec approach can be applied to any situations that you may run into when applications are being installed and errors received. Just enable the 8.3-standard filename compatibility support during the install, and then disable it once again after the install is complete.
That simple workaround will work for 95 percent of the problems that you will encounter when the 8.3 standard filename compatibility is disabled. The remaining few will encounter problems when the applications are running or trying to run. These applications are usually very old 16-bit applications. (Applications are now 32-bit and there are already 64-bit applications starting to pop up.) Either that, or the apps are just not programmed very well. If you have an old application that refuses to run when the compatibility feature is disabled, consider upgrading to a new version of the application to see if that will help. If it still does not work, then you will be in the position of having to keep the legacy support enabled.
Now that you are aware of the possible problems that can be caused by disabling the legacy filename standard, and also know what to do if you experience any, you are ready to disable the feature. Disabling the legacy support is not as easy as clicking a button, but is not very difficult either. Follow these steps to disable/enable this feature:
1.Click the Start Menu and select Run, then type regedit in the box and click OK. This will start up the Registry Editor.
2.Once the Registry Editor has loaded, navigate to the file system settings by expanding HKEY_LOCAL_MACHINE, SYSTEM, CurrentControlSet, Control, and then FileSystem.
3.Look for the key that is named NtfsDisable8dot3NameCreation and right-click it and select Modify, as shown in Figure 10-2.
4.In the Edit DWORD Value box, type in a 1 and click the OK button.
5.Then, restart your computer and you are done!