


Chapter 8 — Speeding Up the System Boot 207
6.Next, click the Time Plan tab and select when you would like the job to be run. You can also set up the job to be run on a weekly schedule by selecting Weekly in the Frequency drop-down box.
7.Click the OK button and you will see the job appear under the job list window. You are now finished setting up O&O defrag and your system will be defragmented at the time you scheduled the program to execute.
Summary
Throughout this chapter, you discovered many ways to lower the amount of time it takes your computer to boot up. First, you learned how to change some of the BIOS settings that can optimize your computer for maximum boot speed. Then, you discovered how you can remove your boot screen to shave off some more time. After that, you saw how you can disable other parts of Windows, such as hardware, fonts, and services, that you may never use, all of which take up time when your computer starts up. To wrap the chapter up, you found out how you can optimize the placement of the files used when your computer boots up, using the Prefetcher and two other disk defragment tools.
This chapter showed you how to speed up the first half of your computer’s startup. The next chapter will pick up on the second half, the system logon. I will also show you some cool tips on how you can speed up.

Making Your
Computer Load
Faster
Ever wonder why it takes your computer so long to start up after you log on? After all, the system already loaded the majority of the operating system components. Does your computer take longer to load after you
sign on than it used to take when you first brought it home? These are all questions that you will find the answers to in this chapter. You can make your system load faster by a number of methods. The last chapter touched on how to make the system boot faster. This chapter will concentrate on how to make the system load faster after the operating system has loaded and you are presented with the sign-on screen. But first, the system startup needs to be examined in more detail so that you will better understand what you will be doing.
After you turn on your computer, it goes through the boot-up process, which loads the main system components and drivers. Eventually, when those are finished loading, the Windows shell is started and you will be presented with the sign-on screen. Once the sign-on screen is displayed and you sign on, the system begins to load the rest of the Windows shell programs, such as Windows Explorer, which is the program behind the spiffy new Windows XP navigation and look. Once that is finished loading, the system moves on to starting up the applications in the startup folder as well as other sneaky registry startup programs. Once these applications are finished loading, your mouse will no longer display the hourglass, and you are set to do whatever you want with your computer.
This chapter will take you through the steps of speeding up all of the different parts of the system startup. First to be examined will be ways to speed up the logon process. Next to be discussed will be ways to get rid of all those extra applications that run at start that further slow down your computer. Additionally, interesting new features of Windows XP that are not turned on by default and will make your system even faster are explored. When you have finished reading this chapter and implementing the suggestions given, your system will have a much faster loading time and will be ready to use earlier than ever before.
chapter
in this chapter
Setting Up Automatic Logon
Removing a User’s Password
Cleaning Up Your Startup Programs
Customizing Startup Programs for Different Users
Removing Sneaky Programs from Startup
Other Time-Saving Tips

210 Part II — Increasing Your System’s Performance
Speeding Up the Logon
The system logon is the first half of the loading time. This process starts when you see the Windows Welcome screen, or the Windows 2000 style logon screen. After you type in your user information, your credentials are checked and then you are allowed access to the system. Although seemingly not much can be done to speed up this part of the system startup, in actuality a few hacks will change the way the logon is performed. By changing the way a logon is done, you can speed up your system logon by automating your system logon and removing unneeded steps.
Enabling automatic logon
Automatic logon is for you, if you primarily use just one user account on your computer and do not want to be forced to click the username and then enter your password each time you start your computer. Enabling automatic logon is a great technique that will save you time that is often wasted when your computer is waiting for you to key in your information. Even if you do not have a password assigned to your account, you are still required by the logon Welcome screen to click your name to sign in. And if you have the Welcome screen disabled, then you are still forced to click the OK button on the Windows 2000 style logon screen to get in. Having to do these tasks yourself is unnecessary and just a waste of time.
 Automatic logon can be a great feature, but it can also create a security problem for your computer. If you use your computer for business, if you have data you prefer to keep safe from others, or both, I strongly recommend that you do not enable this feature. If you happen to step out of your office or if your laptop is stolen, you have left the door wide open to your computer. By enabling automatic logon, you are trading convenience for physical access security. However, you are not changing your network security so your data is still safe from network attackers. The risk of someone remotely connecting to your computer is the same as if you did not have automatic logon enabled.
Hacking your computer with a program called Tweak UI, which is an unsupported application written by Microsoft, allows users to enable the hidden automatic logon feature. Open up your Web browser and visit www.microsoft.com/windowsxp/pro/downloads/powertoys.asp to download a copy of Tweak UI. You will find the link to download the install file on the right side of the page. If you have a standard CPU, like the majority of us, make sure you download Tweak UI and not Tweak UI for Itanium-based systems. The Itanium version is for the new 64-bit CPU by Intel. If you are one of the rare users of that new CPU, however, download that version. Once you have the application installed, enabling automatic logon is really easy:
1.Start up Tweak UI by clicking the Start Menu and navigating to the PowerToys for Windows XP folder and then selecting Tweak UI.
2.Expand the Logon item and then click Autologon, as shown in Figure 9-1.
3.Then, check the Log on Automatically at System Startup box, as shown in Figure 9-1.
4.Type in the username that you want to use, if it is not already entered into the User Name field.

Chapter 9 — Making Your Computer Load Faster 211
FIGURE 9-1: Tweak UI autologon feature properties.
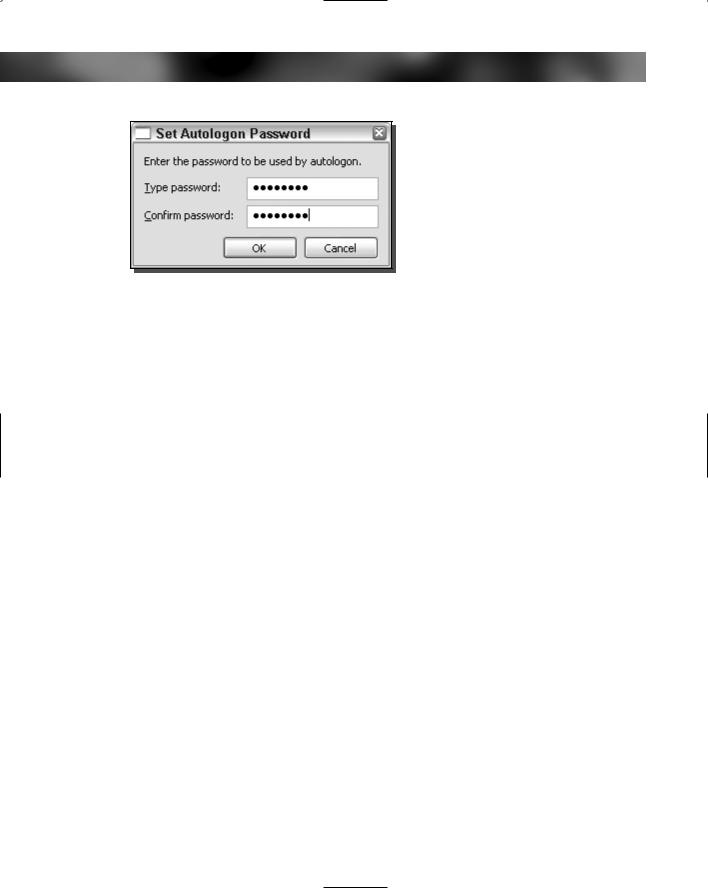
5.Click the Set Password button and type your password in both text boxes, as shown in Figure 9-2.
6.Once you have entered your password twice, click OK to save the password. Then click OK once more to save the autologon settings and close Tweak UI. Your system is now set up to log you on automatically.
Should you ever change your mind and wish to disable the automatic logon feature, just go into Tweak UI again and uncheck the Log on Automatically at System Startup box.
Removing user passwords
Some of you may have computer systems set up with multiple users. You might have a family computer for which each person has his or her own account for personal settings or for which you have separate accounts with different privilege levels. In some situations in which security is not a big concern, a requirement for each user to type in a password to access her account is
212 Part II — Increasing Your System’s Performance
FIGURE 9-2: Setting a user autologon password with
Tweak UI.
not necessary. In those cases, instead of clicking the user name and then typing in the password, the user would find it much easier to just click the name. An additional advantage of this simplification would be that, for those with a family computer, you would not have to worry about reminding everyone what their passwords were or needing to reset passwords when they were forgotten.
Before you begin removing the user passwords, a word of caution is in order about the possible dangers of removing user passwords. First, I strongly recommend that you leave a password on the Administrator account and any account that has administrative privileges. Additionally, before you start removing passwords, I recommend that you secure your system from external intruders on the Internet. If you do not have passwords on your user’s accounts, it would be much easier to connect to your computer remotely. One simple solution is to turn on the built-in firewall and remove the Client for Microsoft Networks from your network adapter through which you get your Internet connection. Turning on the built-in firewall and removing the unneeded network protocol is really easy. If you need any help, refer to Chapter 12, which is all about protecting your computer from intruders.
Now that you know the consequences of removing the passwords and have secured your system, you are ready to get started. They can be removed in two ways. For those of you that are familiar with the Windows 2000 style computer management user snap-in control, I recommend you follow the second method. For everyone else, you will feel more comfortable using the first method.
New Windows XP user accounts method
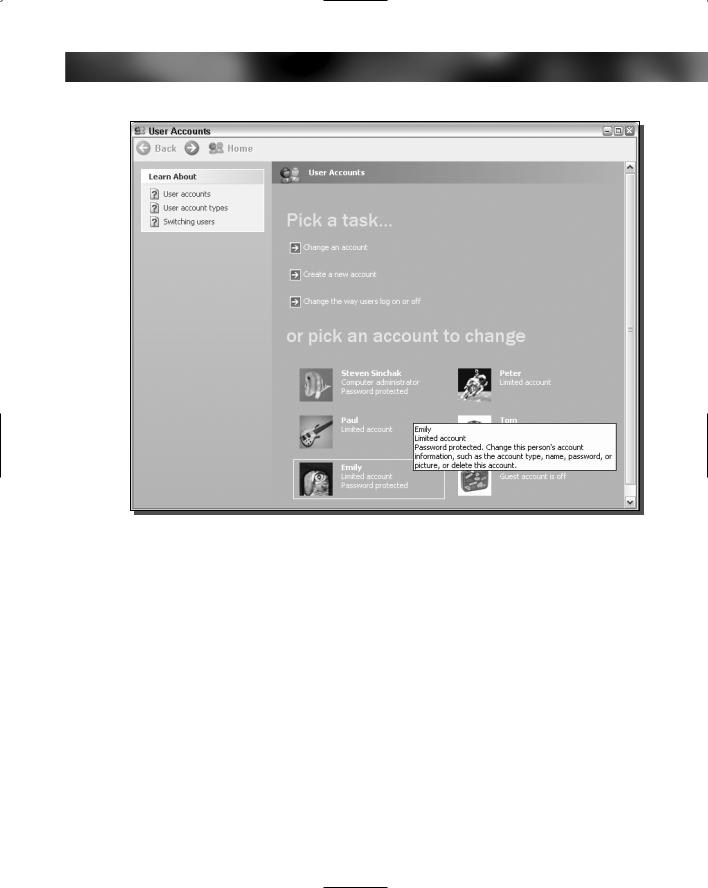
Windows XP includes a new simple account management applet called User Accounts. This applet is a new approach to user management that replaces the Windows 2000 style user list with a nice-looking wizard approach. Follow these steps to remove passwords with the new management applet:
1.Launch the new applet by clicking the Start Menu and then selecting Run.
2.Key in nusrmgr.cpl and click the OK button. The applet will now launch.
Chapter 9 — Making Your Computer Load Faster 213
FIGURE 9-3: User Accounts applet home screen.
3.Use your mouse to click the account from which you want to remove the password, as shown in Figure 9-3.
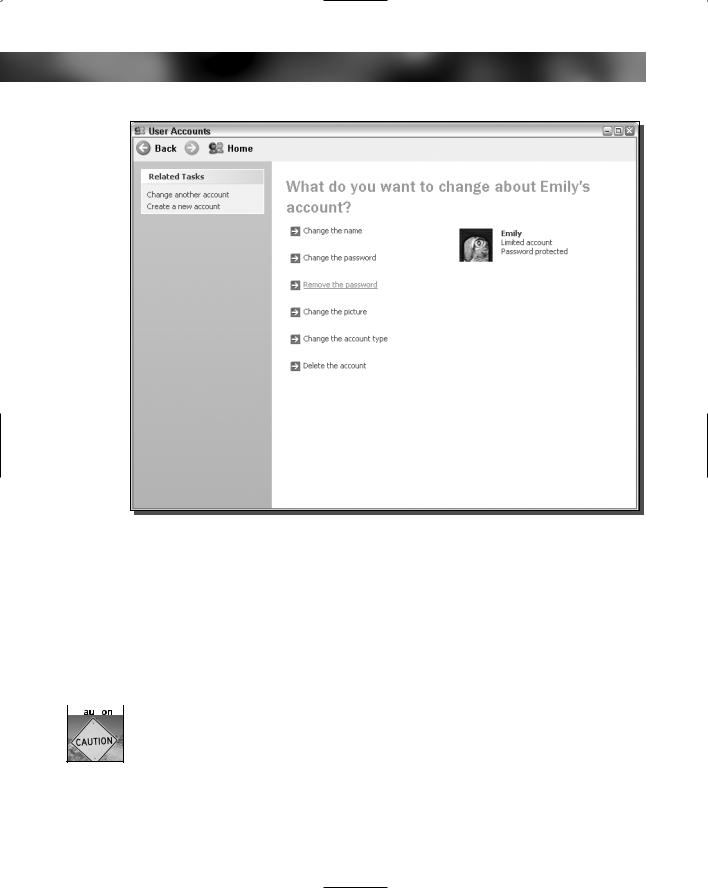
4.Next, click the text that says “Remove the password,” as shown in Figure 9-4.
5.After clicking the text, you will be taken to a confirmation screen, where you will be required to type in the password of the user. Type in the password and then click the Remove Password button.
That’s it! The password is now removed for the user that you selected. Repeat the previous steps for any other accounts for which you would like to remove the password.
If for any reason you change you mind and want to put a password back on a user’s account, just go back into the User Accounts applet and click the user you would like to change. Then, instead of showing “Remove My Password,” the applet will show, “Create a password.” Click the Create text and enter the new password in the two text boxes and then click the Create Password button.
214 Part II — Increasing Your System’s Performance
FIGURE 9-4: User Accounts applet user properties.
Local user and groups method
If you are like me, and like the Windows 2000 way of doing things, this section is for you. Windows XP was based off of code from Windows 2000. You could think of Windows XP as a revised version of Windows 2000. Although thousands of improvements have been made, some of the basic elements of Windows 2000 are still in place. However, they are not always easy to find, but they are still available if you know where they are. I have dug through the system files and have found the old MMC (Microsoft Management Console) applet that was used to manage local usernames and accounts. To start the old MMC applet and remove passwords, follow these steps:
 The old Windows 2000 style user manager can only be found on computers running Windows XP Professional.
1.Click the Start Menu and select Run. Then type lusrmgr.msc in the text box and click OK.
Chapter 9 — Making Your Computer Load Faster 215
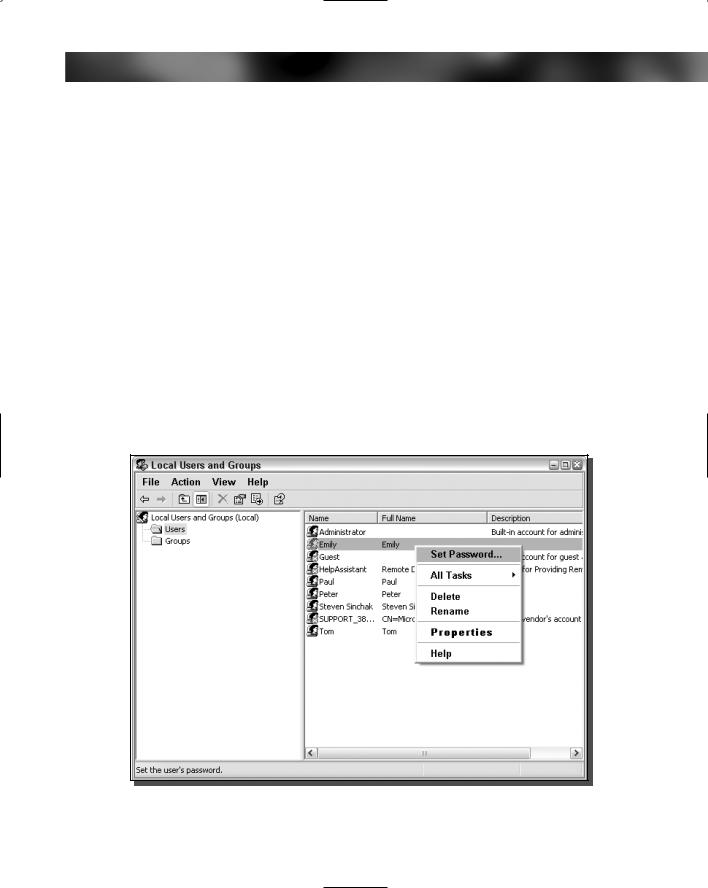
2.This will start up the Local Users and Groups MMC applet. Click the Users folder to expand it to reveal the Users setup on your computer.
3.Next, right-click the name of the account you want to change and select Set Password, as shown in Figure 9-5.
4.A new window will pop up that informs you that you may lose some of the user’s data if you change their password. According to the Microsoft Help file, you will only lose any files and e-mail that the user encrypted and any saved passwords for Web pages saved in Internet Explorer. Most personal use users never need to worry about this limitation, because they would not be encrypting anything. Although they might lose some saved passwords, unless they wrote them down somewhere, the loss would just be a minor inconvenience. If you have a user who is so concerned about his privacy that he encrypted his files, you should think twice about removing his password. Once you have decided if you still want to proceed, click the Proceed button and you will be shown the Set Password For Username window.
5.Leave both of the password boxes blank and click OK. That’s it. You are now finished.
If you ever need to set a password again with this method, repeat the previous steps and type the password in the text boxes instead of leaving them blank.
FIGURE 9-5: Local Users and Groups MMC applet.

216 Part II — Increasing Your System’s Performance
Adjust the startup programs
After you sign on, the system finishes loading the system shell and then begins to load the startup programs that you have installed and also some that you have not. Often when you bring home a new computer it is filled with extra software that you do not need to be starting when your computer, starts up. One example of this kind of software is Windows Messenger, which was developed by Microsoft.
Every time I turn on my computer, Windows Messenger automatically loads and signs me on to the network. I love Windows Messenger, but I do not want it starting up every time I turn on my computer. It slows down my load and lets everyone know that I am on my computer, which makes avoiding certain people impossible. On top of loading Windows Messenger, and other visible programs such as antivirus software, a handful of other applications will start up automatically. This section will help you see what programs are starting up automatically and then will show you some great tricks to stop them all from starting up.
Identifying the auto startup programs
The first step in stopping the auto startup is identifying exactly what is starting up and what its purpose is. To do so, you will use a cool little program called the system configuration utility, which is built into Windows XP, and the Google search engine (www.google.com), which can look up what the entries are for. First, you will need to start up the system configuration utility and write down what programs are listed. To do so, follow these directions:
1.Start up the System Configuration Utility by clicking the Start Menu and selecting Run. Then key in msconfig and click OK.
2.Once the System Configuration Utility has loaded, click the Startup tab, as shown in Figure 9-6.
3.Now that the list of the active startup programs is visible, make a list of all of the items listed with the name as well as the file that is loaded, which is listed under the command column.
4.Once you have your list made, you can start researching which programs should be removed from the list and which programs should stay. Because almost every computer has different programs starting up after logon, I recommend that you browse the Web and look for a specific program and what will happen if it is removed from startup. One interesting site to visit is a database of common startup programs called AnswersThatWork. It is located at www.answersthatwork.com/Tasklist_pages/tasklist.htm. At that site, they can’t present you with recommendations for each of the programs listed. If you can not find one of your programs listed on that site, just do a quick search on Google and most likely you will find several Web sites telling you what that program does and what removing it will do.
Removing programs from startup
The System Configuration Utility makes removal of items from the system startup very easy. Once you know the item that you want to remove, uncheck the check box next to the item, as shown in Figure 9-7.

Chapter 9 — Making Your Computer Load Faster 217
FIGURE 9-6: System Configuration Utility Startup programs tab.
Then, once you have unchecked all of the items that you no longer want to start at startup, click the OK button. This will cause a new window to pop up that asks if you would like to reboot now or later. Choose what is most convenient for you, as it has no effect on the changes you just made.
Once you reboot, the program should no longer be loaded. This procedure will work for the majority of the programs configured to start up automatically. You may notice, however, that a few sneaky applications refuse to go down without a fight. This next section will help you exterminate those.
Removing the sneaky programs
Some programs will just not go away. The software developers may be trying to make sure you use their application by making it difficult to tame or sometimes applications are just trying to make sure that other programs are not disabling them or taking over their turf.
Not uncommonly, competing software applications mess with each other. One example is what happened when I installed several media players on my PC. I installed the music programs Winamp, iTunes, RealPlayer, and Windows Media Player. The programs would fight for my music file associations (that is, what the file would be opened with). Every time I ran RealPlayer, it changed all of my music files over to be played in their player by default. The
218 Part II — Increasing Your System’s Performance
FIGURE 9-7: System Configuration Utility with an unchecked (disabled) startup item.
same thing happened when I tried to play my music files in other players. From this experience, I found that a not uncommon occurrence was for a media player application to install a program to be run at system startup that would check and take over (or preserve, as the developers call it) your file associations.
Only after I dug through the options and preferences of each of the applications and changed several options did I discover how to declare an end to the file association war. I could then proclaim Operation Music Freedom a success.
The only way to defeat these sneaky programs is to stop them from the inside. Disabling these programs from starting up is actually quite easy when you know where to look. In the paragraphs that follow, you will learn how to disable two of the most popular and most difficult applications from starting up automatically. Additionally, the methods that will be used can be applied to disable all other sneaky applications from starting up.
Taming RealPlayer
Real Networks, the developers of RealPlayer (previously known as RealOne), could have made it a little easier for users to disable some of the extra program features. RealPlayer is a good application, but it comes bundled with so much extra junk that knowing how to disable all of the extra features becomes a necessity.
Chapter 9 — Making Your Computer Load Faster 219
 RealPlayer does not come preinstalled with Windows XP. If you did not download and install this application yourself, and it can not be found on the Start Menu, then you do not need to worry about taming RealPlayer.
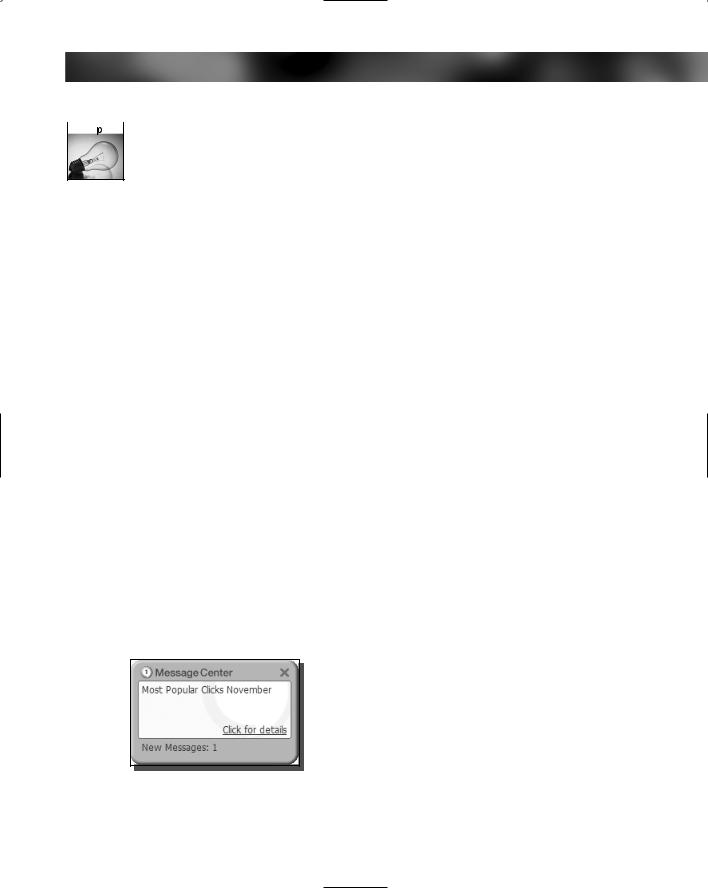
One of the features of RealPlayer that I find most annoying is the Message Center application that automatically starts when you log on. When you least expect it, no matter what you are doing on your computer and after you have run the RealPlayer program, you will get a little pop-up message (see Figure 9-8) that alerts you to some random information or advertisement.
You can do two things to get RealPlayer under control. First, you will need to stop the scheduler from starting up every time you start Windows. You will recognize this application in the System Configuration Utility as realsched.exe. No matter how many times you uncheck this item in the System Configuration Utility, it will keep coming back. The only way to stop it is inside the RealPlayer application. Follow these steps to stop it for good:
1.Start the RealPlayer application by clicking the Start Menu and then selecting the RealPlayer player icon.
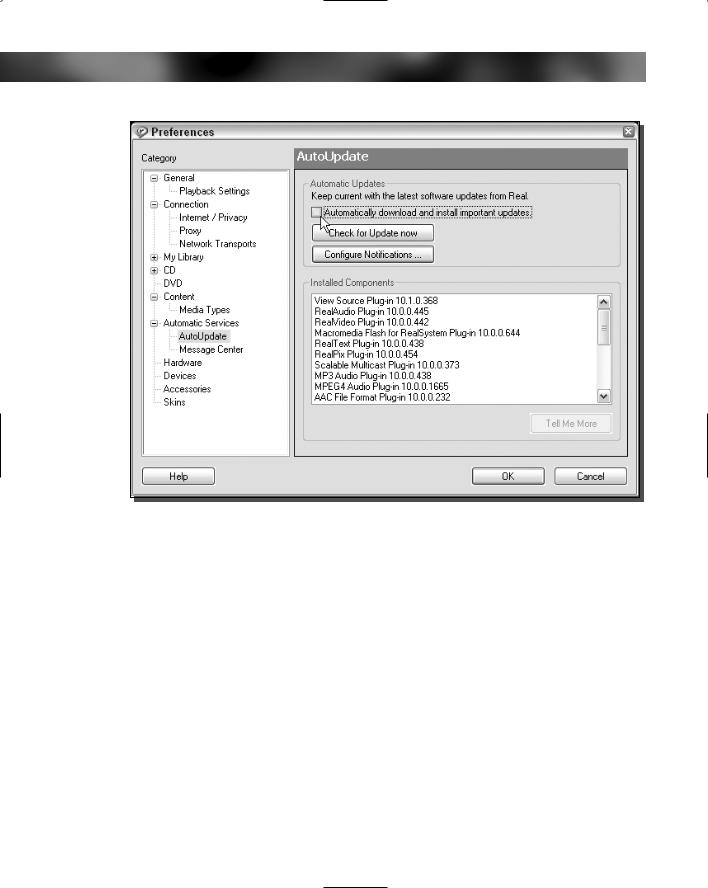
2.Once RealPlayer has loaded, click the Tools menu bar item and select Preferences.
3.This will load the program preferences. Expand Automatic Services and then select Automatic Updates.
4.Uncheck the Automatically Download and Install Important Updates check box, as shown in Figure 9-9.
5.Next, let’s make sure that you will never again see a message from the so-called Message Center. To do so, select the Message Center entry listed under Automatic Services.
6.Hit the Select Message Topics button on the right side of the window.
7.When the Message Center window is displayed, uncheck Product News and Real Exclusives, located at the bottom of the screen, and click the Save Changes button.
8.Close the Message Center window so the Preferences window can be viewed again.
FIGURE 9-8: RealPlayer Message Center alert.
220 Part II — Increasing Your System’s Performance
FIGURE 9-9: Disabling RealPlayer’s automatic updates.
9.Once you are back to the Preferences window, click the Configure Message Center button.
10.Uncheck all of the boxes, as shown in Figure 9-10.
11.Click OK to close the Configure Message Center window.
12.A warning window will be displayed, informing you that you are disabling the Message Center. Click Yes to proceed.
13.Close the Message Center window again so that you can view the Preferences window.
14.Click OK to save your changes and close the Preferences window.
That’s it. RealPlayer is now under your full control and will not be starting up automatically any more and will not be sending you advertisements.
Getting control of Windows Messenger
Windows Messenger is a great instant messaging program that I use frequently. The one problem with it is that it starts up automatically when you log on. Trying to stop this

Chapter 9 — Making Your Computer Load Faster 221
FIGURE 9-10: Disabling Message Center features.
behavior can be frustrating, because disabling the program with the system configuration utility is impossible. The only way to get control of Windows Messenger is from the inside, just as with RealPlayer. Although you have to go inside the program to change the settings, doing so with Windows Messenger is slightly easier than with RealPlayer because there is only one setting that has to be changed. In order to change that setting, follow these steps:
1.Open Windows Messenger by clicking its icon in the system tray or going to the Start Menu, expanding All Programs, and selecting Windows Messenger.
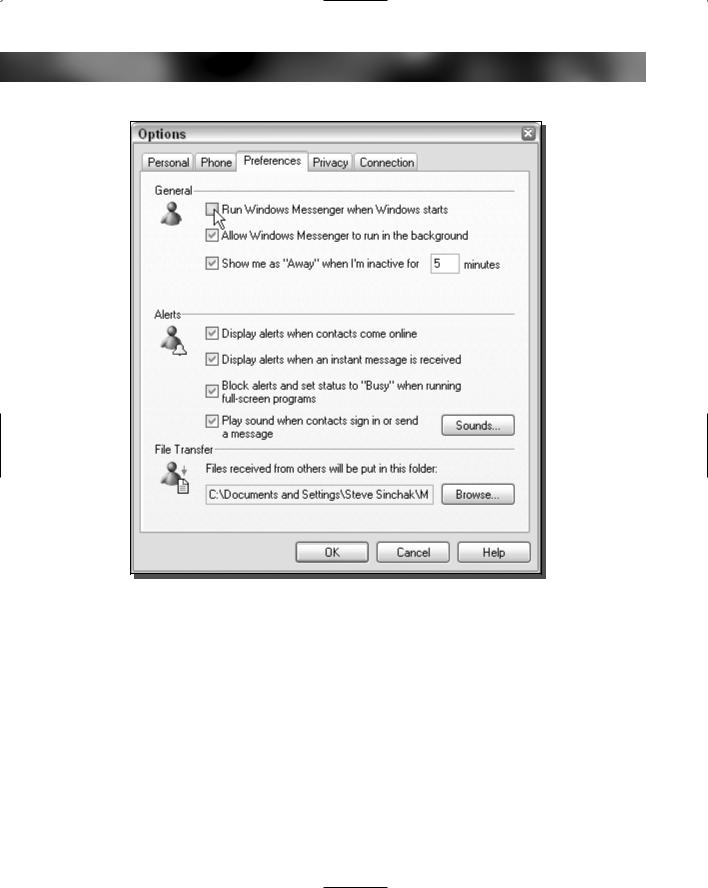
2.Once Windows Messenger is loaded, click the Tools menu bar item and select Options.
3.When the Options window is displayed, click the Preferences tab.
4.On the Preferences tab, you will find a check box that says “Run Windows Messenger When Windows Starts.” Uncheck that check box, as shown in Figure 9-11.
222 Part II — Increasing Your System’s Performance
FIGURE 9-11: Windows Messenger preferences.
5.After you have unchecked the box, click the OK button and exit the application. You are now finished. Windows Messenger will never be started automatically again.
As you can see, stopping sneaky programs from starting up automatically requires you to go into the programs options/preferences/settings. Once you are inside a program’s settings, you have to uncheck any options of features that start up automatically. Most programs, such as Windows Messenger, are easy to disable from starting up automatically from within the preferences. However, other programs, such as RealPlayer, require a little more work, as you have to disable Automatic Updates and several Message Center features. The best way to stop other sneaky programs that keep starting up automatically after you try to remove them using the System Configuration Utility is to dig through the program’s settings. Look in the program’s Help file for information on how to disable automatic startup if you are stuck. If you cannot

Chapter 9 — Making Your Computer Load Faster 223
find any information, try searching on the Web for information or post a request for help on one of the various computer support Web sites, such as TweakXP.com’s Support Forum, located at http://forum.tweakxp.com.
Customizing startup programs for different users
Windows handles the startup programs differently for each user. Certain programs may start up for one user but not for another. All of these settings are stored in the System Registry. With the help of the registry editing utility, regedit, you can manually change these entries.
But first, a word about the structure and where the startup programs are located in the registry. The registry stores startup information in two places for every user. It stores which programs will start for a specific user under the user’s registry entry. It also stores a list of programs that will start automatically in the local machine entry. All of the programs listed in this entry will start automatically for all users on the computer.
Now that you know the two different types of startup items, user-specific and all user entries, you can begin hacking the registry to change the startup programs. First, you will find out how to modify the startup programs for all users, then you will learn how to modify the startup programs for individual users.
To modify all user’s startup programs, you will need to start up the Registry Editor and follow these steps:
1.If you have not already done so, start up the Registry Editor by clicking the Start button and selecting Run. Then type regedit in the text box and click the OK button.
2.Once the Registry Editor is started, expand the entry labeled HKEY_LOCAL _MACHINE. Then scroll through the list and expand the entry labeled SOFTWARE. Scroll through the list again until you locate Microsoft and expand it. Then scroll through the list once again and expand Windows. Next, you will want to expand CurrentVersion. After you have gotten this far, you just have to expand Run and you will see a list of all of the startup programs, as shown in Figure 9-12.
 Keep in mind that if you delete a program entry, there is no way to undo the action. I highly recommend that you create a restore point, as was reviewed in the introduction, so in case you accidentally remove a critical program, it can be easily undone.
3.If you want to remove a startup program, just right-click the name and select Delete.
4.If you want to add an additional startup program, right-click the white background on the right-hand side and select New and then select String Value. Type in a name for the entry and then press Enter. After you have the new entry named, right-click it again and select Modify. Then enter the path to the executable file in the value box and click the OK button.

224 Part II — Increasing Your System’s Performance
FIGURE 9-12: Registry Editor, showing all user startup programs.
That’s it. You now know how to add and remove programs that will start up for all users on the computer. The steps for modifying the startup programs for specific individual users are very similar. The only difference is you have to go to a different place in the registry. Follow these steps to modify user-specific startup programs:
1.First, the easiest way to edit a specific user’s startup programs is to log into their account.
2.Then, once you are logged into the user’s account, you will want to start up Registry Editor again by clicking the Start button, selecting Run, and then typing regedit in the text box. Click the OK button.
3.After Registry Editor is open, you will want to navigate to the HKEY_CURRENT_USER entry and expand it. Then scroll through the list and expand Software. After expanding Software, scroll through the list again and select Microsoft. Then expand the Windows entry and then the CurrentVersion entry. After a little more scrolling, you will find the Run entry. This is where all of the startup information for a specific user is stored.
4.Add and remove string values from this section, as was indicated in step 4 of the previous list, to modify the startup programs.

Chapter 9 — Making Your Computer Load Faster 225
Other Time-Saving Tips
The preceding paragraphs covered the largest factors in slow loading time, but a few other small tips can save you additional time. These tips, individually, do not save a lot of time, but when they are applied in combination, they can really add up. Additionally, if you are running Windows XP on a computer that is fairly old, these tips will help you significantly decrease your loading time even further.
Assigning alternative IP addresses
One of the most common network-related delays occurs in the last moments of the system startup. The majority of computer users use dynamic network card configuration. There is nothing wrong with this feature, but under certain configurations, the user can experience delays when getting an IP address.
Every time you turn on your computer, it has to set up the IP configuration. Often, this setup can result in your computer pausing for moments during the loading process. The delay is a result of your PC waiting for the DHCP server (a DHCP server dynamically assigns addresses to computers connected to a network), which is the provider of the network information, to respond. In other situations, a user can experience a delay when a DHCP server is not present on the network.
If you use a dialup connection to the Internet, your computer will rely on getting a dynamic IP address from your service provider when you connect. When you first turn on your computer, it will search for a DHCP server to get an address for the local networking components of the operating system. This is occurring when your computer is still in the early boot stages and is not connected to your dialup ISP (Internet Service Provider). Because you are not connected to a network that has a DHCP server, such as when you are dialed up to your Internet provider, your computer may experience a delay, as the computer is searching for a DHCP server when there really is none available.
 This hack will only work for users that have network cards and modems installed. It does not apply to users that just have modem connections to the Internet.
One easy solution to this problem is to assign alternative information to your network card. This task is actually pretty easy, as it does not require any major tampering. Follow these steps to specify an alternative IP configuration for your computer:
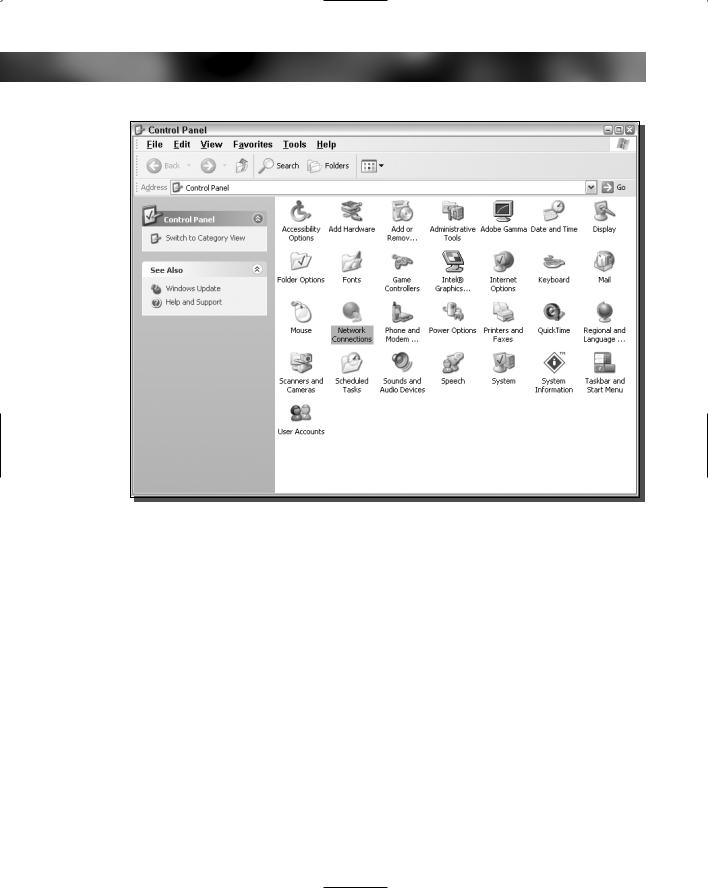
1.First, get into Network Properties. This can be accomplished by going to the Control Panel through the Start Menu.
2.Once you are in the Control Panel, make sure that you are in the Classic View, as shown in Figure 9-13, and open Network Connections. If you are not in Classic View, just click the button on the left that states Switch to Classic View, as shown in Figure 9-14.
226 Part II — Increasing Your System’s Performance
FIGURE 9-13: Control Panel Classic View, showing the Network Connections icon.
3.Now that you are in the Network Connections window, you will see a list of network adapters on your computer. Right-click the icon to which your network connection is hooked up and select Properties.
4.Doing so will launch a new window that lists the different protocols installed on the network card. Click the Internet Protocol (TCP/IP) to select it. Then click the Properties button.
5.Once the Internet Protocol (TCP/IP) Properties window is displayed, click the Alternative Configuration tab. This is where you will have to enter in your data.
6.First, you will have to click the User Configured radio button to allow the text boxes to be edited.
7.Next, type in an IP address for your computer that will be used for the sake of speed in the event that your computer cannot get a DHCP address because you are using a dialup Internet connection. I recommend you use 192.168.1.X. Replace X with any unique number for each computer between 2 and 254. The exact IP address numbers that you choose do not matter. You just want to have a valid IP address filled in so that your

Chapter 9 — Making Your Computer Load Faster 227
FIGURE 9-14: Control Panel Category view highlighting where to switch to classic view.
computer does not waste too much time looking for a DHCP address when there is no DHCP server giving out the address on your network.
8.Then, type in 255.255.255.0 as your Subnet Mask.
9.Your Default Gateway should be set to 192.168.1.1 because that is a valid gateway address. As I mentioned earlier, the exact numbers do not matter. We just want to have the computer assign some value instead of spending time searching when it will not find a DHCP server.
10.Then, enter in what your DNS servers should be. You can ask your ISP what they should be. But this information really isn’t essential, as this configuration will almost never be used to connect to the Internet. It is just a default fallback in the rare case that you are having networking trouble. Feel free to leave these fields blank, as well as the WINS fields.
11.Click the OK button and then click the OK button for the network properties screen.
That’s it; you are now finished.
228 Part II — Increasing Your System’s Performance
Turning off the logon music
The music that Windows XP plays every time I log on is something that, frankly, I can do without. Hearing the tunes was really cool back when most people didn’t have soundcards in their computers. But nowadays, everyone has a soundcard and the logon music is starting to get old. Additionally, having it play slows down your system’s loading. Less is more, and when your computer has to load a 500KB media file to play, it slows things down. I would highly recommend you disable the logon music. To do so, follow these steps:
1.Go to the Control Panel and select the Sounds and Audio Devices icon from the classic Control Panel view.
2.Once the control has loaded, click the Sounds tab.
FIGURE 9-15: Sounds and Audio Devices Properties.