


Contents xix
Introduction
indows XP is a great operating system. It is faster and more secure than any other Wversion of Windows. However, for some, it is not fast and secure enough. By picking
up this book, you have started a three-part journey that will guide you through all of the steps of customizing, optimizing for performance, and securing Windows XP. I am not talking about minor little tweaks; this book is going to show you how to conduct major surgery on your Windows XP box.
Visually, Windows XP is superior to all other Windows versions. No other version of Windows has ever looked this good. So how could you make it look better? Customize it! Impress your friends and refresh your dull desktop with a cool new look. I am going to show you how to completely change the way Windows XP looks during all stages of its operation.
Performance-wise, Windows XP has made great advances. However, for some computer users of older hardware, running Windows XP can be like trying to pull a 100-foot yacht behind a tiny import car. Although Windows XP will not bust your CPU quite so much as a yacht would, it can slow down the operation of your computer because there are so many new features. To help you out, I am going to show you how to get the new features under control; I’ll also tell you about some tricks that I have found to speed up the operation of Windows XP. If you already have the V12 4 x 4 of computers, and you have no problem pulling the 100-foot yacht, then you will still benefit from the performance tips.
Windows XP is a lot more secure than prior Windows operating systems. However, as we all know from recent history, it has not been doing very well. This book is going to show you how to use some of the new features of Windows XP Service Pack 2, as well as many other cool security tips, to make Windows XP much securer. Congratulations on starting your journey. Your computer will be in better shape than ever in no time!
About This Book
This book is the result of several years of research into the subject of the Windows operating system. It is a more polished and portable companion to the author’s Web site, TweakXP.com, which is located at www.TweakXP.com. Most of the information contained in this book is completely new content that was never before published on TweakXP.com.
This book is meant to be read from start to finish in order. However, it was also written so that it can be used as a reference manual of different hacks. Feel free to skip around if you do not want to take the full journey of customizing, optimizing, and securing Windows XP.
xx Introduction
Assumptions
This book is aimed at the intermediate to advanced Windows XP user. If you are a beginner computer user, then this book may not be for you. If you understand the basic operations of Windows XP, then dive right in.
You will need access to a computer running Windows XP Professional or Windows XP Home to perform the hacks listed in this book. Attempting to use the information in this book on any other version of Windows may result in a headache.
How This Book Is Organized
In this book, you will find 14 chapters spread across three parts. Each part covers a different theme, and each chapter is broken down into sections supporting the chapter’s topic. The first two parts are laid out in logical operating system event order, such as boot, logon, and interface. The third part is laid out in order of steps.
Part I: Customizing Your Computer
Chapter 1 will start off by customizing the very first part of Windows XP that you see, the boot screen, and will finish up by customizing the logon screen. Then, Chapter 2 will pick up where Chapter 1 left off and will cover how to customize the Start menu and the new Start panel. Chapter 3 will cover customizing your desktop, and Chapter 4 will discuss how to use themes and visual styles as well as how to create your own. To wrap up customizing Windows XP, Chapters 5 and 6 will cover how to customize Windows Explorer and other methods to enhance the Windows Interface using cool special effects.
Part II: Increasing Your Computer’s Performance
Chapter 7 will kick off Part II by covering methods that analyze your computer to find possible bottlenecks. Then, Chapter 8 will pick up by speeding up the boot time. Chapter 9 is dedicated to reducing the sign-on time and Chapter 10 will show you how to increase system responsiveness by adjusting many hidden settings. To wrap up Part II, Chapter 11 will cover hacks that speed up the loading time and execution time applications and will also cover how to speed up your network and Internet connection.
Part III: Securing Your Computer
Chapter 12 will mark the beginning of Part III by covering how to protect your computer from intruders. It will show how to analyze your computer’s level of vulnerability, as well as how to use firewalls. It also gives you several security tips on how to make Windows XP rock-solid. Chapter 13 will cover how to make Windows XP more secure against SPAM and Spyware and viruses. Finally, Chapter 14 will wrap up Hacking Windows XP by discussing ways to protect your privacy by removing recorded user information from various parts of the operating system.

Introduction xxi
Conventions Used in This Book
In this book, you will find several notification icons—Caution, Tip, and On the CD—that point out important information. Here’s what the three types of icons look like:
Provides valuable information that will help you avoid a disaster.
 A brief tip that will provide help or other useful information.
Refers you to links, files, and software that are on the companion CD in the back of the book.
Hacking Precautions
Although all of the hacks and tips mentioned in this book have been tested, if a step is accidentally missed or a typo made, your computer could experience severe problems. To make sure that your computer is protected, I highly recommend that you use the Windows XP system restore feature.
Windows XP system restore is a great program that monitors all of the changes to your computer. If you make a change to the system registry as one of the hacks in this book requires you to do, you can always undo the change by reverting to an earlier system restore point. By default, Windows XP creates a restore point once per day. But if you are making a lot of changes to your computer, it is a good idea to create a restore point before every computer modification. The following two sections will show you how to use system restore to create a restore point, and how to restore your computer to an earlier checkpoint.
Creating a System Restore restore point
1.Click the Start button, expand All Programs, Accessories, and System Tools, and select System Restore.
2.When System Restore loads, select Create a Restore Point and click Next.
3.Type in a short description for the checkpoint in the box and click Create.
4.Once the restore point is created, just hit Close.

xxii Introduction
Restoring your computer to an earlier restore point
1.Click the Start button, expand All Programs, Accessories, and System Tools, and select System Restore.
2.When System Restore loads, select Restore My Computer To An Earlier Time and click Next.
3.Browse through the calendar and select the restore point that you want your computer to revert to and click Next.
4.The Confirm Restore Point Selection screen will be displayed. Click Next to proceed. Keep in mind that you may lose any files that were created when you revert to an earlier restore point. Make backup copies of important documents and files on a floppy or network drive of important documents just in case.
Once you click Next, your computer will reboot and revert to the earlier restore point.
Customizing
Your System
part
in this part
Chapter 1
Customizing the Look of
the Startup
Chapter 2
Customizing User
Navigation
Chapter 3
Hacking the Desktop
Chapter 4
Customizing the
Appearance of the
Windows Interface
Chapter 5
Hacking Windows Explorer
Chapter 6
Exploring Other Windows
Enhancements

Customizing the
Look of the Startup
Windows XP has a great new look, but after a while, the new look can get old. With the help of some cool tools and tricks, you can change many parts of Windows XP.
This chapter will guide you through customizing two parts of your computer, the boot screen and the Welcome/logon screen. You will learn how to replace the boring boot screen with premade screens and even how to make some of your own.
Then, this chapter will move on to customizing the second part of your computer startup, the Welcome/logon screen. This screen can be customized in several ways, such as selecting to use the new Welcome screen or the old Windows 2000 style logon screen. Also, there are a handful of different hacks that will help you customize each screen and make it look even better. Would you like to replace the Welcome screen with a screen you made yourself? You will also learn how to replace the Welcome screen and how to make one of your own.
Customizing the Windows
XP Boot Screen
Every time I turn on my computer, I am forced to stare at the boring Windows XP boot screen. Although, I must admit, I found the moving blue bars very amusing at first, after a few months, I became bored and wanted something different. Although changing the boot screen is not a feature that the Windows XP team at Microsoft has built into Windows, doing so is still possible.
Changing the boot screen
The image that is displayed during the boot is hidden away in a system file called ntoskrnl.exe. This system file is loaded during the system boot and is what displays the boot image and animation.
chapter
in this chapter
Changing the Boot Screen
Making Your Own Boot Screen
Changing the Welcome Screen
Making Your Own Welcome Screen
Customizing the Logon Screen

4 Part I — Customizing Your System
When users first started to make their own boot screens, they would use resource hacking tools to hack into the file and replace the old Windows XP bitmap image file with one that they made. Then, they would swap the old system file with the hacked version of the system file so that the new boot screen would be displayed.
The majority of users do not start off by making their own boot screen. Instead, they download one that someone else made from the Web. Unfortunately, the only way to distribute a boot screen is to share the system file that the author has hacked from his or her system. This method of distributing boot screens works for some people, but it may cause serious problems for the majority of users.
The problems of changing the boot screen
If you download a hacked system file with a new boot screen and replace the old file on your computer, after you restart, you may find that your computer will not start and will give you a nice error message. “C:\Windows\System32\ntoskrnl.exe is missing or corrupt.” Missing or corrupt? Uh-oh. This is the most common problem that users experience when trying to change their boot screen using the file swap technique.
Users that get this message, or any similar error message, are receiving it because they replaced their system file with a file that is not compatible with their version of Windows XP.
Windows XP was released in many different languages for different parts of the world. Each language version of XP has a slightly different version of code. Additionally, Microsoft continuously releases software update patches to update the code of the system files such as the monthly security updates and almost yearly service packs. All of these factors result in several different versions of the boot screen system file floating around on the Web.
You could find a boot screen file that was made from a hacked system file from the German version of Windows XP. Or more commonly, you could find a boot screen that was made from a hacked file from the original version of Windows XP. When you try to install that boot screen on a computer that, for example, has Service Pack 2 installed on the English version of XP, you will have problems.
Windows XP will only work with a specific version of the system file that contains the boot screen. This arrangement complicates the change of the boot screen with the common file swap technique. It will do so because users will have difficulty telling on what version of Windows XP a particular boot screen that is distributed on the Web will work.
Users have to be aware of more than just the version problem. Because you are downloading a hacked version of a critical system file that is executed during the boot sequence, you could possibly download a version that someone modified and in which he or she put some variation of malicious code that could harm your computer. Read the next section to find out how to change your boot screen safely.
How to safely change your boot screen
Check out the following ways to change your boot screen by using special tools that will allow you to do it safely.

Chapter 1 — Customizing the Look of the Startup |
5 |
Several different boot-screen-changing programs are available on the Web. Some of these programs are shareware and others are freeware. I have used them all. Not all of them have been user-friendly, and some of them have been an out-and-out pain. The one I prefer to use is BootSkin by Stardock, which also happens to be free. This program is by far the easiest and safest one to use to change the boot screen. Instead of replacing the system file, it just installs a special driver that skins the boot. This arrangement does not impact system performance and is a nice alternative to having to deal with system files.
 You can get a copy of this cool app from the companion CD in the Chapter 1 folder or on the Web at www.bootskin.com.
The BootSkin app is a great piece of software, but it does not do everything. Currently, it does not allow you to use the thousands of boot screens already made that are posted all over the Web. It will only allow you to run boot screens that were made especially for the program. True, hundreds of boot screens are available for this application, but thousands of hacked system files are out there.
Because of this limitation, I have decided to show you all how to convert these hacked system file boot screens into safe BootSkin files. But first, let’s get started using the app.
Using BootSkin to change your boot screen
Once you have the BootSkin application installed, start it up by using the link in the Start menu under WinCustomize and perform the following steps:
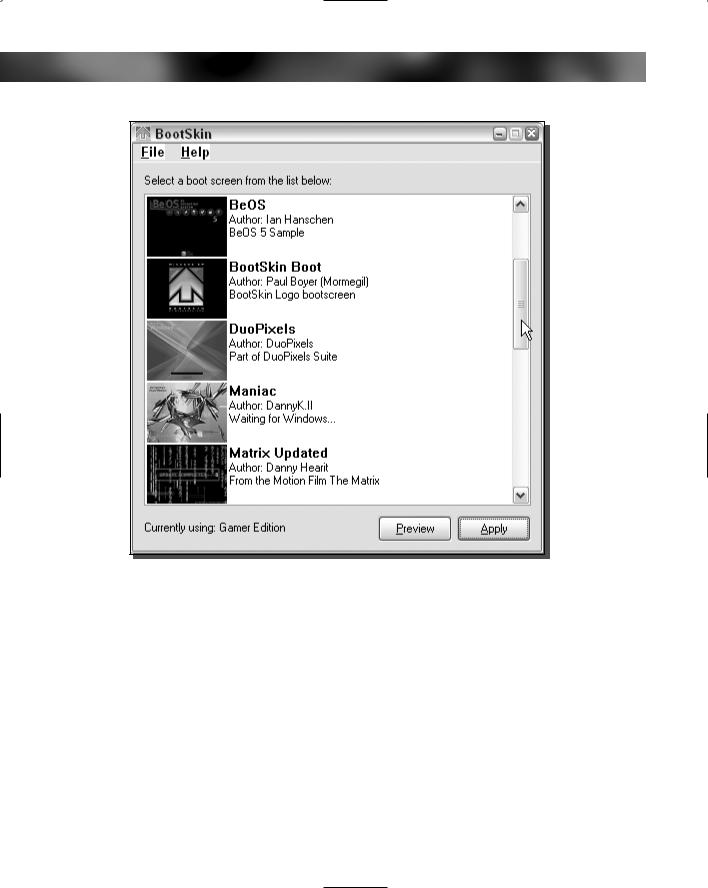
1.Once you have the application running, changing the boot screen is very simple. Just navigate through the list of boot screens by using the scrollbar arrows, as shown in Figure 1-1.
2.Once you find the boot screen that you like, click the item and then click the Preview button to see a full-screen animated preview of what the boot screen will look like.
3.Click a button on the mouse again to exit the full-screen preview. If you like the boot screen, then click the Apply button. That’s it!
Once you reboot, your new boot screen will be displayed every time. If you would like to change your boot screen back to the default Windows XP boot screen, reopen the BootSkin program and select the default system boot screen from the top of the list; click Apply.
Where to get more boot screens for BootSkin
Want more boot screens that will work with BootSkin? The following are two sites where you can find more skins that are already compatible with the program.
Win Customize: www.wincustomize.com/skins.asp?library=32
Skinbase: www.skinbase.org/section.php?sections=BootSkin
6 Part I — Customizing Your System
FIGURE 1-1: Stardock’s BootSkin browsing through the available screens installed on the computer. This figure includes some boot screens that were downloaded and installed as shown in the next section.
Another advantage of using the Bootskin app, besides the safety it provides, is the small size of the skin files. Instead of having to download a hacked system file that can be quite large, BootSkin files are a fraction of that size.
Once you have downloaded the boot screens that ...you want, Just... double-click them and they should automatically be loaded into the BootSkin program and be available for selection if the file has the .bootskin file extension. If that is not the case, then you will have to do a little work to get the file into the right format. Some boot skins that you will find from other sites such as Skinbase could be in a ZIP archive. A BootSkin file is just a ZIP archive that was renamed.To make ZIP archive skins work, just rename the .zip to .BootSkin and you will be able to import the skin by double-clicking the file. Once you have clicked the BootSkin file, it should show up in the list and you will be able to select it as your boot screen.

Chapter 1 — Customizing the Look of the Startup |
7 |
How to convert boot screens to work with BootSkin
Because BootSkin will only allow you to use boot screens that are in the BootSkin format, if you would like to use all of the boot screens that are floating around the Web, you will need to convert them into the BootSkin format. Doing so will involve a lot of steps, but after a short while you will be flying through them in no time.
First, I recommend that you browse around the Web and download some boot screens. Following is a list of a few good sites from which to get boot screens:
ThemeXP : www.themexp.org/view.php?type=boot
Belchfire : www.belchfire.net/showgallery-8.html
XP Theme : www.xptheme.info/resources_view.cfm/hurl/restype_id=4/
EZ Skins : www.ezskins.com/product.phtml?xpBootScreens
Make sure that when you download the screens you save them all in one place. I made a folder on my desktop called Boot Screens in which to store mine.
Now that you have some boot screens downloaded on your computer, you are ready to start converting them to use with BootSkin. Follow these steps to get started:
1.First, extract the image files from the boot files you downloaded. You could do this with a resource hacking tool, but then you would have to worry about converting the image with an image editing program with the special boot color palette; this is just not the easiest way. Instead, I recommend you use a program that was originally designed to change the boot screens to extract the image files. It is a free application called LogonUI & Boot Randomizer by User XP.
 You can copy this file from the Chapter 1 folder on the companion CD. Or, you can download a copy of LogonUI & Boot Randomizer from www.belchfire.net/~userxp/indexlbr
.htm.
This app is loaded with features, but you will only need the image extraction feature.
The LogonUI & Boot Randomizer application has the capability to change the boot screen with any existing hacked system file boot screen. However, I do not recommend you use it for that purpose because of problems that I have experienced using the program and because I do not like the fact that it patches the kernel system file. Because of that, every time you apply a new system update that modifies your kernel system file, you will have to download a new version of the application so that it will work with the new kernel file and will not automatically revert your system file to the older version.
2.Now that you have the file for the app extracted and ready to use, launch the app by double-clicking LogonUIBootRandomizer.exe. The first time you run this application, it will want you to set it up so that it can change your boot screen. If you see the multiboot screen, click OK, as that is your only option. Then when the NTFS Detected screen, as shown in Figure 1-2, appears, click the Close button.
8 Part I — Customizing Your System
FIGURE 1-2: LogonUI NTFS Detected screen, which asks you to add another line to the boot.ini file so that your system will be set up for LogonUI to change your boot screens.
 If you get an error the first time that you run LogonUI saying that the comctl32.ocx component cannot be found, download this file from the following URL, or any other site, and put it in the same folder as your application: www.belchfire.net/~userxp/comctl32.zip
3.Next, you may be prompted with a third configuration screen if you are running Windows XP Service Pack 1. The screen will say that it has detected Service Pack 1 installed and wants to know if you want LogonUI to work with older (nonService Pack 1) boot skins. Click Yes on this screen. When the application has started up, you are going to see the final configuration screen asking you where the folders on your computer are for your boot screens. This step is important, as you will need to specify the folder on your computer to where you download all of the boot screens. Click the three dotted button on the right of the text boxes (. . .) to specify the path easily. Click OK, when you are done. You are now finished with the LogonUI app.
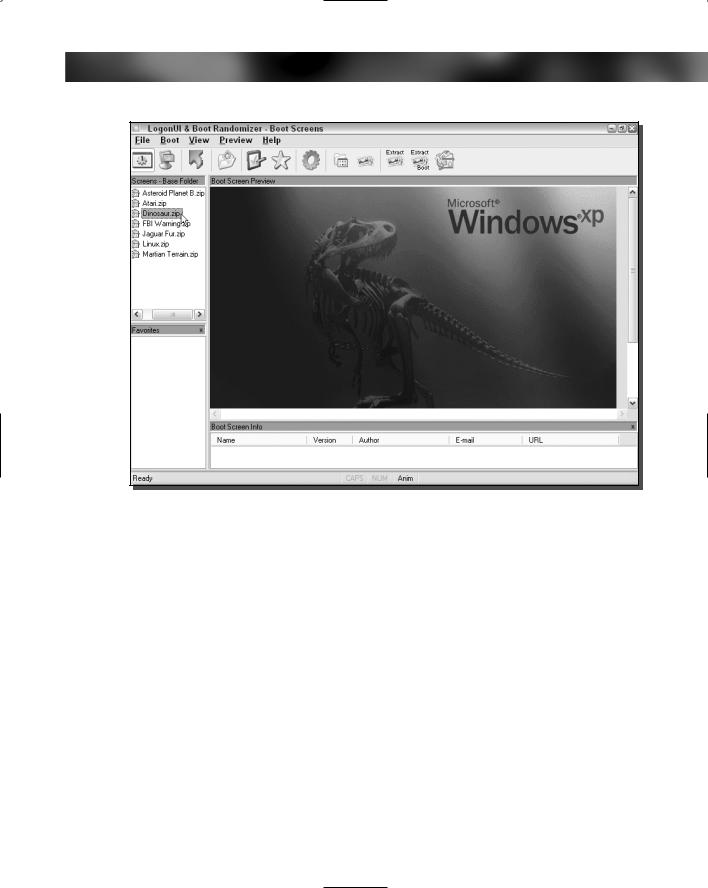
4.If you still see the configuration screen, click OK once more. Now you should see a list of your boot screens in the upper-left window. Click one of the screens to see a preview, as shown in Figure 1-3. If you receive a message asking if you want it to locate the progress bar automatically, click OK, wait a few seconds, and you will then see a preview.
Chapter 1 — Customizing the Look of the Startup |
9 |
FIGURE 1-3: LogonUI displaying available boot screens.
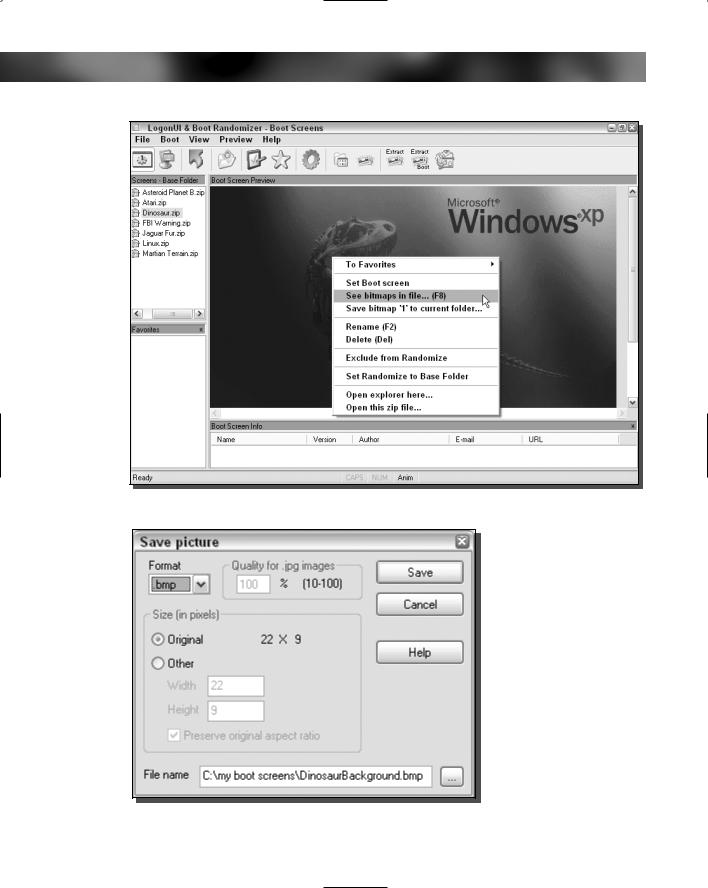
5.Select the boot screen from the list that you want to convert so that it shows up in the preview area. Then, right-click the Preview of the boot screen, and select See Bitmaps in File, as shown in Figure 1-4.
6.The background of your screen will go gray and you will see some numbers in it. Each of the numbers in the box represents an image file stored in this system file. Click number 1, and you will see a preview of the image. Then click the Save button and the Save Picture dialog box will show up, as shown in Figure 1-5.
7.At this point, you will want to change the file format to a bitmap. This can be done by clicking the Format drop-down box and selecting .bmp from the list because Stardock’s BootSkin app can only read bmp files.
8.Next, you should change the location and name of the file to a new folder named after the name of the boot skin so that identifying and finding the image file will be easier later. It is best to place this folder inside of a master boot skins folder such as my boot screens folder I mentioned earlier to keep things organized and simplify the conversion process. You can do so by clicking the button with three dots on the bottom of the dialog box. Once you get the file name and folder set, click the Save button.
10 Part I — Customizing Your System
FIGURE 1-4: LogonUI See Bitmaps in File pop-up menu.
FIGURE 1-5: Save Picture dialog box.
Chapter 1 — Customizing the Look of the Startup |
11 |
9.Now, you are almost finished with the extraction portion of converting the boot screen. If the boot screen that you are converting also has a progress bar (the active bar moving left to right on the screen), then you have to do one more step. (If the boot screen does not have a progress bar, skip to the next step.) After you have clicked the Save button in the last step, return to the screen that shows all of the different numbers for the different bitmaps stored inside the file. The progress bar is stored in bitmap number 4. Select the number 4 item from the list and click the Save button. Then repeat step 8 to save the bitmap file.
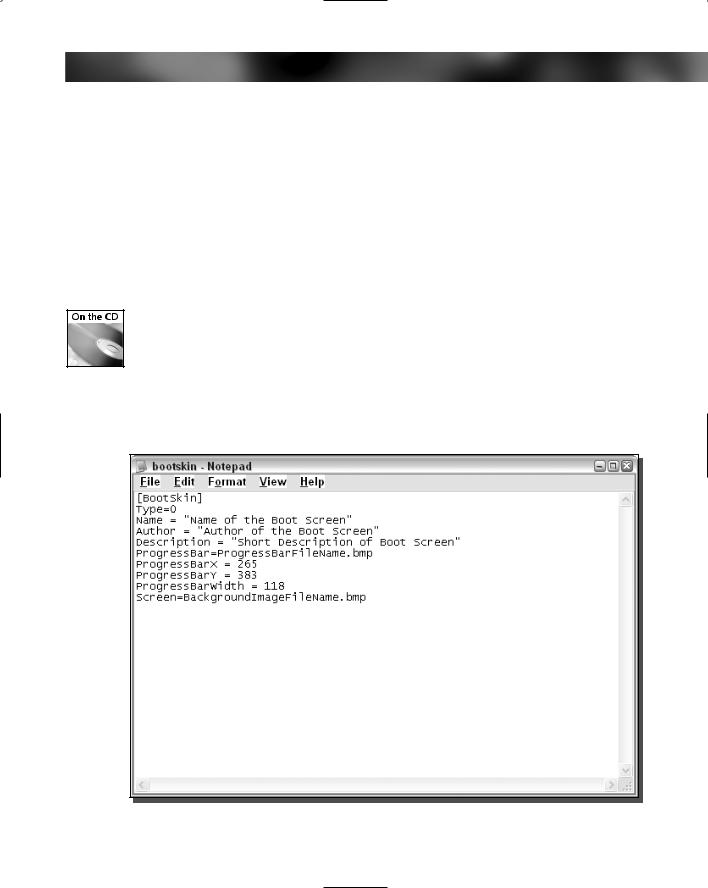
10.You are now finished with the LogonUI app portion of the conversion and are getting close to completion. The next step is to create a BootSkin configuration file. The format of the configuration file is simple, as shown in Figure 1-6.
A copy of a configuration file called BootSkin.ini is in the Chapter 1 folder on the companion CD-ROM at the back of the book. I recommend that you use this file as a guide when making your own configuration file.
Open up a copy of Notepad from the Accessories menu in the Start panel to create your own configuration file. The first line of the file should contain [BootSkin] to indicate that this is a configuration file to the BootSkin application. Type in Type 0 in the
FIGURE 1-6: A BootSkin boot screen configuration file.

12 Part I — Customizing Your System
second line to tell BootSkin what type of screen this is. Next, you will need to include some identification information in the file. Type Name “Name of your screen” on the next line. Do the same for author and description, as shown in Figure 1-6. Now you will have to specify which bitmaps you want to use for the progress bar. Type in ProgressBar ImageName.bmp. Next, you will have to specify where the progress bar will be displayed because BootSkin makes it possible to display the progress bar anywhere on the screen. The location of the progress bar will be determined by the coordinates that you enter in the configuration file. Type in ProgressX 265 and ProgressY 383 on the next two lines. Feel free to replace 265 and 383 with any numbers you like. Keep in mind that the resolution of the boot screen is 640 480, which limits the maximum x value to 640 and the y value to 480. The width/length of the progress bar must also be specified. Type in ProgressBarWidth 118 to do this. If the boot screen that you are converting does not have a progress bar, then just omit the four lines involving the progress bar. The last part of the configuration file is where you specify what you want the background image to be. Type in Screen BackgroundImage.bmp to set this. When you are finished typing in all of the configuration data, save the configuration file in the folder that you named and extracted all of the bitmaps to in step 8.
11.The last step of the process is to copy your newly created files to the BootSkin skin directory. If you installed BootSkin to the default location, it is located at c:\Program Files\Stardock\WinCustomize\BootSkin\skins\. Create a new folder in this directory that is the same as the name that you entered in the configuration file in the last step. Then, copy the two image files (one if you have no progress bar) and the bootskin.ini file to this folder. The next time you start up BootSkin, you should see your new boot screen.
Although performing these steps might seem (and be) a little time-consuming at first, once you have converted a boot screen, any conversions thereafter should take you a minute or less.
As mentioned previously, the process I just described to change your boot screen is the safest possible way to do so. You will not have to get caught up in the mess of looking for compatible boot screens for your version of Windows and you also will not be limited to any number of available boot screens if you use my conversion tips.
Making your own boot screens for BootSkin
Now that you know how to convert boot screens, making your own boot screen will be a snap. The most difficult part of the process would be creating your image file. To get started, you first need to know the basics.
If you have not already noticed, boot screens are a 640 480 resolution image. These images are limited to only 16 colors (4 bits). This limitation makes the ability to create a cool-looking screen a little difficult. The help of a nice graphics converter utility makes the image look much better when you have to convert it to only 16 colors. A good utility that I use is the free version of Stardock’s Skin Studio. This is a program that was designed to make Visual styles for their Windows Blinds application, but it also has a good graphics converter that was made especially for BootSkin within it. Download a copy of this utility from www.stardock.com/ products/skinstudio/downloads.asp. Once you have it downloaded and installed, you can start the application from the Object Desktop folder in the Start menu. Follow these steps to convert your images:

Chapter 1 — Customizing the Look of the Startup |
13 |
1.The first time that you run Stardock’s SkinStudio, you will be greeted with a registration screen. If you do not want to register, just click the Register Later option and the program will load. Now that you have Stardock’s SkinStudio started, you will want to click the Close button on the Welcome screen that asks you what you want to do, because what you want to do is not listed there.
2.Next, click the Tools menu bar item and expand BootSkin and then select Prepare Image.
3.This will bring up the Boot Screen Image Prepare window. Click the Browse button and select the image that you want to convert on your computer.
4.Then, you will see a preview of your image converted by a method known as dithering. This process allows the image to look better by using the same technique that newspapers use to print color and photographs on paper. Most newspapers are printed with only three colors. Dithering makes it possible for the massive newspaper presses to print an image that appears to include thousands of colors from only three basic colors. How is this possible? It is all a trick with your eyes. All images in a newspaper are made up of thousands of tiny dots. Each of the dots is one of the three printing colors. The placement of the dots and combination of one or more colors is what gives the illusion of color. For example, if you want to print something in a color such as orange, then print
a grid of red and yellow dots next to each other. There are various methods to dither the image built-in so that you can play around and see which one makes your image look best using the drop-down box next to the dither image check box, as shown in Figure 1-7.
5.Once you have the image looking the best that you can get it, just click the Save button and you are set!
If you do not want to use the boot screen preparer and do not know how to use Adobe Photoshop or any other robust image editor, I suggest you visit the Belchfire.net Web site that automatically converts and resizes background photos for you: http://server1.belch fire.net/Inno_Resize/. Just click the Browse button and select your image file, then click the Convert button, and sit back for a few minutes and your converted image should come up eventually. I have found that the site does not work well with files other than bitmaps, so it might be a good idea to convert your image to a bitmap first and then let the converter resize the image and decrease the colors automatically.
If you would like to make your computer’s boot screen more attractive and alive, an animated progress bar is for you. To add a moving progress bar to your boot screen, just make a bitmap image that is saved in 16 colors that has a resolution of 22 x 9 pixels . Don’t worry about trying to animate it; that small image will be moved around automatically by the program displaying the screen.
Once you have your image files in 16 colors and at the right sizes, just create a new folder in the BootSkin skin folder (C:\Program Files\Stardock\WinCustomize\BootSkin\ skins) and copy in your image files. Then create a quick bootskin.ini file for your boot screen from the sample file in the Chapter 1 folder on the companion CD and you are finished.
Load up BootSkin to preview your new skin and, if it looks good, you are ready to roll. If you reboot to see your new boot screen in action and you notice that the boot screen does not show