


126 Part I — Customizing Your System
Customizing Your Folders
The folders of Windows XP can be customized in ways that were never before possible. You can easily change the icon of the folder as well as the way the folder behaves once you open it up. These next few sections will show you how to take advantage of the great new folder features of XP.
Changing a folder icon and picture
Changing the icon that is displayed for a folder is one of the easiest ways to customize how it looks and make it stand out from the rest of your folders. Windows XP also includes a new way to apply pictures to the front of your folders when you are using thumbnail view. This next section will show you how to change the way your files and folders look as you browse through them by taking advantage of the new high-resolution icons.
Changing the folder icon and the folder picture are done within a folder properties menu. For the sake of demonstrating what you can do with these new features, create a new folder on one of your hard drives and call it Downloads. This can be a folder to which you can save all of your downloads so that they do not clutter up your desktop. Follow these steps to change the way this folder looks:
1.Right-click the new folder that you just created, or on any folder that you want to customize, and select Properties.
2.Next, click the Customize tab to reveal all of your customizing options.
3.The particular view you are currently using, whether it be the Icons, Tiles or Thumbnails view, will determine what you can customize. First, customize the icon, because that is the most popular way to customize the look of the folder. To do that, click the Change Icon button on the bottom of the window.
4.Now you will be able to browse through the list of available system icons or you will be able to specify your own by clicking the Browse button. Personally, the system icons are good enough for this folder, so I would select one of the globe icons for the Downloads folder.
5.Once you have selected the icon that you want to use, just click the OK button to return to the Customize screen. Then click Apply to see your changes.
6.If you are using Thumbnail view to view your icons, you can customize the folder by making an image appear on the front of the folder so that it can be used as a reminder of what is in the folder. To do that, just click the Choose Picture button on the Customize screen and specify a bitmap to be displayed on the file.
7.Once you are finished selecting the image, click OK to save your change. Then click Apply on the Customize screen to see your changes. Remember that you will only see your change if you are using the Thumbnails view. The view can be changed to Thumbnails view by clicking the View menu bar item.

Chapter 5 — Hacking Windows Explorer 127
When you are finished changing the way your folder looks, just click the OK button to save your changes and exit the folder properties window.
Changing the template of a folder
Windows XP has several different ways to display the contents of a folder. Specifically, XP has many new ways that different types of data inside a folder can be viewed. For example, if you have a folder filled with MP3 files, Windows can display new information, such as the title of the song, artist, year, track #, bitrate, duration, and other data from the ID3 tags (special data that keeps track of the title of the songs, artist, album, etc.) that are stored within a MP3 file when displaying the file in Details view with the music template selected. Another example is the new Filmstrip and Thumbnails view that can be selected to easily browse through your photos on your computer.
To get started customizing the folders on your computer so that they can take advantage of the new features, you have to set the template of the folder so that Windows Explorer knows how
FIGURE 5-5: Changing the template of a folder.
128 Part I — Customizing Your System
to display its contents. This can be done by using the Customize tab in Folder Properties. Follow these steps to specify the template that should be used for a specific folder:
1.Navigate to the folder that you want to modify and right-click it and select Properties.
2.Then click the Customize tab.
3.Next, select the template that you want to use by expanding the drop-down box, as shown in Figure 5-5. The default template that is used is the Documents template. Other template options include Pictures, Photo Album, Music, and Videos. There are actually a few different subsets of music as well, but it really does not matter which one you select because most likely you will be customizing the look further in the next section. The main purpose of changing the template is so that you will have a different set of features with which you can work and customize.
4.Also, if you have a lot of folders within this folder with the same type of content, click the Also Apply This to All Subfolders check box so that your changes will be propagated to all subfolders.
You have now customized the template of the folder and are ready to customize the view.
FIGURE 5-6: New Tiles view.
Chapter 5 — Hacking Windows Explorer 129
FIGURE 5-7: New Thumbnail view.
Customizing the view folder
Now that you have a specific template selected for your folder, you will have a more advanced feature list to work with so that you can display a lot of useful information about the file in your folder. First, you need to be aware of the new views that you can use in Windows XP:
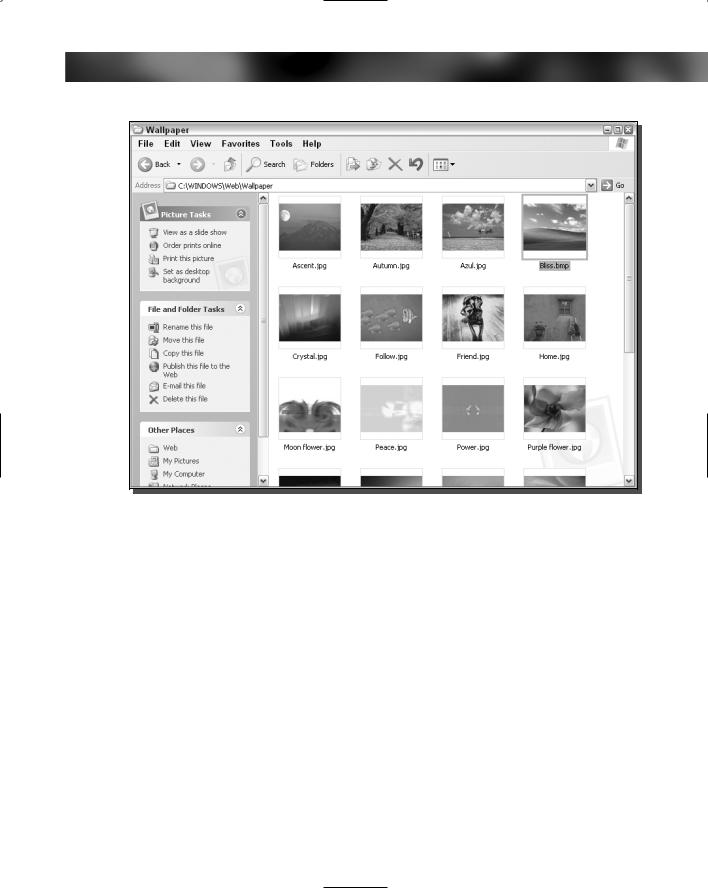
The default view of Windows XP is the Tiles view, as shown in Figure 5-6. This view is basically the same as the Icons view, but the icons that are displayed are just a little bigger.
The Thumbnails view is one of the most useful new views of Windows XP, as shown in Figure 5-7.
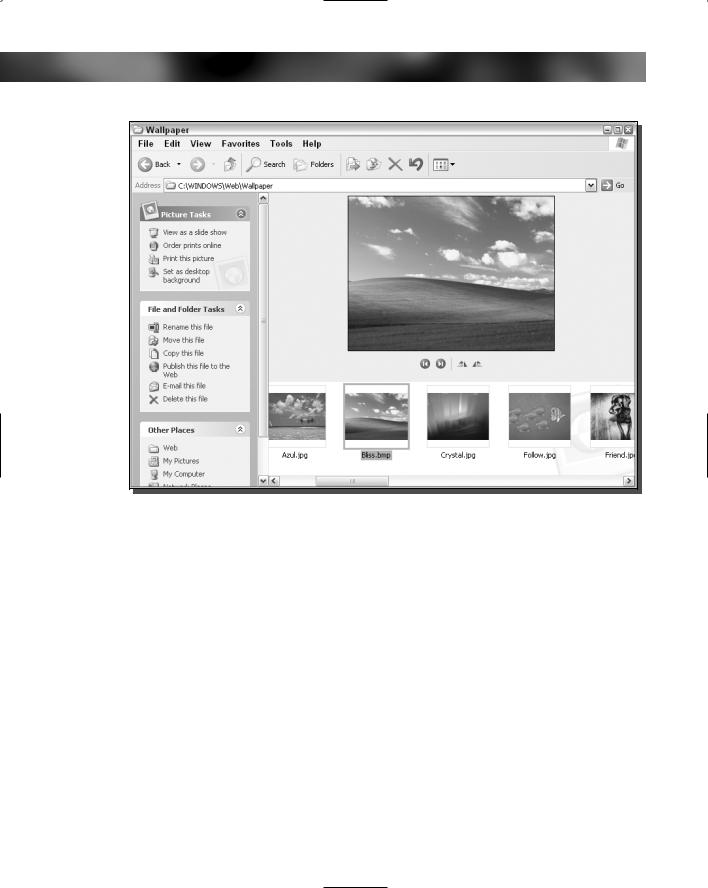
The Filmstrip view is another very useful view that makes it easy to browse through photos on your computer. It gives you the ability to see a large sample of the image, as shown in Figure 5-8, so that you can see a more detailed preview without having to open up the file.
130 Part I — Customizing Your System
FIGURE 5-8: New Filmstrip view.
The Details view is not exactly a new view, but it has been expanded to include many new fields that display useful file information, such as ID3 tags and image data like dimensions and camera info.
The Details view can be customized like no other view can. All of the columns that are displayed can be resized, removed, rearranged, and more can be added. This can all be accomplished by using some of the lesser-known tricks of the interface. To start off, customize a folder that contains a bunch of MP3 files. By now, you should have already changed the template for this folder to one of the music templates so that you can use the advanced music specific features. If you have not already done that, go back to the last section to find out how. When you are ready, follow these steps to customize all of the different parts of the Detail view:
1.Start off by resizing the columns. To do so, just place the mouse on the vertical line that is displayed between the columns and click and hold the left mouse button while you drag the mouse back and forth.
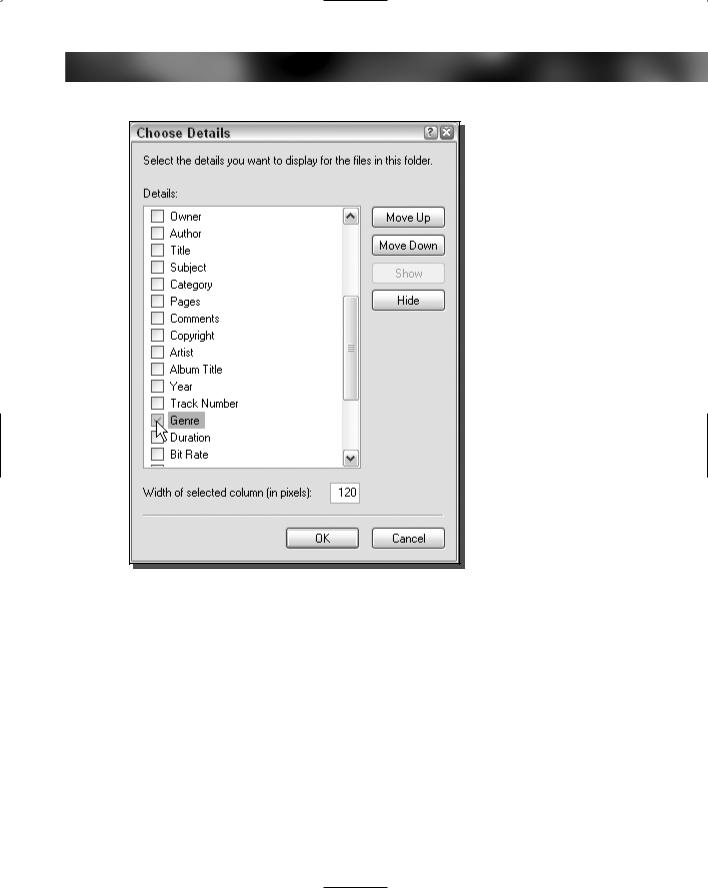
2.Now, add some of the new columns that display information from the ID3 tags from the MP3 files. Just right-click the column heading and select one of the many new options, such as bit rate. You can even select more items to add from the bottom of the pop-up
Chapter 5 — Hacking Windows Explorer 131
FIGURE 5-9: Adding new columns to the detailed view.
menu, as shown in Figure 5-9. Repeat this step until you have added all of the new columns that you want.
3.Most likely, there will be some columns that you just don’t need. To remove these columns from the Details view, just right-click the column heading and select the item once again to uncheck it. This will instantly remove the column from view.
4.The last part of customizing the view is to set the order of the columns in a way that you like the best. To change the order of a column, just grab the column header and drag it around by holding down the left mouse button and moving the mouse.
If you want to customize the detailed view of a folder that contains other multimedia files such as videos or photos, just repeat the previous steps and you will see additional column features with which you will be able to customize your detailed view.