


Chapter 11 — Speeding Up Your Computer 251
The /prefetch:1 flag does not appear in any documentation released by Microsoft. The only way to investigate what this flag does is to experiment.
Because I am a very curious person, I tried to apply this flag to all of the popular programs that I use. When doing so, I noticed an increase in loading time during the second application launch, even after a reboot. It is clear that this flag positively affects the loading time of an application. How it does this is unknown, and will remain unknown unless Microsoft decides to share with us the inner workings of the Prefetcher.
During my experimentation, I have found that this option flag does not work on all applications. The applications that it does not work on tend to be programs that get the option flag confused with a file that you want it to open. For example, when you type mspaint /prefetch:1 at the command prompt, Microsoft Paint will open, giving you an error that it can’t load the prefetch bitmap file because it thinks you are trying to send it a bitmap file to open. You will experience this problem with other applications as well, but the vast majority of programs work well with the flag.
I recommend that you play around with this flag and see if it helps your applications. If you are unclear how to add the flag, follow these steps:
1.Locate the shortcut file that you are interested in modifying to use the prefetch flag.
2.Right-click the Shortcut file and select Properties.
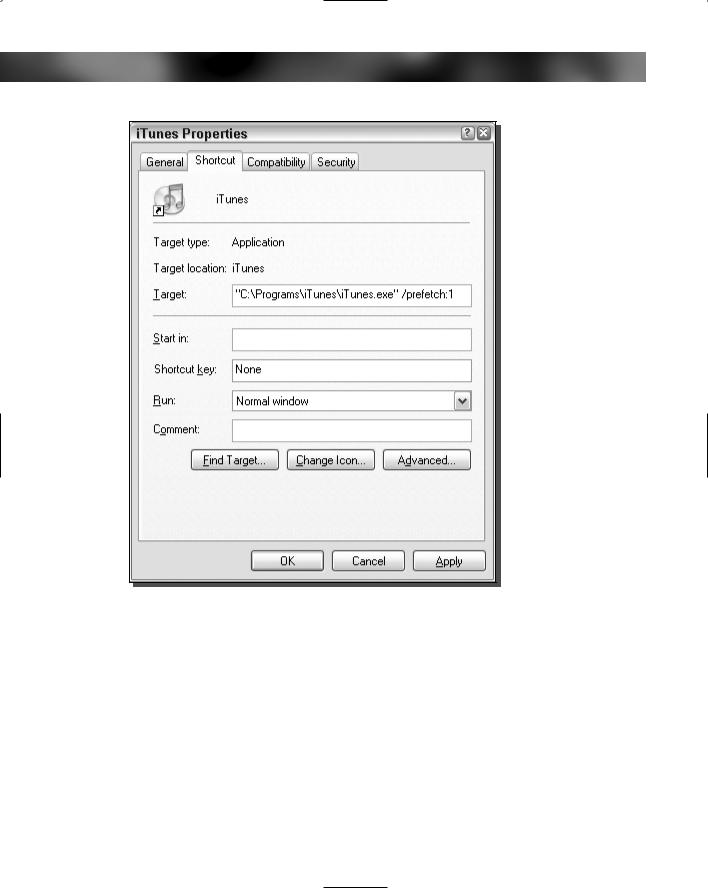
3.Click at the end of the text in the Target textbox and type in /prefetch:1 or any variation of this that you would like to try, such as /prefetch:22. If your shortcut has quotes around the path to the program, place the option flag on the outside of the quotes, as shown in Figure 11-3.
4.Click OK and that’s it.
Unfortunately, no list is available of what programs will work with this and what programs will not. If you load a program after modifying a shortcut and you get an error, just remove the option flag that you added and you will be back to normal.
How much improvement in loading time you observe will vary, depending on the speed of your computer, how your PC is configured, and the like, but it’s definitely worth a try.
Using the Intel Application Accelerator
The Intel Application Accelerator is a great program, released by Intel, that will boost the performance of a user’s system by optimizing the flow of information between the CPU and the storage devices. This improvement is accomplished by replacing the storage drivers that come with Windows XP with drivers that are optimized for their motherboards. According to Intel, the Application Accelerator will eliminate the data storage system bottleneck on the motherboard, which will allow the CPU to be more efficient and will speed up various aspects of the system.
On top of the bottleneck solution, which improves system performance, the Application Accelerator claims to increase application and even game performance because it will increase
252 Part II — Increasing Your System’s Performance
FIGURE 11-3: Shortcut properties with prefetch option added.
the speed of disk inputs and outputs. In other words, the applications and games can read and write data faster.
Additionally, the Application Accelerator is optimized for the Intel Pentium 4 processor, and it therefore uses new high-speed Pentium 4 extensions to accomplish the high speeds. On top of this, the Application Accelerator also promises to decrease your boot time. This seems to be a by-product of the elimination of the bottleneck and faster disk reads.
But that’s not all. The Intel application acceleration also includes 48-bit logical block addressing. That means that you can use hard disks larger than 137GB. In addition, the Application Accelerator will automatically detect and optimize the transfer modes of your storage devices as high as possible to ensure that your hardware is running at top speed.

Chapter 11 — Speeding Up Your Computer 253
The Intel Application Accelerator seems almost too good to be true. Did I mention that this utility is free too? Intel has made some very bold claims about their application. Are these claims true? Find out by reading the next section.
How well does the Intel Application Accelerator work?
The Intel Application Accelerator works surprisingly well. I never thought that a software program could improve the performance of a computer so much. According to Intel performance benchmarks, users of the Application Accelerator will significantly increase the speed of their computer. Intel tested the application accelerator by running the popular benchmark program Winbench99 on a machine with a 2.0 GHz P4 CPU. The score of the machine after installing the Intel Application Accelerator was 34 percent faster than when the Application Accelerator was not installed. Additionally, the boot time of the same computer was 58 percent faster after the program was installed.
The Application Accelerator program actually works as promised. Searching the Web, you will find hundreds of success stories for users that have installed the Application Accelerator with very good results. Users have reported their applications starting up twice as fast as before, and having many seconds shaved off of their boot time.
What are the system requirements?
Unfortunately, the Intel Application Accelerator will only run on certain systems, and your system must meet the strict requirements for it to run without causing problems. After all, the reason why it works so well is because it can optimize the storage driver to work at peak performance for a specific motherboard.
Basically, your PC must meet the following three different qualifications:
1.Your PC must be running an Intel CPU: the Pentium II, III, IIII, as well as the Celeronbased processors and Xeon series of processors. Sorry, AMD users.
2.You must have the Intel Chipset Installation Utility installed, if your chipset requires it. Visit www.intel.com/support/chipsets/inf/inf.htm to view a table of motherboard chipsets that need to be installed. It your motherboard requires it to be installed for the system to correctly identify your chipset, visit http://downloadfinder.intel
.com/scripts-df/Product_Filter.asp?ProductID 816 to download a copy.
3.The last qualification to use the Intel Application Accelerator is that you must have a supported motherboard chipset. Refer to Table 11-2 to see what chipsets are supported.
 If you do not know what kind of chipset your motherboard has, Intel has a free utility that will detect your chipset and display the model number for you. Visit www.intel.com/support/ chipsets/inf/chipsetid.htm to download a copy of this utility.
If your chipset is not listed, then check the Intel Application Accelerator Web site, which is located at www.intel.com/support/chipsets/IAA/.

254 Part II — Increasing Your System’s Performance
Table 11-2 Intel Application Accelerator Compatibility |
|
Chipset |
Support |
440 |
Not Supported |
810 |
Supported |
810E |
Supported |
810E2 |
Supported |
810L |
Supported |
815 |
Supported |
815E |
Supported |
815EM |
Not Supported |
815EP |
Supported |
815G |
Supported |
815EG |
Supported |
815P |
Supported |
820 |
Supported |
820E |
Supported |
840 |
Supported |
845 |
Supported |
845E |
Supported |
845G |
Supported |
845GE |
Supported |
845GL |
Supported |
845GV |
Supported |
845PE |
Supported |
848P |
Not Supported |
850 |
Supported |
850E |
Supported |
852GM |
Not Supported |
852GME |
Not Supported |
855GM |
Not Supported |
855GME |
Not Supported |

Chapter 11 — Speeding Up Your Computer 255
Chipset |
Support |
855MP |
Not Supported |
860 |
Supported |
865G |
Not Supported |
865P |
Not Supported |
865PE |
Not Supported |
875P |
Not Supported |
Also, if your chipset is not currently supported, there is always the chance that someday Intel might add support.
 If your chipset is listed on Table 11-2 as not supported and is also listed on the Intel Web page as not supported, installing the Application Accelerator on your computer will result in big problems. Doing so will screw up your computer so much that it will not boot.
Additionally, Intel Application Accelerator has been confirmed by Intel to work with Windows XP SP1 Home/Pro. Windows XP SP2 Home/Pro has not yet been officially confirmed to work on supported Intel hardware but it is still worth giving it a try. Just make sure that you are using system restore to make backups so that you can easily revert to your previous settings.
How to install Intel Application Accelerator
Installing the Intel Application Accelerator is very simple. This cool application will be running on your computer in no time if you just do the following:
1.Visit http://downloadfinder.intel.com/scripts-df/Product_Filter
.asp?ProductID 663 to download a copy of the Application Accelerator.
2.Then once you have the file downloaded, install the application by following the onscreen directions.
3.After the install is completed, reboot, and the Application Accelerator will be installed and running.
If you have a laptop that has a supported chipset, you should be aware that in the recent version of the Intel Application Accelerator, version 2.3, support for mobile devices was removed. You will have to install version 2.2.2 instead.
Fine-Tuning the Windows Paging File
The Windows paging file, also known as the swap file and virtual memory, is very important to the operation of the operating system. Providing a critical memory feature by allowing the

256 Part II — Increasing Your System’s Performance
operating system to use more random access memory (RAM) than the computer actually has allows users to use more robust programs without having to upgrade their memory.
The paging file can be thought of as a large file on the hard disk that is a collection of system memory used by open applications and operating system components. As more and more applications are started, the amount of free space in the system memory, the RAM, decreases and can eventually be completely used up. When a user starts a program and the RAM used is full, the operating system still loads an application into memory. Before it can do that, it must first make room, and so it pushes a page of low-priority memory out of the RAM and into the paging file.
The exact method that the system uses to decide what programs will stay in the physical RAM and what programs will go is unknown. However, there are several paging file hacks that will help you optimize your computer’s use of the paging file. With the help of hacks to the System Registry, you can prevent certain files from being pushed into the paging as well as completely disabling the paging file.
This next section will guide you through the steps of optimizing the paging file for your computer.
Disabling the paging file
Users of computers with a large amount of RAM have the ability to stop the operating system from pushing any data out into the paging file. This will allow for the faster memory management and memory access that is physically possible for your RAM. Reading and writing directly to the RAM is always significantly faster than having to use the page file. Reading and writing to the paging file requires multiple steps and that takes time. Moreover, reading from the hard drive is nowhere as fast as reading from the RAM.
If your system has a large amount of RAM, over 1 gigabytes, then you can consider disabling the paging file. If you have less than 1 gigabyte of RAM, do not even consider disabling the paging file or else you will be running into problems.
What can happen if you disable your paging file? If you have enough RAM, then nothing. But if you do not have enough RAM, then if you run a large program such as Photoshop and are working on a large image, you will run into “out of memory” errors and the application will crash, causing you to lose all of your work. This is a pretty extreme example, but it can happen.
Basically, stick to the 1 gigabyte minimum and you will have no problems. But be aware that if you ever choose to run some memory-intensive applications, such as rendering a two-hour 3D movie, you could run out of memory easily.
So, now that I have warned you, you are ready to follow these steps to disable the paging file:
1.Enter System Properties, either by right-clicking the My Computer icon on the desktop and selecting Properties or by doing the same to the My Computer icon in the Start Menu.
Chapter 11 — Speeding Up Your Computer 257
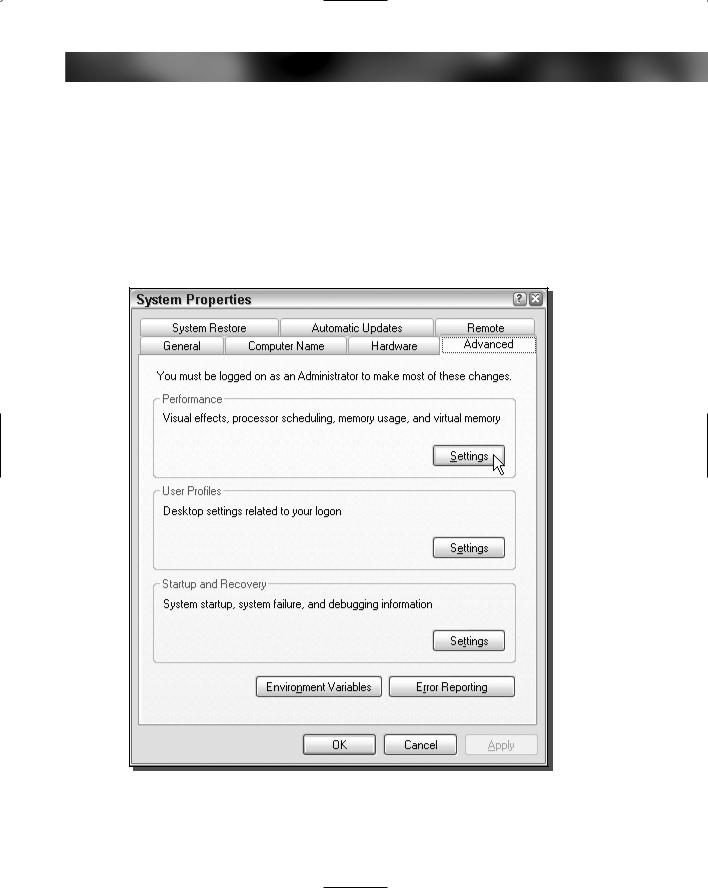
2.Once the System Properties window has loaded, click the Advanced tab and then click the Settings button under Performance, as shown in Figure 11-4.
3.Once you are in the performance options, click the Advanced tab again.
4.Click the Change button that is located under the Virtual Memory section.
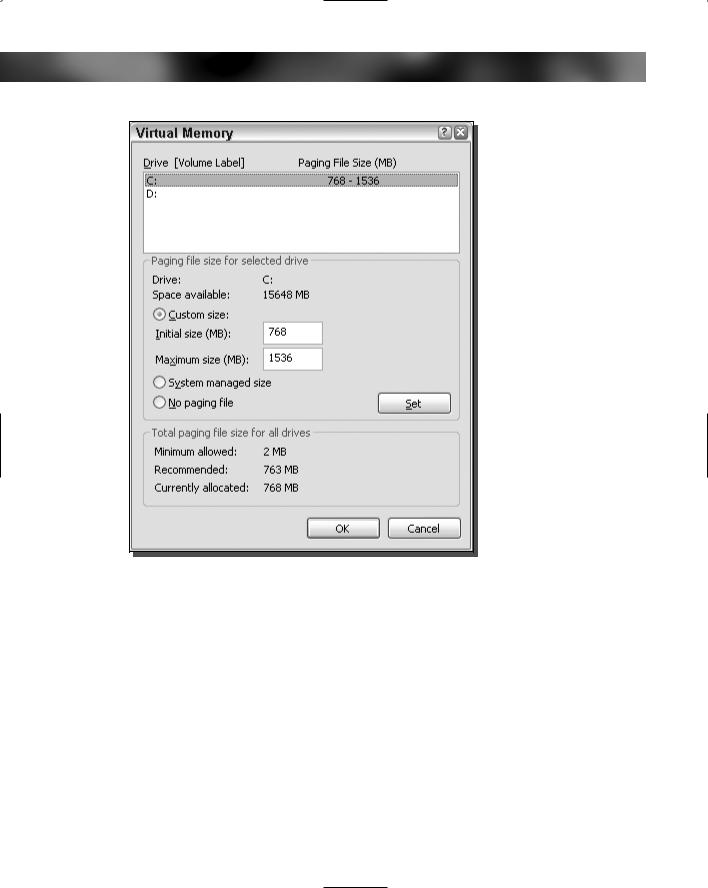
5.This will load the Virtual Memory screen. Locate and select the No Paging File radio button, as shown in Figure 11-5, under the Paging File Size for Selected Drive section.
6.Click the Set button and then click OK three times and you are finished. After you reboot, your page file will be disabled.
FIGURE 11-4: System Properties Advanced Settings.
258 Part II — Increasing Your System’s Performance
FIGURE 11-5: Virtual Memory No Paging File option.
Feel free to delete the pagefile.sys file from your hard drive after you reboot to claim some extra few hundred megabytes of free space.
If you do not have enough RAM to disable the paging file completely, follow the directions in the next section to adjust the size of the paging file for best performance.
Adjusting the size of the paging file
The size of the page file can automatically be set by the system or it can be set by the user. In some situations, having the page file managed by the system is a good idea, but in others, it is better to manage the paging file yourself.
The biggest argument for setting the paging file size and limit manually is to eliminate the growing on the page file when it is set by the system. When the system is managing the size of the paging file, it will monitor the size of the file and will then automatically make it larger

Chapter 11 — Speeding Up Your Computer 259
when it is needed. This causes two problems. First of all, it causes a noticeable delay for all applications running on your computer because the computer has to expand the paging file and this is a hard disk–intensive operation. Secondly, allowing the system to grow and shrink the paging file causes fragmentation errors.
For the sake of having enough speed, your page file should not have any file fragments. In the next section on defragmenting, you will learn exactly how to do this. But before the defragmentation can be successful, the page file needs to have a constant size. If the page file will be growing frequently, and because the defrag utility has no clue by how much, it cannot put the file in a place on the hard disk so that it will never get fragmented, as is the case when you set the page file manually to Constant Size.
Setting the paging file to a constant size does have some disadvantages. For example, the lost disk space taken up by the paging file can be as high as 1 gigabyte. Additionally, when you set the maximum paging file size manually, you are setting a limit that your computer can never go above. Should you run some extremely memory-intensive application and your limit is too low, your paging file will fill up and you will be out of luck.
The previous example is why setting the correct paging file size is so important. A real easy way to calculate the maximum size of your page file will be to take the recommended size of the page file from the Virtual Memory Settings window, as shown in Figure 11-6, and multiply it by 2.5. If you are having problems finding where your computer states the recommended size, perform the following steps for changing the paging file to a constant size, because this value is on the same screen as that on which you will be working.
Now that you are ready to optimize the paging file to a constant size, follow these steps:
1.Get inside the System Properties again. Do so by right-clicking one of the My Computer icons that is either in the Start Menu or the desktop and selecting Properties.
2.Next, click the Advanced tab and click the Settings button under the Performance section.
3.On the Performance Options window, click the Advanced tab and then click the Change button under the Virtual Memory section.
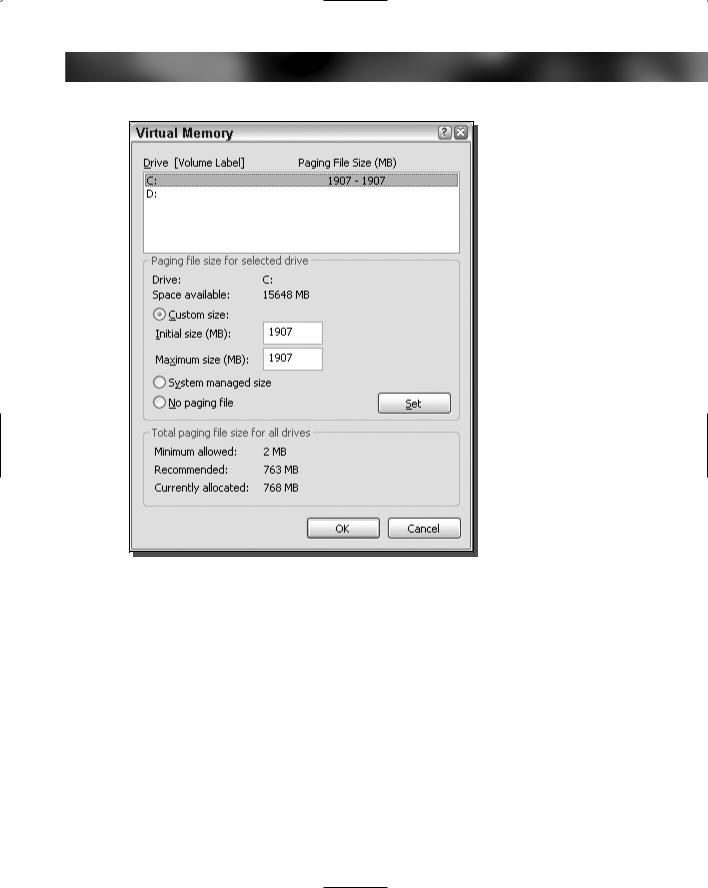
4.This will bring up all of the page file settings. Once this information is shown, you will want to modify the custom values so that the initial and maximum sizes are the same. Enter in the value that you calculated in these two boxes, as shown in Figure 11-7. If you have not yet calculated what your size should be, you will find the recommended size on the bottom of this window, as was shown in Figure 11-5.
5.Click the Set button and then click OK three times to close all of the windows and save your settings.
Once you restart, you will be using the new constant size paging file. You are now ready to run your defragmenter to defragment the paging file to ensure optimal performance.
Be aware: The method that I use to calculate the size of the constant paging file is a very conservative approach. I figure it would be better to be safe than sorry. The method of calculating the size is an effective one. However, if you feel the need for more free disk space, feel free to
260 Part II — Increasing Your System’s Performance
FIGURE 11-6: Virtual Memory settings, showing the recommended
Paging File Size.
play around with the calculation, such as only multiplying the recommended amount by 2 or maybe even 1.5. Although if you do that, keep in mind that you will be increasing your chances of maxing out your paging file.
Changing the location of the paging file
The paging file can be placed all over your machine. If you really wanted to, your PC could move it to one of those keychain USB thumb drives that use a compact flash card. Although this would be insane because compact flash cards are extremely slow compared to hard drives, it is possible.
If you have multiple hard drives in your system, and I am not talking about multiple partitions on the same drive, you may see a performance increase if you move your paging file off the main system drive.
Chapter 11 — Speeding Up Your Computer 261
FIGURE 11-7: Virtual Memory settings, showing a constant paging file setup.
Moving the paging file off your main drive will allow it to be accessed faster in situations in which your primary hard drive is busy. Also, often when users add hard drives to their computers, they were purchased after their computer was made and usually are faster because hard drives, just like everything else in the computer, get faster as time passes. Moving your paging file to the faster hard drive will also help performance.
Changing the location of the paging file is very easy. Just follow these steps and you will have it done in no time:
1.Once again, you will want to get back to the Virtual Memory settings. If you can get there on your own, feel free to skip to step 4. For those of you that would like directions one more time, follow this and the next two steps. Right-click the My Computer icon located on the desktop in the Start Menu and select Properties.
2.Then click the Advanced tab and click the Settings button under the Performance section.

262 Part II — Increasing Your System’s Performance
3.Next, click the Advanced tab and then click the Change button under the Virtual Memory section.
4.Now that you have the Virtual Memory settings displayed, you will want to select the drive on which your current paging file is located from the list of drives, as shown in Figure 11-8.
5.Before you make any changes, write down what the initial and maximum size text boxes contain, if your page file is set to the custom setting. Then, click the No Paging File option and click the Set button.
6.Select the hard drive on which you want your new paging file to be placed from the list of drives (see Figure 11-8) by clicking it.
7.When the new hard drive is highlighted, click the Custom Size radio box and enter in the number that you wrote down before. If you are not using the Custom Size mode,
FIGURE 11-8: Virtual Memory Drive setting.