

Chapter 11 — Speeding Up Your Computer 275
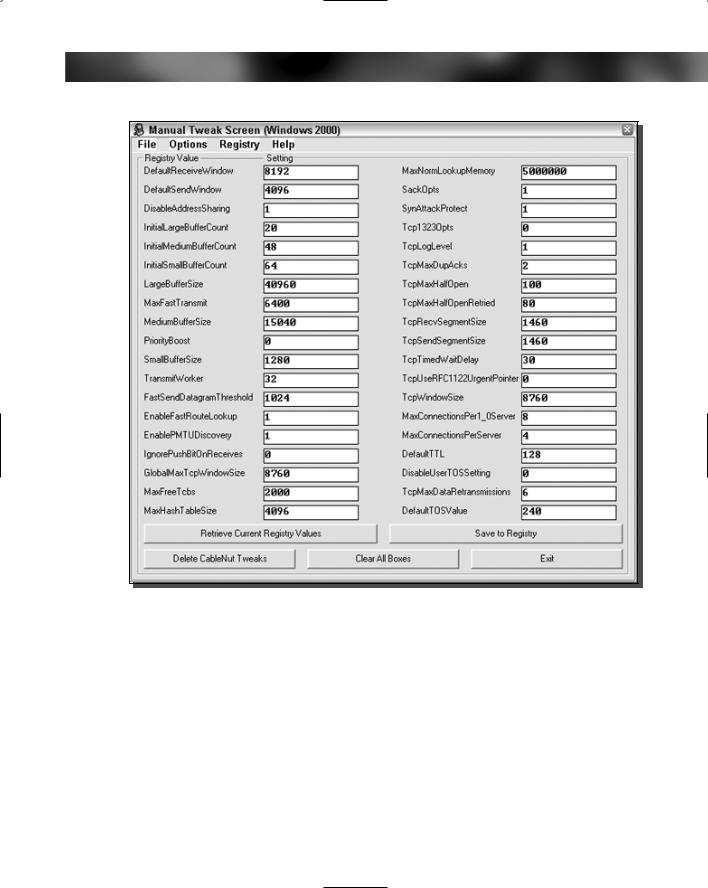
FIGURE 11-13: CableNut settings.
have problems, or if you have problems with the directions and still want to optimize your connection, a great forum to get help on this topic is at www.broadbandnuts.com, or feel free to visit the TweakXP.com support forum at www.tweakxp.com/forum/.
Summary
This chapter focused on speeding up loading time and speeding up your network. Now you know how to optimize your applications and some of the operating system settings, such as the paging file and your application priorities. You also know how to defragment not only the files on your hard drive but also the paging file and the Windows master file table. On top of

276 Part II — Increasing Your System’s Performance
finding out about all sorts of intriguing performance hacks and tips, you also learned the steps to correctly optimize your Internet connection.
You are now finished with the second part of Hacking Windows XP. The next part of this book is completely dedicated to making Windows XP a more secure operating system and protecting yourself from the other type of hacker, the kind that tries to break into your computer. Additionally, the next chapters will touch on the popular and troublesome topic of Spyware and will even touch on hacking Windows XP to maintain your privacy.

Securing Your
System
part
in this part
Chapter 12
Protecting Your Computer from Intruders
Chapter 13
Fighting Spam, Spyware,
and Viruses
Chapter 14
Protecting Your Privacy
278 Part III — Securing Your System

Protecting Your Computer from Intruders
Computer security is one of the most important issues in the computer world. With the number of viruses and other malicious software that prey on exploits in the Windows operating system increasing, you
need to take preventative measures to make sure that your computer does not become infected.
The days of only having to worry about e-mail attachments and documents on a floppy disk are over. Nowadays, viruses or worms actively seek out computers to infect without the computer user even doing anything.
Once a virus or worm has gained entry to a system, the invaded computer can turn into a virus distribution center. Often, the computer sends copies of the virus to all of the people in its address book. Even worse, the infected computer may begin to scan a block of IP addresses (that is, computer addresses) to try to find more machines that it can infect. If your computer is not protecting its connection to the Web, it is at increased risk of becoming infected.
So how do you protect your Internet connection? That topic is what this whole chapter is about. You will learn how to test your computer and see how vulnerable it actually is. Then, you’ll find out how you can use firewalls to build a “brick wall” around your computer. You’ll also learn how to turn off some unnecessary services to lower the risk of infection even further. Additionally, you’ll discover how you can secure wireless network connections, as they are growing so much in popularity.
Once you have your computer locked down from the outside, some connections to your computer may still be open, which you do not want to close down. Remote connections need to have certain ports open on your computer so that you can connect remotely to your computer. Additionally, if you want to share files with other computers on your local network, then you will want to leave the Client for Microsoft Networks unblocked. However, when you have openings in your computer’s security, you leave yourself vulnerable, allowing users to get in. To help combat that vulnerability, you’ll learn about ways to use the various user accounts settings to assign complex passwords and permissions to users.
chapter
in this chapter
How Open is Your Computer?
Firewalls
Unneeded Services
Wireless Security
Controlling Access

280 Part III — Securing Your System
How Vulnerable Is Your System?
Our computers are a vault of important information. You could have sensitive data on your computer that you do not want the whole world to see. Data such as family photos, personal documents, and financial information can be found on almost everyone’s computer. If a virus or an attacker connected to your computer remotely and gained access, that intruder could wipe out years of work and memories as well as steal sensitive personal information. This section will show you how to test your computer and find out how vulnerable it really is. To do this, you’ll be using a nifty online utility to test your Internet security. Then, proper security update procedures will be examined, so you can see if you are really doing what you should to ensure a secure PC.
Testing your Internet security
Ports are the gateways inside your computer. When a computer program wants to communicate with a remote computer, it makes a connection to the remote computer with a port, with which it can then talk to the computer. Each computer has thousands of ports—65,535 to be exact.
The different ports of a computer can be thought of as a bunch of different mailboxes. When a program wants to send data to a remote computer, it sends it to a specific port (mailbox) number. Then, provided that a program is on the remote computer that is set up to receive data at a particular port (mailbox), the remote computer can then work with the data that it was sent.
Theoretically, nothing is wrong with this scenario. In the real world, however, programs don’t always work this way. Programs are not perfect, nor are they always efficient. Sometimes, they are sent data that they are not programmed to receive, which causes all kinds of program errors, including errors that can allow a remote attacker to connect and run commands on your computer. The technical name for data sent to a program that results in problems is exploit.
Because of errors in programs and the exploitation of the errors, you need to protect your computer. Even though you may have all the latest security patches installed, your computer will not be protected forever. It is just a matter of time before someone figures out a new exploit and it starts to spread. Only after the fact is the patch usually developed and distributed.
So how do you protect yourself from future attacks? It is actually a very simple concept. There are a lot of open ports (mailboxes) on your computer that just don’t really need to be open to the outside world. Why not close all ports except for one or two you absolutely need so that exploits can no longer get through because they never have a chance to connect to your computer? How do you close ports and protect your computer? Use a firewall, as shown in the Firewalls section found in the second half of this chapter.
To give you an idea of how open your computer really is to the outside world, I recommend that you use one of the various online security screening tests that attempt to probe your computer to find weaknesses. The following is a list of sites that I feel do a good job of letting you know how open your computer really is:
Symantec Security Check: http://security.symantec.com
Sygate Online Services: http://scan.sygate.com/

Chapter 12 — Protecting Your Computer from Intruders 281
Gibson Research Shields Up: www.grc.com
DSL Reports: www.dslreports.com/scan
Visit a few of these sites and follow their directions to scan your computer. You will be presented with a report that shows you the open doors that they found.
Updating your computer
Because programs are not perfect, they require updating. Windows XP is a great operating system; however, no operating system is perfect. In order to keep your machine secure and free of the latest exploits, you must update your computer regularly. Visiting the Windows Update Web site (www.WindowsUpdate.com ) once every few months is not going to result in a secure, up-to-date computer. Microsoft releases security updates monthly and emergency security updates whenever they are needed. The only way to stay on top of these updates is to check Windows Update daily, subscribe to the Microsoft Security Newsletter, or enable automatic updates.
Windows Update
Microsoft’s Windows Update Web site offers an easy way to view all of the updates that are available for your computer. Microsoft releases both critical and features updates that update various software apps and add interesting new features to Windows XP. For example, critical updates fix major security concerns, such as the widespread exploit for Windows XP known as the W32.Blaster.Worm worm. This worm spread to other computers by using a vulnerability in a component of Windows known as RPC (remote procedure call). To fix the security hole, Microsoft released a critical patch that fixed the security hole. Feature updates update bugs and add new features to common Windows applications such as Windows Movie Maker. Using the Windows Update Web site is very easy too. Just key in www.WindowsUpdate.com in your Web browser Address window, click Go, and you will be there in no time.
Security Newsletter
The Microsoft Security Newsletter is a great way to keep informed about all of the latest security patches that Microsoft releases. Receive an e-mail in your inbox every time Microsoft releases a critical security patch. If you are a home user, visit www.microsoft.com/security/ security_bulletins/alerts2.asp for more information on the newsletter. On that page, Microsoft also offers a more technical version of the Microsoft Security Newsletter that will not only notify you of a critical security patch, but will also explain the full vulnerability. If you are an IT professional and want to know exactly what the patch is for, the technical version is for you.
Microsoft TechNet also offers a monthly newsletter that offers security news and advice. This is another great newsletter to subscribe to. It was primarily intended for IT professionals, but home users may also find it useful if they are interested in a more technical approach. Visit www.microsoft.com/technet/security/secnews/newsletter.htm for a copy of the latest newsletter, as well as information on how to subscribe.

282 Part III — Securing Your System
Automatic Updates
Windows XP has a great Automatic Updates service. With the release of Service Pack 2, that service is now even better. With the ability to set a specific time every day to check and install new updates, you now can schedule a time for your computer to automatically check for and apply updates so that you will not have to visit the Windows Update Web site manually.
 Turning on Automatic Updates is a great way to make sure your computer is up-to-date. However, it is a good idea to visit the Windows Update Web site every few months to make sure that Automatic Updates is still working. If it is, then you should not see any critical updates available when you visit the Web site.
Working with the Automatic Update settings is not a difficult task. Just right-click the My Computer icon located in the Start panel or on your desktop and select Properties. Then, click the Automatic Updates tab and specify the setting that you want, and click OK to save your changes. Figure 12-1 is a shot of the Automatic Updates screen, with the automatic download and install feature enabled. I selected 12:00 p.m. so my computer will automatically install new updates when I am at lunch and not using my computer. Also, this is a time when it is pretty much guaranteed that my computer will be on.
As you can see from Figure 12-1, there also are settings to automatically download patches that then prompt you to confirm the install as well as a feature that will just notify you of new patches. Unlike the technical security newsletter that was mentioned earlier, the notification of new updates will just give you the basic information instead of all of the technical reasons for the update.
Users also have the ability to turn off Automatic Updates by selecting the last option on the Automatic Update tab. You would have to be crazy to do this unless you plan on checking the Windows update Web sites daily or subscribing to the Microsoft Security Newsletter. The Automatic Updates service does not consume a lot of system resources. The resources that it does consume are well worth it because of the invaluable service that Automatic Updates provides.
Firewalls
You now know that your computer is vulnerable to viruses and attackers from the Internet. You also know that one way to help fight those attackers is to block access to your computer on all of the different ports, which can be gateways into your computer. How exactly to block all the ports? Use a firewall. A firewall is a special application that acts like a brick wall that is protecting all of the ports on your computer.
When a remote computer attempts to access a computer on which a firewall has been installed, which is blocking the port on which the remote machine is trying to connect, it will not be able to connect and the data that was sent will be ignored and discarded. Depending on the way the firewall is configured, when data is sent to a blocked port on your computer, the firewall will either respond to where the data was sent from with a message that the port is closed or it will do nothing, giving your computer a stealth presence. Most firewall applications are set up by default to run in a stealth mode, which will provide the maximum amount of protection. Any remote computer trying to connect or send data to your computer with a firewall installed

Chapter 12 — Protecting Your Computer from Intruders 283
FIGURE 12-1: Windows XP Service Pack 2 Automatic Updates settings.
running in stealth mode will think that your computer has gone offline because it is not getting any response.
Firewalls can be a very powerful security device. Windows XP benefits greatly from a firewall because it can lower, if not completely eliminate, the chance that your computer will be compromised. This next section will show you how to use the new and improved firewall of Service Pack 2 as well as two popular third-party firewall utilities.
Using the Windows firewall
Windows XP has included a firewall—specifically, Internet Connection Firewall (IFC) software— since the product was first shipped. Although the firewall has not been turned on by default, it

284 Part III — Securing Your System
has always been there. The original firewall was a basic one-way firewall that would block incoming traffic from the Web. One feature allowed users to open up ports so that they could still use remote applications. This way, a user could protect all of the ports on the computer except one or two that they had set to remain open so that they could use a program such as remote desktop to connect to their computer from a different location.
The new version of the firewall included as part of Service Pack 2 has a bunch of new features that makes use of a firewall even easier while the protection it provides your computer remains the same.
Enabling the Windows firewall
The new Windows firewall is usually disabled by default on any computers running Windows XP, including those that upgraded to Service Pack 2, unless your computer manufacturer has turned this feature on for you. If you want to use the built-in firewall to protect your computer, just follow these steps to enable it:
1.Click the Start button and select Run. Key in firewall.cpl in the box and click OK.
2.When the Windows Firewall settings window loads, just select On and click OK to save your changes.
3.Click OK once more to save the settings for the adapter, and the firewall will be activated.
Now that you have the firewall set up, try using all of your common Internet applications. If you find that some of them do not work, then you can configure the firewall to allow them to pass through the firewall so that they can still be useful. Instant messaging programs can have problems with firewalls when a remote user attempts to send you a file. Sending files often requires the remote computer that is sending you the file to be able to connect to your computer. Because your firewall is designed to block all connections by default, you will have to configure it so that it will let certain applications work through the firewall. How to do so is described in the next section.
Configuring the Windows firewall
Configuring the firewall to allow certain programs to work through it is not always the best thing to do, because it will expose your computer more to the outside world and increase your risk of getting infected with something. However, in the short term or for an application that you must use, you can make it work through the firewall. In the original version of the firewall, the only possibility was to specify a port number to open. Now, it is much easier to make an application work though the firewall. Instead of typing in a port number, users can
just select the program on their computer that they want to have accessed through the firewall. This capability makes the firewall configuration much more user-friendly. Additionally, in Service Pack 2, Microsoft left in the old way to open up the firewall manually by entering in a port number, so that users still have total control if they really want it. The end result of these two methods is the same; the only difference is the ease of use for less experienced Windows XP users.
Using the new feature to open up holes in the firewall is pretty cool. Follow these steps to open up the firewall for a specific application:

Chapter 12 — Protecting Your Computer from Intruders 285
1.Open up Network Connections again by clicking the Start Menu and selecting Run. Then, type firewall.cpl in the box and click OK.
2.When the Windows Firewall settings window loads, click the Exceptions tab.
3.You will see a list of all of the different exceptions that are currently enabled, as signified by the check in the box. By default, a few applications will be enabled. I recommend that you uncheck all of the entries unless you use them. If not, then you are just taking an unnecessary risk by leaving those doors open.
4.If you want to add an application to the exception list so that it will be able to accept connections and data from the outside world, such as an Instant Message program that wants to receive files from other users, just click the Add Program button.
5.Select the name of the program from the list or click the Browse button on the Add a Program window to select the executable of the application that you want to open to the world.
6.When you are finished selecting the program that you want to be able to access through the firewall, click OK and it will appear on the list, as shown in Figure 12-2.
7.Now that the program is on the list, just check the box next to the name to open up the firewall for the application.
8.Click OK to activate your new firewall settings.
Windows Firewall also includes settings on how you want your computer to respond when several different standard Internet messages are sent to it. For example, one setting you can specify is the ping command, which is a network command used to estimate turnaround time between sending data to a computer and receiving a response. All of these settings are found on the Advanced tab by clicking the Settings button under the ICMP section. The screen is pretty straightforward. If you want your computer to have a stealth presence on the Web, as I mentioned earlier, you should uncheck all of the entries listed on the ICMP tab.
Using ZoneAlarm personal
Several different software companies have released their own firewalls and protection utilities. One of the oldest and most popular programs is called ZoneAlarm, by Zone Labs. ZoneAlarm comes in two different flavors: a pro version, which is a two-way firewall plus a boatload of other features, and a free version that is just the basic two-way firewall. ZoneAlarm is a different type of firewall than the firewall that is included with Windows XP and Windows XP Service Pack 2. ZoneAlarm includes a special two-way firewall that not only blocks traffic that remote users are sending to your computer but also blocks traffic that your programs are trying to send out.
Now, why would you want to block traffic that your computer is sending? Sometimes, people are concerned about their personal privacy and do not want their computer applications phoning home to the developer’s Web site sending usage data, checking for updates, or validating licenses. Additionally, it is nice to be able to control what applications have access to the Internet. If you let someone use your computer and they accidentally fell for some trick and

286 Part III — Securing Your System
FIGURE 12-2: Adding an application to the firewall Exceptions list.
installed software that turns out to be a Trojan (a program that allows others to mess with your computer), the Trojan will not be able to phone home to its creators, alerting them that your computer is now compromised.
Two-way firewalls, such as ZoneAlarm, will render such applications useless because they are contained in an isolated box and are not able to access the Internet.
ZoneAlarm is a great application to play around with and see which of your applications are trying to send data out to the Web. Follow these steps to get ZoneAlarm up and running on your computer:

Chapter 12 — Protecting Your Computer from Intruders 287
1.Visit ZoneAlarm’s Web site at www.zonealarm.com and download a copy. The free version is a little hard to find. Your best bet is to look for “ZoneAlarm (free)” under Direct Links, found on the mid-right side of the page.
2.Once you have ZoneAlarm installed and have followed the Getting Started wizard to get your computer’s policy configured, you are ready to start up ZoneAlarm.
3.By default, certain applications, such as Internet Explorer, will always have access to the Web. However, the first time you run a program that requires access to the Internet, such as Windows Messenger, you will be prompted with a message from ZoneAlarm, asking if you really want it to have access, as shown in Figure 12-3.
4.Click Yes on the pop-up window to allow Windows Messenger to connect to the Internet. If you see a request such as the one shown in Figure 12-3 and do not know what the program is, click No and do a search on the Web to try to find out what that program does. If your search on the Web reveals that it could be spyware or adware, read Chapter 13 to find out how to remove it.
FIGURE 12-3: ZoneAlarm prompting about an Internet access request.
288 Part III — Securing Your System
5.If you want to fine-tune your application blocking settings, select Program Control from the left menu and then click the Program Wizard button, as shown in
Figure 12-4.
6.Then, select the Advanced setting and click Next. You will be shown a list of programs that will be exempt from the firewall, to which you can add entries. This list is similar to the exception list for the built-in Windows firewall.
7.Once you are finished, click Finish, and you are done.
ZoneAlarm is a great application. It adds a valuable two-way firewall to Windows, which can be very useful. I recommend that you give it a try and see how you like it. Just remember to disable the built-in Windows firewall when you are using ZoneAlarm to make sure there are no conflicts.
FIGURE 12-4: Configuring ZoneAlarm’s Program Control.
Chapter 12 — Protecting Your Computer from Intruders 289
Using Sygate Personal Firewall
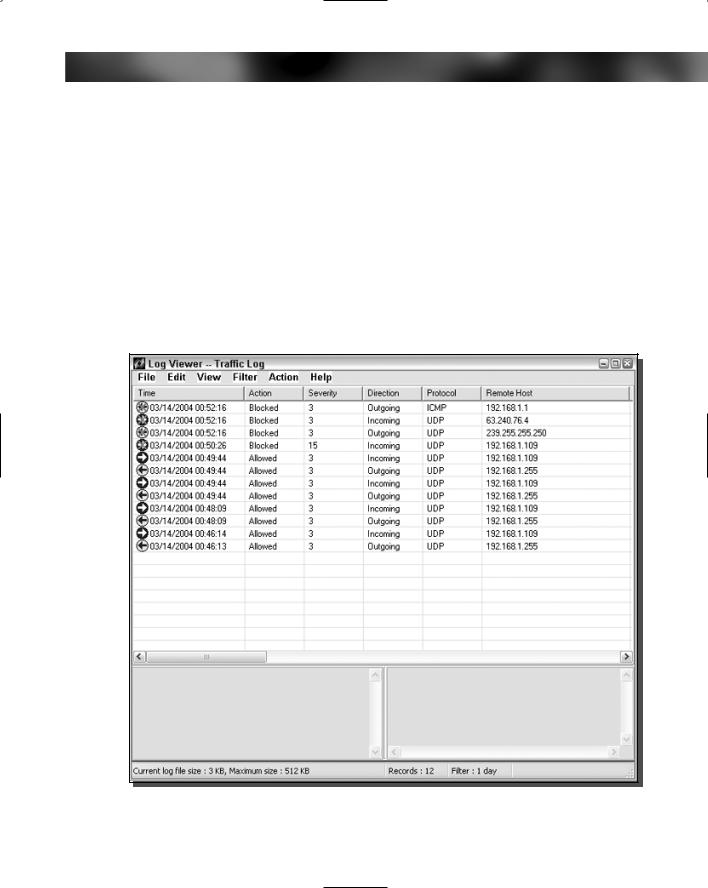
Sygate is another company that makes a great personal firewall. Just like ZoneAlarm, Sygate Personal Firewall includes a two-way firewall that audits your incoming as well as outgoing traffic. ZoneAlarm and Sygate are very similar products. The only real difference is the user interface of the firewall. I personally like the way Sygate Personal Firewall displays the incoming and outgoing connections better than ZoneAlarm. Figure 12-5 shows the nice list interface of all of the connections that have been granted as well as all of the connections that have been blocked.
The Sygate user’s interface is also different and a little easier to use than ZoneAlarm’s, yet it offers a lot more power on the main screen. The interface shows detailed graphs and also the icons of the open programs, as shown in Figure 12-6. You can simply right-click the icon and select Block or Allow to set a program to a specific access setting.
FIGURE 12-5: Sygate Personal Firewall with connections log.

290 Part III — Securing Your System
FIGURE 12-6: The main Sygate Personal Firewall interface.
The operation of Sygate Personal Firewall is similar to that of ZoneAlarm. When a program attempts to access the Internet, it is caught, and the user is prompted to confirm if he or she wants the program to access the Internet or not. It all comes down to personal preference. If you like the cleaner and more accessible interface of Sygate personal firewall, visit Sygate’s Web site at http://smb.sygate.com/products/spf_standard.htm and download a free copy.
Disabling Unneeded Services
Windows XP includes a lot of extra services and features that most users just do not use and have no reason to have running. In Part II of this book, you learned how you can disable unneeded services to increase the performance of your computer. Now, I am going to show you some services that you should disable that will make your computer more secure.
Disabling Remote Desktop connection
The Remote Desktop feature of Windows XP is a great way to be able to access your computer when you are away from the office or home. However, if you have poor computer security, the Remote Desktop also is a great way for anyone to be able to access and control

Chapter 12 — Protecting Your Computer from Intruders 291
your whole computer. Remote Desktop is a very risky application to leave exposed to the world. Its security relies solely on your account password, which for most users is easy to guess.
If you do not use Remote Desktop, then it would be a good idea to disable the feature. Doing so is a snap. Just follow these steps to turn it off:
1.Right-click the My Computer icon on the desktop or in the Start Menu and select Properties.
2.Click the Remote tab to expose the remote access settings.
3.Next, uncheck the box under Remote Assistance, as shown in Figure 12-7.
FIGURE 12-7: Remote Assistance & Desktop connections disabled.

292 Part III — Securing Your System
4.Uncheck the box under Remote Desktop as well.
5.Click OK to save your changes.
When Remote Desktop connections are disabled, you have one less thing to worry about— namely, someone having the ability to break into your computer.
Disabling Messenger Service
Microsoft has included a service in the last few versions of Windows that allows system administrators to send pop-up messages to all computers on a local network. This service can be an invaluable resource for administrators who want to get the word out about some upcoming server maintenance. For example, end users would see a message pop up on their screens that notifies them that the workgroup file server will be inaccessible for the next hour while routine maintenance is performed.
This is a great service—when it is used correctly. Unfortunately, the Messenger Service has been abused. Just because any user can send messages to the entire workgroup doesn’t mean that she or he should. This capability is sometimes not a good thing. Users that are part of large local area network, such as just about every Internet user, can send out a mass message to all users in the same subnet. As you can imagine, some users that know how to use the service have started to abuse it by sending spam to all the users in their same subnet. Nowadays, you may get spam not only in your inbox but also in a pop-up window that could appear at any time.
The Messenger Service, just like any other service or program that is accessible to the outside world, increases your security risk. Although there is currently not an exploit for the Messenger Service that allows remote users to execute commands on your computer, who knows what the future will hold? To be safe, it is best to just disable this service. You will also be cutting down on a new type of spam.
Disabling the Messenger Service can be done by using the Service Manager. Follow these steps to get started:
1.Click the Start button and select Run.
2.Key in services.msc in the box and click OK.
3.The Services Manager will load. Scroll though the list and right-click Messenger and select Properties.
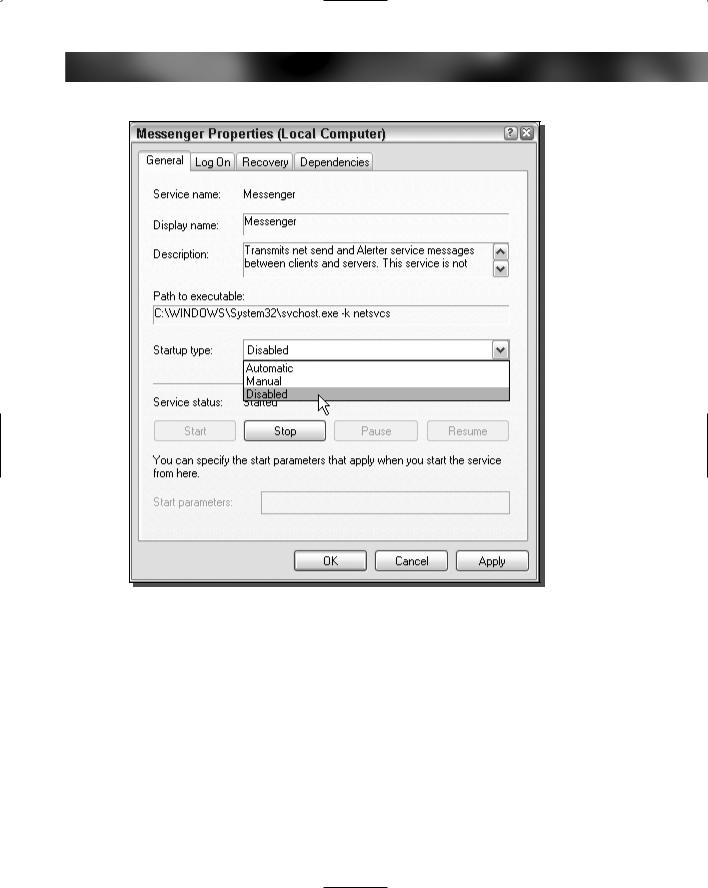
4.Change the Startup Type to Disabled, as shown in Figure 12-8.
5.Click the Stop button and then click OK to save your changes.
Now the Messenger Service is one less thing to worry about. You can kiss the annoying pop-up text ads goodbye and also reduce your risk for an attack in the future.
Disabling Universal Plug and Play
Universal Plug and Play (UPnP) is kind of like an expanded version of the old Plug and Play hardware support. Many years ago, when you would buy a new soundcard, you would have to
Chapter 12 — Protecting Your Computer from Intruders 293
FIGURE 12-8: Disabling the Messenger Service.
manually set up all of the configuration data, such as the interrupt and address that it was going to run at. Then Plug and Play technology came around and automated that whole process so that the user did not have to worry about managing interrupt and address numbers any more. Now there is Universal Plug and Play, which expands the easy install concepts of the original Plug and Play to a whole new class of devices. Universal Plug and Play can not only detect local devices such as hardware (the original version), but it can also detect external hardware such as printers across the network or other PCs’ shared drives.
Universal Plug and Play, theoretically, is a great idea. It gives you the ability to easily add and control devices such as a printer across your local network, an MP3 player, a television, lighting devices, and so on. Universal Plug and Play can be thought of as a way to make all of the different electronic devices in your home, or local network, work together. However, there are very few devices, other than remote printers and file shares, that take advantage of the new

294 Part III — Securing Your System
protocol. Universal Plug and Play will play a big role in our computing lives in the future, but not yet.
Universal Plug and Play also presents a security risk for your computer. It continuously scans your local network, which could be a network that is open to the world, for new devices and negotiates new connections. Just as with the Messenger Service, with Universal Plug and Play the surface exposure of your computer is increased, which increases the risk that your computer could become attacked and infected. Unlike with the Messenger Service, with Universal Plug and Play a flaw has been found in the service and has already been exploited. Microsoft was forced to release a critical security patch to fix Universal Plug and Play so that users’ computers would no longer be vulnerable (this patch can be found on the Windows Update Web site mentioned earlier).
Because there are almost no devices that use Universal Plug and Play currently available on the market, and it also presents a security risk, it is a good idea to just disable the new protocol for now because 99.9 percent of you have absolutely no use for it. Disabling UPnP is not a hard task. Just follow these steps to disable the service with a nifty utility, called UnPlug n’ Pray, by Gibson Research:
1.Visit www.grc.com/unpnp/unpnp.htm and download a copy of UnPlug n’ Pray.
2.Start up the utility and click Disable UPnP, as shown in Figure 12-9.
3.Click the Exit button, and you are done.
Using the utility by Gibson Research is much easier than going back to the Service Manager and disabling the service. Moreover, if you ever find that you need to use Universal Plug and Play, you can just run the utility again and click Enable UPnP and the service will be restored.
FIGURE 12-9: Using UnPlug n’ Pray to disable Universal Plug and Play for users who do not need it.

Chapter 12 — Protecting Your Computer from Intruders 295
Disabling Remote Registry Access
As already mentioned, the System Registry is one of the most important parts of the operating system. It’s where all of the system settings and configuration data is stored. If you do not know what you are doing and you just start editing entries found in the System Registry, you can render your computer useless. So, protecting your computer’s registry is very important.
Included with Windows XP Professional (not Windows XP Home) is a service that allows users with administrative privileges to connect your computer’s registry and edit it. Having this service enabled and running is just way too big a security risk. The vast majority of computer users have little or no use for this service. Why would you even want to give anyone a chance at trying to break into one of the most critical parts of the operating system?
Disabling this service is a snap. Just follow these steps:
1.Click the Start button and select Run.
2.Key in services.msc in the box and click OK to launch the services manager.
3.Scroll through the list and right-click and select Properties on the Remote Registry entry.
4.Set the Startup Type as Disable and click the Stop button.
5.Click OK to close and save your changes.
Now you have knocked off yet another unneeded service from your computer.
Disable DCOM support
The Distributed Component Object Model, or DCOM, is yet another feature that was built into Windows that has caused a great deal of problems. Sure, it provides an acceptable programming interface for programmers who are trying to write network apps, but there are better ways to do that than to use a DCOM.
DCOM has presented quite a few problems in terms of security. Exploits have been discovered for it that have allowed an Internet worm to spread to hundreds of thousands of Windows machines worldwide. Additionally, a very small number of applications actually use DCOM. In all of my computing experience, I have only seen one application that used DCOM, and that was an inventory and store management software suite. Home and professional PC users probably will never even use an application that uses DCOM.
So why is it on your computer? DCOM was one of Microsoft’s attempts to please software developers. However, this attempt has clearly failed, and yet they still include it. The only thing that it has given to operating systems such as Windows XP is headlines in the newspapers about how some worm exploited it and has now infected thousands of PCs.
Disabling the Distributed Component Object Model is a good idea for most computing users. That is, it is for everybody except the rare few who actually have an application that the developers wrote using DCOM. To shut down DCOM and increase the security of your computer, follow these steps:

296 Part III — Securing Your System
FIGURE 12-10: Disabling Distributed Component Object Model support with
DCOMbobulator.
1.Gibson Research has come up with another cool utility to take care of Windows security shortcomings. This one is called DCOMbobulator and will help you disable DCOM on your computer. Visit www.grc.com/dcom/ and download a copy.
2.Start up DCOMbobulator and click the tab labeled DCOMbobulator Me!
3.Click the Disable DCOM button, as shown in Figure 12-10.
4.Click the Exit button and you are finished.
If you find that you are forced to use a program that needs DCOM, just run the utility again and click the Enable DCOM button on the DCOMbobulator Me! tab.
Wireless Networks
Wireless networks are growing in popularity because of the ease of installation and the terrific benefits that they offer. Nothing beats the ability to take your laptop and not have to worry about plugging into the network to do your work. The added freedom of a wireless network is very pleasing. Nevertheless, many people do not realize how insecure most wireless networks actually are. To fully understand this, you must realize how exactly a wireless network works.

Chapter 12 — Protecting Your Computer from Intruders 297
Basically, wireless connections are made up of a base station and a client adapter. The wireless base station broadcasts all of the data to the clients in a circle around the base station, as do the client’s adapters. This creates a large area over which information is broadcast. If you care about the security of your computer and personal information such as credit card numbers, you must configure your wireless base station to encrypt the data that it sends. Otherwise, just about anyone can connect to your wireless network and gain access behind your firewall to all of your unprotected computers. Additionally, users can sniff the wireless traffic and see exactly what you are sending back and forth.
It really is amazing how many people leave encryption turned off on their wireless base stations. I was always surprised when I took the train into Chicago and worked on my laptop on board. Every now and then, I would notice my laptop connecting to various wireless access points for a few seconds as the train was moving past them. Securing your wireless base station/access point is very important.
Using WEP for secure communication
Wired Equivalent Privacy, or WEP, is the first security standard for wireless networks. The basic concept for WEP security is to encrypt the data that is sent back and forth between the access point and the client adapter. This is done using various degrees of encryption strength. A special key, known as the encryption key, is used by computers to connect to a WEP-protected wireless network. This allows the client computer’s adapter to be able to decrypt and also send encrypted messages in the same language as the base station.
This standard sounds like a great way to secure a wireless network. However, it presents some flaws. The largest one is that the whole system relies on just one key. If someone’s laptop is stolen that is part of a corporate network, the encryption key must be changed for the base station and for all of the other computers using the wireless connection. This change is necessary because the current encryption key could be easily extracted from the system settings. Additionally, someone can potentially derive the encryption key by carefully analyzing the data they intercepted.
If you have a wireless base station, I highly recommend that you enable WEP to protect your home. Setting up WEP is different on every set of hardware, but the following are the basics:
1.Connect to your base station setting remotely using your Web browser. This address and port number varies, but usually is http://192.168.1.1 or http://192.168.2.1. Often, the port number is changed to 8080 so people don’t think you have a Web server running. In that case, try http://192.168.1.1:8080 or http://192.168.2.1:8080.
2.Once you connect, you usually are asked for a password. For all Linksys hardware, the Username field is left blank and the password is admin. Other hardware manufacturers use some sort of a variation of the above. It also would be a good idea to change the password to something other than admin when you are working in the administration settings.
3.Locate the WEP settings and specify the encryption strength in bits. Then, come up with an encryption key and type that in. Write down your encryption key and strength for use in step 5.
298 Part III — Securing Your System
4.Save your changes. You can now close the Web administration site.
5.The last part of setting up WEP is configuring the client computers that will connect to the base station. Once again, this information varies, depending on your wireless card. Consult the manual for your card to find out how to set up your card to use WEP.
Setting up WEP will greatly increase the security of your wireless network. Even though there are some flaws, it is much better than using no protection at all. It has the same effect as a car alarm. If a burglar has to choose between a car that clearly has an alarm or one that doesn’t, which one will they choose to break into?
Using WPA for a more secure wireless connection
Wi-Fi Protected Access, or WPA, is a new, improved security standard for wireless connections. WPA has addressed the weaknesses of WEP; it was developed to create a viable alternative to WEP that is more secure than that standard. The fundamentals are the same between the standards, but WPA has improved some of the various mechanisms that plagued WEP. For example, encryption keys are now dynamic and change often automatically. Additionally, the complexity of the encryption key has also been increased to help fight off users who try to derive a key from data that they capture. One of the largest improvements in WPA is the addition of authentication to the wireless connection. Now, users have to have the right encryption settings, as well as a valid username and password, to gain access to the network.
This new standard is just starting to gain momentum. Microsoft has released a special patch for Windows XP that adds this new standard to Windows. However, installing the patch will not allow you to use this new standard. Just as with WEP, WPA is programmed into the firmware of the hardware components. In order to use WPA, you must have hardware that specifically supports it. Currently, only a few companies offer base stations and wireless adapters that support this new method of security. However, that will change in time.
The next time you are considering purchasing a wireless base station and adapter, do some research and pick one that supports WPA to ensure that your wireless communications will not be decrypted and your privacy is secure.
Controlling access to your computer
So far, you have spent a lot of time locking down your computer. You have closed down ports and have removed unused services from your computer. The next step to secure your computer is to reinforce the main entry point, the logon. No matter what you do to secure your computer, it all comes down to your security at the user level. If you have no password on your account and have a computer that is not protected by a firewall and other devices, then you are at huge risk of being attacked.
Managing user accounts is very important with Windows XP because the accounts are the keys into the system. This next section will show you some good secure practices, as well as some tips that will help make your box even more secure.

Chapter 12 — Protecting Your Computer from Intruders 299
Managing user accounts
Windows XP includes the same old account manager found in Windows 2000. This easy-to- use and straightforward interface can be found in the Local User and Group Management interface. There are various “good” security practices that you can follow to make your computer practically invincible to many attackers.
Assign a password and rename the guest account
Windows XP includes a guest account that is disabled by default. However, at some time, this account may be enabled by an application. If you have Windows XP Professional, I recommend that you disable this account using the old Windows 2000 Local User and Group application. Just in case it becomes enabled again, I recommend that you rename the guest account and also assign it a password. Follow these steps to disable the guest account:
1.Click the Start button and select Run.
2.Key in lusrmgr.msc and click OK.
3.The Local User and Group application will launch. Right-click the Guest username and select Set Password.
4.You will be prompted with a warning screen. Just click Proceed.
5.Type a complex password in both boxes and click OK.
6.The password has now been set. Next, rename the account by right-clicking it and selecting Rename.
7.Type in a new name, such as Disabled, and click Enter to save the changes.
The vulnerable guest account is now less of a problem.
Clearing the last user logged on
If you are using the classic logon screen, every time a user logs into your computer, their username is stored, and that name is displayed the next time the classic logon screen is displayed. This can be a nice feature, but it also can be a feature that causes a security problem. Knowing a user’s username is half the battle of breaking into a computer. If you have sensitive information on your computer, I suggest that you follow these instructions to hide the last user logged on:
1.Start up the Registry Editor again by clicking the Start Menu and selecting Run. Then type regedit in the box and click OK.
2.Navigate through HKEY_LOCAL_MACHINE, SOFTWARE, Microsoft, Windows, CurrentVersion, policies, and system. Locate the dontdisplaylastusername entry.
3.Right-click the entry and select Modify. Then type in a 1 to activate the feature. Click OK, and you are finished.

300 Part III — Securing Your System
If you ever want to reverse this hack, just repeat the instructions above and replace the 1 with a 0 for the value of dontdisplaylastusername.
Disable and rename the Administrator account
The Administrator account is the most important account on the computer. Users should not be using the computer under the Administrator account. That just is not a good security practice for anyone that is running Windows XP Professional and has sensitive data on their computer. I like to disable my Administrator account and rename it, so that anyone trying to get in with that account and at that privilege level will not be able to. To disable the account, perform the following steps:
1.Click the Start button and select Run.
2.Key in lusrmgr.msc and click OK.
FIGURE 12-11: Disabling an account with the local user and group administrator.

Chapter 12 — Protecting Your Computer from Intruders 301
3.When you have the Local User and Group application on your screen, just right-click the Administrator entry and select Rename. Give your administrator account a new name, such as admin123.
4.Next, disable the account by right-clicking the entry and selecting Properties.
5.Check the Account Is Disabled box, as shown in Figure 12-11.
6.Click OK to save your changes.
Make sure every account on your computer has a complex password
All of the accounts on your computer should have a complex password associated with them if your computer is ever exposed to the Internet. Passwords such as easy-to-remember words and key combinations like “asdf ” just do not cut it. A complex password is a password that is at least seven characters long and consists of uppercase and lowercase letters as well as numbers or other symbols. Ftm3D8& is an example of a complex password. Something like that is impossible to guess and will take quite some time for a brute-force technique to crack.
Using complex passwords on all of your accounts might not be easy at first, but after a while they will grow on you and you will have no problem remembering them.
Summary
This chapter has shown you how to test to see how vulnerable your computer is to attacks and how to protect it by using firewalls and lowering your computer’s exposure to the world by disabling unneeded services. You have learned how to secure your wireless networks and how to strengthen your account security.
The next chapter will show you how to protect your computer from spam, spyware, and adware. Additionally, it will show you some great utilities that will help you detect and clean your system, as well as some cool tricks to eliminate spam.


Fighting Spam,
Spyware, and
Viruses
This chapter will show you how to defend your computer against the major menaces of operating a computer: spam, spyware, adware, and viruses. Viruses have been around for a very long time; spam just
keeps getting worse and worse; and now there is a new computer menace that is infecting millions of computers, known as spyware and adware. Spyware is the name for applications that are secretly installed on your computer and record your personal activities or do other tasks with your computer of which you would probably not approve if you knew about them. Adware is very similar to Spyware, but can be a little worse. Instead of just spying on your activities, it uses its monitoring data to display relevant advertisements on your computer.
All of these computer menaces can be eradicated (or at least severely limited) by tweaking some of the settings of Windows XP and using various protection and defense apps. This chapter will show you how you can make Windows XP defend against some of the most popular types of viruses and spyware. It will also present some great utilities that you can use to battle spam and remove spyware and viruses from your computer.
Eliminating Spam
Spam is everywhere these days. Recently, I have been forced to change all of the e-mail addresses that I had used for years because I just started to get way too much spam. If you are tired of receiving messages from advertisers about debt consolidation, male sexual enhancements, and messages from the president of Congo asking you to help him launder $40,000,000 by giving him your bank account number, then this section is for you. When you are finished reading it, you will know how to stop spam from starting in the first place and how to filter the spam you already get.
chapter
in this chapter
Stopping Spam Before It Can Start
Using Spam Filtering Software
Removing Spyware and Adware
Defending Against Spyware and Adware
Protecting Against Viruses

304 Part III — Securing Your System
Stopping spam in the first place
Users can do a lot of things when browsing the Internet to make sure that they do not end up receiving spam. But before anyone can prevent the actual receipt of spam, he or she needs to be aware of why spam is received in the first place. So, why is that annoying spam sent?
To start off, the most common reason why users receive spam is because they submit their e-mail address to a Web site or company that starts sending them advertisements or sells their e-mail address. Usually, most Web sites notify you when they intend to sell your e-mail address, if they plan on doing so. This notification is commonly hidden away in the terms of service agreement or privacy policy—so much so that 99 percent of Web visitors check the agreement box but never actually take a look at the information.
This is by far the number one reason why users receive spam. They sign up for some service that promises them some great free offer, such as free movie tickets, and then they end up receiving tons of spam because they didn’t realize that they gave the Web site permission to sell their e-mail address to thousands of other companies. If they would have taken the time to read the terms of service agreement and the privacy policy, they would have found out that by using the so-called free service, they give the Web site permission to do whatever they want with your personal information.
Paying attention to the details is very important when you’re using the Web. With the absence of useful laws that actually make a difference on certain Internet subjects such as spam, some companies take advantage of users. If you are considering signing up for a site and cannot find their terms of service or privacy policy, do not use their service. That lack of information should be a huge warning sign.
Another common reason why users end up with inboxes packed with spam is because they inadvertently sign up for various newsletters. I shop online a lot and end up creating many different accounts at different stores so that I can purchase items. During the signup process, you are almost always asked if you would like to sign up for their deal-of-the-week newsletter or some other kind of promotional material. They want you to give them permission to send you more advertisements so that, it is hoped, you will buy from them again. You may think that this is nice, but when you have accounts at 25 different online stores, you could be getting a lot of messages that are just advertisements. When you are creating accounts at online shops or other Web sites, make sure that you uncheck all of the newsletter links, unless you really want to get one. These options are usually placed on the Web page in a location that you may overlook. The check boxes are checked on purpose so that those people that miss them automatically end up on the advertisement mailing list. Keep an eye out for these boxes and you will be able to cut down on spam.
If you follow the two tips just mentioned you will dramatically cut down on the amount of spam you receive. Another way to fight spam is to create separate e-mail accounts. There are several different Web sites on the Web from which you can get free e-mail. Create separate accounts on these free sites or request more mailboxes from your Internet Service Provider. Then, use each mailbox for a different purpose. I like to have one mailbox that is just for my personal mail from my family and friends. I never give away that address on any Web site and even tell my family and friends never to submit that address to any Web site on my behalf. I have been doing that for the last two years and still to this day have not received any spam to

Chapter 13 — Fighting Spam, Spyware, and Viruses 305
that account. I highly suggest that you create an e-mail that you will use for personal mail only and never give that address to any Web site.
I also have a separate account that I use for all of my online purchases. This way, if I ever start to get too many weekly newsletters and some unethical store sells my information, I can just close the e-mail account and start up a new one with a different name. Additionally, I have a separate e-mail address (my junk mail address) that I give to any Web site that requests an e- mail to sign up for something. This way, I can still get the confirmation message that a lot of sites require you to do something with to verify your e-mail address and not have to worry about the site sending me tons of junk that will fill up my personal inbox. You should defiantly create a separate junk e-mail address so that you can give that address out to Web sites instead of using your personal address.
Using filtering software
I have shown you how to lower your chances of receiving spam from sites on the Web. However, what if you already receive a lot of spam? If you fit into that category, you have two choices. You can either create a new e-mail address or start using the tips that I have given you previously, or you can try some filtering software. There are thousands of different anti-spam software apps on the Web. Everyone is trying to cash in on spam. Because of the mass amounts of spam apps, it is a little difficult to find the best programs. No spam filtering app is 100 percent accurate. If they are anything close to 90 percent, that is great.
I am not going to show you how to use all of the different spam filters; instead, I am going to give you a list of the best anti-spam apps (Table 13-1) so you can try out a few to find the program that works best for you.
Blocking external links in HTML mail
Every time you receive an e-mail, and your e-mail client supports graphical HTML-based e-mail messages the possibility exists that the sender could be tracking you if you read the message. This can be done by using a hidden image link in the message that points to a Web server where a special tracking program resides. This may not sound like a big deal, but when you take into consideration that spammers use this type of technology, it is a whole new game.
Spammers can use this type of technology to weed out e-mail addresses from their database that are no longer in use. When you open up spam, it can send a signal home to a spammer’s Web server, alerting them that your e-mail address is active and that you read your e-mail. If you could prevent that signal from being sent to the spammer’s servers, then you could make your e-mail address appear to be inactive and could be removed from their database.
Thankfully, Microsoft automatically blocks all external image links in HTML messages in Outlook 2003. Additionally, with the release of Windows XP Service Pack 2, Outlook Express also gains this feature. If you have not already upgraded to Service Pack 2, and use Outlook Express as your e-mail program, you should definitely upgrade. Your computer will not only be more secure, but you will also be protected against some spammers as well.

306 Part III — Securing Your System
Table 13-1 Anti-Spam Apps |
|
Application Name |
Description |
McAfee SpamKiller |
SpamKiller is a good app that filters messages based on its |
|
database, which is automatically updated once a day. Aside |
|
from the standard filtering features that all anti-spam apps |
|
have, SpamKiller has a quarantine area for your spam and also |
|
allows you to report spam senders to McAfee to help them |
|
keep an up-to-date database. It supports Web-based e-mail |
|
accounts such as MSN and Hotmail, as well as POP3and |
|
IMAPI-based e-mail accounts. SpamKiller costs around $40. |
|
Visit www.McAfee.com for more information |
SAproxy Pro |
SAproxy Pro is another good program that uses the same |
|
database as McAfee Spamkiller (the open source spam assassin |
|
database). It includes all of the basic features of spam filters, as |
|
well as the effective Bayesian learning engine that allows the |
|
program to get smarter at catching spam based on what it |
|
observes you classifying as spam. Currently, SAproxy Pro only |
|
supports POP3-based e-mail accounts and sells for $30. Visit |
|
www.statalabs.com for more information |
K9 |
K9 is another popular spam filtering app that allows you to filter |
|
your incoming mail from a constantly updated database as well |
|
as “statistical analysis”. It supports only POP3-based e-mail |
|
accounts, but is available for free. Visit www.keir.net/k9.html |
|
to download a copy and for more info |
Cloudmark SpamNet |
SpamNet filters incoming mail based on its own database of spam |
|
that is updated from its 800,000+ subscriber base. This app works |
|
only with Microsoft Outlook and Outlook Express. It installs a |
|
special toolbar in these applications that allows you to manage |
|
your spam. Unlike other commercial spam programs, SpamNet |
|
works on a subscription basis of $4 a month. SpamNet supports |
|
any e-mail accounts that you can use with Outlook and Outlook |
|
Express, including Hotmail and MSN e-mail accounts. Visit www |
|
.cloudmark.com/products/spamnet/ for more information |
Spam Inspector |
Spam Inspector filters all of the incoming mail using its own |
|
database that is updated by its users daily. Also gives users the |
|
ability to make messages bounce so it appears that your e-mail |
|
address no longer exists. Recently introduced fraud protection |
|
that automatically flags fraudulent scams that you may also |
|
receive. Spam Inspector currently supports Outlook, Outlook |
|
Express, Eudora, and Incredimail and sells for $20. Visit |
|
www.giantcompany.com to download a trial and for more |
|
information |

Chapter 13 — Fighting Spam, Spyware, and Viruses 307
If you are using Outlook Express, this blocking of external image links in HTML messages can be turned on by working with the Security tab of the Options window, located under the Tools menu bar item. If you are using a different e-mail program, I recommend that you read through the Help files or contact the developer of your program to find out how to disable HTML images and other external content.
Outlook and Outlook Express also provide a safe sender list that allows you to enable this feature for only certain senders, such as messages from your bank or newsletters that you have signed up for. Just right-click a message and add the sender to your safe list to enable images and other external content for a specific sender.
Defending Spyware and Adware
Spyware is becoming the largest menace of computers in the last year. Hidden away within free applications, these programs can spy on your computer activities and report home various information about your computer habits. Adware is another menace that is closely related to spyware. Just like Spyware, it can be secretly installed on your computer and will monitor what you do. Then, when the time is right, some Adware apps will display relevant advertisements. Did you ever visit eBay.com and then notice an advertisement for Ubid.com, one of eBay’s competitors, pop up on your screen? If so, then you are infected with a bad case of adware.
How does your computer get infected? There can be a number of reasons why, but the most common reason is that you visit a Web site and are prompted to click Yes on some pop-up box to allow an application to install that you think is a game or some cool browser utility such as a search toolbar. Often, these utilities are spyware themselves and are also bundled with other spyware and adware. Unfortunately, users never seem to read the terms of service agreements that are presented when they are installing these free apps on their computers and pass right over the notices that this software will display ads and will monitor your browsing habits.
These next few sections will show you how to detect and remove spyware and adware from your computer, as well as what to look out for to protect your computer from getting infected in the first place. Additionally, you will learn how to use some of the new features of Windows XP Service Pack 2 to protect your computer from getting infected if you accidentally try to install spyware or adware.
Detecting and removing spyware
There are a bunch of free apps on the Web that will help you scan your computer for adware and spyware. There are two programs I recommend that you use to scan your computer. Each of these programs has its own database of adware and spyware that is updated frequently. To make sure that no spyware and adware goes undetected, it is a good idea to scan your computer with both programs. The first app is called Ad-aware, which is published by Lavasoft. This is a great program that has a basic version available for free when used for personal use. The second app is called Spybot S&D, which is developed by Patrick M. Kolla and is also free.
308 Part III — Securing Your System
Using these two apps to detect and remove spyware and adware from your computer will not only rid your computer of those annoying programs, but will also speed up your computer and free up disk space. Follow these steps to get started using Ad-aware:
1.Visit www.lavasoft.de and download a copy of the basic version of Ad-aware that is free when used on personal computers.
2.Once you have Ad-aware installed on your computer, start it up by clicking the Adaware icon on your desktop.
3.When Ad-aware is loaded, the first thing you should do is update the data files. This can be done by clicking the globe icon, as shown in Figure 13-1.
4.Then, on the Webupdate screen, click the Connect button. It will tell you if a new update is available. If one is, just click OK and it will be downloaded and installed.
5.Now that Ad-aware is updated, you are ready to scan your computer. Just click the Start button in the lower-right corner of the window.
6.Select Perform Smart System-Scan on the Next screen and click Next. The scan will begin.
7.Once the scan has finished, you will hear a sound. Click the Next button again to view the results.
FIGURE 13-1: Checking for updated data files for Ad-aware.
Chapter 13 — Fighting Spam, Spyware, and Viruses 309
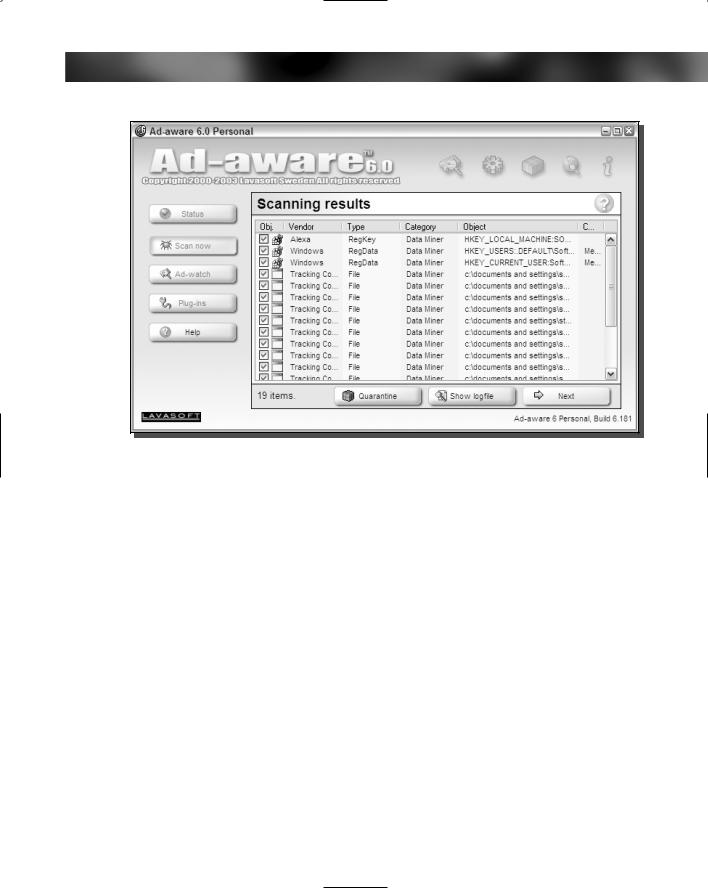
FIGURE 13-2: Browsing the results of the Ad-aware scan.
8.The Scanning Results screen will be shown, which lists any instances of spyware and adware on your computer, as shown in Figure 13-2. Scroll through the list and uncheck any objects that you do not want to remove. Then, click the Next button again.
9.You will be asked to confirm that you want to delete the items on the list. Click OK to continue removing the files and registry entries associated with spyware and adware.
The files will be quarantined as a backup just in case you experience any problems with the operating system after you remove the files and registry entries. You are now finished with using Ad-aware and can close the application.
You are now ready to get Spybot Search & Destroy installed and set up on your computer so that you can ensure that you have removed all spyware and adware from your computer. To do that, just follow these steps:
1.Visit Spybot’s Web site at www.spybot.info and download a copy of Spybot Search & Destroy.
2.Once Spybot S&D is installed on your computer, start it up by expanding the Spybot Search & Destroy folder and selecting Spybot S&D (easy mode). The first time it is run, you will have to select the language that you want to use and will be shown a few legal disclaimer screens.
310 Part III — Securing Your System
FIGURE 13-3: Updating Spybot Search & Destroy.
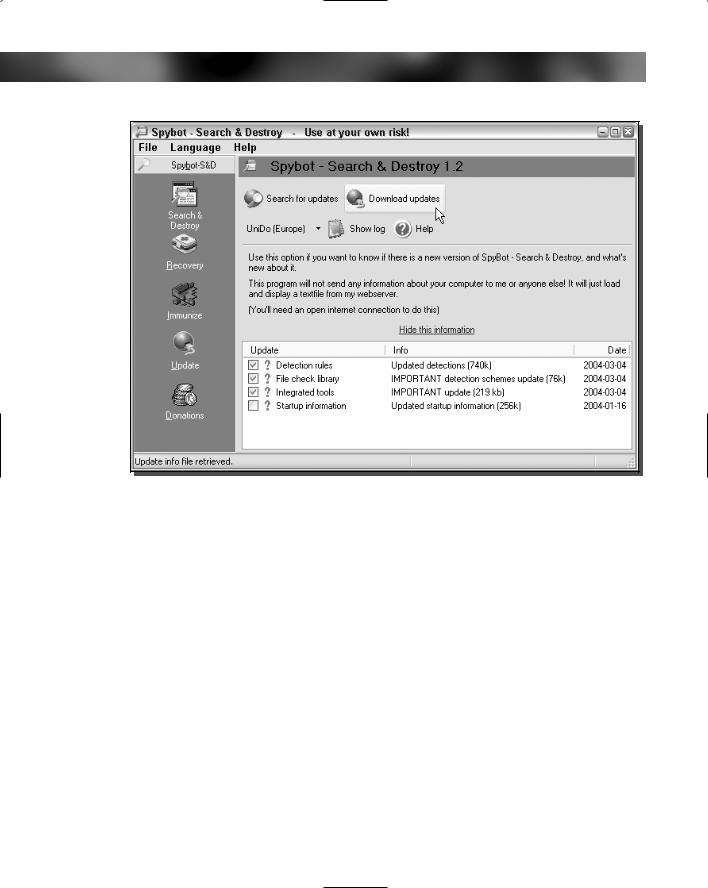
3.When Spybot loads, you will want to update its data files as well. This can be done by clicking the Search For Updates screen located in the middle of the screen.
4.Check all of the updates that are shown on the screen and click the Download Updates button, as shown in Figure 13-3.
5.Once Spybot has finished downloading and installing the updates, it will restart itself. When that happens, you are ready to begin scanning your computer. To begin scanning, just click the Check for Problems button.
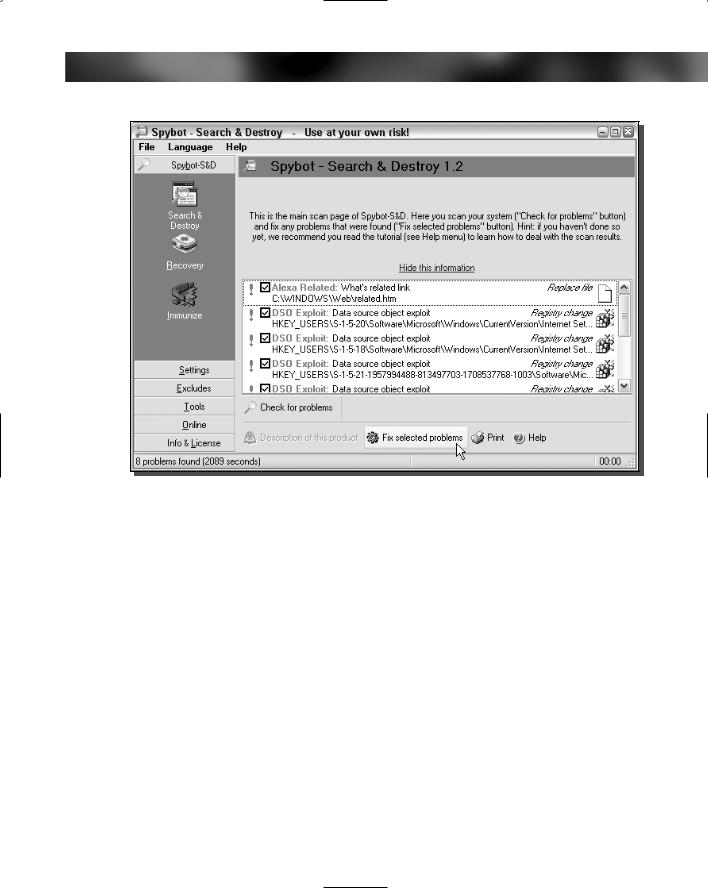
6.Once scanning has finished, you will be presented with the Results screen. Click the Fix Selected Problems button, as shown in Figure 13-4, to remove all of the selected search results.
7.When all of the entries in the search box have check marks, Spybot is finished cleaning your system. You may now close Spybot.
Your computer has now been scanned and cleaned with two great spyware cleaning software apps. As you can see, Spybot picked up on some things that Ad-aware missed. Using both of these programs together will allow you very good detection and removal of spyware on your computer.
Chapter 13 — Fighting Spam, Spyware, and Viruses 311
FIGURE 13-4: Using Spybot Search & Destroy to remove spyware & adware found during a system scan.
Locking down Internet Explorer
Now that you have removed all of the spyware and adware on your computer, let’s turn off certain features of Internet Explorer so that you will be less likely to accidentally install more spyware. To get started, change the ActiveX install settings to prevent any new ActiveX apps to be installed. Follow these steps to change this setting:
1.Open up a copy of Internet Explorer.
2.Click the Tools menu bar item and select Internet Options.
3.Click the Custom Level button on the Security tab.
4.Locate Download Signed ActiveX Control at the top of the list and select Disable.
5.Click OK and click Yes on the confirmation screen.
6.Select OK once more to close Internet Options.
A change in this setting can prevent you from installing new ActiveX controls from all Web sites, good and bad. If you ever run into some problem with a Web site not loading correctly, just re-enable this setting and try the site again.
312 Part III — Securing Your System
FIGURE 13-5: Immunizing your computer from common spyware apps.
Immunizing your computer
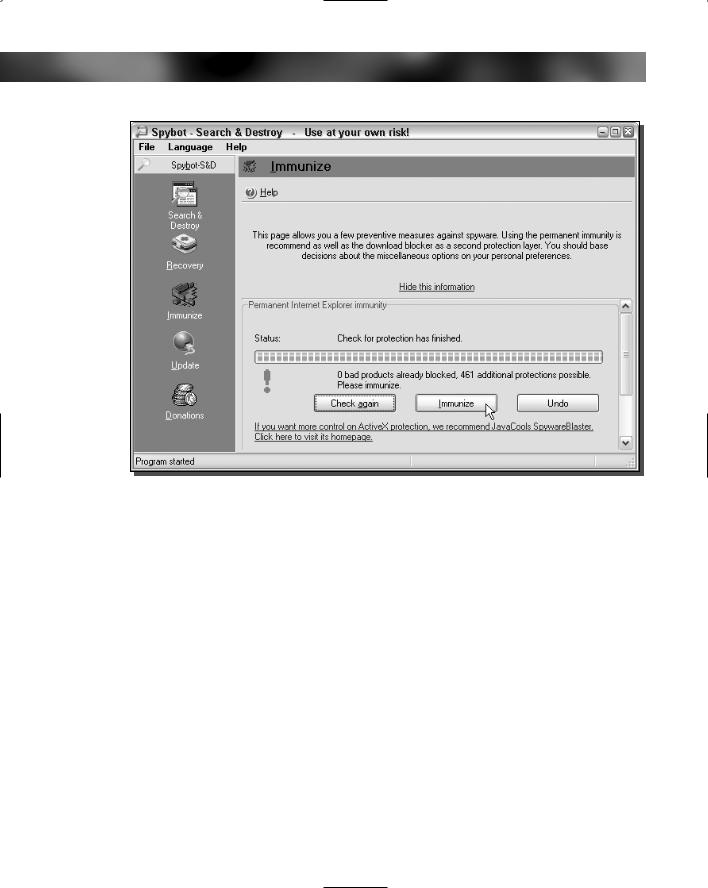
Spybot Search & Destroy does a lot more than just scanning your computer and removing spyware and adware. It also offers the ability to immunize your computer against some of the most common types of spyware. This feature provides a great added level of protection that can only help in your battles with spyware. To use this feature, follow these steps:
1.Start up Spybot by expanding the Spybot Search & Destroy folder and selecting Spybot S&D (easy mode).
2.Once Spybot S&D is loaded, click the Immunize button on the left of the window.
3.Then, just click the Immunize button, as shown in Figure 13-5, and you are now protected.
Defending against Viruses
Windows XP Service Pack 2 has many new features that make Windows XP the most secure Microsoft operating system to date. One of the new features, called execution protection,

Chapter 13 — Fighting Spam, Spyware, and Viruses 313
takes advantage of a new hardware protection found in the latest CPUs of modern computers.
One of the most common types of computer break-ins and virus exploits has to do with buffer overflows. These occur when data is being sent to a buffer faster than the CPU can process it. When the buffer becomes filled, the system can become unstable and sometimes can execute code that was placed in the buffer. This is how many types of viruses spread. They take advantage of an unchecked buffer and can get the CPU to execute their malicious code. One easy solution to solve this problem is to include a feature in the CPU that will disable executing of data in all buffers. By doing this, a virus might be able to get its code into the buffer, but because of limitations of the CPU, the code would never be executed, rendering the virus useless and unable to spread.
The new CPU level security can be found on the AMD Athlon 64 processor and new versions of the Intel Pentium 4 Prescott. If you have one of these chips with the execution protection feature, this feature is enabled by the operating system. However, having this feature enabled for all programs may cause some application errors because some need to be able to execute data in their buffers. To allow for this, Microsoft has created an exception list for such programs. You are advised to make sure every once in a while that no application has automatically added itself to the exception list. You really need to make sure that only the applications that truly need to be there are there. To do this, follow these steps:
1.Right-click the My Computer icon located on the desktop or Start Menu and select Properties.
2.When System Properties loads, click the Advanced tab.
3.Then, click the Settings button under the Performance section.
4.Next, click the Data Execution Prevention tab and make sure that Help Protect All Programs Except: is selected.
5.Then, review the list and remove any apps except for the ones that you are 100 percent positive should be there.
6.Click OK to save your changes.
7.Select OK once more to close System Properties.
Use an antivirus program
If you still are not running an antivirus program, then you really should reconsider your decision. Viruses, especially in e-mail attachments, are very prevalent these days. I highly recommend that you install an antivirus program on your computer if you do not have any protection currently installed. Additionally, if your current virus definitions subscription has expired and you no longer can download updates to the data files, your antivirus program is almost completely useless. You must always be running up-to-date antivirus data files so that your computer is always protected from the latest viruses.