


Chapter 11 — Speeding Up Your Computer 263
then click the System Managed Size mode but reconsider what was talked about in the last section, because it will really help your performance.
8.Click the Set button and then click OK three times to close all of the settings windows, and you are finished.
After a reboot, your system will be using the paging file on the new hard drive. Feel free to delete pagefile.sys from your old hard drive location because it is no longer needed there.
Defragmenting Your Drive
Fragmentation is everything when it comes to maintaining your hard drive. Over time, as your hard drive fills up and you install and uninstall programs and games, the files on your hard drive can become fragmented, as Windows has to find open spots on your hard drive to place the file. Often the file is broken up into thousands of little pieces and scattered all over the hard drive. This cannot cause any significant problems for your computer, but it can cause a noticeable performance slowdown, which can be easily cured by running a software program known as a defragmenter.
Defragmenters do a very simple task of just moving the bits of the files around on the hard drives so that they are all placed together. This arrangement allows the hard drive to load a file faster because the head, which is the arm that reads the data off the plates inside the drive, does not have to scatter all over the place to read the data.
In Chapter 8, I discussed using several utilities to defragment the boot files. The same utilities can be used to defragment the whole drive as well as the special files. This next section will concentrate on two of those special files because defragmenting the whole drive is done at the same time.
Defragmenting the Windows paging file
The Windows paging file can be quite large, as you know from the previous sections. Once you have created a constant size paging file, or if you just want to defragment the paging file, you can defragment the file during the next system boot. Windows will not allow any program to move the paging file around on the hard drive when the operating system is in use. The main reason why Windows does not allow this is because other programs are running in the background as well as operating system services that will depend on the paging file. This is why the defragmentation can only be done during the boot, because very few files are in use then.
The built-in Windows XP defragmenter does not defragment the paging file during a normal defrag. Microsoft has a workaround for this limitation. It tells users to do a normal defrag first, then after the free space is consolidated, to delete the paging file by disabling it and then recreating it right after a fresh defrag. Doing so will cause the operating system to create one big, continuous file on the hard drive.
There is nothing wrong with Microsoft’s approach, since it will accomplish the task, but there is an easier way to do this. I recommend that, if you have not already done so, you download

264 Part II — Increasing Your System’s Performance
the disk defragmenter utility called Diskeeper, by Executive Software (www.executive.com), which was discussed in Chapter 8. All you have to do in order to defragment the paging file is to run a boot defrag. By default, the option to defragment the paging file is already set. If you do not remember how to do a boot defrag, go back to Chapter 8 and review the step-by-step instructions in the section Boot time system defrag with Diskeeper.
Defragmenting the NTFS master file table
The master file table, or MFT, is very important to the operation of the file system on your computer. Think of it as a phone directory of all the files on your computer. It is a big database of every file on your computer and it is stored on the hard drive. As the number of files and directories on your computer increase, so does the master file table. Over time, the master file table can also become fragmented. Because the master file table is so important to computer operations, it is used any time you want data from the hard drive. Defragmenting it will help your performance.
The built-in defragmenter will not defragment the MFT. Microsoft recommends that you adjust the amount of space that is reserved for the MFT, then back up your drive, and then do a full reformat and then restore your whole drive. This seems like way too much effort expended to me. Once again, Diskeeper by Executive Software comes to the rescue. Also, by default, when you perform a boot defrag, the option to defragment the master file table is already selected.
Using the Diskeeper method, instead of the Microsoft method, will save you hours of time wasted backing up and restoring your drive.
Adjusting Your Application Priorities
Ever since the introduction of the multitasking processor, operating systems have been able to handle running multiple programs at once using the new task switching and segmentation features provided by the CPU. These new technologies are what made it possible for an operating system like the Windows series to be made. Even though PCs nowadays are able to multitask, they really only can do one thing at a time. In order for the operating system to support running hundreds of applications at once, it has to slice up all of the available processing time and give each application a turn.
Operating systems use a variety of techniques to determine which application will get the next available slot to use the CPU. One of the factors that determines this for Windows XP is the priority level at which the application is running.
Every application that runs on your computer has a priority level attached to its runtime record. By default, the operating system starts each application at normal priority, which is right in the middle of the priority spectrum. Applications can run and be assigned six different priority levels ranked highest to lowest: real time, high, above normal, normal, below normal, and low. Because the CPU can only do one thing at a time, the different priority levels allow the operating system to decide which application will get the next CPU burst. If an application is running at high or above normal priority level, it will get more CPU time than an application running at normal.

Chapter 11 — Speeding Up Your Computer 265
As you can see, the priority you give an application can impact how fast the program runs.
Using Task Manager to adjust priorities
The Windows Task Manager is something that we all have experience with when we have problems with a frozen program. The Task Manager is actually a very useful utility, as was discussed in Chapter 7. Another use of the Task Manager is to change the priority at which an application is running while it is running. The Task Manager makes it possible to dynamically change the priority of application. This capability can be very useful when you have a lot of programs running on your computer.
 Setting any application to real time can be dangerous, because doing so will allow the application to hog all of the CPU time and will make exiting a program that is running at this high priority impossible, if for some reason it crashes. Because the program is hogging all of the CPU time, it takes a very long time to just load the Task Manager to end the application.
If you have a program that is doing a lot of CPU-intensive operations, such as rendering a video clip or a game, you can adjust the priority of the application by following these steps:
1.Load the Task Manager by clicking the Start Menu and selecting Run. Then type taskmgr.exe in the text box and click the OK button.
2.Once Task Manager loads, click the Processes tab.
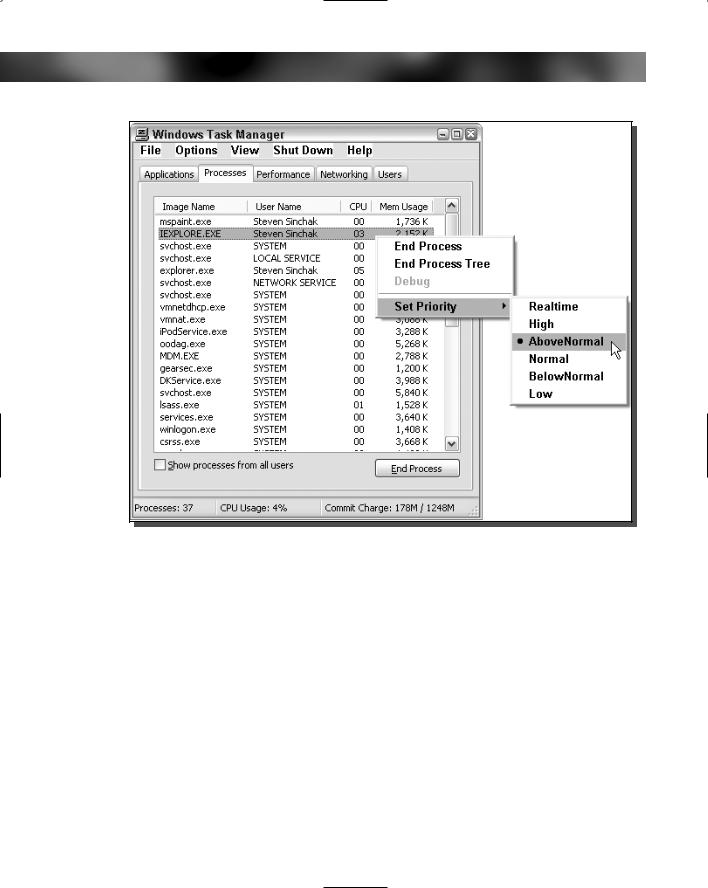
3.Right-click the name of the process for which you would like to adjust the priority, select Set Priority, and then select the level, as shown in Figure 11-9.
4.After you click the priority level, your change is complete.
 If your computer has multiple processors or supports hyperthreading, then you will notice an extra option when you right-click a process called Set Affinity. This option will allow you to specify on which CPU the application will run (or which virtual CPU, in the case of hyperthreading users).
Using the Task Manager to change the priority levels is great. However, there is one downside. When an application on which you have altered its priority level is closed, the priority level it was running at will be lost. The next time the program is started up, it will be running back at the default level. This can be a real annoyance for some users; however, there is a great trick to fix this problem, which will be shown in the next section.
Starting applications with a user set priority
Using a wonderful command built into Windows XP allows you to start any program and specify what priority it should be run at. This cool utility is called the Start command. Using the Start command with priority flags, followed by the executable, will allow any program to start at the priority level at which you want it to start.
266 Part II — Increasing Your System’s Performance
FIGURE 11-9: Task Manager adjusting application priorities.
For the sake of demonstrating how to use the command, assume that the calculator is set at high CPU priority. Follow these steps to set the command:
1.First, open Notepad so that you can type in the command so that it can be turned into a batch script file. This can be done by starting Notepad from the Accessories item in the Start Menu’s All Program entry.
2.Once Notepad is open, key in start /high calc.exe. If you want to start the calculator at a different priority, you can replace /high with /low, /normal, /realtime/, /abovenormal, and /belownormal.
3.Once you have the priority level keyed in, click the File menu bar item in Notepad and select Save As. Change the file Save As Type to All Files and type launchcalc.bat in the filename box. You can call the file anything you want, but make sure that it has the
.bat file extension so that Windows knows to execute the commands in the file.
4.Then specify a location on your hard drive to save it, such as your Desktop, and click the Save button. You are now finished and may exit Notepad.

Chapter 11 — Speeding Up Your Computer 267
Now that you have the batch command file created, just double-click the file to launch the calculator application at the high-priority level.
The same technique can be applied to any program on your computer. Instead of typing calc.exe at the end of the command, type the name of the executable of the program that you want to start. Additionally, this command can be used on nonexecutable files such as documents.
For example, you can type in start /high mydocument.doc and it will start Microsoft Word in high priority with your document opened.
Using WinTasks to profile your priorities
Another great utility, made by LIUtilities, is called WinTasks Pro. This utility is like the Windows Task Manager, but on steroids. It offers tons of new features that the Windows Task Manager does not have, such as the ability to see individual CPU and memory graphs for each application, scripting capabilities that allow the user to set up triggers based on CPU and memory activity for each application, and most importantly, the ability to have preset profiles for application priority levels. Also, on top of these features, it has built-in information about quite a few commonly known processes to help users figure out each process that is listed because they are often not easily identified by the process name.
The ability to have a profile for your open application priority levels enables you to automatically change the priority of several applications at the click of one button.
WinTasks 4 professional can be downloaded from www.liutilities.com/support/ downloads/. Download a copy now and install it if you would like to follow along with these steps, which will guide you through creating a profile of your priorities:
1.Start WinTasks by clicking the Start button, expanding All Programs, and selecting Start WinTasks from the WinTasks folder.
2.When WinTasks is loaded, you will see a list of all of the different processes running on your computer. You can adjust the priority at which each process is running by right-clicking the process and then selecting either Increase or Decrease Priority. Go ahead and change the priorities of all of the applications that you have running to what you would like them to be.
3.When you are satisfied with all of your priority changes and are ready to create a profile of them, click the little key icons in the Presets toolbar, as shown in Figure 11-10.
4.Type in a name to save the state of all of the priorities, as in the Save Preset window, and press OK.
5.Next to the key icon that you pressed, you will notice the name showing up in the button to the right of it. Every time you press this button, it will reset all of the priorities to what you changed them to for this preset.
6.Repeat the previous steps, changing the priority levels for each application to a different value, and then click a different key icon to save the new preset again.
Now that you have multiple presets of application priority levels, you can easily switch between them by clicking the buttons.