

1 - The Basics
SoundSprint
SoundSprint
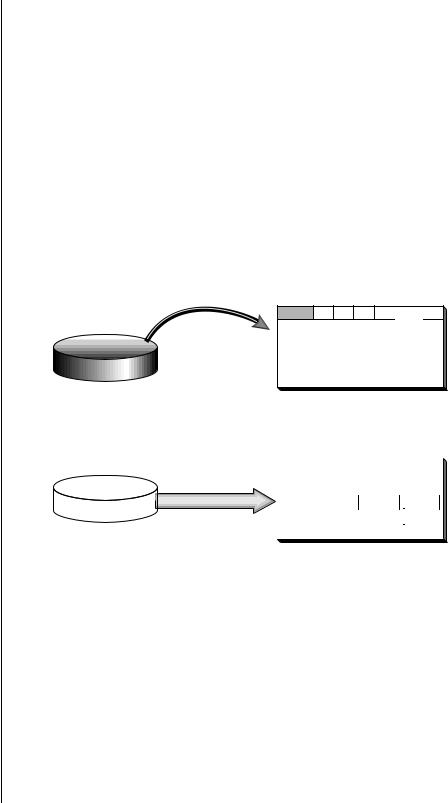
SoundSprint is a special mode used to load presets quickly and automatically within a folder as you browse through them. Presets are loaded in the background while the keyboard remains active with the last preset. Loading time varies with the size of the preset, but most presets load in one to three seconds.
Presets loaded via SoundSprint are placed at the top of the bank memory and are assigned preset numbers 990-999.
You can load up to ten SoundSprint presets in RAM and these can be selected instantly. Once you load more than 10, the oldest Sprint preset is erased. SoundSprint will not overwrite a preset that has been loaded in the conventional manner and a “Memory Full” message will be displayed. See “Soundsprint™” on page 376 for additional information.
|
|
|
|
ne |
|
|
|
d |
o |
|
|
|
a |
|
|
|
|
o |
|
|
|
T |
|
L |
|
t |
a |
||
|
|
||||
|
|
a |
|
|
|
|
|
|
|
|
|
Pres ime
e
t
Presets are erased to make room for new ones

 Preset 991 992 993 994


 999
999
Bank
Hard Disk
SOUNDSPRINT
|
|
|
Load All |
|
Bank |
|
|
|
|
|
|
|
|
|
|||
|
|
|
|
|
|
|
|
|
|
|
|
|
Preset |
|
|
|
|
|
|
|
|
|
|
|
|
|
|
|
|
|
Preset |
Preset |
Preset |
Preset |
|
|
Hard Disk |
|
Preset |
Preset |
Preset |
Preset |
||
|
|
|
|
|
|
|
|
|
LOAD BANK
EOS 4.0 Software Manual 23
1 - The Basics
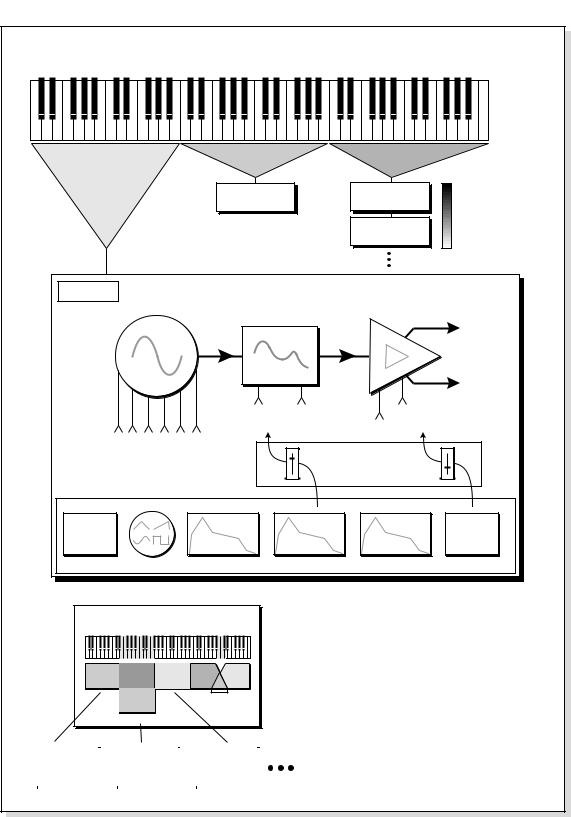
Preset Diagram
Preset
KYBD Range |
KYBD Range |
KYBD Range |
Voice Voice
Voice
Velocity
or Realtime Crossfade
Group #
Voice
L
Samples |
Morph |
Amp |
|
Filter |
|||
|
R |
||
|
|
Pitch |
Retrigger |
Chorus |
Glide |
Start Offset |
Loop |
Frequency Q |
Pan |
Vol
- 24 Cords -
Key # |
LFOs |
Envelope |
Envelope |
Envelope |
Other |
Velocity |
Gen. |
Gen. |
Gen. |
||
Gate |
|
|
|||
|
|
|
|
|
|
Samples |
|
||
S01 |
S10 |
S03 |
S04 |
S05 |
|
S02 |
|
Positional |
|
|
|
Crossfade |
||
|
|
|
||
Velocity Crossfade |
|
|
||
Sample 01 |
|
Sample 02 |
|
Sample 03 |
|
Loop, Info, |
|
Loop, Info, |
|
Loop, Info, |
|
Sample Rate |
|
Sample Rate |
|
Sample Rate |
|
|
|
|
|
|
|
|
|
|
|
|
|
24 E-MU Systems
1 - The Basics
Bookmarks
Bookmarks
When in SoundSprint mode, you can attach Bookmarks to your favorite presets so that they can be selected instantly with a single or double key press. You can store up to 100 bookmarks and save them to nonvolatile Flash RAM.
O Up to 100 Bookmarks can be saved to nonvolatile Flash RAM.
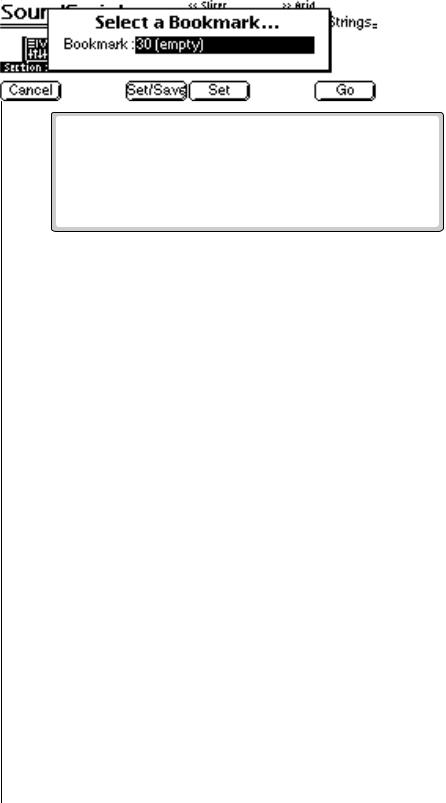
v To Set a Bookmark:
1.Select a preset. From the SoundSprint Browser, use the left/right cursor buttons to select the preset you want to bookmark.
2.Press the Mark… function key (F3). The screen shown above appears.
3.Select a bookmark location using the Data Entry Control or INC/DEC buttons.
4.After selecting a location, press the Set function key (F4) to set the bookmark. Press the Set/Save function key (F3) if you want to save the bookmarks to nonvolatile memory.
The numeric keypad selects a bookmark from the rank of 10 you last selected with the Lock engaged.
5.Press the Go function key (F6) to go to the currently selected preset. Press Cancel (F1) to cancel the operation.
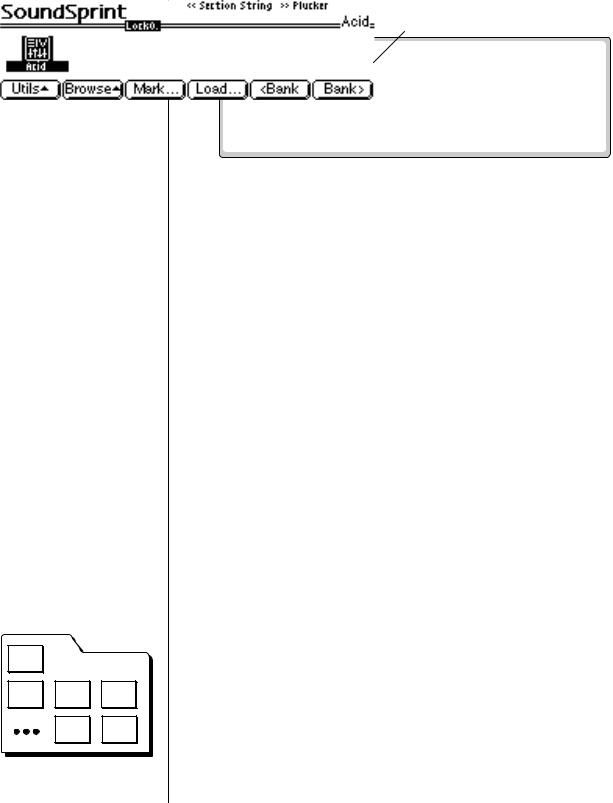
v Alternate Method to Set a Bookmark: (Using the Set button)
1.The first digit must be Locked for this trick to work. Press the ± key so that Lock0 appears in the display.
2.From the SoundSprint Browser, select the preset you want to bookmark using the left/right cursor buttons.
3.Press and hold the Set button located to the right side of the numeric buttons. While holding the Set button, press one of the numeric buttons. A pop up dialog box will inform you that the bookmark is set.
v To Select a Bookmark:
•From the SoundSprint Browser, press the numeric button(s) corresponding to the bookmark you want to select. For example, if you want to select the preset at bookmark number 9, press 9 on the numeric buttons. The preset is selected.
EOS 4.0 Software Manual 25
1 - The Basics
The Bank
A bank can hold up to 1000 presets.
BANK |
|
00 |
100 Banks per Folder |
|
BANK |
BANK |
BANK |
01 |
02 |
03 |
BANK |
BANK |
98 |
99 |
Indicates first digit is locked at 0
v To Lock the first digit of the two digit Bookmark Number:
•Press and hold the Lock button (located to the left of the numeric buttons) while pressing one of the numeric buttons to lock the most significant digit.
•Press the Lock button by itself to turn Lock mode On or Off. The lock indicator on the display is shown in the previous illustration.
With Lock Off, two digits must be entered to select a bookmark. For example, to select bookmark 9, you would press 0, then 9.
With the most significant digit locked, only one button press is required to select a bookmark.
v To Select another Rank of 10 Bookmarks:
•Press and hold the Lock button and press one of the numeric buttons. The display informs you of which rank of 10 bookmarks is now selected.
The Bank
The bank contains samples, voices, presets and sequences. Everything that is loaded into the Emulator is part of the bank. Although the memory is volatile, meaning that the data disappears when you turn off power, all bank data can be saved permanently to a hard disk drive or other media. The number of samples that can be loaded into a bank at once is dependent on the amount of sample RAM you have installed in your Emulator.
Folders
Just like on a computer, folders help keep banks organized. A folder can contain up to 100 banks (0-99). You can use folders to organize your sound banks by including all the banks used for a particular project in a folder. The number of folders in a disk depends on the size of the disk. As an example, a one gigabyte hard disk can hold up to 96 folders.
26 E-MU Systems