- •Contents
- •Introduction
- •Introduction
- •Important Upgrade Information
- •About EOS
- •Graphic User Interface
- •Sequencer and Data Filer
- •Sound Libraries
- •Sound Storage
- •Advanced DSP
- •Built-in Digital Effects
- •More Digital Processing Features
- •Power Up!
- •Loading a Bank from the Hard Disk
- •Loading SoundSprints
- •Selecting Presets
- •Lock Button
- •Saving
- •Arpeggiator
- •Keyboard Modes
- •Whole
- •Layer
- •Split
- •Multi
- •The Basics
- •How Sounds are Organized
- •The Sample
- •Voices
- •The Preset
- •SoundSprint
- •Bookmarks
- •The Bank
- •Folders
- •The Internal Drive
- •To Update the EOS Software:
- •External Drives
- •Sample Memory & Preset Memory
- •Sound ROM & Sound RAM
- •Five Types of Memory
- •Flash Sound RAM
- •Sample Numbers
- •Using Preset Flash Memory
- •Using Sound Flash Memory
- •Modules
- •Saving
- •Default
- •Icons
- •The Cursor
- •Data Entry Control & Increment/Decrement Buttons
- •Selecting
- •Using The Browser
- •Guided Tours
- •Banks, Sequences, Presets & Samples
- •Loading a Bank Automatically
- •Loading a Sequence from a Different Bank
- •Loading Standard MIDI Files
- •Saving Banks
- •Finding Banks, Presets, Samples & Sequences
- •Naming Banks
- •Erasing Banks
- •Assignable Keys
- •Recording a Sequence
- •Arpeggiator Sequencing!
- •A Practice Sampling Session
- •Exploring the Preset
- •Which Voices are Assigned to the Keyboard?
- •Creating a Link
- •Master Menu
- •Overview
- •Memory Statistics
- •Master Utilities
- •Assignable Keys
- •Channel Volume
- •Tones
- •Recalibration
- •Test Access
- •About…
- •Bank
- •Erase Bank
- •Name Bank
- •Auto Bank Load
- •Flash Utilities
- •Using Sound Flash Memory
- •Erase the Bank
- •Load the Bank you Wish to Save to Flash
- •Save the Sounds to Flash
- •Mount the Drive
- •Erase the Bank…again
- •Erase Preset 000
- •Merge the Presets
- •Save the Presets
- •Setup
- •Tune
- •Tuning Offset
- •Transpose
- •Audition Key
- •Input/Output
- •Headroom
- •Output Boost
- •Output Format
- •ADAT Output Dither
- •Default Clock
- •Word Clock In
- •WC Phase In/Out
- •Miscellaneous
- •Contrast
- •Wrap Field Selection
- •Screen Saver
- •Disable Sound ROM
- •Zero Crossing Threshold
- •Background
- •Undo/Redo Enable
- •SCSI/Disk
- •SCSI ID
- •SCSI Termination On/Off
- •Avoid Host on ID
- •Disk Button Goes To:
- •Import Options
- •Master Effects
- •Use Master Effects Settings in MultiMode
- •Master Effects A
- •A EFFECT TYPES
- •Master Effects B
- •B EFFECT TYPES
- •Effects Setup
- •Effects Control
- •Sequence Manage
- •MIDI
- •MIDI Mode
- •Basic Channel
- •MIDI Mode
- •MIDI Device ID
- •Local Control
- •Multimode - MIDI Mix
- •MIDI Controllers
- •About MIDI Controllers
- •MIDI Preferences
- •Velocity Curve
- •Controller #7 Sensitivity
- •Controller #7 Curve
- •Global Pedal Override
- •Receive Program Change On/Off
- •Send Program Change On/Off
- •Magic Load Preset
- •Effects
- •Effects
- •Dual Effects Processor
- •The Effects Sends
- •Effect B Into Effect A
- •Three-way Effects Control
- •Effects Programmed in the Preset
- •Master Effects
- •Using Master Effects Settings in Multimode
- •Using the Effects Channel Settings in Multimode
- •Effects Bypass
- •Effect Descriptions
- •A EFFECT TYPES
- •B EFFECT TYPES
- •Reverb
- •General Descriptions of Reverb
- •Chorus
- •Doubling
- •Slapback
- •Stereo Flanger
- •Delay
- •Stereo Delay
- •Panning Delay
- •Dual Tap
- •Vibrato
- •Distortion
- •Sequencer
- •Sequence Manage
- •Recording MIDI SysEx
- •Important Information for Loading Standard MIDI Files
- •Name Sequence
- •Export
- •Transport Controls
- •Sequencer Utilities
- •Erase
- •Copy Sequence
- •Sequencer Memory
- •Jukebox
- •Sequence Edit
- •The Sequence Edit Screen
- •Track Mode
- •Track Numbers
- •Counter Display
- •Tempo Display
- •MIDI Channel Modes
- •Volume - Pan - Submix
- •The Initial Track State Screen
- •Initial Tempo
- •Editing: Cut, Copy & Paste
- •Cut/Copy/Erase
- •Note Erase
- •Erase
- •Delete
- •Paste
- •Insert
- •Replace
- •Track Delete
- •Track Copy
- •UNDO! (REDO!)
- •Tools
- •Quantize
- •Quantize -1/4 Note
- •Quantize - 8th Notes, Swing 60%
- •Quantize - 8th Notes, Swing 67%
- •Quantize - 8th Notes, Swing 75%
- •Transpose
- •Sequence Velocity
- •Channelize
- •Channel Extract
- •Setup
- •Metronome
- •Sequence Clock
- •Sequence Input
- •Sequence Record
- •Start Record -
- •Count In
- •Sequence Loop
- •Transport
- •Track Status Options:
- •Received MMC Commands
- •Locate
- •Sample Manage
- •Overview
- •Sample Utilities
- •Erase Sample
- •Copy Sample
- •Sample Dump
- •Defragment Memory
- •Name Sample
- •New Sample
- •Threshold
- •Input Channels
- •Sampling Source & Rate
- •Dither
- •ADC Gain
- •Sample Length
- •Arm Sample Trigger
- •Force Sample Trigger
- •Keyboard Sample Trigger
- •Monitor On/Off
- •Automatic Parameters
- •Automatic Digital Signal Processing Operations
- •Auto-Placement Parameters
- •Place Sample
- •Export Sample
- •Get Info
- •Sample Edit
- •Sample Edit
- •Background: The Scrub Wheel
- •Background: Using Cut, Copy, Paste and Undo
- •Undo and Redo
- •Typical Applications
- •Background: About Looping
- •How Looping Works
- •Auto Correlation
- •Creating Attack & Decay Characteristics for the Looped Portion
- •Loop Compression
- •Crossfade Looping
- •Zero Crossing
- •Utilities
- •Cut Section
- •Copy Section
- •Paste Section
- •Truncation
- •Taper
- •Tools 1
- •Loop
- •Loop Type
- •Digital Tuning
- •Sample Rate Convert
- •Sample Calculator
- •Tools 2
- •DC Filter
- •Swap Left & Right
- •Stereo <-> Mono
- •Reverse Section
- •Sample Integrity
- •Tools 3
- •Gain Change
- •Compressor
- •Mode
- •Threshold
- •Compression Ratio
- •Attack Time
- •Release Time
- •Using the Digital Compressor
- •Limiter
- •Musical Compression (e.g. Guitar)
- •Noise Reduction
- •Parametric Equalizer
- •FIR (Phase Linear Filter)
- •Aphex Aural Exciter
- •Tools 4
- •Transform Multiplication
- •Doppler
- •Time Compression
- •Pitch Change
- •Bit Converter
- •Beat Munger
- •Beat Munger Controls
- •Undo
- •Preset Manage
- •Preset Manage
- •Utilities
- •Erase Preset
- •Dump Preset
- •Name Preset
- •New Preset
- •Copy Preset
- •Export Preset
- •Get Info
- •Preset Edit
- •Synthesizer Basics
- •Editing Presets
- •Modulation
- •Modulation Sources
- •Keyboard Key
- •Key Velocity
- •Release Velocity
- •Gate
- •Key Glide
- •Pitch and Mod Wheels
- •Keyboard Pressure (mono aftertouch)
- •Pedal
- •Miscellaneous Controllers A -H
- •Low Frequency Oscillators (2 per voice)
- •Envelope Generators (3 per voice)
- •Noise & Random Generators
- •Thumby Button and Footswitches
- •Modulation Cords
- •Envelope Generators
- •Low Frequency Oscillators (LFOs)
- •Random Sources
- •Clock Modulation
- •Syncing an LFO to the Clock
- •Modulation Destinations
- •Modulation Processors
- •Dynamic Filters
- •Dynamic Filters
- •What is a Filter?
- •Parametric Filters
- •The Z-Plane Filter
- •Selecting Voices, Samples & Groups
- •Selecting from the Preset Editor Windows
- •Selecting All Voices
- •Selecting Voices from the Dynamic Processing Level
- •Selecting Voices from the Voice Select Screen
- •Groups
- •Preset Editor
- •PRESET EDIT - Global
- •Global Editor
- •Edit All
- •Preset Effects A
- •Effects Programmed in the Preset
- •Effect
- •A EFFECT TYPES
- •Decay Time
- •HF Damping
- •FX Amounts
- •FX B Through FX A
- •Preset Effects B
- •Effect B
- •B EFFECT TYPES
- •Feedback Amount
- •LFO Rate
- •Delay Time
- •FX Amounts
- •Preset Edit - Links
- •Main Controls
- •Link Type
- •Link Volume
- •Link Pan
- •Link Transpose
- •Link Fine Tuning
- •Link Utilities
- •New Link
- •Copy Link
- •Delete Link
- •Subsume Link
- •Links - Key Window
- •Key Window Controls
- •Keyboard & Velocity Ranges
- •Links - Velocity Window
- •Velocity Window Controls
- •Velocity Range
- •Links - MIDI Filters
- •MIDI Filter Window Controls
- •Preset Edit - Voices
- •Voices - Main Controls
- •Voice Utilities
- •New Voice
- •Copy Voice
- •Delete Voice
- •Split Voice
- •Solo Voice
- •Sample Zone
- •New Sample Zone
- •Get Multisample
- •Delete Sample Zone
- •Combine
- •Expand...
- •Voices - Key Window
- •Key Window Controls
- •Keyboard Ranges
- •Voices -Velocity Window
- •Velocity Window Controls
- •Velocity Range
- •Voices - Realtime Window
- •Realtime Window Controls
- •Preset Edit - Dynamic Processing Level
- •Utilities
- •Voice Select
- •Function Keys
- •The Isolate Key:
- •Copy Voice(s)
- •Delete Voice(s)
- •Automatic Voice Selection
- •WARNING!
- •Solo Voice
- •Key Transpose
- •Coarse Tuning
- •Fine Tuning
- •Non-transpose Mode
- •Chorus Amount
- •Delay
- •Start Offset
- •Glide Rate & Curve
- •Solo Modes
- •Latch Mode
- •Assign Group
- •Filter Parameters
- •FILTER TYPES
- •2-Pole Lowpass
- •4-Pole Lowpass
- •6-Pole Lowpass
- •2nd Order Highpass
- •4th Order Highpass
- •2nd Order Bandpass
- •4th Order Bandpass
- •Contrary Bandpass
- •Swept EQ, 1-octave
- •Swept EQ, 2->1-octave
- •Swept EQ, 3->1-octave
- •Phaser 1
- •Phaser 2
- •Bat Phaser
- •Flanger Lite
- •Vocal Ah-Ay-Ee
- •Vocal Oo-Ah
- •Dual EQ Morph
- •2EQ + Lowpass Morph
- •2EQ Morph + Expression
- •Peak/Shelf Morph
- •Filter Envelope
- •LFO/Auxiliary Envelope
- •Lag Processors
- •Auxiliary Envelope
- •Cords
- •Sample Retrigger
- •Disk Menu
- •Disk Menu
- •Disk Browser
- •Disk
- •Disk Utilities
- •Mount Drives
- •Copy System
- •Format Disk
- •Low Level Format
- •Backup
- •Load Bank
- •Note:
- •Save Bank
- •View…
- •Info, Lock Drive, & Sleep
- •Lock
- •Sleep
- •Folder Utilities
- •Delete
- •Rename
- •Find…
- •View
- •Info…
- •Bank
- •Bank Utilities
- •Delete
- •Name
- •Find…
- •Load Bank
- •Save Bank
- •View
- •Info…
- •Preset
- •Preset Utilities
- •Soundsprint™
- •Bookmarks
- •Find…
- •Load Preset
- •View
- •Info…
- •Sample
- •Sample Utilities
- •Find...
- •View
- •Load Sample
- •Load .WAV & AIFF Files
- •Audition
- •Info…
- •Sequence
- •Sequence Utility
- •Find…
- •View
- •Load Sequence
- •Info…
- •Important Information for Loading Standard MIDI Files
- •Appendix
- •SCSI
- •Why Use SCSI?
- •The SCSI Bus
- •ID Numbers
- •Types of SCSI Cables
- •Terminating SCSI Cables
- •SCSI Problems
- •Sample Transfers Via SMDI
- •Using Multiple Samplers on the SCSI Bus
- •MIDI
- •MIDI Implementation Chart
- •Notes:
- •Index
1 - The Basics
Finding Banks, Presets, Samples & Sequences
2.Choose a location for the bank using the Data Entry Control, the INC/ DEC buttons, cursor buttons or the numeric keypad.
3.Press OK to load the bank or Cancel to cancel the operation. If you pressed “OK” the bank will be saved and the main preset selection screen appears. If you are about to overwrite an existing bank, the display will warn you.
•If the bank contains SoundSprint presets (presets in locations 990-999), the display will ask you if you want to save the SoundSprint presets along with the bank.
Finding Banks, Presets, Samples & Sequences
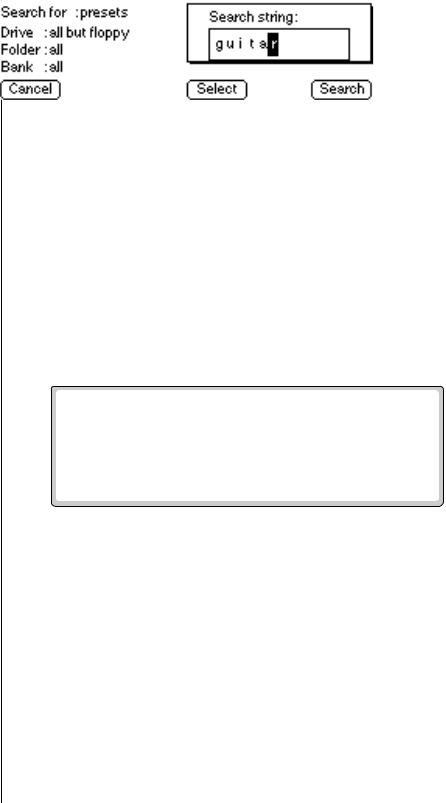
This utility searches your disk library for a particular pattern of letters and numbers (a search string). If it finds the string anywhere in the name, the bank will be selected. Use the Find utility again to find additional matching items.
v To Find a Bank:
1.From the Bank Browser, press the Utilities function key (F1).
2.Press the Find function key (F6). A screen similar to the following appears.
3.Select the type of item (folder, bank, preset, sample or sequence) you want to search for. If you have an idea of where the item is located, you can narrow the search by inputting additional data about the drive, folder or bank. Selecting “All” tells EOS to search everything.
4.Press the String function key (F4), and enter the search string. Letters can be selected using the numeric pad, Data Entry Control, INC/DEC buttons and cursor buttons, or using an ASCII keyboard.
5.Press the Search function key (F6) to search for the item or the Cancel function key (F1) to cancel the operation.
EOS 4.0 Software Manual 45
1 - The Basics
Naming Banks
OThe Assignable Keys have secondary functions which are accessed by holding down the decimal point button and pressing the Assignable Key.
Naming Banks
Use this utility to rename a bank.
v To Name a Bank:
1.From the Bank Browser, select the bank you wish to rename using the cursor buttons, INC/DEC buttons or the Data Entry Control.
2.Press the Utilities function key (F1).
3.Press the Name function key (F4). A pop-up window appears prompting you to name the bank.
4.Change the name of the bank. Select letters using the numeric pad, Data Entry Control, INC/DEC buttons, cursor buttons, or using an ASCII keyboard.
5.Press the OK function key (F6) to confirm the new name or the Cancel function key (F1) to cancel the operation.
Erasing Banks
This utility allows you to erase an entire bank.
v To Erase a Bank:
1.From the Bank Browser, select the bank you wish to delete using the cursor buttons, INC/DEC buttons or the Data Entry Control.
2.Press the Utilities function key (F1).
3.Press the Delete function key (F3). A pop-up window appears asking you if you want to delete the bank.
4.Press the OK function key (F6) to delete the bank or the Cancel function key (F1) to cancel the operation.
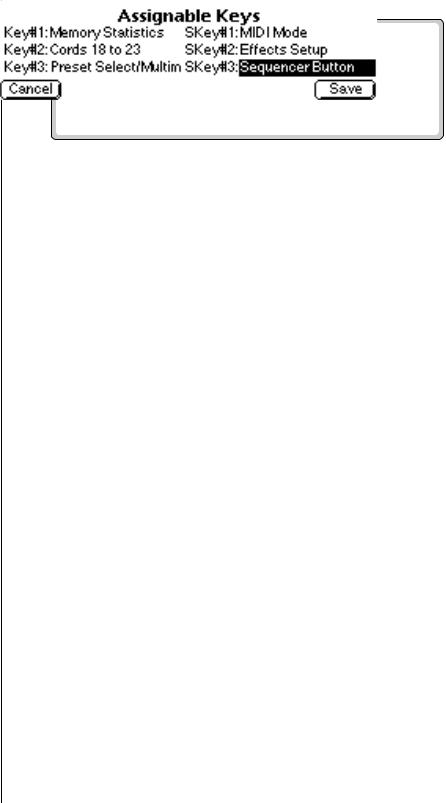
Assignable Keys
You can program six assignable keys on the front panel to jump to almost any screen in EOS. This handy feature saves you from having to page through multiple menus to find the screen you want to edit. The assignable keys can be programmed from the assignable keys screen in the Master Utilities submodule or, directly from any screen in which you are working.
v To Program an Assignable Key from the Master Menu:
1.Press the Master button. The LED illuminates and the Memory Statistics screen appears.
2.Press the Utilities function key (F1). A second row of function keys appears.
3.Press the AsnKy function key (F1). The following screen appears.
46 E-MU Systems
1 - The Basics
Recording a Sequence
|
|
|
|
|
|
4. |
Select a screen. Use the Data Entry Control or the INC/DEC buttons to |
||
|
|
change the screen associated with each assignable key. |
||
|
5. |
Press Save to store the assignable keys settings and return to the |
||
|
|
Memory Statistics screen. Press Cancel to cancel the operation and |
||
|
|
return to the Memory Statistics screen. |
||
|
v To Program an Assignable Key from the Current Screen: |
|||
|
This method allows you to link an assignable key to the screen you are |
|||
Note: if a key is |
currently viewing. |
|||
• |
Press and hold one of the assignable keys from any screen. After two |
|||
assigned to RAM/ROM, it can’t |
|
seconds a pop up window appears, informing you that the assignable |
||
be programmed from the |
|
key has been programmed for the current screen. |
||
current screen |
|
|
|
|
|
Recording a Sequence |
|||
|
The easiest way to learn about sequencing is simply to record one. A multi- |
|||
|
timbral sequence contains more than one sound. In this guided tour of the |
|||
|
sequencer, you'll learn how to set up the metronome, the input quantize |
|||
|
function and lay down multitimbral tracks. These instructions apply to |
|||
|
both a rack and keyboard EOS synthesizers.If you’re using a Rack Emulator. |
|||
|
make sure your MIDI keyboard is connected. If you have two MIDI In ports, |
|||
|
use Port A. |
|||
|
v Load a Bank of Sounds |
|||
|
For your initial investigations, choose a bank which contains all types of |
|||
|
instruments, including drums. The Combos Bank might be a good choice. |
|||
|
1. |
From the main screen press the Load function key (F4). |
||
|
2. |
Select the desired Folder and Bank. |
||
|
3. |
Press the Load function key (F6). |
||
|
4. |
The display informs you that you are about to overwrite the current |
||
|
|
bank. Press OK (F6) to load the bank. |
v Select Multimode
5.From the main screen press the Mode function key (F6).
6.Select Multi (F6). The following screen should appear.
EOS 4.0 Software Manual 47
1 - The Basics
Recording a Sequence
•There are two different Multimode screen views. If you get the other screen, press the F6 function key, then press View (F3).
v Enter the Sequencer Submodule
7.Hold the Decimal Point button and press Assignable Key 1. The Sequence Manage screen appears.
8.Press the Edit function key (F5). The Edit screen appears.
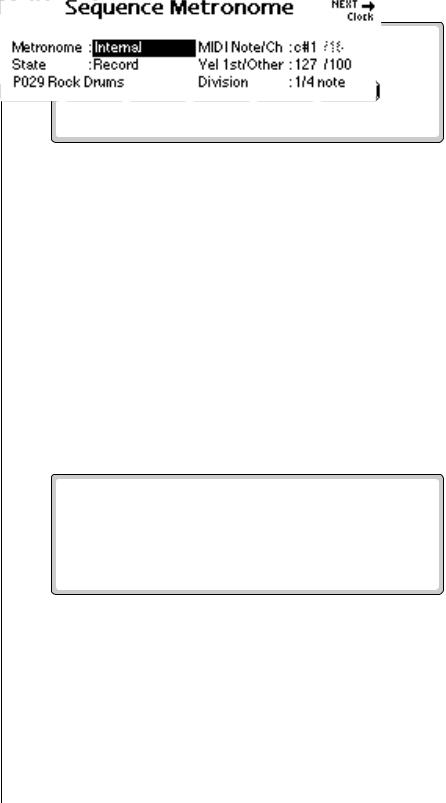
v Set up the Metronome
The Metronome is important if you want to use the Quantize functions. If you don't want quantization and just want to enter a few tracks, skip to step 20.
9.Press the Setup button (F3). A second row of function keys appears.
10.Press the Metro button (F1). The following screen appears.
11.Set the Metronome parameters as shown.
12.The lower left field allows you to select a preset to be used for the Metronome. Select a preset containing a click or short percussion sound.
13.Move the cursor to the MIDI Note/Ch field.
14.Select the metronome sound using the Data Entry Control, INC/DEC buttons or the keyboard. The metronome sound is played as you scroll through the note numbers.
15.Press the Exit button to leave the Metronome screen.
48 E-MU Systems
1 - The Basics
Recording a Sequence
v Turn Quantization On
Input Quantization is really handy for laying down a drum track for your sequence.
16.Press the Setup function key (F3) again. A second row of function keys appears.
17.Press the Input function key (F3). The following screen appears.
18.Turn Quantize Input On (Select Yes). Set Swing to 50%. Set the Amount for quarter notes or eighth notes for starters.
19.Press the Exit button to lock in your selections and return to the Edit screen.
v Setup Track 1 for Recording
OK! You're almost ready to start recording.
20.Set the Track Mode to Record. Move the cursor to the Track Mode location as shown above. Set this field to R (Record) using the Increment button or Data Entry Control.
21.Move the cursor right to the Channel field. Set the channel to @1 using the Inc/Dec buttons or Data Entry Control. The @1 function records on MIDI channel 1 exclusively.
22.Select a preset. Move the cursor left to the Preset field. Play the keyboard and select the preset you want to play on your first track. Select a drum preset if you're laying down a drum track.
EOS 4.0 Software Manual 49