

O The Memory Configuration control (Master, Setup, Memory), allows you to balance the allocation of Preset Memory between the Sequencer and Presets.
Contact your E-mu dealer if you wish to upgrade your CPU RAM.
Preset Flash can also be used to store presets for HD based sound banks. However, this can be confusing since the proper samples may not be loaded into Sample RAM when the preset is selected.
1 - The Basics
Sound ROM & Sound RAM
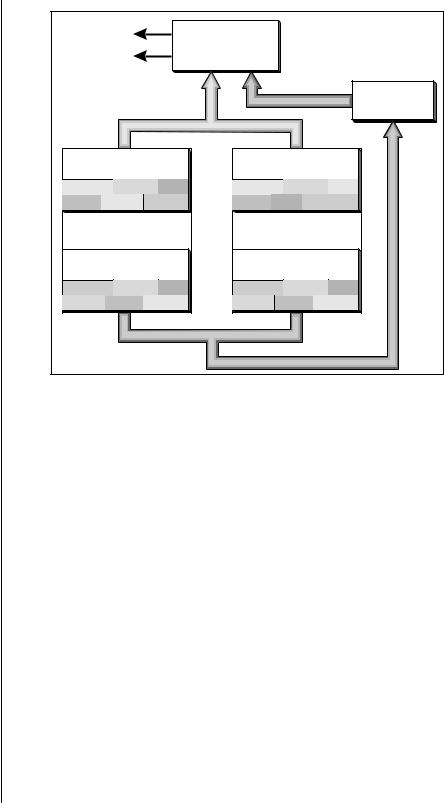
Sample Memory & Preset Memory
EOS presets use two separate memory locations — Preset Memory and Sample Memory. Preset memory (also called CPU memory) is used to hold both preset parameter information and sequences. (The ratio between presets & sequences is user adjustable — see sidebar tip.) The amount of Preset Memory determines the number of presets and sequences you can have in your Emulator.
Preset memory on the e-64, E-IV, E4K, and E-6400 is about half a megabyte. The E4X, and E-Synth come standard with 2.6 MB of usable preset memory. Ultra models have about 4 MB of preset memory. Sample memory contains the actual sample data and can vary from 4 MB to 128 MB. Because presets use far less memory than do samples, less preset memory is needed.
Audio Out |
Sound |
|
|
|
|
|
Generation |
|
|
|
|
||
Sound |
|
Control Data |
|
Preset |
|
|
|
|
|
|
|||
Data |
|
|
Control |
|||
Sample Memory |
|
|
Control Data |
|||
Sample |
Sample Sample |
Preset Memory |
||||
Sample |
Sample Sample |
|||||
|
|
|
|
|||
|
|
Preset |
Preset |
Preset |
||
Hard Disk |
|
Preset |
|
Preset |
Preset |
|
|
|
|
|
|
||
Sound ROM & Sound RAM
Sound ROM is a standard feature on E-Synth and one of the available hardware upgrades for other EOS instruments. Although the samples themselves are in ROM and cannot be changed or modified, the Presets with all their keyboard mapping and synthesizer parameters can be changed because they are stored in non-volatile Preset Flash RAM. Flash RAM contain 256 to 1000 presets depending on the amount of Flash RAM you have installed. Flash presets are located immediately after RAM preset 999 (I000 - IXXX) in the preset numbering scheme.
Five Types of Memory
The Emulator uses up to five different memory types. It CAN be confusing.
•Sample RAM - 4-128 MB. Contains samples loaded from the hard disk.
•Sample ROM - Permanent ROM samples. Optional on all but E-Synth.
•Preset RAM - 1-8 MB of dynamic RAM. Used by CPU, and also contains presets and sequences loaded from the hard disk.
•CPU Flash - Normally used to store presets for ROM or S-Flash banks.
•Sound Flash - Optional flash SOUND memory to store your own banks.
EOS 4.0 Software Manual 29
1 - The Basics
Flash Sound RAM
Tip #1: Storing RAM based presets in flash can be useful to store preset “templates” that do not have samples associated with them. Bear in mind that unless you have Sound ROM or Sound Flash installed, the presets may NOT point to the correct samples.
Tip #2: Flash presets can also be used when you’re working on a RAM based preset which uses a lot of sample memory. Normally you would Save the bank, but this can take quite some time with a really large bank.
If you’re only modifying the preset parameters, you can Copy the preset to Flash and save time. Later you can Copy the preset back to RAM then Save the bank normally.
Tip #3: Flash memory is also handy to store your favorite sequences. Copy the sequence to a Flash (z) sequence location.
Audio Out |
|
Sound |
|
|
|
|
Generation |
|
|
|
|||
|
|
|
|
|
||
|
|
|
Control Data |
Preset |
||
|
Sound Data |
|
|
|
||
|
|
|
|
Control |
||
Sample ROM |
Sample RAM |
|
||||
Sample |
Sample Sample |
Sample |
Sample |
Sample |
|
|
Sample |
Sample |
Sample |
Sample Sample Sample |
|
||
Presets I000-IXXX |
Presets 000-999 |
|
||||
Preset FLASH |
Preset RAM |
|
||||
Preset |
Preset |
Preset |
Preset |
Preset |
Preset |
|
Preset |
Preset |
Preset |
Preset |
Preset |
Preset |
|
|
|
|
|
Control Data |
||
Sample ROM and Preset Flash are both retained when power is disconnected. Sample RAM and Preset RAM are not retained with power disconnected and must be re-loaded from the hard disk.
Normally, preset data stored in Flash RAM uses the samples stored in ROM. However, you can also create RAM presets (saved and loaded from disk) which use the permanent ROM samples.
Presets stored in Flash RAM can point to RAM based samples also. This mode of operation can be CONFUSING however, because there is no guarantee that the correct samples will be in RAM when the flash preset is selected.
Copy Presets to and from a floppy or hard disk using special Flash memory utilities which are located under Master, Bank, Flash. See “Flash Utilities” on page 73 for details.
Flash Sound RAM
Flash Sound RAM is yet another upgrade that adds either 8 MB or 16 MB of non-volatile Sample storage. Unlike the Sound ROM option, both samples and presets are stored in Flash RAM.
You can save entire banks to Flash RAM just like ordinary Sound RAM, but unlike ordinary RAM, Flash RAM retains its memory when the power is turned off. Flash RAM lets you create a custom ROM bank that is reliable and always available. If both Sound ROM and Flash Sound RAM options are installed, the 256 available presets are shared between them.
30 E-MU Systems
1 - The Basics
Sample Numbers
|
|
Sound |
Flash Sound RAM |
|
Audio Out |
||||
Generation |
|
|||
|
|
|
||
|
|
|
||
|
|
|
|
|
SAMPLE RAM |
|
FLASH RAM |
|
4-128 MB |
|
8 or 16 MB |
depending |
|
|
|
on installed |
Presets 000 - 999 |
|
I 255 |
|
|
|
||
|
Presets I000 - I 999 |
Flash RAM |
|
|
|
|
|
|
|
|
|
Sample Numbers
The Emulator contains two internal SIMM sockets for use by Sound ROM and Flash Sound RAM. These special sockets are designated X and Y. If you have either Sound ROM or Sound Flash RAM installed, you'll notice that the samples stored in these locations have the prefix X or Y before the sample number. (Press Preset Edit to see the sample assignments) Similarly samples stored in main sample RAM use the designator “S” before the sample number, as in “S003”.
Using Preset Flash Memory
The Preset Flash memory comes pre-loaded with 256 Presets. If you need to reload the factory presets, use the following instructions.
v To Upload the Factory Presets into Flash:
1.Power up the machine and wait for it to finish booting.
2.Press the Master button.
3.Press the Setup function key (F3).
4.Press the Memory function key (F6).
5.Set the Memory Configuration. To load the 8 MB FLASH Presets you’ll need at least 85K of Preset Memory. To load the “Big RAM” Presets you’ll need at least 507K of Preset Memory.
6.Press the Save function key (F6).
7.Press the Master button again to exit the Master module.
8.Insert the floppy disk containing the factory presets into the drive with the label side towards the center of the unit.
9.Press the Load function key (F4). The pop-up Load window appears.
10.Set the Drive to “Floppy” using the cursor buttons and Data Entry Control.
EOS 4.0 Software Manual 31

1 - The Basics
Using Sound Flash Memory
11.Press the Load function key (F6).
12.When the bank has finished loading, press the Master button.
13.Press the Bank function key (F2).
14.Press the Flash function key (F6).
15.Press the RAM F function key (F3). A warning screen appears advising you that you are about to overwrite Flash RAM.
16.Press OK (F6) to write the bank to Flash RAM.
Using Sound Flash Memory
Sound Flash Memory is a similar to a hard disk containing one bank. A bank is assembled in Sample RAM, then Saved to Flash Memory. Individual presets can be saved to Flash Memory using the Copy function in the Preset Manage module.
v To Save a Bank to Flash Memory:
1.Erase the Bank
•Press the Master button.
•Press the Bank function key (F2).
•Press the Erase function key (F1).
2.Load the Bank you want to Save to Flash
•From the main screen, press Load.
•Select the Drive, Folder and Bank you want to Save to Flash, then press Load. The bank will load into RAM.
3.Save the Sounds to Flash.
•Press Save.
•Select Flash Memory as the drive you wish to Save to, then press OK (F6). The Samples will be stored in Flash Sound RAM.
4.Mount the Drive.
•Press Disk.
•Press Utils (F1).
•Press Mount (F1).
5.Erase the Bank…again
•Press Master.
•Press Bank (F2).
•Press Erase (F1).
32 E-MU Systems

1 - The Basics
Using Sound Flash Memory
6. Erase Preset 000
This operation deletes the empty preset in the P000 location of the bank so it won’t get merged into your Flash Bank. Unfortunately, you must have at least one preset in the bank, so before deleting P000 we’ll create a new empty preset at location 999.
•Press Preset Manage.
•Press New…
•Select destination preset P999 Empty Preset.
•Press OK, twice.
•Select P000 Untitled Preset.
•Press Utils (F1).
•Press Erase Preset (F1). Press OK (F6).
7.Merge the Presets. Merging the presets into the bank will point to the correct locations in the Flash Sound Memory bank. The Emulator sees that the samples are in Flash Sound Memory and changes the sample numbers so they point to Flash.
•From the main screen, press the Arrow button, then Load.
•Select the Drive, Folder and Bank you want to Save to Flash, then press Merge.
8.Save the Presets. Now that the sample numbers point to the samples in Flash Sound Memory, write the presets into CPU Flash memory using the Flash utilities.
•Press Master.
•Press Bank (F2).
•Press Flash (F6).
•Press RAM->F (F3). A warning screen appears.
•Press OK (F6). The presets are written into CPU Flash memory.
v To Copy Flash RAM Presets to Disk:
1.Power up the machine and wait for it to finish booting.
2.Press the Master button.
3.Press the Bank function key (F2).
4.Press the Flash function key (F6).
5.Press the F RAM function key (F4). A warning screen appears advising you that you are about to overwrite RAM.
6.Press OK (F6) to write to RAM.
7.Press the Master button to return to the main screen.
8.Insert the floppy disk into the drive if you wish to copy to floppy disk.
9.Press the Save function key (F5). The pop-up Save window appears.
EOS 4.0 Software Manual 33