


4 - Sequencer
Setup
O Use the Previous and Next Page keys to move back and forth through the Setup menus.
Setup
The Setup menu contains mostly pre-sequence setup options such as the metronome, tempo, input quantize, sequence looping, etc. It also contains the MMC transport controls which can be used to control digital recorders and tape machines.
The Setup submodule contains the following functions:
Metronome . Sets the metronome to play internal sounds or external MIDI instruments or both. It also allows you to select a MIDI channel, preset, note number, beat value and two velocities for the metronome tick.
Tempo. Sets the tempo, meter, and clock type. You can also turn MIDI Clock Out on or off.
Input Quantize. Lets you quantize and add swing to tracks as they are recorded. This is very useful when creating percussion tracks.
Record Options. Recording can be set to start when the sequence starts, after a specified number of lead-in beats or on the first note played.
Looping. The sequence can be made to continuously loop or to stop at the end of the song.
Transport. The MMC transport allows you to control an external 48 track recorder from the EOS panel. The internal sequencer can also be controlled from this screen.
v To Access the Sequencer Setup Menu:
1.From the Sequence Manage screen, press the Edit key. The Sequence Edit screen appears.
2.Press the Setup function key (F3). Another row of function keys appears with the Sequencer Setup options.
160 E-MU Systems
4 - Sequencer
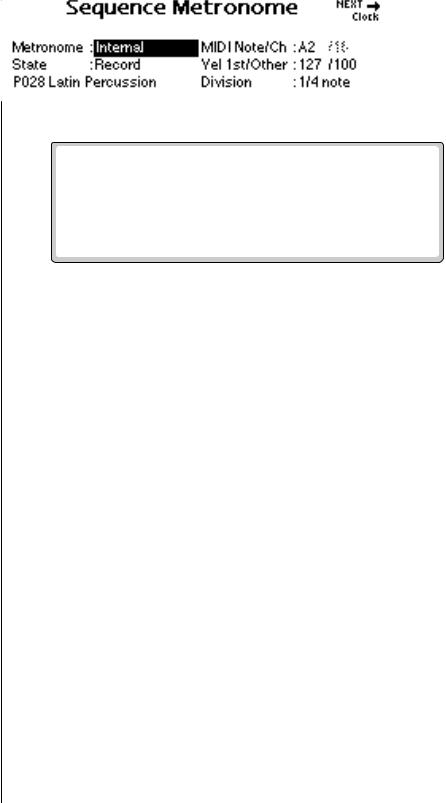
Metronome
Metronome
The metronome provides an accurate beat for recording and is especially important when Quantizing since notes are quantized according to the metronome's clock.
This screen lets you choose the MIDI channel, preset, note number and accent velocity for the metronome sound.
Metronome . When in Internal mode, an onboard preset is used to produce the metronome sound. In External mode, the metronome generates a MIDI note to play the metronome note on an external synthesizer.
State . The metronome state determines whether the metronome will play when recording, in playback, or in record and play modes (both).
Preset. Selects the internal preset that the metronome uses when set to internal mode. A percussion instrument, such as a woodblock or rimshot, would be a good choice for the metronome sound, although any sound with a sharp attack can be used.
MIDI Note/Channel. Selects the note that will be used for the metronome sound. Select a MIDI channel if you are using an external MIDI instrument for the metronome sound.
Vel 1st/Other. This parameter allows you to set the velocity value for the first beat and subsequent beats in the measure. The first note is normally set to a higher velocity in order to identify the start of each measure. Note: The preset must have velocity programmed for this feature to work correctly.
Division. Division sets the meter for the metronome beats. Choose from Quarter notes, Eighth notes, or Sixteenth notes.
EOS 4.0 Software Manual 161
4 - Sequencer
Sequence Clock
OUse the Previous and v To Set Up the Metronome:
Next Page keys to move back |
1. |
From the main sequencer screen, press the Edit function key. |
|
and forth through the Setup |
|||
2. Press the Setup function key (F3). A second row of function keys |
|||
menus. |
|||
|
appears. |
||
|
|
||
3.Press the Metro… function key (F1). The screen shown above appears.
Note: The Preset screen 4. Set the Metronome to Internal, External or Both.
is not accessible when External |
5. |
Set the State. This sets the metronome to sound during record, |
|||
Metronome is selected. |
|||||
|
playback or both. |
||||
|
|
||||
|
6. |
Select the Preset if you are using the metronome in Internal mode. |
|||
|
7. |
Select the MIDI Note and MIDI Channel. As you change the note it |
|||
|
|
will be transmitted so that you can hear which metronome sound you |
|||
O If the metronome preset |
|
are selecting. |
|||
8. |
Select the Note Velocity for the first note in the measure and for subse- |
||||
has effects on it (and you don’t |
|
quent notes. Usually the first note will be set to a higher velocity to |
|||
want effects): |
|
accent the first note of the measure. |
|||
1. Copy the preset. |
9. |
Set the Note Value in quarter notes, eighth notes or sixteenth note for |
|||
2. Assign it to a Submix out with |
|
the metronome. |
|||
0% effects. |
10. |
Press Exit to lock in the Metronome settings and return to the |
|||
3. Save the Bank. |
|
Sequence Edit screen. |
|||
4. Assign the Metronome to the |
|
|
|
|
|
new Preset. |
|
|
|
|
|
|
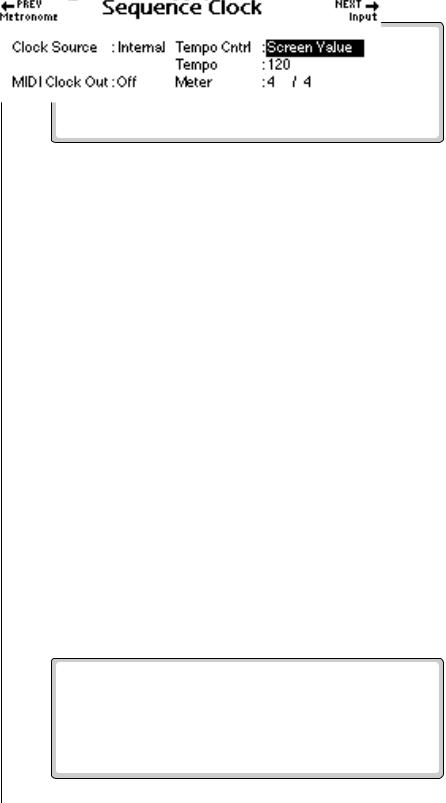
Sequence Clock |
||||
|
This screen sets the tempo and meter of a sequence. The sequencer tempo |
||||
|
can be controlled by an internal or external clock. This screen also turns |
||||
|
MIDI Clock Out on or off. |
||||
|
|
|
|
|
|
|
|
|
|
|
|
162 E-MU Systems

4 - Sequencer
Sequence Clock
The Tempo and Meter screen are not accessible when Tempo Track is selected.
O The Arpeggiator and Sequencer use the SAME CLOCK.
Change the Arpeggiator clock to adjust the tempo of Flash sequences …
…or Copy the Flash sequence to RAM, then adjust the tempo.
Clock Source. Determines if the sequencer clock is controlled by the internal or and external (MIDI) clock.
Tempo Control. Allows the tempo of a sequence to be controlled in one of three ways:
a.By the Tempo Track stored in the sequence. An initial tempo value is stored when you create a new sequence. Sequences imported from an external sequencer may have tempo changes within the song.
b.By the adjustable Screen Value tempo value shown in this display.
c.By an External Clock (MIDI).
Tempo. Sets the tempo (speed) of the sequence and is adjustable from 20 beats per minute (bpm) to 240 bpm.
Meter. Sets the time signature of the song. The Meter setting is used by the metronome function to determine measures and beats.
MIDI Clock Out. Turns MIDI Clock Out on or off. Turn this feature on if you want to control an external MIDI device with the sequencer clock.
v To Set the Clock:
1.From the main sequencer screen, press the Edit function key (F3).
2.Press the Setup function key (F3). A row of function keys appears.
3.Press the Clock function key (F2).
4.Select the Clock Source as internal or external clock.
5.Set the Tempo Control to Tempo Track, Screen Value or External Clock.
6.Set the desired Tempo (if Screen Value is selected)
7.Set the desired Meter (if Screen Value is selected). Any time signature can be programmed.
8.Turn MIDI Clock Out On or Off.
9.Press Exit to lock in the Clock settings and return to the Sequence Edit screen.
EOS 4.0 Software Manual 163