


1 - The Basics
Arpeggiator Sequencing!
v Record Track 1
23.Press the Menu/Transport function key (F6). The Transport control buttons appear on the lower line of the display.
24.Get ready to record! Press the Record function key (F4).
25.Press the Play function key (F3) to begin recording. You should be hearing the metronome.
26.Start playing. If you make a serious mistake in your playing and want to try again, press Abort (F5). Then press Record, then Play to begin again.
27.Press the Stop function key (F2) to end recording. Press RTZ (F1) to rewind to the beginning of the sequence. Press Play (F3) to play back your creation.
•Note that the Track Status field for Track 1 now reads P for playback. The track can also be set to M to Mute the track if you don't want to hear it.
v Record Another Track
28.Set Track 2 to Record. Move the cursor to the record field of track 2 and set the track to R (record).
29.Move the cursor to the channel field of track 2 and set the channel to @2. This will force all information onto MIDI channel 2.
30.Move the cursor back to the preset field on track 2 and select a preset.
31.You’re ready to record track 2. Follow the instructions for recording on track 1 and GO!
Arpeggiator Sequencing!
One of the many things you can do with EOS is combine the Arpeggiator and the Sequencer. This is a great idea stimulator and tons of fun.
v Load a Bank of Sounds (E-Synth - jump to step 5)
1.From the main screen press the Load function key (F4).
2.Select the desired Folder and Bank.
3.Press the Load function key (F6).
4.The display informs you that you are about to overwrite the current bank. Press OK (F6) to load the bank.
v Select Multimode
5.From the main screen press the Mode function key (F6).
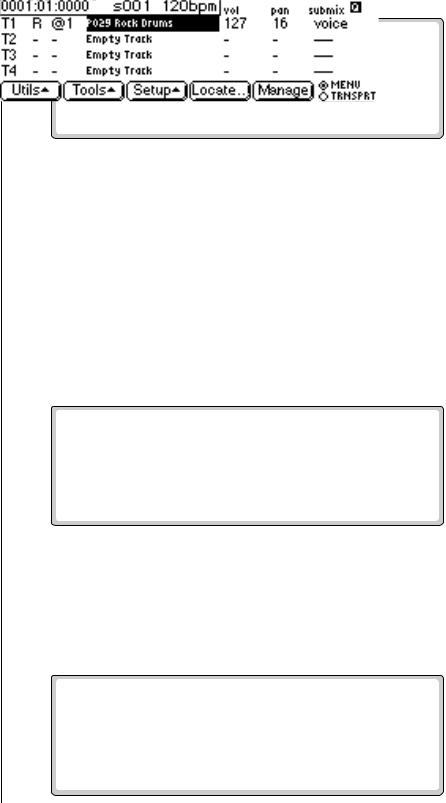
6.Select Multi (F6). The following screen appears.
50 E-MU Systems
1 - The Basics
Arpeggiator Sequencing!
There are two different Multimode screen views. If you get the other screen, press the key (F6), then press View (F3).
v Set Keyboard to Channel 1
7.If you are using an E-Synth keyboard or an E4K, select channel 1 and press SetBCh (Set Basic Channel). If you are using an external MIDI keyboard, set it to transmit on channel 1.
v Select a Preset
8.Move the cursor to the preset field and select a preset. Turn on the Arpeggiator.
9.Press the Mode function key (F6).
10.Select Arp (F5). The Multimode Arpeggiator screen appears.
11.The Arpeggiator will be on. While playing the keyboard select a Preset using the Data Entry Control, INC/DEC buttons or the numeric keypad.
12. Adjust the Arpeggiator controls until you have a nice groove going.
vEnter the Sequencer Submodule
E-Synth Keyboard and 13. Press the Seq function key (F1) from the main preset screen. The
E4K have dedicated Sequencer |
|
Sequence Manage screen appears. |
|
buttons. |
14. |
Press the Edit function key (F5). The Edit screen appears. |
|
|
|||
|
|
|
|
|
|
|
|
EOS 4.0 Software Manual 51

1 - The Basics
Arpeggiator Sequencing!
O Since you've already selected a preset for MIDI channel 1 in Multimode, the preset will automatically come up when you set @1 as the channel number.
v Setup Track 1 for Recording
Almost ready to start recording…
15.Set the Track Mode to Record. Move the cursor to the Track Mode location as shown above. Set this field to R (Record) using the Increment button or Data Entry Control.
16.Move the cursor right to the Channel field. Set the channel to @1 using the Inc/Dec buttons or Data Entry Control. The @1 function records on MIDI channel 1 exclusively.
17.Play the keyboard. You should be hearing the arpeggiator playing the preset you selected.
v Record Track 1
18.Press the Menu/Transport function key (F6). The Transport control keys appear on the lower line of the display.
19.Get ready to record! Press Record (F4), then Play (F3) to begin recording.
20.Start playing.
21.Press Stop (F2) to end recording. Press RTZ (F1) to rewind to the beginning of the sequence. Press Play (F3) to play back your creation.
v Turn the Arpeggiator Off
22.Note that the arpeggiated sequence is being arpeggiated again! Press the Stop function key (F2), then press the Exit button to return to the Multimode screen.
23.Press the Mode function key (F6).
24.Select Arp (F5). The Multimode Arpeggiator screen appears.
25.Press Stop (F2) to stop the arpeggiator.
26.Press OK (F6) or Done (F1) to return to the Multimode screen.
v Back to the Sequencer…
27.Hold the Decimal Point button and press Assignable Key 1. The Sequence Manage screen appears.
28.Press the Menu/Transport function key (F6). The Transport control keys appear on the lower line of the display.
29.Press Play (F3) to play the sequence. Yeah!
v Record More Tracks?
30.Repeat steps 15-21 changing the MIDI channel for each subsequent track.
52 E-MU Systems
1 - The Basics
A Practice Sampling Session
You can also record additional tracks using the arpeggiator. To do this you must match the MIDI channel generated by the keyboard to the MIDI channel of the track you wish to record. Use Set Kybd on E-Synth or E4K. If you are using an external MIDI keyboard, change the MIDI channel output from the keyboard to the same channel you are recording on the track.
A Practice Sampling Session
Sampling lets you play ANY SOUND! In this session, you will sample your own voice. Although there is much more to the art of sampling than just sampling your voice, this lesson will give you a good start.
In preparation for this sampling session, please read over Chapter 5, Sample Management.
v Connections…
1.Connect a microphone to the left sample input jack on the rear panel of your EOS instrument. If you don't have a microphone you can use another signal source such as a CD player. Connect a CD player to both the left and right sample inputs or just the left input if you want to sample in mono.
v Erase the Bank
This step “cleans the slate” for your experiments.
2.Press the Master button to enter the Master module.
3.Press the Bank function key (F2).
4.Press Erase (F1). A popup dialog box appears asking you if you want to erase Preset, Samples and Sequences.
5.Don't worry, be happy! Press OK (F6).
v Sample Setup
6.Press the Sample Manage button.
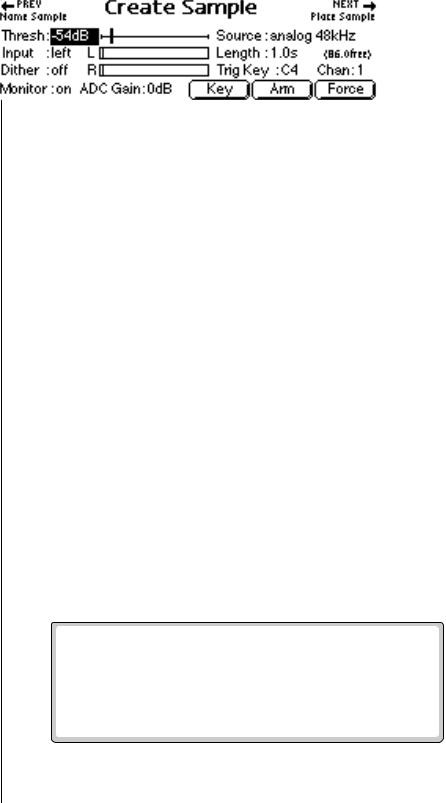
7.Press the New function key (F3). The following screen appears.
8.If you are sampling in mono, select the Left channel only. The Threshold sample trigger only reads the Left channel.
EOS 4.0 Software Manual 53
1 - The Basics
A Practice Sampling Session
Ultra Users: To select the 48kHz (or 24kHz) sampling rate, you must change the “Default Clock” located in the MASTER menu under “In/Out” to 48kHz.
Truncation trims the silence off the beginning and end of the sample.
Normalize boosts the signal to its optimum level.
9. Set the Source to analog 48 kHz or analog 44.1 kHz.
10.Set Length to 2 seconds.
11.Move the cursor to ADC Gain.
12.Sing “Ahhh” into the microphone. (This is an easy sound to loop.) You should see the VU meter moving.
13.Still singing “Ahhh”, adjust the ADC Gain using the Data Entry Control or INC/DEC buttons so that the peak bar of the VU meter comes close to the extreme right side without actually reaching it.
14.Set the Threshold to -54 dB. When the input sound exceeds this level, sampling will start.
v Sampling!
15.Press the Arm function key (F5). This arms the sampling process.
16.Sing Ahhhh! The display says “Sampling”.
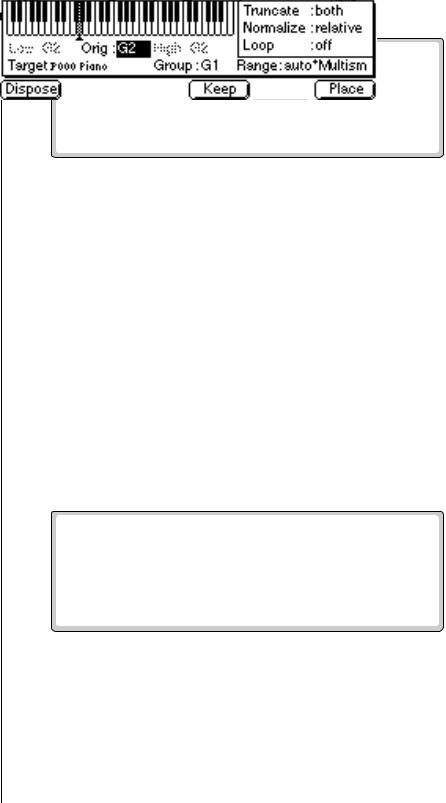
17.When you are out of breath, press Stop (F1), Exit or Enter to stop sampling. In any case, EOS will stop sampling after 2 seconds. The following screen appears.
18.The screen shown above gives you the option to Dispose, Keep or place the sample you just took. It also contains the Automatic Sampling parameters. Set the Automatic Truncate, Normalize and Loop parameters as shown above (both, relative, off).
19.Press the Place function key (F6).
20.Popup dialog boxes will inform you that the sample is being Truncated and Normalized. Play the keyboard. Your voice will play up and down
54 E-MU Systems
1 - The Basics
A Practice Sampling Session
O Tip: If you name the current preset BEFORE taking the sample, EOS will automatically name the sample for you. If you happen to be sampling another synthesizer and have MIDI connected, EOS will even add the original key to the sample name!
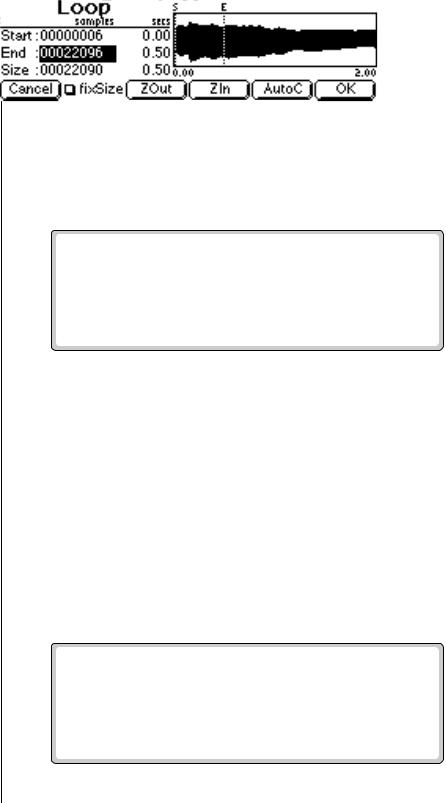
The Attack portion of the sound is the large part of the waveform. The attack contains changing harmonics and is difficult to loop. Move the loop start and end points into a portion of the wave where the level looks steady.
the entire keyboard. You will probably notice that the original key sounds the most natural.
Congratulations! You've just taken your first sample. If you haven't already done so, check out Chapter 5, Sample Management to learn all about the various sampling options.
v Name the Sample
Name everything! It saves valuable time when you're trying to find a certain Sample or Preset you created earlier.
21.Press the Exit button to go to the main Sample Manage screen.
22.Press the Name function key (F2). The following screen appears.
23.Change letters using the Data Entry Control, INC/DEC buttons or numeric keypad. Move the cursor using the left/right cursor buttons. The up cursor adds a space. The down cursor button deletes a space.
24.Press OK (F6) when you're finished naming your sample.
v Looping
Looping has gained a reputation for being something of a black art. In actuality, it's really not that difficult to loop most sounds, especially with all the looping tools provided by EOS. Let's go ahead and loop the sample you just created.
25.Press the Sample Edit button.
26.Press the Tools1 key (F3). Another row of function keys appears.
27.Press Loop (F1). The following screen appears.
EOS 4.0 Software Manual 55

1 - The Basics
A Practice Sampling Session
28.Turn the “fixSize” parameter Off by pressing the F2 key so there is no check mark in the box.
29.Move the cursor down to the third line and adjust the Loop Size so that it is about half a second or less. As you do so, you'll see the dotted line marked “E” move toward the left.
30.Play a key. You'll hear your voice being looped… badly.
31.Move the cursor back up to the Start field. Play a key as you adjust the Loop Start using the Data Entry Control. As you move the start point out of the “attack” portion of the sound, you’ll notice the loop improve. Find a location where the loop sounds best. Don't worry if it's not that great.
32.Press the AutoC function key (F5 Autocorrelate). This advanced control examines the waveform for similarities and adjusts the loop points for you.
33.Play a key. Did the loop improve? If the volume wavers excessively, try reducing the loop start. Autocorrelate again.
34.Continue adjusting the loop size and start times. Autocorrelate the sample after each adjustment until you get a good loop. It takes a little practice, but you'll get it.
35.Press OK when you've found a good loop. The Loop Parameters screen appears. This screen contains three other looping tools. Press OK to continue.
•Read about the other looping tools in Chapter 5, Sample Edit and, by all means, feel free to try them out. The best way to learn about looping is to experiment with a wide variety of signals.
56 E-MU Systems