


1 - The Basics
Banks, Sequences, Presets & Samples
O The Enter button can be used to step forward through the Folder, Bank, Preset and Sample browsers.
Use the Exit button to back out of the pages.
15.Press the Exit button to “back out” of the pages. Press the Exit button once from the sample browser to return to the preset browser. Press Exit again to put you in the folder browser. Press it once more and you're in the disk browser. Press Exit one more time and you're out of the disk module altogether and back in the preset selection screen.
16.Press the function key under Browse.
17.Press the function key under Seqs to examine or load the sequences resident in the selected bank. If no sequences exist, a pop-up window will inform you of this fact.
Guided Tours
These Guided Tours will help get you up and running in no time.
Banks, Sequences, Presets & Samples
The Bank is a set of up to 1000 presets which can be loaded into and saved to disk from internal memory (RAM). When you save to disk, that collection of presets, samples and sequences is a bank. Banks can be constructed as large as the memory in your Emulator will allow (usually 128 MB). A preset is one complete keyboard setup containing voices and samples arranged on the keyboard together with all programmable synthesizer parameters. A sample is the most basic sound element of EOS and consists of the digitized sound together with truncation and looping parameters.
Banks, Presets and Samples can be loaded into RAM, renamed, saved to disk, and deleted using the Utilities menu of the individual modules.
The following sections describe how to Load, Save, Find, Name and Erase Banks, Presets and Samples. Also included in this section is how to change the way the display looks, how to load Standard MIDI Files and using the Assignable Keys.
A bank can be loaded directly from the Disk Browser or from the Main Screen. Presets and samples are loaded from the Preset Browser and Sample Browser respectively. Detailed instructions on how to access each of these browsers is located in the previous section titled “Using the Browser.” For simplicity’s sake, we’ll assume you are starting from the desired browser in the following instructions.
EOS 4.0 Software Manual 41
1 - The Basics
Loading a Bank Automatically
v To Load Banks, Sequences, Samples, and Presets:
1.From the Browser, press the Load function key (F4). One of the load screens will appear. (If the bank is empty and you are loading a bank, the bank will load without delay.)
2.Choose the item you want to load using the Data Entry Control, INC/ DEC buttons, cursor buttons or the numeric keypad.
3.Press OK to load the item or Cancel to cancel the operation.
If you are loading a bank and there is a bank already loaded, the Merge button appears. Merge combines the new bank with the bank previously loaded.
v To Merge Banks:
4.Press the Merge function key to combine the two banks of presets or press OK to overwrite the current bank. The display will warn you if there isn't enough memory to hold both banks.
Note: EIII presets are translated into EOS presets as they are loaded. EOS voices are much larger than EIII voices. By contrast, EOS sample zones within voices are tiny. At import/load time, EOS tries to collapse adjacent EIII voices into EOS voice+sample zones if it can (Envs, LFOs, etc. must be the same), otherwise, it creates voices. Therefore, EIII presets that use lots of differing voices really balloon in EOS. Simpler presets (Instrument-based presets which have the same settings for all samples) may collapse into a single voice.
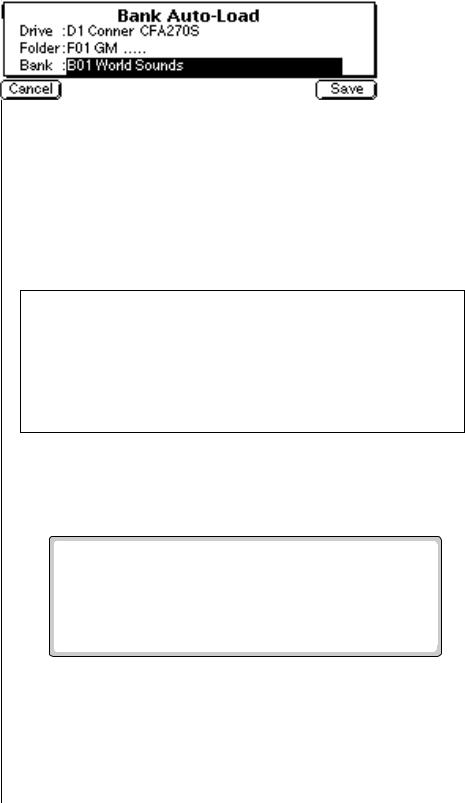
Loading a Bank Automatically
This function automatically loads the selected bank whenever the unit is first powered up.
v To Set the Auto Load Bank:
1.Press the Master button. The LED illuminates and the Memory Statistics screen appears.
2.Press the Bank function key (F2). A second row of function keys appears.
42 E-MU Systems
1 - The Basics
Loading a Sequence from a Different Bank
3.Press the Auto… function key (F3). The pop-up dialog box shown above appears.
4.Select the bank to be automatically loaded on power up. Banks can be selected using the numeric keypad, Data Entry Control, INC/DEC buttons and cursor buttons.
5.Press Save to confirm your choice or Cancel to cancel the operation.
Loading a Sequence from a Different Bank
An individual sequence can be loaded from another bank using the sequence browser. Simply load in the desired sequences, then save the bank to disk. Sequences can be either Emulator sequences or Standard MIDI Files.
v To Load a Sequence from Another Bank:
1.Select the Drive and Bank containing the sequence you wish to load using the cursor buttons, INC/DEC buttons or the Data Entry Control from the Disk Browser.
2.Select the Sequence you wish to load from the Sequence Browser.
3.Press the Load function key (F4). A pop-up window prompts you to select the destination sequence.
4.Choose a location for the sequence using the Data Entry Control, the INC/DEC buttons or the numeric keypad. You may overwrite an existing sequence or choose an empty sequence as the destination. There are 50 possible sequence locations (and 50 Flash locations).
5.Press OK to load the selected sequence or Cancel to cancel the operation.
•If you are loading an imported sequence from the bank browser, press Merge to combine it with the bank of presets in memory.
EOS 4.0 Software Manual 43
1 - The Basics
Loading Standard MIDI Files
Important Information for Loading Standard MIDI Files
*Use PC DOS formatted, highdensity diskettes to load from floppy. Disks can be formatted on either the Mac or PC.
*To be readable by EOS, the file MUST have 0-8 characters, then a period, then “MID”.
Loading Standard MIDI Files
The Emulator can load and play Standard MIDI File sequences (type 0 or 1). Sequence files should conform to PC DOS format using a DOS formatted disk and using the following format for the file name: 12345678.MID (up to eight characters followed by “.MID”). It is important to note that Standard MIDI Files appear as Banks, NOT as sequences in the sequence browser.
v To Load a Standard MIDI File from Floppy Disk:
1.Insert a DOS formatted floppy disk containing the Standard MIDI Files.
2.From the Disk Browser, select the floppy drive.
3.Press Browse.
4.Select Banks. The MIDI sequences appears as banks.
5.Press the Load function key (F4). A pop up dialog box appears warning you that loading will destroy the resident bank.
6.Press the Merge button (F4). The selected sequence will be merged into the current bank, and will be placed in the first empty sequence location.
7.Press OK to load the selected sequence or Cancel to cancel the operation.
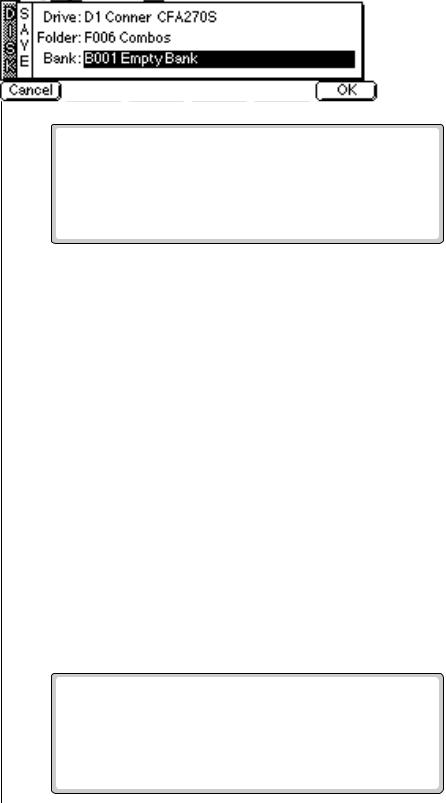
Saving Banks
A bank can be saved to disk from the bank browser.
v To Save a Bank:
1.From the Browser, press the Save function key (F5). The following screen appears:
44 E-MU Systems