- •Contents
- •Introduction
- •Introduction
- •Important Upgrade Information
- •About EOS
- •Graphic User Interface
- •Sequencer and Data Filer
- •Sound Libraries
- •Sound Storage
- •Advanced DSP
- •Built-in Digital Effects
- •More Digital Processing Features
- •Power Up!
- •Loading a Bank from the Hard Disk
- •Loading SoundSprints
- •Selecting Presets
- •Lock Button
- •Saving
- •Arpeggiator
- •Keyboard Modes
- •Whole
- •Layer
- •Split
- •Multi
- •The Basics
- •How Sounds are Organized
- •The Sample
- •Voices
- •The Preset
- •SoundSprint
- •Bookmarks
- •The Bank
- •Folders
- •The Internal Drive
- •To Update the EOS Software:
- •External Drives
- •Sample Memory & Preset Memory
- •Sound ROM & Sound RAM
- •Five Types of Memory
- •Flash Sound RAM
- •Sample Numbers
- •Using Preset Flash Memory
- •Using Sound Flash Memory
- •Modules
- •Saving
- •Default
- •Icons
- •The Cursor
- •Data Entry Control & Increment/Decrement Buttons
- •Selecting
- •Using The Browser
- •Guided Tours
- •Banks, Sequences, Presets & Samples
- •Loading a Bank Automatically
- •Loading a Sequence from a Different Bank
- •Loading Standard MIDI Files
- •Saving Banks
- •Finding Banks, Presets, Samples & Sequences
- •Naming Banks
- •Erasing Banks
- •Assignable Keys
- •Recording a Sequence
- •Arpeggiator Sequencing!
- •A Practice Sampling Session
- •Exploring the Preset
- •Which Voices are Assigned to the Keyboard?
- •Creating a Link
- •Master Menu
- •Overview
- •Memory Statistics
- •Master Utilities
- •Assignable Keys
- •Channel Volume
- •Tones
- •Recalibration
- •Test Access
- •About…
- •Bank
- •Erase Bank
- •Name Bank
- •Auto Bank Load
- •Flash Utilities
- •Using Sound Flash Memory
- •Erase the Bank
- •Load the Bank you Wish to Save to Flash
- •Save the Sounds to Flash
- •Mount the Drive
- •Erase the Bank…again
- •Erase Preset 000
- •Merge the Presets
- •Save the Presets
- •Setup
- •Tune
- •Tuning Offset
- •Transpose
- •Audition Key
- •Input/Output
- •Headroom
- •Output Boost
- •Output Format
- •ADAT Output Dither
- •Default Clock
- •Word Clock In
- •WC Phase In/Out
- •Miscellaneous
- •Contrast
- •Wrap Field Selection
- •Screen Saver
- •Disable Sound ROM
- •Zero Crossing Threshold
- •Background
- •Undo/Redo Enable
- •SCSI/Disk
- •SCSI ID
- •SCSI Termination On/Off
- •Avoid Host on ID
- •Disk Button Goes To:
- •Import Options
- •Master Effects
- •Use Master Effects Settings in MultiMode
- •Master Effects A
- •A EFFECT TYPES
- •Master Effects B
- •B EFFECT TYPES
- •Effects Setup
- •Effects Control
- •Sequence Manage
- •MIDI
- •MIDI Mode
- •Basic Channel
- •MIDI Mode
- •MIDI Device ID
- •Local Control
- •Multimode - MIDI Mix
- •MIDI Controllers
- •About MIDI Controllers
- •MIDI Preferences
- •Velocity Curve
- •Controller #7 Sensitivity
- •Controller #7 Curve
- •Global Pedal Override
- •Receive Program Change On/Off
- •Send Program Change On/Off
- •Magic Load Preset
- •Effects
- •Effects
- •Dual Effects Processor
- •The Effects Sends
- •Effect B Into Effect A
- •Three-way Effects Control
- •Effects Programmed in the Preset
- •Master Effects
- •Using Master Effects Settings in Multimode
- •Using the Effects Channel Settings in Multimode
- •Effects Bypass
- •Effect Descriptions
- •A EFFECT TYPES
- •B EFFECT TYPES
- •Reverb
- •General Descriptions of Reverb
- •Chorus
- •Doubling
- •Slapback
- •Stereo Flanger
- •Delay
- •Stereo Delay
- •Panning Delay
- •Dual Tap
- •Vibrato
- •Distortion
- •Sequencer
- •Sequence Manage
- •Recording MIDI SysEx
- •Important Information for Loading Standard MIDI Files
- •Name Sequence
- •Export
- •Transport Controls
- •Sequencer Utilities
- •Erase
- •Copy Sequence
- •Sequencer Memory
- •Jukebox
- •Sequence Edit
- •The Sequence Edit Screen
- •Track Mode
- •Track Numbers
- •Counter Display
- •Tempo Display
- •MIDI Channel Modes
- •Volume - Pan - Submix
- •The Initial Track State Screen
- •Initial Tempo
- •Editing: Cut, Copy & Paste
- •Cut/Copy/Erase
- •Note Erase
- •Erase
- •Delete
- •Paste
- •Insert
- •Replace
- •Track Delete
- •Track Copy
- •UNDO! (REDO!)
- •Tools
- •Quantize
- •Quantize -1/4 Note
- •Quantize - 8th Notes, Swing 60%
- •Quantize - 8th Notes, Swing 67%
- •Quantize - 8th Notes, Swing 75%
- •Transpose
- •Sequence Velocity
- •Channelize
- •Channel Extract
- •Setup
- •Metronome
- •Sequence Clock
- •Sequence Input
- •Sequence Record
- •Start Record -
- •Count In
- •Sequence Loop
- •Transport
- •Track Status Options:
- •Received MMC Commands
- •Locate
- •Sample Manage
- •Overview
- •Sample Utilities
- •Erase Sample
- •Copy Sample
- •Sample Dump
- •Defragment Memory
- •Name Sample
- •New Sample
- •Threshold
- •Input Channels
- •Sampling Source & Rate
- •Dither
- •ADC Gain
- •Sample Length
- •Arm Sample Trigger
- •Force Sample Trigger
- •Keyboard Sample Trigger
- •Monitor On/Off
- •Automatic Parameters
- •Automatic Digital Signal Processing Operations
- •Auto-Placement Parameters
- •Place Sample
- •Export Sample
- •Get Info
- •Sample Edit
- •Sample Edit
- •Background: The Scrub Wheel
- •Background: Using Cut, Copy, Paste and Undo
- •Undo and Redo
- •Typical Applications
- •Background: About Looping
- •How Looping Works
- •Auto Correlation
- •Creating Attack & Decay Characteristics for the Looped Portion
- •Loop Compression
- •Crossfade Looping
- •Zero Crossing
- •Utilities
- •Cut Section
- •Copy Section
- •Paste Section
- •Truncation
- •Taper
- •Tools 1
- •Loop
- •Loop Type
- •Digital Tuning
- •Sample Rate Convert
- •Sample Calculator
- •Tools 2
- •DC Filter
- •Swap Left & Right
- •Stereo <-> Mono
- •Reverse Section
- •Sample Integrity
- •Tools 3
- •Gain Change
- •Compressor
- •Mode
- •Threshold
- •Compression Ratio
- •Attack Time
- •Release Time
- •Using the Digital Compressor
- •Limiter
- •Musical Compression (e.g. Guitar)
- •Noise Reduction
- •Parametric Equalizer
- •FIR (Phase Linear Filter)
- •Aphex Aural Exciter
- •Tools 4
- •Transform Multiplication
- •Doppler
- •Time Compression
- •Pitch Change
- •Bit Converter
- •Beat Munger
- •Beat Munger Controls
- •Undo
- •Preset Manage
- •Preset Manage
- •Utilities
- •Erase Preset
- •Dump Preset
- •Name Preset
- •New Preset
- •Copy Preset
- •Export Preset
- •Get Info
- •Preset Edit
- •Synthesizer Basics
- •Editing Presets
- •Modulation
- •Modulation Sources
- •Keyboard Key
- •Key Velocity
- •Release Velocity
- •Gate
- •Key Glide
- •Pitch and Mod Wheels
- •Keyboard Pressure (mono aftertouch)
- •Pedal
- •Miscellaneous Controllers A -H
- •Low Frequency Oscillators (2 per voice)
- •Envelope Generators (3 per voice)
- •Noise & Random Generators
- •Thumby Button and Footswitches
- •Modulation Cords
- •Envelope Generators
- •Low Frequency Oscillators (LFOs)
- •Random Sources
- •Clock Modulation
- •Syncing an LFO to the Clock
- •Modulation Destinations
- •Modulation Processors
- •Dynamic Filters
- •Dynamic Filters
- •What is a Filter?
- •Parametric Filters
- •The Z-Plane Filter
- •Selecting Voices, Samples & Groups
- •Selecting from the Preset Editor Windows
- •Selecting All Voices
- •Selecting Voices from the Dynamic Processing Level
- •Selecting Voices from the Voice Select Screen
- •Groups
- •Preset Editor
- •PRESET EDIT - Global
- •Global Editor
- •Edit All
- •Preset Effects A
- •Effects Programmed in the Preset
- •Effect
- •A EFFECT TYPES
- •Decay Time
- •HF Damping
- •FX Amounts
- •FX B Through FX A
- •Preset Effects B
- •Effect B
- •B EFFECT TYPES
- •Feedback Amount
- •LFO Rate
- •Delay Time
- •FX Amounts
- •Preset Edit - Links
- •Main Controls
- •Link Type
- •Link Volume
- •Link Pan
- •Link Transpose
- •Link Fine Tuning
- •Link Utilities
- •New Link
- •Copy Link
- •Delete Link
- •Subsume Link
- •Links - Key Window
- •Key Window Controls
- •Keyboard & Velocity Ranges
- •Links - Velocity Window
- •Velocity Window Controls
- •Velocity Range
- •Links - MIDI Filters
- •MIDI Filter Window Controls
- •Preset Edit - Voices
- •Voices - Main Controls
- •Voice Utilities
- •New Voice
- •Copy Voice
- •Delete Voice
- •Split Voice
- •Solo Voice
- •Sample Zone
- •New Sample Zone
- •Get Multisample
- •Delete Sample Zone
- •Combine
- •Expand...
- •Voices - Key Window
- •Key Window Controls
- •Keyboard Ranges
- •Voices -Velocity Window
- •Velocity Window Controls
- •Velocity Range
- •Voices - Realtime Window
- •Realtime Window Controls
- •Preset Edit - Dynamic Processing Level
- •Utilities
- •Voice Select
- •Function Keys
- •The Isolate Key:
- •Copy Voice(s)
- •Delete Voice(s)
- •Automatic Voice Selection
- •WARNING!
- •Solo Voice
- •Key Transpose
- •Coarse Tuning
- •Fine Tuning
- •Non-transpose Mode
- •Chorus Amount
- •Delay
- •Start Offset
- •Glide Rate & Curve
- •Solo Modes
- •Latch Mode
- •Assign Group
- •Filter Parameters
- •FILTER TYPES
- •2-Pole Lowpass
- •4-Pole Lowpass
- •6-Pole Lowpass
- •2nd Order Highpass
- •4th Order Highpass
- •2nd Order Bandpass
- •4th Order Bandpass
- •Contrary Bandpass
- •Swept EQ, 1-octave
- •Swept EQ, 2->1-octave
- •Swept EQ, 3->1-octave
- •Phaser 1
- •Phaser 2
- •Bat Phaser
- •Flanger Lite
- •Vocal Ah-Ay-Ee
- •Vocal Oo-Ah
- •Dual EQ Morph
- •2EQ + Lowpass Morph
- •2EQ Morph + Expression
- •Peak/Shelf Morph
- •Filter Envelope
- •LFO/Auxiliary Envelope
- •Lag Processors
- •Auxiliary Envelope
- •Cords
- •Sample Retrigger
- •Disk Menu
- •Disk Menu
- •Disk Browser
- •Disk
- •Disk Utilities
- •Mount Drives
- •Copy System
- •Format Disk
- •Low Level Format
- •Backup
- •Load Bank
- •Note:
- •Save Bank
- •View…
- •Info, Lock Drive, & Sleep
- •Lock
- •Sleep
- •Folder Utilities
- •Delete
- •Rename
- •Find…
- •View
- •Info…
- •Bank
- •Bank Utilities
- •Delete
- •Name
- •Find…
- •Load Bank
- •Save Bank
- •View
- •Info…
- •Preset
- •Preset Utilities
- •Soundsprint™
- •Bookmarks
- •Find…
- •Load Preset
- •View
- •Info…
- •Sample
- •Sample Utilities
- •Find...
- •View
- •Load Sample
- •Load .WAV & AIFF Files
- •Audition
- •Info…
- •Sequence
- •Sequence Utility
- •Find…
- •View
- •Load Sequence
- •Info…
- •Important Information for Loading Standard MIDI Files
- •Appendix
- •SCSI
- •Why Use SCSI?
- •The SCSI Bus
- •ID Numbers
- •Types of SCSI Cables
- •Terminating SCSI Cables
- •SCSI Problems
- •Sample Transfers Via SMDI
- •Using Multiple Samplers on the SCSI Bus
- •MIDI
- •MIDI Implementation Chart
- •Notes:
- •Index
6 - Sample Edit
Background: About Looping
Insufficient Hard Disk Drive Memory
The display will inform you if there is not enough memory to back up a sample onto the hard disk drive. You then have two choices: either free up some additional memory by erasing banks on the hard disk drive, or call up the Undo function and disable the backup process. Of course, if backup is disabled, you will not be able to undo an operation.
Typical Applications
Typical cut/copy/paste applications would be to splice the beginning of one sample to the end of another, or to mix two samples together to conserve memory. (Do this by copying an entire sample, then pasting it at the beginning of the second sample using the mix option.) You can splice an attack transient on to a synthesizer waveform loop to produce realistic sounds that take up virtually no memory, or take out a pop or click in a sample. Another possibility is, flanging and chorusing. Paste (mix) a sample to itself, offset from the beginning by a few hundred samples or so, to thicken up the sound.
Background: About Looping
Sampling is the process of storing sounds in digital memory. Since each individual sample (not the complete sample, but each element of the sample) requires one memory slot, memory requirements increase if you sample long sounds or use high sampling rates.
How Looping Works
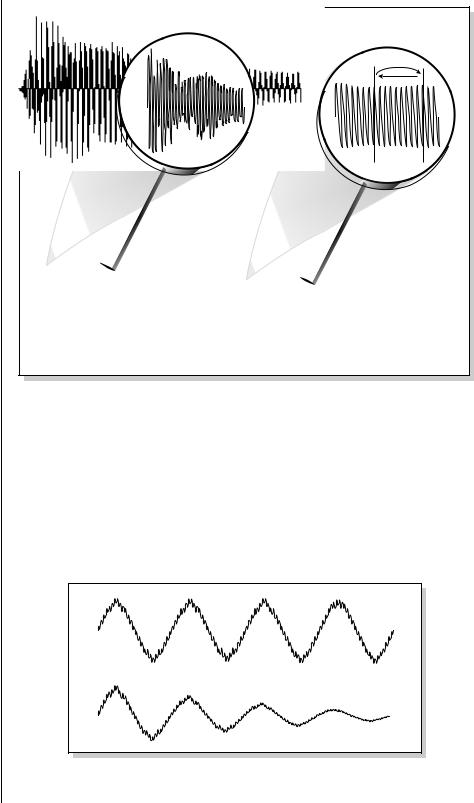
Looping is a technique that can extend a sound’s length without using lots of memory. It is based on the fact that many sounds start off with a complex attack transient, then settle down to a comparatively steady sound. Listen carefully to a plucked guitar string. The first part of the sound consists of a complex mixture of pick noise and several harmonics; after a while, the string decays down to a pretty steady repetitive waveform.
Since the latter part of the waveform is repetitive, there is no need to waste memory sampling several seconds of it. Instead, you can mark off a loop of the repetitive section, and play that looped section for as long as the key is held down. After playing to the end of the loop, the sound jumps back to the beginning of the loop and play through the loop again. This process repeats until you release the key playing back the sample.
Auto Correlation
First of all, just what does auto correlation mean? Auto correlation simply means automatic correlation or comparison. The computer analyzes the signal around the loop points you have specified and then moves the start or end point of the loop until it finds a section of the wave that closely matches the section around the start point. If the Fix Size parameter is On, the Start point of the loop is adjusted. If Fix Size is Off, the End point in the loop is adjusted. Auto correlation may be used again and again with the computer moving the analysis window slightly each time to try to zero in on the optimum loop.
196 E-MU Systems
6 - Sample Edit
Background: About Looping
Loop |
t |
t |
Creating Attack & Decay Characteristics for the Looped Portion
One potential problem is that the loop repeats at the same level. This is usually acceptable for sustaining instruments (flute, organ, brass, etc.), but is unacceptable for plucked or struck sounds, which decay over time. Fortunately, the Dynamic Processing module provides a means to shape the attack, sustain, and decay characteristics of a sample. You can create a decay during the looped portion, and simulate pluck or struck sounds.
Artificial Decay can be applied to a looped sound.
EOS 4.0 Software Manual 197
6 - Sample Edit
Background: About Looping
Crossfade Looping takes sound data from around the loop start point and fades it into the sound data around the loop end point so that the data at those loop points is identical.
In the diagram at right, a sine wave is crossfaded with silence to illustrate the process.
O See Zero Crossing Threshold on page 88 for additional information.
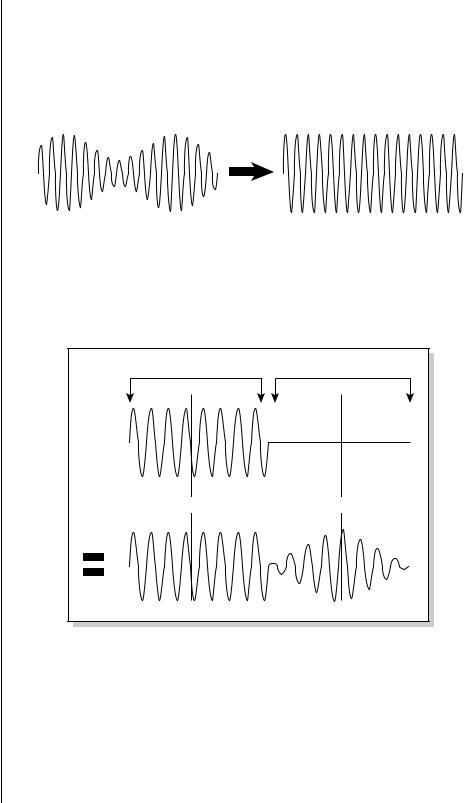
Loop Compression
The looped section of the sample can be compressed, which “evens out” any changes in amplitude. Changes in amplitude can cause “breathing” effects, thumping or clicks.
|
Amplitude Variations in Loop |
After Loop Compression |
|
|
|
||
|
|
|
|
|
|
|
|
Crossfade Looping
The Emulator fades between the beginning and end of the loop so that as the end fades out, the beginning fades in. This virtually eliminates the clicks and pops that can occur with other types of looping.
Source Data |
faded in & out with this data |
Loop Start |
Loop End |
Zero Crossing
The term zero crossing refers to the point at which the positive slope of a waveform passes through zero. In many sample editing applications it is useful to locate zero crossings in order to make glitch-free joins and loops. On some signals, a simple zero crossing may not be effective because the signal contains excessive noise or low-level, high-frequency harmonics. In these cases, every few samples may cross through zero. By setting a zero crossing threshold, we can ignore low-level zero crossings and wait for the signal to reach a certain level before choosing the next zero-crossing.
198 E-MU Systems