

1 - The Basics
Definitions
How Sounds are Organized
It is important to understand how sounds are organized in order to make best use of the instrument in the shortest possible time. Many terms will be introduced now that show up later in the manual.
You can think of the Emulator as a collection of sound organizing modules, all contained within the currently loaded bank. Let’s take a closer look at what makes up this information, and how it is transferred from one section of the instrument to another. The Disk is the largest element in the hierarchy; the Sequence is the smallest element. The following gives a brief description of the EOS hierarchy.
Disk Drive. Floppy Disk, Hard Disks, CD-ROM Drives, Optical Drives, ROM Chips, etc.
Folder. Used to group and organize collections of Banks.
Bank. All samples, voices, and presets - Everything that resides in RAM (memory).
Preset. One complete keyboard setup containing one or more voices.
Voice. One complete sound which contains one or more samples with keyboard and velocity settings and all programmable synthesizer parameters.
Sample. An individual digital recording with a name, sample rate and looping information.
Sequence. A sequence of key depressions, controller movements, program changes or system exclusive MIDI data. Up to 50 sequences can be stored with each bank, but sequences can also be exported as Standard MIDI Files or as Emulator sequences. They can even be saved to Flash RAM.
To explain the hierarchy, we’ll begin with individual elements, then work our way through the system.
EOS 4.0 Software Manual 19
1 - The Basics
The Sample
The total amount of available sampling time can be divided up any way you like— one long sample, lots of short samples, a few medium samples, or any combination thereof.
The Sample
Loading in any sound, in mono or stereo, creates a sample, the raw material with which the Emulator works.
The term sample commonly means two different things:
1.A digital recording of a complete sound, or
2.Each snapshot of the sound that makes up the complete sample.
In this manual, we’ll assume sample means the complete recorded sound unless indicated otherwise.
You can modify a raw sample in several ways. A sample can be transposed up or down in pitch to cover a particular range of the keyboard making it unnecessary to record a sample for every key. Sample editing might consist of Looping a sample (allowing even short samples to play indefinitely), Truncating (cutting off unneeded parts of a sample, thus saving memory), or any of a number of digital processes that actually change the raw sample data.
|
|
|
Low |
Orig |
High |
Low |
Orig |
High |
Low Original |
High |
|
|
|
|
|
|
|
Key |
Key |
Key |
|
|
|
|
|
|
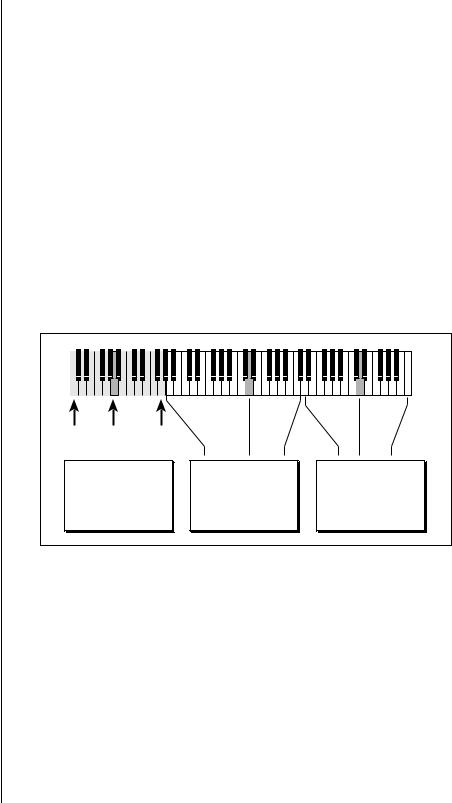
S01 Piano A0 |
S02 Piano D3 |
S03 Piano D5 |
||||||
|
Sample |
|
Sample |
|
Sample |
|
||
You can name samples also. It is usually a good idea to include the original pitch in the name so that you can place it on the keyboard later at the proper pitch. A bank can hold up to 1000 samples.
20 E-MU Systems
1 - The Basics
Voices
O A voice can contain a single sample or multiple samples, whichever you prefer.
Voices
A voice is a complete sound that can be assigned to a range of the keyboard. A sample is the sound-generating portion of a voice. You can think of a voice as a complete instrument consisting of one or more samples, which can then be used as a building block in constructing more complicated presets. A voice consists of one or more samples, a dynamic filter, a dynamic amplifier, up to three 6-stage envelope generators, up to two multi-wave LFOs and up to 24 modulation routings called “Cords” to connect everything together.
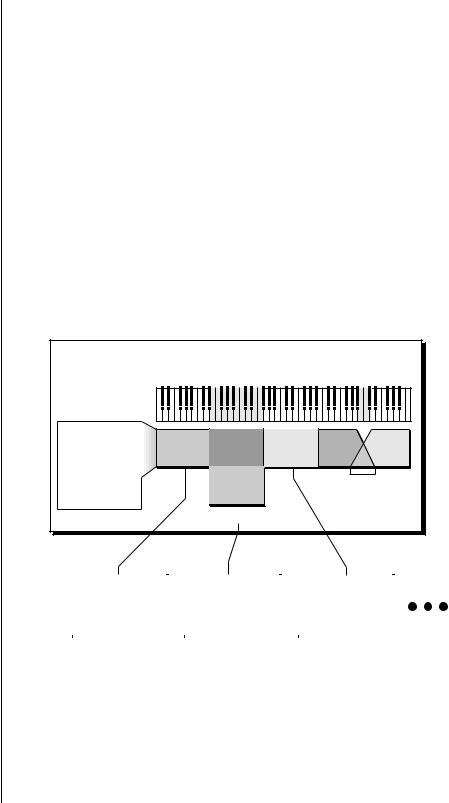
In one typical scenario, you might record several samples of an instrument (such as a piano), then place them into the same voice. Normally these samples would be placed side by side on the keyboard as in the following diagram. You assign the sample to a range by setting the original key, (which is usually the original pitch of the sample) a high key and a low key. The number of samples needed for a realistic emulation varies with the instrument, but in general, “more is better.”
When a sample is taken, it can be automatically placed into a voice with one sample. You can also place the voice (and its sample) on the keyboard.
Each Sample:
Orig. Key
Tune
Volume
Pan
Key Range/Fades
Velo Range/Fades
Voice
S01 |
S10 |
S03 |
S04 |
S05 |
|
S02 |
|
Positional |
|
|
|
Crossfade |
||
|
|
|
||
Velocity Crossfade |
|
|
||
Sample 01 |
|
Sample 02 |
|
Sample 03 |
Loop, Info, |
|
Loop, Info, |
|
Loop, Info, |
Sample Rate |
|
Sample Rate |
|
Sample Rate |
If more than one voice is assigned to the same range, then pressing a key in that range plays all the voices assigned to that range. Voices assigned to the keyboard can be crossfaded by their position on the keyboard, or the key stroke velocity. Voices can also be switched or faded depending on the value of a realtime controller such as a modulation wheel, an LFO or an envelope generator.
EOS 4.0 Software Manual 21

1 - The Basics
The Preset
The Preset
A voice can be assigned to a single note on the keyboard, or transposed polyphonically to cover a wider keyboard range. A preset is one entire keyboard setup consisting of one or more voices. The process of assigning, and optionally transposing, samples to specific ranges of the keyboard is called making a preset. Making a preset is a three-step process:
1.Create the preset and give it a number and name.
2.Place voices in different keyboard ranges. For example, with six voices you could assign each voice to cover one octave of a six octave keyboard. A voice can be assigned more than once within a given preset, and assigned to more than one preset. Each preset can have up to 256 voices.
3.Choose from a number of available options that further define the preset. Some examples are: assigning samples to partially or fully overlap other samples, thus producing doubling effects, or assigning dynamic control to individual voices in a preset. Overlapping voices can be crossfaded using any modulation source. You can modify voice parameters and set up MIDI and dynamic processing parameters.
EOS allows you great flexibility in the way you construct presets. Consider this — you can assign multiple samples to the keyboard inside the voice or assign single sample voices to the keyboard. Unless you specify otherwise, only one sample is assigned per voice. In this case you would assign voices (and the single sample each one contains) to the keyboard and create presets. On the other hand, you may want to create finished voices before you start designing presets and treat the voice as your finished sound. In this case, the preset can be used to crossfade, layer or switch multiple complex voices.
22 E-MU Systems