


5 - Sample Manage
Automatic Parameters
Monitor On/Off
With Monitor turned On, you can monitor the input source through the main outputs before, during and after sampling takes place. As a rule, you want to leave the Monitor on so that you can monitor your sample quality. On occasion there may be instances, such as a feedback loop in the mixing board, where you would want to turn sample monitor Off.
Automatic Parameters
After sampling, the automatic parameters screen appears. You will perform certain sample processing functions on every sample you take. EOS can automatically perform these processes for you when you decide to keep it. After taking the sample you have three choices for what to do next: Dispose, Keep, and Place. This section describes these options and the automatic DSP operations performed on the sample. If clipping occurred during sampling, the display informs you at this time.
Dispose: Discards the sample and returns you to the New Sample menu.
Keep: Keeps the sample and performs the auto-DSP functions, but does not auto-place the sample. Returns you to the New Sample menu.
Place: Keeps the sample, performs the auto-DSP functions and auto-place functions, then returns you to the New Sample menu. When Place is selected, the sample is automatically placed in the target preset, group and range defined. See Auto-Placement Parameters.
Automatic Digital Signal Processing Operations
The automatic DSP parameters are as follows:
Truncate: (Off, Start, End, Both). Automatically truncates the beginning, the end, or both the beginning and end of the sample. The point or points at which the sample is truncated is defined by the Zero Crossing Threshold parameter in the Master, Misc module.
Auto Normalize: (Off, Absolute, Relative) . Automatically increases the amplitude of a sample until the largest peak reaches 100% of full scale. Relative mode increases the amplitude of stereo samples until the largest peak of one side reaches 100%. Both sides maintain their proper amplitude relationship. Absolute mode increases the left and right samples to full level independently. Absolute and Relative have no effect when sampling in mono.
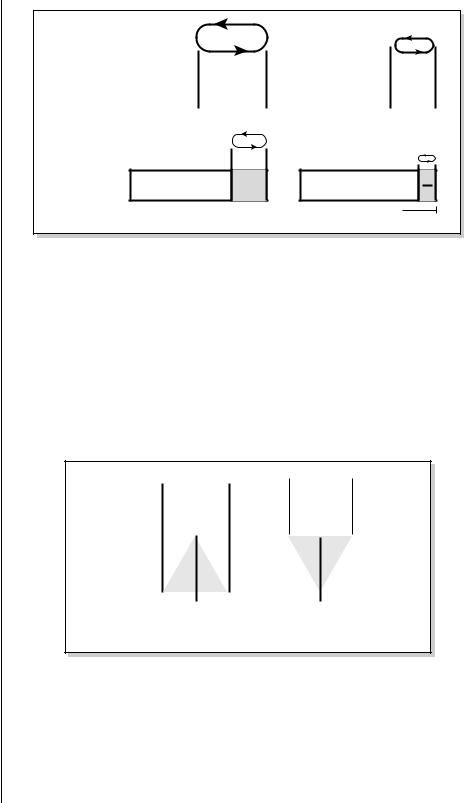
Auto Loop: (Off, Whole, 1/2, 1/2 + xfd, 1/3, 1/3 + xfd, 1/4, 1/4 + xfd, 1/8, 1/8 + xfd).
This function automatically loops and autocorrelates the sample, then crossfade loops it if selected. Matching the loop length to the type of sample is important for getting the best results from auto loop. Ensemble sounds are notoriously hard to loop and are best looped manually.
184 E-MU Systems
5 - Sample Manage
Automatic Parameters
Auto Looping
Lengths
|
Loop |
|
Loop |
|
|
|
|
|
|
1/2 |
1/2 |
|
2/3 |
1/3 |
|
|
|
|
|
 Sample Length
Loop
3/4 1/4
 Sample Length
 Sample Length
|
Loop |
|
7/8 |
1 |
|
8 |
||
|
 Sample Length
Select the auto looping length to match the type of sound. Loop on sections of the sound where the tone and amplitude are fairly static.
Crossfade looping smoothly crossfades between the waves on either side of the loop so that the data at the loop splice points are identical. Since Crossfade looping permanently modifies the sample data, you may want to turn this feature off when it is important to maintain the integrity of the data. Auto-crossfade is a linear crossfade and sets the crossfade size to 1/2 the loop length. Experiment with auto-loop using 1/4 to 1/3 sized loops to start. In most cases, you'll find that auto-loop produces amazingly good results.
|
|
|
Size |
|
|
|
|
|
|
|
|||
Data from |
… into the |
|||||
this area is |
|
data in |
||||
mixed… |
this area. |
|||||
|
|
|
|
|
|
|
|
|
|
|
|
|
|
Loop |
Loop |
Start |
End |
Crossfade Looping uses data from around the loop start point and cross fades this data into the area around the loop end point.
EOS 4.0 Software Manual 185

5 - Sample Manage
Automatic Parameters
_ Be sure to change the target preset when resampling or you may place the sample into the same preset you are sampling from.
O Multisample voices contain multiple samples. The Expand function in the Preset Edit menu creates individual voices for each sample in a Multisample.
Auto-Placement Parameters
The auto-placement parameters define which preset, group, and range of keys to place the sample on the keyboard when the sample is placed automatically.
Target Preset: Selects the preset to which the sample will be auto-placed.
Target Group: Selects a group number for the sample.
Range: Samples will be placed on the keyboard according to the selected placement range, beginning with the original key. The original key can be changed at any time to change the placement of samples.
The choices for range are:
•Auto* Multisample: This function places consecutive samples into a multisample voice at the original key you select from your MIDI keyboard. As you take additional samples, the low and high keys are adjusted in order to fit the new samples onto the keyboard.
You don't ever have to set the low and high keys! Simply define the original pitch and you're finished. Samples are automatically named using the name of the preset appended with the original key name (i.e. Strings C1).
|
Original |
|
|
Key (S01) |
|
Low |
Sample |
High |
Key |
01 |
Key |
|
|
|
Original |
|
Original |
Key (S01) |
|
Key (S02) |
Sample |
|
Sample |
01 |
|
02 |
Auto* Multisample: The first sample is placed over the entire keyboard. When a new sample is taken, the low and high keys are automatically adjusted to accommodate the new sample.
186 E-MU Systems

5 - Sample Manage
Automatic Parameters
•White Key* Voice: A new sample will be placed on the lowest available white key beginning at the original key you select (C1 is the default starting key). Each new sample will create a new voice.
•1 Key* Voice: A new sample will be placed on the lowest available white or black key beginning at the original key you select (C1 is the default starting key). Each new sample will create a new voice.
•2-24 Key* Voice: New samples will be placed over a keyboard range consisting of the number of keys selected. You can select the starting key by manually setting the original key (C1 is the default starting key). Each new sample will create a new voice.
v To Create an Auto-Multisample:
This function works especially well for sampling other synthesizers.
1.Press the Sample Manage key. The LED illuminates and the main screen appears.
2.Press the New function key (F3). The Create Sample display appears.
3.Set up the sampling parameters such as sample length, sample source.
4.Take the sample. The auto-placement screen appears.
5.Press the Original Key on your MIDI keyboard.
6.Set Truncate to Both, Normalize to Relative, Loop to 1/4 + xfade.
7.Set Range to auto* Multisample.
8.Set the Target Preset to an empty location.
9.Press Place. You will be asked to name the preset (if it was empty).
10.Name the preset and press OK. EOS performs the DSP functions, then auto-places the sample.
11.If you wish to take additional samples do so now. Simply define the original key using your MIDI keyboard then press Place after taking each sample.
EOS 4.0 Software Manual 187