

3 - Effects
The Effects Sends
_ If you try to access these screens from Multimode, a warning message will appear. Simply change back into Whole mode from the Mode screen on the main page.
Effects Programmed in the Preset
When playing single presets (Whole = Omni or Poly modes), the effects are normally programmed as part of the preset.
v To Program the Effects as part of the Preset:
1.Press the Preset Edit button. The LED illuminates and the Preset Edit screen appears.
If you are in a screen where the “Global, Links, Voices” function keys are not visible, press the Exit button once.
2.Press the Global function key (F3). The Global menu appears.
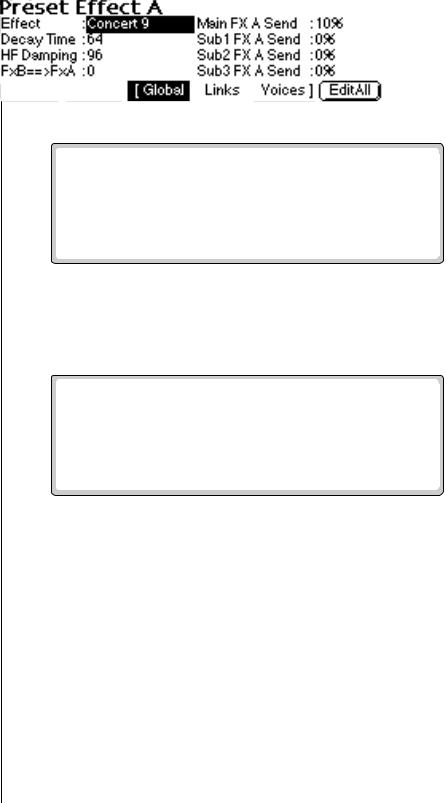
3.Press the Next page button. The Preset Effect A menu appears.
4.Select an Effect. Do not select the “Master Effects” setting as this will cause the Master effect settings to be used instead of the Preset Effect settings. Set the other effect parameters to your preference.
5.Press the Next page button again to go to the Preset Effect B menu.
6.Save the bank. The programmed effects setting will be saved along with the preset.
Master Effects
You might want the effects to be programmed on a global basis in Omni and Poly modes. You could choose your favorite reverb, for example, and have it applied to any preset you select.
v To Program the Effects Globally for all Presets:
1.Press the Preset Edit button. The LED illuminates and the Preset Edit screen appears.
122 E-MU Systems

3 - Effects
The Effects Sends
If you are in a screen where the “Global, Links, Voices” function keys are not visible, press the Exit button once.
2.Press the Global function key (F3). The Global menu appears.
3.Press the Next page button. The Preset Effect A menu appears.
4.Set the Effect to the “Default” setting which will cause the Master Effect settings to be used.
5.Press the Next page button again to go to the Preset Effect B menu. Set the Effect to the Default setting if you wish the Master settings to be used.
6.Change each preset in the bank to the Default setting if you want the Master Effect setting used on all presets.
7.Save the bank.
Using Master Effects Settings in Multimode
In Multimode, the two effects processors can be controlled from the Master Effects settings or they can follow the effects settings of the preset on a special MIDI channel. Because up to 32 presets can play at once in multi mode, the effects cannot be programmed at the preset level. There are only two effects processors!
v To Program the Effects Globally for all Presets:
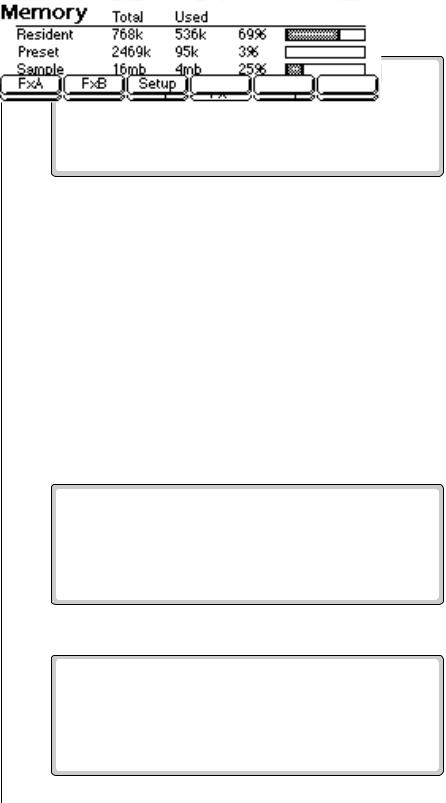
1.Press the Master button. The LED illuminates and the Memory Statistics screen appears.
2. Press the FX function key. A second row of MIDI options appears.
EOS 4.0 Software Manual 123

3 - Effects
The Effects Sends
A warning message appears if an effect routing other than “Master” is currently selected.
The FX menu can be also be accessed by holding the Set/Shift button (decimal point) and pressing Assignable Key 2.
3. Press the Setup function key. The Effects Setup menu appears.
4.Move the cursor to the Multimode Effects Control field using the cursor buttons.
5.Set the Effect Control channel to Master Settings using the Data Entry Control or INC/DEC buttons.
6.Press the Exit button three times to save the settings and return to the main screen.
Using the Effects Channel Settings in Multimode
In Multimode, the effect settings can follow the effects settings of the preset on a special MIDI channel. You designate one MIDI channel as the “Multimode Effects Control Channel.” When this is done, the effects processors follow the effects setting made in the preset assigned to this MIDI channel. This powerful feature lets you to change effects during a sequence.
v To Set the Effects Control Channel:
1.Press the Master button. The LED illuminates and the Memory Statistics screen appears.
124 E-MU Systems
3 - Effects
The Effects Sends
2.Press the FX function key. A second row of MIDI options appears.
3.Press the Setup function key. The Effects Setup menu appears.
4.Move the cursor to the Multimode Effect Control field using the cursor buttons.
5.Set the Effect Control channel using the Data Entry Control or INC/ DEC buttons.
6.Press the Exit button three times to save the settings and return to the main screen.
Effects Bypass
This control provides a true bypass of the effects engine. Bypass is a useful feature if you are using external effects at the mixing console and want to turn the effects off for all presets.
v To Bypass the Effects:
1.Press the Master button. The LED illuminates and the Memory Statistics screen appears.
2. Press the FX function key (F4). A second row of Effects options appears.
EOS 4.0 Software Manual 125