

2 - Master Menu
SCSI/Disk
O The SCSI ID of a device does not necessarily indicate the physical location of the device on the SCSI bus. For example, your Emulator can be the last item of three in the chain and have a SCSI ID of 2.
SCSI/Disk
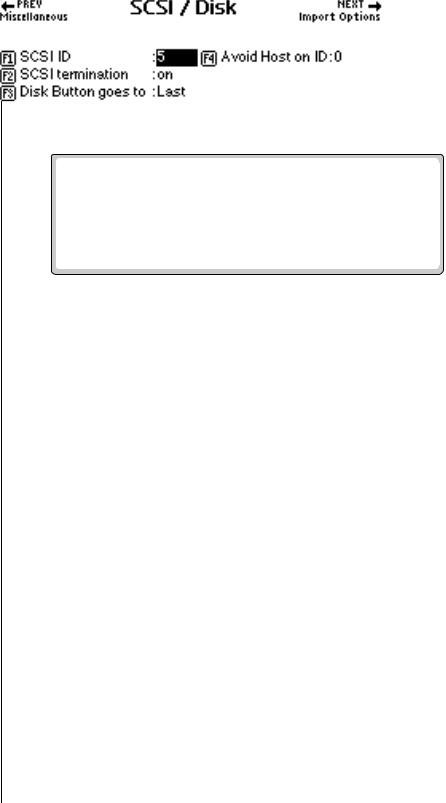
Each Emulator has a SCSI device connector for attaching SCSI devices. You can have up to seven SCSI devices connected, or chained together. This chain is called a “bus.” Each device on the SCSI bus must have its own ID number. The SCSI/DISK submenu operations let you change the SCSI settings, including the SCSI ID of the Emulator, and program the function of the Disk button on the front panel of the unit.
SCSI ID
This utility allows you to change the SCSI ID number of the Emulator in the event that it conflicts with a device on the SCSI bus having the same ID number. For other units in the SCSI chain, refer to the manual that came with the hardware for instructions on how to change the SCSI ID.
v To Change the ID Number:
1.Press the Master button. The LED illuminates and the Memory Statistics screen appears.
2.Press the Setup function key (F3). A second row of function keys appears.
3.Press the SCSI/Disk function key (F4). The SCSI/Disk menu appears.
4.Move the cursor to the SCSI ID number using the cursor buttons or by pressing the F1 function key.
5.Select the ID number using the Data Entry Control, or INC/DEC buttons.
6.Press the Exit button twice to return to the Memory Statistics screen.
90 E-MU Systems

2 - Master Menu
SCSI/Disk
O This function tells EOS to avoid any host on the selected SCSI ID number. All Macs use ID 7. If you're a PC user, make sure this number matches your SCSI card.
SCSI Termination On/Off
Both ends of a SCSI chain (meaning the first and last device on the bus) must be terminated for proper operation. If not properly terminated, the equipment can malfunction. Some equipment will not work at all if the chain is not properly terminated. Proper termination helps reduce line echoes or standing waves on the SCSI bus. This utility turns the SCSI termination on and off internal under software control. SCSI termination should usually be left on since the Emulator is normally connected at one end of the SCSI line.
v To Turn SCSI Termination On or Off:
1.Press the Master button. The LED illuminates and the Memory Statistics screen appears.
2.Press the Setup function key (F3). A second row of function keys appears.
3.Press the SCSI/Disk function key (F4). The SCSI/Disk menu appears.
4.Move the cursor to the SCSI Termination field using the cursor buttons or by pressing the F2 function key.
5.Turn SCSI Termination On or Off using the Data Entry Control, or INC/DEC buttons.
6.Press the Exit button to return to the Memory Statistics screen.
Avoid Host on ID
SCSI was originally designed to have only one Master on the bus. EOS contains special software which lets multiple “Master” devices coexist peacefully on the SCSI bus. If you have a computer connected to the SCSI bus set this ID number so it matches your computer’s SCSI card.
v To Enable a Computer on the SCSI Bus:
1.Find out the SCSI ID of your computer’s SCSI card. The Macintosh is set to ID #7. PCs use various SCSI ID numbers.
2.Press the Master button. The LED illuminates and the Memory Statistics screen appears.
3.Press the Setup function key (F3). A second row of function keys appears.
4.Press the SCSI/Disk function key (F4). The SCSI/Disk menu appears.
5.Move the cursor to “Avoid Host on ID” or press F4.
6.Set the ID number to avoid using the Data Entry Control, or INC/DEC buttons.
7.Press the Exit button to return to the Memory Statistics screen.
EOS 4.0 Software Manual 91

2 - Master Menu
SCSI/Disk
Disk Button Goes To:
This parameter lets you to set the function of the front panel disk button. The disk button can be set to jump directly into SoundSprint mode or it can call up the last Disk Browser screen you accessed.
v To Assign the Disk Button:
1.Press the Master button. The LED illuminates and the Memory Statistics screen appears.
2.Press the Setup function key (F3). A second row of function keys appears.
3.Press the SCSI/Disk function key (F4). The SCSI/Disk menu appears.
4.Move the cursor to the “Disk Button goes to” field using the cursor buttons or by pressing the F5 function key.
5.Select Sprint or Last using the Data Entry Control, or INC/DEC buttons.
6.Press the Exit button to return to the Memory Statistics screen.
92 E-MU Systems