

5 - Sample Manage
Name Sample
Name Sample
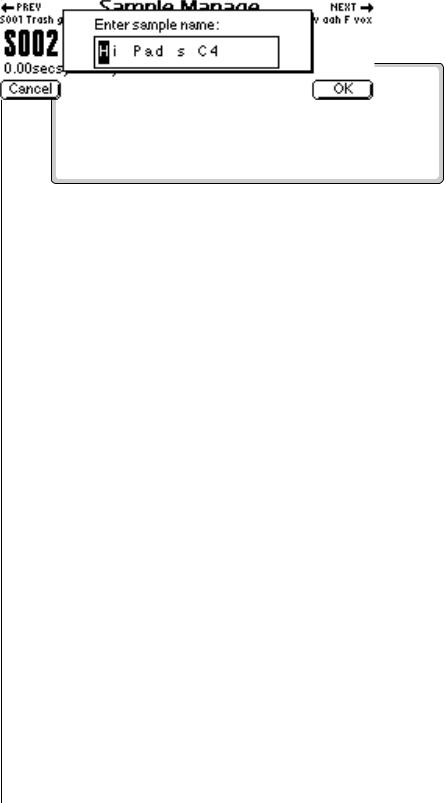
This function allows you to name or rename any sample in the bank.
v To Name a Sample:
1.Press the Sample Manage key. The LED illuminates and the main screen appears.
2.Select the sample to be named using the Data Entry Control, INC/DEC keys, or the numeric keypad.
3.Press the Name function key (F2). A pop up dialog box appears asking you to enter the new sample name.
4.Name the sample. Select letters using the numeric keypad, Data Entry Control, INC/DEC keys and cursor keys, or using an ASCII keyboard.
5.Press OK to confirm the new name or Cancel to cancel the operation.
New Sample
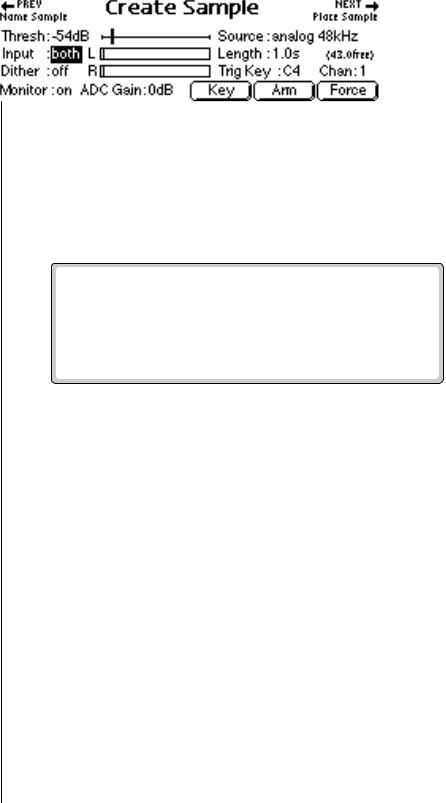
This submodule prepares the Emulator for making a sample. The Emulator triggers sampling using one of three different trigger modes: Keyboard, Arm, and Force. The New Sample submenu contains the sampling trigger controls and automatic DSP and auto-sample placement controls. The following functions are integrated into this important submodule.
•Threshold
•Left and Right Input Meters
•Sample Through Monitor Select
•ADC Gain
•Sampling Source and Source Sample Rate
•Sample Length
•Dither
•Arm Sample
•Force Sample
•Keyboard Sample Trigger
•Automatic DSP
•Automatic Sample Placement
The next few pages describe these parameters and functions in detail.
178 E-MU Systems
5 - Sample Manage
New Sample
Threshold
In the Arm Sampling mode, sampling begins when the input signal exceeds the threshold setting. The Threshold field defines this level. Set the sampling threshold high enough so that it is not triggered by background noise, but low enough that all of the signal is captured. Sampling is actually initiated just before the threshold is exceeded in order to preserve the attack transient of the sound. This is called pre-sampling. Pre-sampling times are preset depending on the sample rate; 12 mS at 44.1 kHz and above, 17 mS at 24 kHz and below (see Sampling Source & Rate for more information).
v To Set the Sample Threshold:
1.Press the Sample Manage key. The LED illuminates and the main screen appears.
2.Press the New function key (F3). The “Create Sample” display appears.
3.If it is not already there, move the cursor to “Threshold” using the cursor keys.
4.While observing the input signal on the VU meters, adjust the Sampling Threshold using the Data Entry Control, or INC/DEC keys.
5.Press the Exit key to return to the Sample Manage screen.
Input Channels
Select Left, Right or Both: The Input field determines which channels are On or Off and controls boththe analog and digital inputs (AES and ADAT). The input levels are displayed in the VU Meter (the VU meter is used to help set the ADC Gain). Use the INC/DEC keys or Data Entry Control to select Left, Right or Both channels. If sampling in mono, use the LEFT channel ONLY since the Threshold trigger only monitors the left channel.
Sampling Source & Rate
The Source field defines the sampling source and the rate at which the information is sampled. It is important to use the lowest rate possible (to conserve memory) that is at least twice as high as the highest frequency component in the sound being sampled. If the sampling rate is too low, you will lose some of the high frequency information.
EOS 4.0 Software Manual 179

5 - Sample Manage
New Sample
If an ADAT Optical card is installed, you will have four additional digital sampling source options:
•ADAT in 1 and 2
•ADAT in 3 and 4
•ADAT in 5 and 6
•ADAT in 7 and 8
_ 20 bit resampling is only available on the Ultra series Emulators.
Analog Sampling: Choose between 22.05 kHz, 24 kHz, 44.1 kHz or 48 kHz when using the analog inputs. The sample rate should be at least twice as high as the highest frequency component in the sound being sampled.
Ultra Series - Only two of the four sample rates will be shown at one time (22.05 kHz & 44.1 kHz) or (24 kHz & 48 kHz). To select a sample rate which is not currently displayed, press Master, Setup, In/Out , then change the Default Clock rate.
Digital Sampling. Choose between 32 kHz, 44.1 kHz or 48 kHz when using the digital input. The display setting should match the sample rate of the incoming digital data, otherwise the Arm and Force Sample function keys cannot be selected. If a digital source is not connected, the AES clock indicator displays “no AES” and sampling is disabled.
A sample overload message is displayed if digital audio containing “Full Code” data (all 1's) is detected. This indicates that the input data has been clipped at some point. Full code data may distort in the Emulator because changing the pitch can cause a slight gain increase. If possible, reduce the level of the incoming digital data if you see an overload message.
Resampling: This function allows you to resample the main outputs as you are playing. Resampling lets you build up extremely dense sounds or record a sequence of notes to be played back with a single key. There are three resampling modes, 16 bit, 18 bit and 20 bit. Use 16 bit mode for monophonic or duophonic passages. The 18 and 20 bit modes give you more headroom when playing many notes at once. If clipping occurs, use a higher bit mode.
v To Set the Sample Source:
1.Press the Sample Manage key. The LED illuminates and the main screen appears.
2.Press the New function key (F3). The “Create Sample” screen appears.
3.Move the cursor to “Source” using the cursor keys.
4.Select the desired sampling source using the Data Entry Control or INC/DEC keys.
5.Press the Exit key to return to the Sample Manage screen.
Dither
Dither is a technique used in digital systems to improve audio performance by adding noise to the least significant data bits. Dither should be used whenever a digital number is converted to a smaller number (for instance when converting 20 bits to 16 bits).
EOS samples at 16 bit linear, so dither should be turned On when digitally sampling from a source that has more than 16 bits, for example when sampling a 24 bit AES signal or when sampling from a 20 bit ADAT machine. Dither can be either On or Off when analog sampling (the audio performance is the same).
180 E-MU Systems
5 - Sample Manage
New Sample
ADC Gain
ADC stands for Analog-to-Digital Converter. The ADC Gain field defines the dynamic range for the sample. Setting too high an ADC gain may cause clipping. Set the analog sample level with the Data Entry Control or INC/ DEC keys so that the left and right side meters indicate optimum sampling level. Play the sound to be sampled and observe the bar graph display. The signal level should be set so that the peak bar comes close to the extreme right side without actually reaching it. The gain is adjustable from -18 dB to +30 dB in 2 dB steps. This control has no effect on the digital input.
v To Set the ADC Gain:
1.Press the Sample Manage key. The LED illuminates and the main screen appears.
2.Press the New function key (F3). The following display appears.
3.Move the cursor to “ADC Gain” using the cursor keys.
4.Plug in a microphone or other sample source to view the left and right VU meters.
5.While monitoring the sound to be sampled on the VU meters, adjust the ADC Gain using the Data Entry Control or INC/DEC keys. Set the level so that the bars never quite reach the top of the meter range.
6.Press the Exit key to return to the Sample Manage screen or Arm or Force to begin sampling.
EOS 4.0 Software Manual 181