- •Contents
- •Introduction
- •Introduction
- •Important Upgrade Information
- •About EOS
- •Graphic User Interface
- •Sequencer and Data Filer
- •Sound Libraries
- •Sound Storage
- •Advanced DSP
- •Built-in Digital Effects
- •More Digital Processing Features
- •Power Up!
- •Loading a Bank from the Hard Disk
- •Loading SoundSprints
- •Selecting Presets
- •Lock Button
- •Saving
- •Arpeggiator
- •Keyboard Modes
- •Whole
- •Layer
- •Split
- •Multi
- •The Basics
- •How Sounds are Organized
- •The Sample
- •Voices
- •The Preset
- •SoundSprint
- •Bookmarks
- •The Bank
- •Folders
- •The Internal Drive
- •To Update the EOS Software:
- •External Drives
- •Sample Memory & Preset Memory
- •Sound ROM & Sound RAM
- •Five Types of Memory
- •Flash Sound RAM
- •Sample Numbers
- •Using Preset Flash Memory
- •Using Sound Flash Memory
- •Modules
- •Saving
- •Default
- •Icons
- •The Cursor
- •Data Entry Control & Increment/Decrement Buttons
- •Selecting
- •Using The Browser
- •Guided Tours
- •Banks, Sequences, Presets & Samples
- •Loading a Bank Automatically
- •Loading a Sequence from a Different Bank
- •Loading Standard MIDI Files
- •Saving Banks
- •Finding Banks, Presets, Samples & Sequences
- •Naming Banks
- •Erasing Banks
- •Assignable Keys
- •Recording a Sequence
- •Arpeggiator Sequencing!
- •A Practice Sampling Session
- •Exploring the Preset
- •Which Voices are Assigned to the Keyboard?
- •Creating a Link
- •Master Menu
- •Overview
- •Memory Statistics
- •Master Utilities
- •Assignable Keys
- •Channel Volume
- •Tones
- •Recalibration
- •Test Access
- •About…
- •Bank
- •Erase Bank
- •Name Bank
- •Auto Bank Load
- •Flash Utilities
- •Using Sound Flash Memory
- •Erase the Bank
- •Load the Bank you Wish to Save to Flash
- •Save the Sounds to Flash
- •Mount the Drive
- •Erase the Bank…again
- •Erase Preset 000
- •Merge the Presets
- •Save the Presets
- •Setup
- •Tune
- •Tuning Offset
- •Transpose
- •Audition Key
- •Input/Output
- •Headroom
- •Output Boost
- •Output Format
- •ADAT Output Dither
- •Default Clock
- •Word Clock In
- •WC Phase In/Out
- •Miscellaneous
- •Contrast
- •Wrap Field Selection
- •Screen Saver
- •Disable Sound ROM
- •Zero Crossing Threshold
- •Background
- •Undo/Redo Enable
- •SCSI/Disk
- •SCSI ID
- •SCSI Termination On/Off
- •Avoid Host on ID
- •Disk Button Goes To:
- •Import Options
- •Master Effects
- •Use Master Effects Settings in MultiMode
- •Master Effects A
- •A EFFECT TYPES
- •Master Effects B
- •B EFFECT TYPES
- •Effects Setup
- •Effects Control
- •Sequence Manage
- •MIDI
- •MIDI Mode
- •Basic Channel
- •MIDI Mode
- •MIDI Device ID
- •Local Control
- •Multimode - MIDI Mix
- •MIDI Controllers
- •About MIDI Controllers
- •MIDI Preferences
- •Velocity Curve
- •Controller #7 Sensitivity
- •Controller #7 Curve
- •Global Pedal Override
- •Receive Program Change On/Off
- •Send Program Change On/Off
- •Magic Load Preset
- •Effects
- •Effects
- •Dual Effects Processor
- •The Effects Sends
- •Effect B Into Effect A
- •Three-way Effects Control
- •Effects Programmed in the Preset
- •Master Effects
- •Using Master Effects Settings in Multimode
- •Using the Effects Channel Settings in Multimode
- •Effects Bypass
- •Effect Descriptions
- •A EFFECT TYPES
- •B EFFECT TYPES
- •Reverb
- •General Descriptions of Reverb
- •Chorus
- •Doubling
- •Slapback
- •Stereo Flanger
- •Delay
- •Stereo Delay
- •Panning Delay
- •Dual Tap
- •Vibrato
- •Distortion
- •Sequencer
- •Sequence Manage
- •Recording MIDI SysEx
- •Important Information for Loading Standard MIDI Files
- •Name Sequence
- •Export
- •Transport Controls
- •Sequencer Utilities
- •Erase
- •Copy Sequence
- •Sequencer Memory
- •Jukebox
- •Sequence Edit
- •The Sequence Edit Screen
- •Track Mode
- •Track Numbers
- •Counter Display
- •Tempo Display
- •MIDI Channel Modes
- •Volume - Pan - Submix
- •The Initial Track State Screen
- •Initial Tempo
- •Editing: Cut, Copy & Paste
- •Cut/Copy/Erase
- •Note Erase
- •Erase
- •Delete
- •Paste
- •Insert
- •Replace
- •Track Delete
- •Track Copy
- •UNDO! (REDO!)
- •Tools
- •Quantize
- •Quantize -1/4 Note
- •Quantize - 8th Notes, Swing 60%
- •Quantize - 8th Notes, Swing 67%
- •Quantize - 8th Notes, Swing 75%
- •Transpose
- •Sequence Velocity
- •Channelize
- •Channel Extract
- •Setup
- •Metronome
- •Sequence Clock
- •Sequence Input
- •Sequence Record
- •Start Record -
- •Count In
- •Sequence Loop
- •Transport
- •Track Status Options:
- •Received MMC Commands
- •Locate
- •Sample Manage
- •Overview
- •Sample Utilities
- •Erase Sample
- •Copy Sample
- •Sample Dump
- •Defragment Memory
- •Name Sample
- •New Sample
- •Threshold
- •Input Channels
- •Sampling Source & Rate
- •Dither
- •ADC Gain
- •Sample Length
- •Arm Sample Trigger
- •Force Sample Trigger
- •Keyboard Sample Trigger
- •Monitor On/Off
- •Automatic Parameters
- •Automatic Digital Signal Processing Operations
- •Auto-Placement Parameters
- •Place Sample
- •Export Sample
- •Get Info
- •Sample Edit
- •Sample Edit
- •Background: The Scrub Wheel
- •Background: Using Cut, Copy, Paste and Undo
- •Undo and Redo
- •Typical Applications
- •Background: About Looping
- •How Looping Works
- •Auto Correlation
- •Creating Attack & Decay Characteristics for the Looped Portion
- •Loop Compression
- •Crossfade Looping
- •Zero Crossing
- •Utilities
- •Cut Section
- •Copy Section
- •Paste Section
- •Truncation
- •Taper
- •Tools 1
- •Loop
- •Loop Type
- •Digital Tuning
- •Sample Rate Convert
- •Sample Calculator
- •Tools 2
- •DC Filter
- •Swap Left & Right
- •Stereo <-> Mono
- •Reverse Section
- •Sample Integrity
- •Tools 3
- •Gain Change
- •Compressor
- •Mode
- •Threshold
- •Compression Ratio
- •Attack Time
- •Release Time
- •Using the Digital Compressor
- •Limiter
- •Musical Compression (e.g. Guitar)
- •Noise Reduction
- •Parametric Equalizer
- •FIR (Phase Linear Filter)
- •Aphex Aural Exciter
- •Tools 4
- •Transform Multiplication
- •Doppler
- •Time Compression
- •Pitch Change
- •Bit Converter
- •Beat Munger
- •Beat Munger Controls
- •Undo
- •Preset Manage
- •Preset Manage
- •Utilities
- •Erase Preset
- •Dump Preset
- •Name Preset
- •New Preset
- •Copy Preset
- •Export Preset
- •Get Info
- •Preset Edit
- •Synthesizer Basics
- •Editing Presets
- •Modulation
- •Modulation Sources
- •Keyboard Key
- •Key Velocity
- •Release Velocity
- •Gate
- •Key Glide
- •Pitch and Mod Wheels
- •Keyboard Pressure (mono aftertouch)
- •Pedal
- •Miscellaneous Controllers A -H
- •Low Frequency Oscillators (2 per voice)
- •Envelope Generators (3 per voice)
- •Noise & Random Generators
- •Thumby Button and Footswitches
- •Modulation Cords
- •Envelope Generators
- •Low Frequency Oscillators (LFOs)
- •Random Sources
- •Clock Modulation
- •Syncing an LFO to the Clock
- •Modulation Destinations
- •Modulation Processors
- •Dynamic Filters
- •Dynamic Filters
- •What is a Filter?
- •Parametric Filters
- •The Z-Plane Filter
- •Selecting Voices, Samples & Groups
- •Selecting from the Preset Editor Windows
- •Selecting All Voices
- •Selecting Voices from the Dynamic Processing Level
- •Selecting Voices from the Voice Select Screen
- •Groups
- •Preset Editor
- •PRESET EDIT - Global
- •Global Editor
- •Edit All
- •Preset Effects A
- •Effects Programmed in the Preset
- •Effect
- •A EFFECT TYPES
- •Decay Time
- •HF Damping
- •FX Amounts
- •FX B Through FX A
- •Preset Effects B
- •Effect B
- •B EFFECT TYPES
- •Feedback Amount
- •LFO Rate
- •Delay Time
- •FX Amounts
- •Preset Edit - Links
- •Main Controls
- •Link Type
- •Link Volume
- •Link Pan
- •Link Transpose
- •Link Fine Tuning
- •Link Utilities
- •New Link
- •Copy Link
- •Delete Link
- •Subsume Link
- •Links - Key Window
- •Key Window Controls
- •Keyboard & Velocity Ranges
- •Links - Velocity Window
- •Velocity Window Controls
- •Velocity Range
- •Links - MIDI Filters
- •MIDI Filter Window Controls
- •Preset Edit - Voices
- •Voices - Main Controls
- •Voice Utilities
- •New Voice
- •Copy Voice
- •Delete Voice
- •Split Voice
- •Solo Voice
- •Sample Zone
- •New Sample Zone
- •Get Multisample
- •Delete Sample Zone
- •Combine
- •Expand...
- •Voices - Key Window
- •Key Window Controls
- •Keyboard Ranges
- •Voices -Velocity Window
- •Velocity Window Controls
- •Velocity Range
- •Voices - Realtime Window
- •Realtime Window Controls
- •Preset Edit - Dynamic Processing Level
- •Utilities
- •Voice Select
- •Function Keys
- •The Isolate Key:
- •Copy Voice(s)
- •Delete Voice(s)
- •Automatic Voice Selection
- •WARNING!
- •Solo Voice
- •Key Transpose
- •Coarse Tuning
- •Fine Tuning
- •Non-transpose Mode
- •Chorus Amount
- •Delay
- •Start Offset
- •Glide Rate & Curve
- •Solo Modes
- •Latch Mode
- •Assign Group
- •Filter Parameters
- •FILTER TYPES
- •2-Pole Lowpass
- •4-Pole Lowpass
- •6-Pole Lowpass
- •2nd Order Highpass
- •4th Order Highpass
- •2nd Order Bandpass
- •4th Order Bandpass
- •Contrary Bandpass
- •Swept EQ, 1-octave
- •Swept EQ, 2->1-octave
- •Swept EQ, 3->1-octave
- •Phaser 1
- •Phaser 2
- •Bat Phaser
- •Flanger Lite
- •Vocal Ah-Ay-Ee
- •Vocal Oo-Ah
- •Dual EQ Morph
- •2EQ + Lowpass Morph
- •2EQ Morph + Expression
- •Peak/Shelf Morph
- •Filter Envelope
- •LFO/Auxiliary Envelope
- •Lag Processors
- •Auxiliary Envelope
- •Cords
- •Sample Retrigger
- •Disk Menu
- •Disk Menu
- •Disk Browser
- •Disk
- •Disk Utilities
- •Mount Drives
- •Copy System
- •Format Disk
- •Low Level Format
- •Backup
- •Load Bank
- •Note:
- •Save Bank
- •View…
- •Info, Lock Drive, & Sleep
- •Lock
- •Sleep
- •Folder Utilities
- •Delete
- •Rename
- •Find…
- •View
- •Info…
- •Bank
- •Bank Utilities
- •Delete
- •Name
- •Find…
- •Load Bank
- •Save Bank
- •View
- •Info…
- •Preset
- •Preset Utilities
- •Soundsprint™
- •Bookmarks
- •Find…
- •Load Preset
- •View
- •Info…
- •Sample
- •Sample Utilities
- •Find...
- •View
- •Load Sample
- •Load .WAV & AIFF Files
- •Audition
- •Info…
- •Sequence
- •Sequence Utility
- •Find…
- •View
- •Load Sequence
- •Info…
- •Important Information for Loading Standard MIDI Files
- •Appendix
- •SCSI
- •Why Use SCSI?
- •The SCSI Bus
- •ID Numbers
- •Types of SCSI Cables
- •Terminating SCSI Cables
- •SCSI Problems
- •Sample Transfers Via SMDI
- •Using Multiple Samplers on the SCSI Bus
- •MIDI
- •MIDI Implementation Chart
- •Notes:
- •Index
4 - Sequencer
Sequence Manage
O See Chapter 1: The Basics, for step by step instructions on how to create a sequence.
EOS 3 contains a powerful 48-track onboard sequencer which is always ready and available to capture your musical ideas. The sequencer's easy to use interface lets you lay down tracks almost as fast as you can play them. After recording, you can use its powerful editing capabilities to rearrange and polish your creation in almost any imaginable way. Editing is easy, thanks to intuitive Copy and Paste style editing and an impressive array of tools which allow you to: Quantize, Transpose, Scale Velocity or Rechannelize Tracks. You can also Channelize or Quantize MIDI data while recording.
Program Changes, Pan Position, Initial Volume, Submix, Tempo, Controller Changes and SysEx data can all be stored with the sequence. You can record and save up to 50 sequences along with each EOS bank. If Flash RAM is installed (ROM or Flash RAM upgrade), you can save 50 additional sequences to Flash Memory.
Sequencer note capacity is dependent upon the amount of CPU memory installed and how much you have allocated to sequences. As an example, over 400,000 notes can be stored if you have 4 MB of preset RAM. About 97,000 notes can be stored if you have 1 MB of preset RAM.
Sequences can be copied, renamed, and are easily imported or exported as Standard MIDI Files or E-mu’s EIV format. As a bonus feature, the virtual “Jukebox” lets you link up to 7 sequences and play them back in any order.
————————————— Note ——————————————
When sequencing on a Rack Emulator with dual MIDI ports, you MUST use Port A for your MIDI input. Port B does not get routed to the sequencer.
———————————————————————————————
EOS 4.0 Software Manual 133
4 - Sequencer
Sequence Manage
vTo Enter the Sequence Manage Menu:
•Hold the Decimal Point key and press Assignable Key 1.
•On the E4K or E-Synth keyboard, press the Sequencer key.
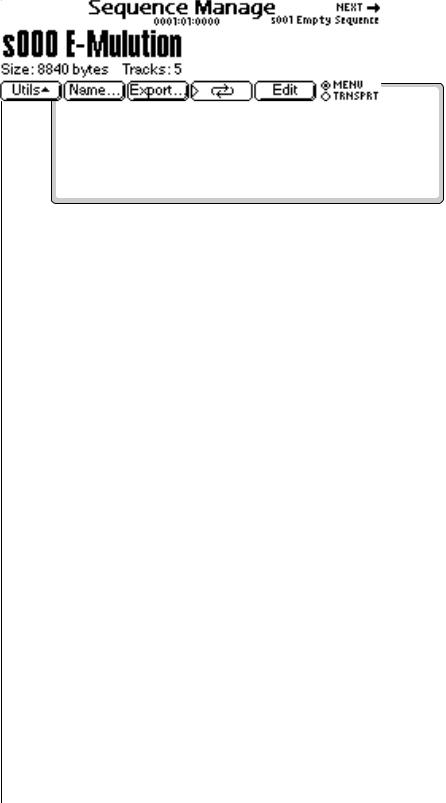
The Sequence Manage menu accesses the following functions. The memory usage and number of tracks contained in the current sequence are displayed.
Sequence Select. Use the Data Entry Control, INC/DEC keys, Page keys or
Left/Right Cursor keys to select sequences.
Utilities. Contains Erase, Copy and Jukebox functions.
Name. Allows you to name a sequence.
Export. This function exports the currently selected sequence as a Standard
MIDI File or in EIV Format.
Loop. The sequence can be set to repeat continuously or to stop when it reaches the end.
Edit. The Edit function key toggles back and forth between the main
Sequencer functions and the Sequence edit screen and functions.
Menu/Transport. Toggles between the Manager function keys and the
Transport Control Keys.
v To Change the Current Sequence:
1.From the Sequence Manage screen, use the Data Entry Control or INC/ DEC keys to select a sequence location.
•An Untitled Sequence is one that has been recorded but not yet named.
•An Empty Sequence is an empty sequence location ready to be recorded.
134 E-MU Systems
O You can also Copy Sequences to Preset Flash memory, designated by the prefix “z”.
4 - Sequencer
Sequence Manage
v To Load a Sequence into the Bank
1.Enter the Disk submodule.
2.Press the Browse function key (F2).
3.Select Drives (F1).
4.Select the desired disk drive using the cursor keys.
5.Press the Browse function key (F2).
6.Select Banks (F3).
7.Select the desired Bank using the cursor keys.
8.Press the Browse function key again (F2).
9.Press the Seqs function key (F6). Any sequences resident in the selected bank are shown.
10.Select a sequence to be loaded using the cursor keys.
11.Press the Load function key (F4).
12.Select the destination location and press OK (F6). The sequence is loaded into the bank.
13.Repeat steps 5-12 to load additional sequences.
v To Save a Sequence:
Sequences are saved along with the bank.
v To Save the Bank and its Sequences
1.Press Save (F5) from the main screen of EOS.
2.Choose a location and press OK (F6). The default location is the current bank. Press OK to overwrite.
EOS 4.0 Software Manual 135
4 - Sequencer
Recording MIDI SysEx
O To edit a Flash sequence, first Copy it into a RAM location (00-49).
O If a Standard MIDI File is too large to fit into memory, try re-recording it from an external sequencer into the Emulator’s MIDI In port. Files generally use MUCH less memory when imported this way.
v To Save a Sequence into Flash Memory:
1.From the Sequence Manage screen, press Utils.
2.Press the Copy function key. The screen shown above appears.
3.Select a sequence location. If you have Flash ROM or Flash RAM installed, 50 flash locations (z050-z099) are provided to store your sequences.
4.Press OK (F6). The sequence is stored in Flash Memory.
Recording MIDI SysEx
The Sequencer can also function as a MIDI data filer to record System Exclusive messages such as control data or programs for another MIDI instrument.
v To Record a SysEx Message:
1.Connect MIDI Out of the external device to MIDI In of the Emulator.
2.Start the Sequencer recording and send the SysEx data.
3.Stop the Sequencer when the transmission is finished.
v To Play Back a SysEx Message:
•Simply play back the sequence with MIDI Out of the Emulator connected to MIDI In on the receiving device.
Standard MIDI files
The Sequencer can load and play Standard MIDI File sequences (type 0 or 1). Sequence files should conform to PC DOS format using a DOS highdensity, formatted disk and using the following format for the file name: 12345678.MID (up to eight characters followed by “.MID”). It is important to note that Standard MIDI Files appear as Banks, NOT as sequences in the Sequence Browser.
v To Load a Standard MIDI File from Floppy Disk:
1.Insert a DOS formatted HD (1.44MB) floppy disk containing the Standard MIDI Files into the floppy disk drive.
2.From the Disk Browser, select the floppy drive.
136 E-MU Systems