

6 - Sample Edit
Truncation
Mode: Mix |
Source Amount = 100% |
After the start point, a section of the destination is replaced with the clipboard contents.
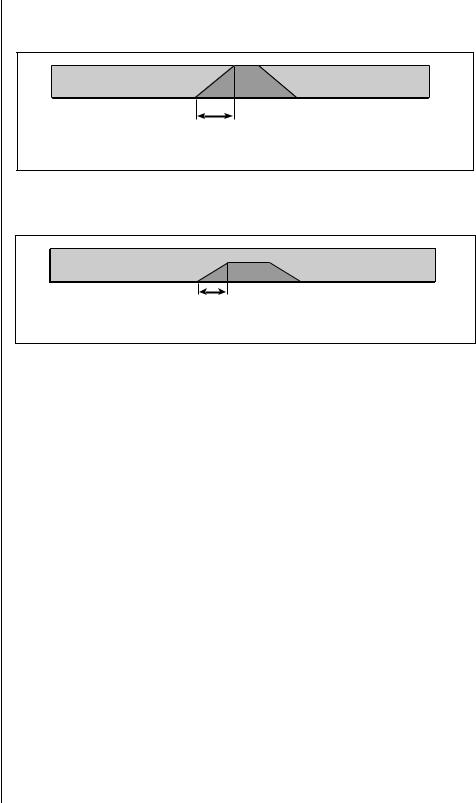
Crossfade Size |
|
Mode: Xfade Mix |
Source Amount = 100% |
The clipboard contents will be gradually mixed into the destination sample and will replace the destination when the fade reaches 100%.
Crossfade Size |
|
Mode: Xfade Mix |
Source Amount = 50% |
The clipboard contents will be gradually mixed into the destination sample and reach a maximum of 50-50 mix.
10.Press OK to paste the section or Cancel to return to the Sample Edit screen.
Truncation
Truncation shortens a sample's length by trimming off individual samples from the beginning and/or end. Truncation is most often used to remove unneeded portions of a sample to conserve memory, but it can also be used to change instrument characteristics such as removing the attack from a plucked string note or isolating a particular section of a sample.
v To Truncate a Sample:
1.Press the Sample Edit key. The LED illuminates and the sample edit screen appears. Select the sample.
If the sample is stereo, a 2. Select the sample that you want to paste the clipboard contents into
pop up dialog box will ask you |
|
using the Data Entry Control, INC/DEC keys, or the numeric keypad. |
to select left, right or both sides. |
3. |
Press the Utils function key (F1). A second row of function keys |
|
||
|
|
appears. |
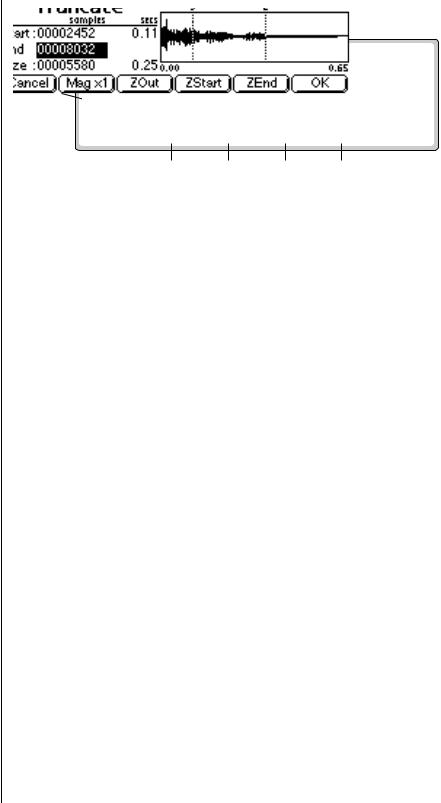
4.Press the Trunc function key. The Truncation Section screen appears. (If the sample is stereo, you will first be asked to select the right side, left side or both.)
204 E-MU Systems
6 - Sample Edit
Taper
O Holding down the Enter key while turning the Data Entry Control allows “fine tuning” of the value by one number per click.
O If you aren’t happy with the resulting truncation or want to compare before and after, press the Undo function key (F6).
O Taper the ends of sounds before splicing to avoid clicks or pops at the splice point.
Insure that a sample starts at 0 and that no click happens at note on by using a very short taper (-96 to 0) on the attack.
Waveform Display
Editing
Fields
Vertical |
Zoom |
Zoom In |
Zoom In |
Scale |
Out |
at Start |
at End |
Magnifier |
|
Point |
Point |
•Editing Fields: Move the cursor to the desired field to truncate the Start and End points of the sample.
•Magnification: Adjusts the vertical scale for 1x, 2x, 4x, or 8x magnification. Pressing the button repeatedly rotates through the 4 options.
•Zoom Start: Magnifies the sample to display finer detail around the Start point.
•Zoom End: Magnifies the sample to display finer detail around the End point.
•Zoom Out:Reverses the effect of Zoom Start and Zoom End.
5.Specify the start and end points for the sample truncation using the Data Entry Control, left/right cursor keys, INC/DEC keys or the numeric keypad.
Taper
Taper lets you create an artificial decay on percussion samples where the original decay is absent, create an artificial fast attack (such as bowed violin with a slow attack), or clean up background noise when editing dialog.
v To Taper a Sample:
1.Press the Sample Edit key. The LED illuminates and the sample edit screen appears. Select the sample.
2.Select the sample that you want to taper using the Data Entry Control, INC/DEC keys, or the numeric keypad.
3.Press the Utils function key (F1). A second row of function keys appears.
4.Press the Taper function key. The Taper Section screen appears. (If the sample is stereo, you will first be asked to select the right side, left side or both.)
EOS 4.0 Software Manual 205
6 - Sample Edit
Taper
The Taper display is identical to the display in Truncate. See Truncate for a full description of the controls.
O The left and right cursor buttons will change the start and end points so that they fall on positive zero-crossing points in the waveform.
5.Specify the Start and End points for the portion of the sample to be tapered using the Data Entry Control, left/right cursor keys, INC/DEC keys or the numeric keypad.
6.Press OK to continue on to the next page of options or Cancel to cancel the operation.
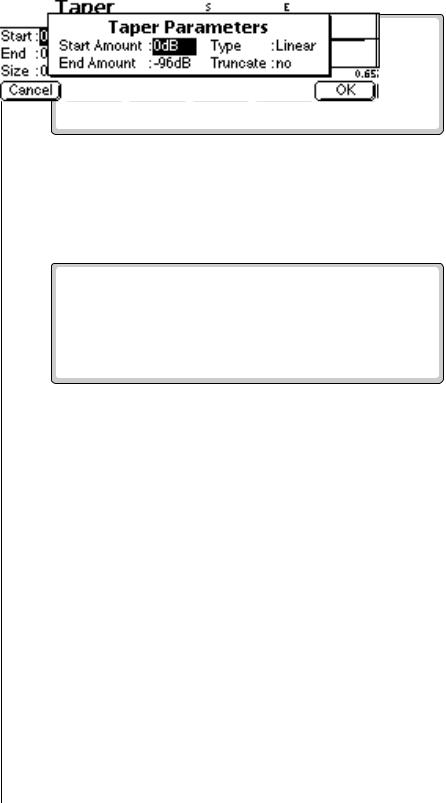
Several more tapering parameters are shown.
•Start Amount:This is the amount of attenuation or gain applied at the start of the selected section. Variable from -96 dB to +96 dB.
•End Amount:This is the amount of attenuation or gain applied at the end of the selected section. Variable from -96 dB to +96 dB.
•Type: Selects the type of curve: Linear, Exponential 1, Exponential 2. Exponential 3.
•Truncate: (After Taper) Discards any information after the taper end point in order to conserve memory.
7.Specify the taper parameters using the Data Entry Control, or the INC/ DEC keys.
8.Press OK to taper the sample or Cancel to cancel the operation.
206 E-MU Systems