

4 - Sequencer
Track Mode
A track can contain multiple channels, whether recorded or imported via MIDI file.
Regardless of channels, a MIDI file cannot have more then 48 tracks or it won’t load.
The counter display may slow when large amounts of data are being recorded because it is being given a low priority by the computer.
This does not affect the accuracy of the recording.
The Sequence Edit Screen
Track Mode
This field allows you to change the track status of the 48 sequencer tracks. Several track status options are available.
P: Play: Plays the track.
M: Mute: Temporarily silences the track without erasing it.
S: Solo: Solo silences all other tracks and plays only those tracks which are in solo mode.
R: Record: Puts the track in record mode.
- : Empty: Indicates that the track is empty.
o: Overdub: Allows you to record additional data onto the track.
r: Re-record: New data entered will replace existing data between the point where the sequence is started and stopped.
Track Numbers
The track numbers are listed on the left side of the Edit display. Only four tracks are shown at once. Press the up/down cursor keys to access other tracks.
Counter Display
The sequence counter shows the current position of the sequence in bars- beats-ticks (there are 480 ticks in a beat). This display helps you locate your current position in the song. See the Clock function (Setup, Clock) for more information about the counter.
Tempo Display
The tempo displays the current tempo of the song. See the Clock function (Setup, Clock) for additional information about the Tempo display.
Track Preset
This field allows you to change the preset assigned to each track. Preset changes made during recording will be displayed in this field.
144 E-MU Systems
4 - Sequencer
MIDI Channel Modes
MIDI Channel Modes
This field allows you to set the MIDI channel which will be recorded on each track.
rcvd: Received: Data on any received MIDI channels will be recorded on the selected track. EOS tracks can contain data on multiple MIDI channels.
@1: At Channel: All MIDI data will be rechannelized to the selected channel. This mode ensures that you will record on only one MIDI channel per track.
1:Single Channel, 1-16: Indicates that data on a single MIDI channel (the one displayed) has been recorded onto the track.
M:Multiple Channel: Indicates that multiple MIDI channels have been recorded on the track.
Volume - Pan - Submix
OOverdub mode is useful These fields display and allow you to change the volume, pan and submix
for making real-time edits to the |
routing for each track. |
|||
Volume, Pan and Submix of the |
|
|
|
|
track. |
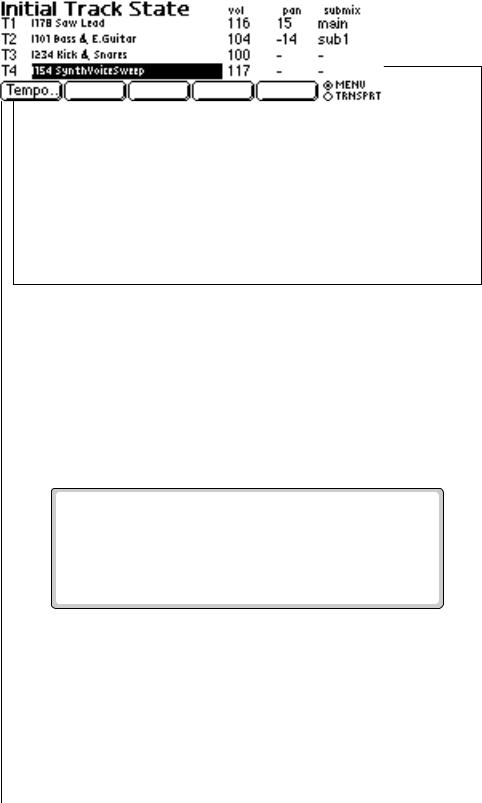
The Initial Track State Screen |
|||
|
||||
|
This screen allows you to set the initial Preset, Volume, Pan Position and |
|||
|
Submix for each of the 48 tracks. Setting the initial parameters ensures that |
|||
O By creating special |
the correct presets are selected when your sequence starts. |
|||
|
|
|
||
sequences containing only Initial |
|
|
|
|
Track State information, you can |
|
|
|
|
store Multimode preset/channel |
|
|
|
|
maps. Simply start and stop the |
|
|
|
|
special sequence to load a new |
|
|
|
|
multimap. |
|
|
|
|
1. Put a track into Record and |
|
|
|
|
move the pitch or mod. wheel. |
|
|
|
|
|
|
|
||
2. Setup the Initial Track State |
|
|
|
|
info for the track. |
v To Access the Initial Track State Screen: |
|||
|
||||
|
1. To modify the Initial Track State, you must have with a recorded |
|||
_ Caution: If you copy the |
sequence. |
|||
2. From the Sequence Edit screen, press the Page Right key. The Initial |
||||
first measure of a sequence that |
Track State screen shown above appears. |
|||
has Initial Track States |
3. Adjust the initial Preset, Volume, Pan Position and Submix as desired |
|||
programmed, the initial |
||||
for each recorded track. |
||||
parameters will also be copied. |
||||
4. To remove Initial Track State information from a track, Cut the first |
||||
|
||||
|
Tick from the track. This is where the Initial Track State info is stored. |
|||
EOS 4.0 Software Manual 145

4 - Sequencer
Initial Tempo
O To remove initial track state information, Delete the first Tick of the sequence.
Initial Tempo
This screen lets you program the Initial Tempo and Meter of a song. The tempo track and meter settings are stored with the song, but they can be overridden by setting the tempo control (located in the Sequencer Clock menu) to Screen Value.
v To Set the Initial Tempo:
1.From the Sequence Edit screen, press the Page Right key. The Initial Track State screen appears.
2.Press the Tempo function key (F1). The following window pops up on the screen.
3.Set the Initial Tempo and Meter.
4.Press Update to lock in the new tempo and meter or Cancel to cancel the operation.
146 E-MU Systems