


146 Part II: Becoming a Functional C++ Programmer
using namespace std;
int main(int nNumberofArgs, char* pszArgs[])
{
//accumulate input numbers until the
//user enters a negative number, then
//return the average
int nSum = 0;
for (int nNums = 0; ;nNums++)
{
//enter another number to add int nValue;
cout << “Enter another number:”; cin >> nValue;
cout << endl;
//if the input number is negative...
if (nValue < 0)
{
//...then output the average cout << “\nAverage is: “
<<nSum/nNums
<<“\n”;
break;
}
//not negative, add the value to
//the accumulator
nSum += nValue;
}
//wait until user is ready before terminating program
//to allow the user to see the program results system(“PAUSE”);
return 0;
}
Now rebuild the program and retest with the 1, 2, 3, and –1 sequence. This time you see the expected average value of 2. After testing the program with a number of other inputs, you convince yourself that the program is now exe cuting properly.
Calling for the Debugger
For small programs, the WRITE technique works reasonably well. Adding output statements is simple enough, and the programs rebuild quickly so the cycle time is short enough. Problems with this approach don’t really become obvious until the programs become large and complex.

Chapter 10: Debugging C++ 147
In large programs, the programmer often generally doesn’t know where to begin adding output statements. The constant cycle of adding write statements, exe cuting the program, adding write statements, and on and on becomes tedious. Further, in order to change an output statement, the programmer must rebuild the entire program. For a large program, this rebuild time can be significant.
(I have worked on programs that took most of the night to rebuild.)
Finally, finding pointer problems with the WRITE approach is almost impossi ble. A pointer written to the display in hex means nothing, and as soon as you attempt to dereference the pointer, the program blows.
A second, more sophisticated technique is based on a separate utility known as a debugger. This approach avoids the disadvantages of the WRITE state ment approach. However, this approach involves learning to use a debugger.
Defining the debugger
A debugger is actually a tool built into Dev-C++, Microsoft Visual Studio.NET, and most other development environments (though they differ, most debug gers work on the same principles).
The programmer controls the debugger through commands by means of the same interface as the editor. You can access these commands in menu items or by using hot keys.
The debugger allows the programmer to control the execution of her pro gram. She can execute one step at a time in the program, she can stop the program at any point, and she can examine the value of variables. To appreci ate the power of the debugger, you need to see it in action.
Finding commonalities among us
Unlike the C++ language, which is standardized across manufacturers, each debugger has its own command set. Fortunately, most debuggers offer the same basic commands. The commands you need are available in both the ubiquitous Microsoft Visual C++.NET and the Dev-C++ environments. In addi tion, in both environments, you can access debugger commands via menu items or function keys. Table 10-1 lists the command hot keys you use in both environments.
148 Part II: Becoming a Functional C++ Programmer
Table 10-1 |
Debugger Commands for Microsoft |
|
|
Visual C++.NET and Dev-C++ |
|
Command |
Visual C++ |
Dev-C++ |
Start executing in debugger |
F5 |
F8 |
|
|
|
Step in |
F11 |
Shift-F7 |
|
|
|
Step over (Next Step) |
F10 |
F7 |
|
|
|
Continue |
F5 |
Ctl-F7 |
|
|
|
View variable |
Menu only |
<Add Watch> |
|
|
|
Set breakpoint* |
Crl+B or click |
Ctl+F5 |
|
|
|
Add watch |
Menu only |
F4 |
|
|
|
Program reset |
Shift+F5 |
Ctl+Alt+F2 |
|
|
|
*Clicking in the trough to the left of the C++ source code listing is an alternate way to set a break point in both environments.
Running a test program
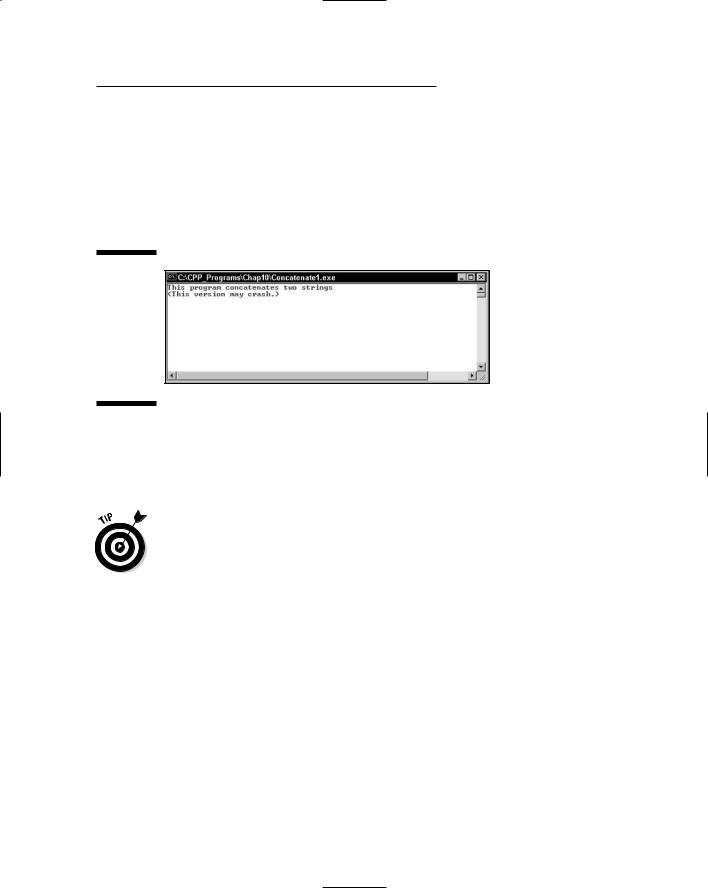
The best way to learn how to fix a program using the debugger is to go through the steps to fix a buggy program. The following program has several problems that need to be discovered and fixed. This version is found on the CD-ROM as Concatenate1.cpp.
// Concatenate - concatenate two strings
// |
with a “ - “ in the middle |
// |
(this version crashes) |
#include <cstdio> #include <cstdlib> #include <iostream> #include <string.h>
using namespace std;
void stringEmUp(char* szTarget, char* szSource1, char* szSource2, int nLength);
int main(int nNumberofArgs, char* pszArgs[])
{
cout << “This program concatenates two strings\n” << “(This version may crash.)” << endl;
char szStrBuffer[256];

Chapter 10: Debugging C++ 149
//create two strings of equal length...
char szString1[16];
strncpy(szString1, “This is a string”, 16); char szString2[16];
strncpy(szString2, “THIS IS A STRING”, 16);
//...now string them together stringEmUp(szStrBuffer,
szString1,
szString2,
16);
//output the result
cout << “<” << szStrBuffer << “>” << endl;
//wait until user is ready before terminating program
//to allow the user to see the program results system(“PAUSE”);
return 0;
}
void stringEmUp(char* szTarget, char* szSource1, char* szSource2, int nLength)
{
strcpy(szTarget, szSource1); strcat(szTarget, “ - “); strcat(szTarget, szSource2);
}
The program compiles uneventfully. Execute the program. Rather than gener ate the proper output, the program may return with almost anything. The first time I tried it, the program opened a console window and then immedi ately went away, without giving me any idea of what might be wrong. You’ll need to dive into the program using the debugger if you’re to have any hope of tracking down the problem.
Single-stepping through a program
The best first step when tracking down a program problem is to execute the program in debugger mode. Sometimes, the debugger can give you more information about the problem. The first time I executed the program under Dev-C++ using the debugger (by pressing F8), I received the error message “An Access Violation (Segmentation Fault) raised in your program.”
This is a little help, but you’ll need more information in order to track down the problem.

150 Part II: Becoming a Functional C++ Programmer
A Segmentation Fault usually indicates an errant pointer of some type.
You’ll have to reset the program back to the beginning before trying again. Click OK to acknowledge the error and then the Program Reset from the Debug menu or the Stop Execution command from the Debug toolbar to make sure that everything within the debugger is reset back to the beginning. It’s always a good idea to reset the debugger before starting again — doing so is necessary if the program is not at the starting point, and resetting the debug ger won’t hurt anything if the program is already at the beginning.
To see exactly where the problem occurs, execute just a part of the program. The debugger lets you do this through what is known as a breakpoint. The debugger stops the program if execution ever passes through a breakpoint. The debugger then gives control back to the programmer.
Now set a breakpoint at the first executable statement by clicking in the trough just to the left of the reference to cout immediately after main() or pressing F5 as shown in Table 10-1. A small red circle with a check appears. The display now appears like the one shown in Figure 10-2.
Now execute the program under the debugger again, either by selecting the Debug item under the Debug menu, by clicking the blue check mark on the debug toolbar, or by pressing F8. Program execution starts like normal but immediately stops on the first line. The line containing the breakpoint turns from red to blue, indicating that execution has halted at that point.
Figure 10-2:
A breakpoint shows up as a small red circle with a check.
Chapter 10: Debugging C++ 151
You can now select Next Step either from the Debug menu, from the debug toolbar, or by pressing F7 to execute one line at a time in the program. The blue marking moves to the next executable statement, skipping over both declarations. (A declaration is not a command and is not executed. A declara tion simply allocates space for a variable.) Executing a single C++ statement is also known as single stepping. You can switch to the Console window to see that the single output statement has executed, as shown in Figure 10-3.
Figure 10-3:
You can click the Console window at any time to see any program output.
Execute the Next Step two more times to move the point of execution to the call to StringEmUp(). So far, so good. When you select Next Step one more time, however, the program crashes ignominiously just as before. You now know that the problem is encountered somewhere within the StringEmUp() function.
When the program crashes within a function, either the function contains a bug, or the arguments passed to the function are incorrect.
The Next Step command treats a function call like a single command. This is known as stepping over the function. However, a function consists of a number of C++ statements of its own. You need to execute each of the statements within the function in order to better see what’s going on. I need a different type of single step command, one that steps into the function. This functional ity is provided by the Step Into debugger command.
Restart the program by selecting the Program Reset menu item from the Debug menu, by clicking on Stop Execution from the debug toolbar, or by pressing Alt+F2. This time, you want to save a little time executing right up to function call before stopping. Click the existing red circle to toggle the exist ing breakpoint off. The dot disappears. Next click in the trough across from the call to the function to set a new breakpoint, as shown in Figure 10-4.

152 Part II: Becoming a Functional C++ Programmer
Figure 10-4:
A breakpoint on the function call allows the programmer to execute up to the call.
You can have as many breakpoints active in a program at one time as you like. There is no (reasonable) limit.
Now start the program over again. This time, execution stops on the function call. Step into the function. The display appears like the one shown in
Figure 10-5.
Figure 10-5:
Stepping into a function moves control to the first executable statement within the function.
Chapter 10: Debugging C++ 153
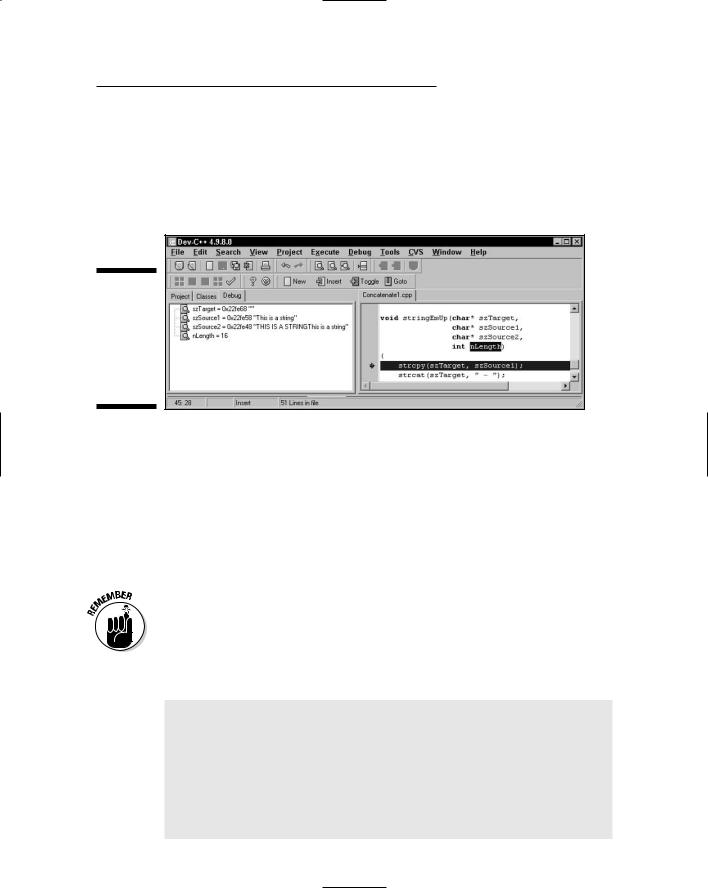
You know that the program is about to crash. You could understand better what’s going on in the program if you could see the value of the arguments to the function. This is the function of Add Watch. A watch displays the value of a variable each time execution is halted. The easiest way to set a watch is to select the variable on the display and press F4. Figure 10-6 shows a watch set on all four arguments to the function.
Figure 10-6:
Setting a watch allows the programmer to monitor the value of a variable.
The numbers next to each name in the watch window are that variable’s address, which aren’t of much use in this case. szTarget appears to be an empty string — this makes sense because you’ve yet to copy anything there. The value of szSource1 looks okay, but the value of szSource2 includes both the “this is a string” and the “THIS IS A STRING” messages. Something seems to be amiss.
The answer actually lies in the final argument. The length of the two strings is not 16 characters but 17! The main program has failed to allocate room for the terminating null. The program terminates as soon as you execute the first statement within stringEmUp(), the call to strcpy().
The length of a string always includes the terminating null.
Now you update the program. This time, let C++ calculate the size of the string because it just naturally includes sufficient space. The resulting pro gram Concatenate2 works properly:
// Concatenate - concatenate two strings
// |
with a “ - “ in the middle |
// |
(this version crashes) |
#include <cstdio> |
|
#include <cstdlib>
#include <iostream> #include <string.h>
using namespace std;
void stringEmUp(char* szTarget,
154 Part II: Becoming a Functional C++ Programmer
char* szSource1, char* szSource2);
int main(int nNumberofArgs, char* pszArgs[])
{
cout << “This program concatenates two strings\n” << “(This version shouldn’t crash.)” << endl;
char szStrBuffer[256];
// define two strings...
char szString1[] = “This is a string”; char szString2[] = “THIS IS A STRING”;
//...now string them together stringEmUp(szStrBuffer,
szString1,
szString2);
//output the result
cout << “<” << szStrBuffer << “>” << endl;
//wait until user is ready before terminating program
//to allow the user to see the program results system(“PAUSE”);
return 0;
}
void stringEmUp(char* szTarget, char* szSource1, char* szSource2)
{
strcpy(szTarget, szSource1); strcat(szTarget, “ - “); strcat(szTarget, szSource2);
}
This version of the program generates the expected result:
This program concatenates two strings (This version shouldn’t crash.)
<This is a string - THIS IS A STRING> Press any key to continue . . .
Congratulations! You’re now a debugging expert.

Part III
Introduction to Classes

In this part . . .
The feature that differentiates C++ from other languages is C++’s support for object-oriented programming.
Object-oriented is about the most hyped term in the com puter world (okay, maybe .com has it beat). Computer languages, editors, and databases all claim to be objectoriented, sometimes with justification, but most of the time without.
Check out the BUDGET2 program on the enclosed CD-ROM to see an example program that can help you orient objects of object-oriented concepts.
What is it about being object-oriented that makes it so desired around the world? Read on to find out.