


12 |
Part I: Introduction to C++ Programming |
Dev-C++ does generate Windows-compatible 32-bit programs, but it does not easily support creating programs that have the classic Windows look. If you want to do that, you’ll have to break open the wallet and go for a commercial package like Visual Studio.NET. Having said that, I strongly recommend that you work through the examples in this book first to learn C++ before you tackle Windows development. They are two separate things and (for the sake of sanity) should remain so in your mind.
Follow the steps in the next section to install Dev-C++ and build your first C++ program. This program’s task is to convert a temperature value entered by the user from degrees Celsius to degrees Fahrenheit.
The programs in this book are compatible with Visual C++.NET and the C++ section of Visual Studio.NET (which are essentially the same thing). Use the documentation in the Visual C++ .NET for instructions on installing C++. True, the error messages generated by Visual C++.NET are different (and often just as difficult to decipher), but the territory will seem mysteriously familiar. Even though you’re using a different songbook, you shouldn’t have much trouble following the tune.
Installing Dev-C++
The CD-ROM that accompanies this book includes the most recent version of the Dev-C++ environment at the time of this writing.
The Dev-C++ environment comes in an easy-to-install, compressed executable file. This executable file is contained in the DevCPP directory on the accom panying CD-ROM. Here’s the rundown on installing the environment:
1.Navigate to and double-click the file devcpp4980.exe, or (in Windows) click Start Run.
•Double-clicking the file installs the environment automatically. (Note that 4.9.8.0, the version number, will be different on any newer ver sion of Dev-C++ you downloaded off the Web.)
•If you clicked Start Run, type x:\devcpp\devcpp4980 in the Run window that appears, where x is the letter designation for your CD-ROM drive (normally D but perhaps E — if one doesn’t work, try the other).
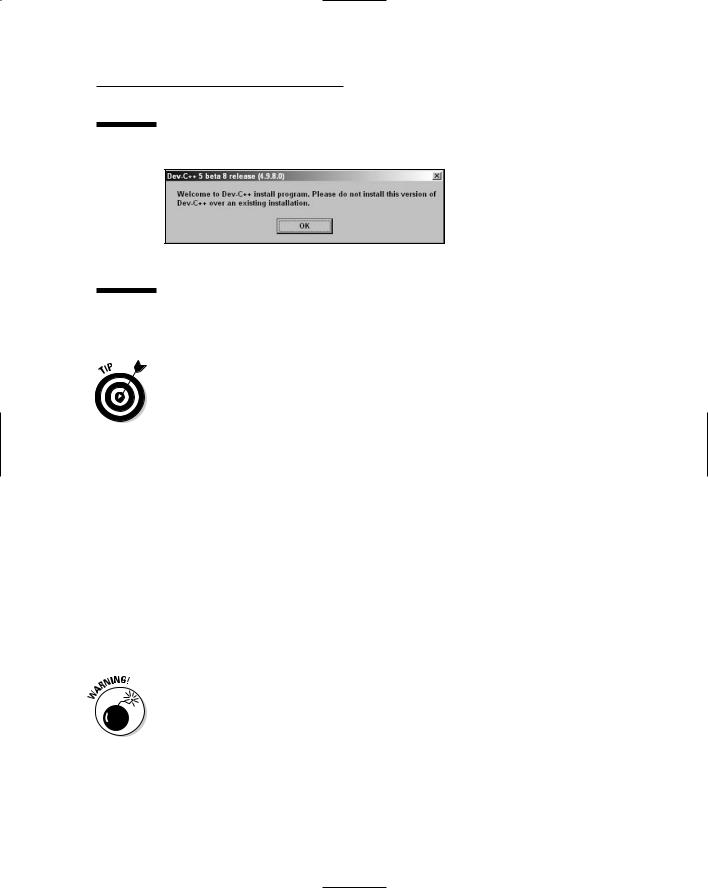
Dev-C++ begins with a warning (shown in Figure 1-1) that you’d better uninstall any older version of Dev-C++ you may have hanging around, and then reboot and start over. (Starting an installation with a threat is an inauspicious way to begin a relationship, but everything gets better from here.)
Chapter 1: Writing Your First C++ Program |
13 |
Figure 1-1:
You must uninstall earlier versions of Dev-C++ before you begin the installation process.
2. If you don’t have to uninstall an old version of Dev-C++, skip to Step 4; if you do have to uninstall, abort the current installation process by closing the Run window.
Don’t get upset if you’ve never even heard of Dev-C++ and you still get the warning message. It’s just a reminder.
3.Okay, if you’re on this step, you’re uninstalling: Open the Dev-CPP folder and double-click the Uninstall.exe file there.
The uninstall program does its thing, preparing the way for the new instal lation; the End User Legal Agreement (commonly known as the EULA) appears.
4.Read the EULA and then click OK if you can live with its provisions.
Nope, the package really won’t install itself if you don’t accept. Assuming you do click OK, Dev-C++ opens the window shown in Figure 1-2 and offers you some installation options. The defaults are innocuous, with two exceptions:
•You must leave the Mingw compiler system. . . option enabled.
•The Associate C and C++ Files to Dev-C++ option means that doubleclicking a .CPP file automatically opens Dev-C++ rather than some other program (such as Visual C++ .NET, for example). It is possible, but difficult, to undo this association.
Don’t check this option if you also have Visual Studio.NET installed. Dev- C++ and Visual Studio.NET coexist peacefully on the same machine, but what Visual Studio has done, let no man cast assunder. You can still open your .CPP files with Dev-C++ by right-clicking on the file and selecting Open With. Personally, I prefer to use this option, even with Visual Studio.NET installed. It doesn’t cause any problems, and Dev-C++ starts a lot faster than Visual Studio.
14 |
Part I: Introduction to C++ Programming |
Figure 1-2:
The default installation options should be acceptable to most users.
Figure 1-3:
The default location for the Dev-C++ environment is provided.
5.Click the Next button.
The installation program asks where you want it to install Dev-C++, using a message like that shown in Figure 1-3.
6.Accept the default directory, c:\Dev-CPP.
Don’t install Dev-C++ in the directory \Program Files with all the other executables. That’s because Dev-C++ doesn’t do well with directories that contain spaces in their names. I haven’t experimented much along these lines, but I believe you can use any other directory name without any special characters other than ‘_’. It’s safer just to accept the default.
7.Make sure you have enough room for the program, wherever you decide to put it.
The Dev-C++ environment uses only a paltry 45MB, but it’s always good practice to check.
8.Click Install.
At first, nothing seems to happen. Then Dev-C++ gets going, copying a whole passel of files to the Dev-CPP directory — putting absolutely noth ing in the Windows home directory. Figure 1-4 displays the eventual result.

Chapter 1: Writing Your First C++ Program |
15 |
Figure 1-4:
The Dev- C++ installation process unzips a large number of mostly small files.
While the installation is going on, Dev-C++ presents a window that asks whether you want to install for all users once it’s done copying files onto your hard drive. That question boils down to this: If someone else logs on to your computer, do you want her or him to be able to execute Dev- C++? (The answer is “Yes” in my case.)
9.Choose whether you want to install for all users, and then click the Close button to complete installation of the package.
Dev-C++ starts immediately, so you can set its options properly for your needs. (Yep, there’s more work to do. But you knew that. Read on.)
Setting the options
As you probably know if you’ve spent more than a coffee break’s worth of time installing software, setting options is a procedure unto itself. In this case, Dev- C++ has two options that must be set before you can use it. Set ’em as follows:
1.Choose Tools Compiler Options.
You can change these settings at any time, but now is as good as any.
2.Choose the Settings tab.
3.Choose Code Generation from the menu on the left.
Make sure that the Enable Exception Handling is enabled, as shown in Figure 1-5. (If it isn’t, click on the option box to display the two choices and select Yes.)
4.Choose Linker and make sure the Generate Debugging Information option is enabled.
Figure 1-6 shows you what to look for.