


Chapter 5
This chapter describes the fundamental principles and techniques involved in tooth extraction. A tooth or root may be removed with either the closed or the open technique. The closed technique is also known as the simple technique or forceps technique, while the open technique is also known as a surgical extraction or flap technique (see Chap. 6).
The simple technique is that which is used most often in everyday practice. In contrast, the surgical technique is employed only in cases where the tooth or root extraction is not possible with the simple technique.
The basic requirements for a successful outcome in simple tooth extraction are as follows:
ΟInforming and reassuring the patient, so that stress and fear levels are minimized, and so to ensure desirable cooperation during the procedure.
ΟKnowing tooth anatomy well, which can be variable.
ΟDetailed clinical and radiographic examinations, since these provide important information pertaining to procedure planning and selecting the appropriate technique.
Simple Tooth Extraction |
5 |
|
F.D. Fragiskos
ΟPreparation of the patient, which includes: (1) rinsing the oral cavity with various antiseptic solutions, and (2) correct positioning of the dental chair.
5.1
Patient Position
To ensure adequate visualization and comfort during the various manipulations required for the tooth extraction, the dental chair must always be positioned correctly. For the extraction of a maxillary tooth, the patient’s mouth must be at the same height as the dentist’s shoulder and the angle between the dental chair and the horizontal (floor) must be approximately 120° (Fig. 5.1a). Also, the occlusal surface of the maxillary teeth must be at a 45° angle compared to horizontal when the mouth is open. During mandibular extractions, the chair is positioned lower, so that the angle between the chair and the horizontal is about 110º
(Fig. 5.1b). Furthermore, the occlusal surface of the mandibular teeth must be parallel to the horizontal when the patient’s mouth is open. The position of
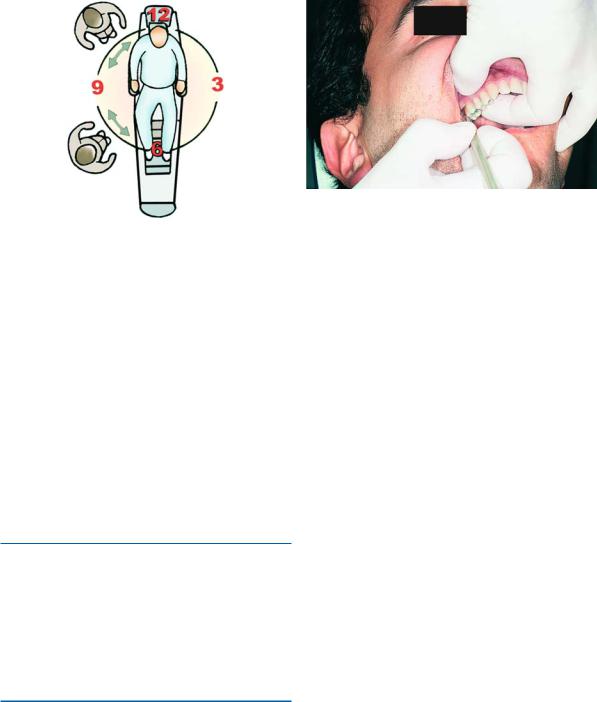
Fig. 5.1 a, b. Position of dental chair during extraction. a Maxilla: angle between dental chair and the horizontal (floor) is 120°. b Mandible: angle between dental chair and the horizontal (floor) is 110°
74 |
F. D. Fragiskos |
Fig. 5.2. Position of dentist during extraction. In this and all other figures, positions for right-handed dentists are illustrated. For all maxillary teeth and posterior mandibular teeth, the dentist is to the front and right (and to the left, for left-handed dentists) of the patient. For the anterior mandibular teeth (teeth 33–42 for right-handed, and teeth 32–43 for left-handed, dentists), the dentist is positioned in front of or behind and to the right (or to the left, for left-handed dentists) of the patient
right-handed dentists during extraction using forceps is in front of and to the right of the patient; left-handed dentists should be in front of and to the left of the patient. For the extraction of anterior mandibular teeth right-handed dentists should be positioned in front of the patient, or behind them and to their right; lefthanded dentists should be in front of them or behind them and to their left (Fig. 5.2).
5.1.1 Extraction
The extraction itself is accomplished in two stages.
During the first stage, the tooth is separated from the soft tissues surrounding it using a desmotome or elevator; during the second stage, the tooth is elevated from the socket using forceps or an elevator.
5.2
Separation of Tooth from Soft Tissues
5.2.1
Severing Soft Tissue Attachment
The first step in removing a tooth using the simple technique is to sever or loosen the soft tissue attachment surrounding the tooth. Two instruments are re-
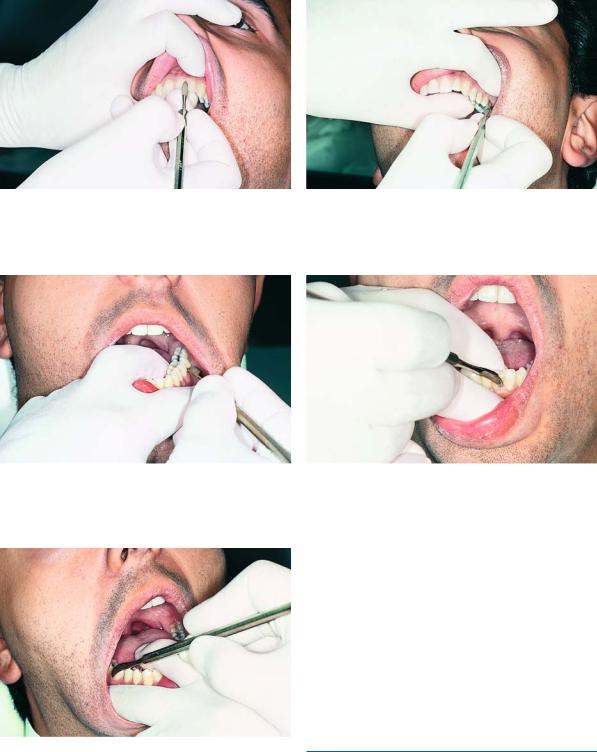
Fig. 5.3. Severing the soft tissue attachment in maxillary right teeth (teeth 13–18). Placement of fingers of the nondominant hand: index finger is palatal, thumb is buccal
quired to sever the soft tissue attachment: the straight and curved desmotomes (Fig. 4.56). The straight desmotome is used for the six maxillary anterior teeth, while the curved desmotome is used for the rest of the maxillary teeth and all the mandibular teeth.
The desmotome is held in the dominant hand, with a pen grip and, after being positioned at the bottom of the gingival sulcus, it is used to sever the periodontal ligament. This is accomplished in one continuous motion, beginning at the distal surface of the tooth and moving toward the mesial surface, first buccally and then lingually or palatally.
While severing the soft tissue attachment, the index finger and thumb of the nondominant hand are positioned buccally and palatally or the index finger and middle finger are placed buccally and lingually, to protect the soft tissues from injury (tongue, cheeks and palate). More specifically for right-handed dentists, in the right maxilla, from the canine and posterior to the canine teeth (teeth 13–18), the index finger is placed palatally and the thumb buccally (Fig. 5.3), while for the rest of the teeth (anterior teeth and teeth on the left side, teeth 12–28), the index finger is positioned buccally and the thumb palatally (Figs. 5.4, 5.5). In the mandible, the fingers are positioned differently. The fingers usually used are the index finger and middle finger of the nondominant hand. More specifically, from the left third molar until the right lateral incisor
(teeth 38–42), the index finger is placed buccally and the middle finger lingually (Figs. 5.6, 5.7), while for the rest of the teeth of the right side (teeth 43–48), the index finger is positioned lingually and the middle finger buccally (Fig. 5.8). For left-handed dentists, from the canine and posterior to the canine teeth (teeth 23–28) in the left maxilla, the index finger is placed palatally and the thumb buccally, while for the
Chapter 5 Simple Tooth Extraction |
75 |
Fig. 5.4. Severing the soft tissue attachment in anterior maxillary teeth. Placement of fingers of the nondominant hand: index finger is labial, thumb is palatal
Fig. 5.6. Severing the soft tissue attachment in mandibular left teeth. Placement of fingers of the nondominant hand: index finger is buccal, middle finger is lingual
Fig. 5.8. Severing the soft tissue attachment in mandibular right teeth (teeth 43–48). Placement of fingers of the nondominant hand: middle finger is buccal, index finger is lingual
Fig. 5.5. Severing the soft tissue attachment in maxillary left teeth. Placement of fingers of the nondominant hand: index finger is buccal, thumb is palatal
Fig. 5.7. Severing the soft tissue attachment in anterior mandibular teeth. Placement of fingers of the nondominant hand: index finger is labial, middle finger is lingual
rest of the teeth (anterior teeth and teeth on the right side, teeth 22–18), the index finger is positioned buccally and the thumb palatally. In the mandible, the fingers are positioned differently. The fingers usually used are the index finger and middle finger of the nondominant hand. More specifically, from the right third molar until the left lateral incisor (teeth 48–32), the index finger is placed buccally and the middle finger lingually, while for the rest of the teeth of the left side (teeth 33–38), the index finger is positioned lingually and the middle finger buccally.
5.2.2
Reflecting Soft Tissues
Reflecting the gingiva surrounding the tooth is accomplished with two instruments called Chompret elevators. Depending on the shape of the blade,

76 |
F. D. Fragiskos |
the Chompret elevator is either straight or curved
(Figs. 4.52 a, b). These elevators are used to push or slightly reflect the gingiva around an intact tooth, to allow the extraction forceps to grasp the tooth beneath the cervical line of the tooth as apically as possible. Some people suggest that reflecting the soft tissues is not necessary since severing them is sufficient, while others consider that reflecting is a more appropriate procedure compared to severing the soft tissue attachment. The fact remains that severing the soft tissue attachment is a less traumatic procedure compared to reflecting.
Chompret elevators are also used to expose destroyed teeth that are covered by hyperplastic gingivae, enabling positioning of the appropriate instrument for their removal. Reflecting (positioning of fingers and movements) is done in exactly the same way as severing the soft tissue attachment, with a slightly different motion, which is applied with slight pressure and in an outward direction.
Chompret elevators may also be used as dental elevators to remove roots and broken root tips. It is worth noting that in the case of an intact tooth, the Freer periosteal elevator (Fig. 4.8), being a very narrow instrument and easy to handle, is considered more suitable for reflecting the soft tissue attachment compared to the previously mentioned instruments
(Figs. 4.52 a, b).
5.3
Extraction Technique Using Tooth Forceps
The extraction technique using tooth forceps is based on certain guidelines to ensure that the tooth is extracted with maximum skill. These guidelines involve the correct way to hold the forceps and the tooth itself, the forces applied to the tooth, and the direction of movement during the extraction.
The extraction forceps are held in the dominant hand, while the thumb is simultaneously placed between the handles directly behind the hinge, so that pressure applied to the tooth is controlled (Figs. 5.9, 5.10). The nondominant hand also plays an important role in the extraction procedure. More specifically:
ΟIt reflects the soft tissues of the cheeks, lips, and tongue, so that there is adequate visualization of the surgical field.
ΟIt supports the alveolar process of the maxilla and aids in stabilizing the patient’s head. It also controls the expansion of the alveolar bone by way of feel, as well as luxation of the tooth during the various maneuvers.
Fig. 5.9. The correct way to hold maxillary extraction forceps
Fig. 5.10. The correct way to hold mandibular extraction forceps
ΟIt supports and stabilizes the mandible, counteracting the forces applied by the extraction forceps, which, when very great, may injure the temporomandibular joint.
After reflecting of the gingiva, the beaks of the forceps are positioned at the cervical line of the tooth, parallel to its long axis, without grasping bone or gingivae at the same time. The initial extraction movements applied are very gentle. More specifically, the dentist applies slow steady pressure to move the tooth buccally at first, and then palatally or lingually. Movements must become greater gradually and the buccal pressure is greater than the corresponding palatal or lingual pressure, because the labial or buccal bone is thinner and more elastic compared to that of the palate. If anatomy of the root permits (single, conical roots), rotational force may be applied in addition to buccopalatal or buccolingual pressure. These movements expand the alveolar bone and also sever all the periodontal fibers. Slight traction is also employed at the same time, facilitating the tooth extraction. Dur-

Chapter 5 Simple Tooth Extraction |
77 |
ing the final extraction phase, traction is not permitted, because there is risk of damage due to sudden removal of the tooth and the risk of the forceps knocking the teeth of the opposite arch. To avoid such a possibility, the final extraction movement must be labial or buccal, and in a curved direction that is outwards and upwards for the maxilla, and outwards and downwards for the mandible.
Before the tooth is delivered from the socket, the soft tissue between the tooth and the gingiva must be examined for a possible attachment. If this is the case, the gingiva must be completely severed from the tooth, because there is a risk of greatly tearing the tissues.
5.3.1
Extraction of Maxillary Central Incisors
Instruments. Extraction forceps for six anterior maxillary teeth or maxillary universal forceps (no. 150). In order to extract maxillary central incisors, righthanded dentists must be positioned in front of and to the right of the patient, and left-handed dentists in front of and to the left of the patient. The index finger of the nondominant hand is then placed labially, and the thumb palatally, firmly holding the alveolar process next to the tooth to be extracted. The beaks of the forceps are adapted to the tooth, and the beaks must be parallel to the long axis of the tooth. The initial extraction movements are gentle, first in a labial direction, and then palatal. After the initial force is applied to the tooth, motions gradually become greater and the final extraction force is applied labially (Fig. 5.11). Because the root of the central incisor is conical in shape, its removal may also be achieved using rotational forces.
More specifically, the tooth is rotated first in one direction and immediately afterwards in the other direction, until the periodontal fibers are completely severed. The tooth is then delivered from the socket using slight traction.
5.3.2
Extraction of Maxillary Lateral Incisors
Instruments. Extraction forceps for six anterior maxillary teeth or maxillary universal forceps (no. 150). In order to extract maxillary lateral incisors, righthanded dentists must be positioned in front of and to the right of the patient, and left-handed dentists in front of and to the left of the patient. The fingers of the nondominant hand are placed in exactly the same way as for the central incisors.
The extraction movements for removal of the lateral incisor are labial and palatal. Because the lateral incisor has a thin root and there is usually curvature of the root tip distally, rotational force is not allowed. Slight rotational motions may be employed only in the final stage, with simultaneous traction of the tooth from the socket.
5.3.3
Extraction of Maxillary Canines
Instruments. Extraction forceps for six anterior maxillary teeth or maxillary universal forceps (no. 150 forceps).
Maxillary canines present some degree of difficulty due to: (1) their firm anchorage in alveolar bone, and
(2) their long roots and frequent curvature of the root tip. Also, the labial surface of the tooth’s root is covered by thin alveolar bone, and if due consideration is not given during movements, there is a risk of fracturing the alveolar process.
In order to extract maxillary canines, right-handed dentists must be positioned in front of and to the right (left-handed dentists should be in front of and to the left) of the patient, whose head should be turned towards the dentist. For the right-handed dentist, the fingers of the nondominant hand are placed as follows: for the right side, the thumb is placed labially and the index finger palatally, while for the left side, the index finger is placed labially and the thumb palatally. For the left-handed dentist, the fingers of the nondominant hand are placed as follows: for the right side, the thumb is placed palatally and the index finger labially, while for the left side, the index finger is placed palatally and the thumb labially. The extraction movements are labial and palatal, with gradually increasing intensity. Because the canine has a flattened root and the root tip is usually curved distally, rotational motions are not permitted, or if they are used, they must be done so very gently and with alternating buccopalatal pressure. The final extraction movement is labial.
5.3.4
Extraction of Maxillary Premolars
Instruments. Maxillary universal forceps (no. 150).
In order to extract maxillary premolars, the dentist should be positioned in front of and to the right (or to the left for left-handed dentists) of the patient. For right-handed dentists, the fingers of the nondominant hand are placed as follows: for the right side, the index
78 |
F. D. Fragiskos |
Fig. 5.11 a, b. a Extraction of a maxillary anterior tooth (central incisor). Forceps grasps the tooth and fingers of the nondominant hand support the alveolar process. b Extraction movements: initial labial (L) pressure (i); the tooth
finger is placed palatally and the thumb buccally, while for the left side, the index finger is placed buccally and the thumb palatally. For left-handed dentists, the fingers of the nondominant hand are placed as follows: for the right side, the index finger is placed buccally and the thumb palatally, while for the left side, the in-
is brought back to its original position, with direction of motion continuing to the palatal (P) side (ii); the final extraction movement is curved, with the concave part facing upwards (iii)
dex finger is placed palatally and the thumb buccally.
As for the first premolar, because it usually has two roots, buccal and palatal pressure should be gentle and slight (Figs. 5.12, 5.13). If movements are vigorous and abrupt, there is a risk of fracturing the root tips. If one of the root tips does break, it may be removed easily,
Chapter 5 Simple Tooth Extraction |
79 |
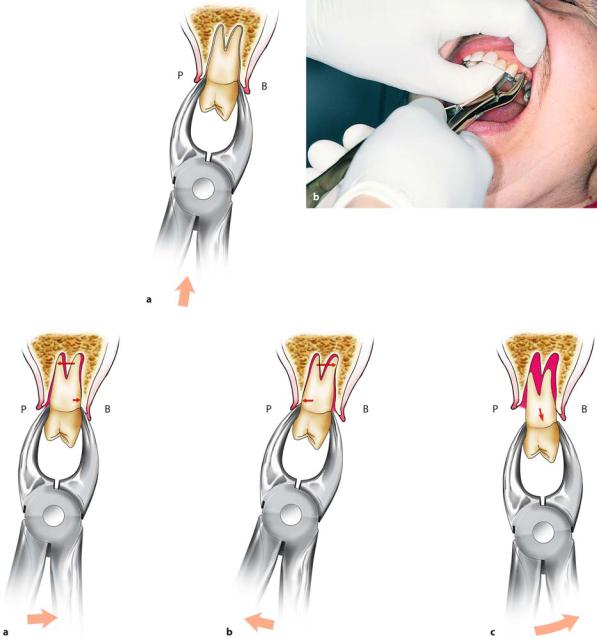
Fig. 5.12 a, b. Extraction of maxillary left tooth (first premolar). a Diagrammatic illustration and b clinical photograph, which show how to hold the tooth with forceps and support the alveolar process with fingers of the nondominant hand. (B Buccal,
P palatal)
Fig. 5.13 a–c. Extraction movements: a buccal (B), b palatal (P), c final extraction movement according to the legend for Fig. 5.11
since they are not very curved and the tooth has already been mobilized during the extraction attempt. Rotational motions are not allowed due to the tooth’s anatomy.
Extraction of the second premolar is easier, because the tooth has one root. Movements are the same as those for the first premolar. The final movement for both teeth is buccal.

80 F. D. Fragiskos
5.3.5
Extraction of Maxillary First and Second Molars
Instruments. Maxillary right molar forceps, maxillary left molar forceps.
In order to extract maxillary molars, the dentist must be positioned in front of and to the right (or to the left, for left-handed dentists) of the patient. The fingers of the nondominant hand are placed in exactly the same way as for maxillary premolars. The appropriate forceps are chosen, depending on the tooth to be extracted. The right and left maxillary molar forceps differ in that their buccal beaks have a pointed end at the center, which adapts to the root bifurcation.
The maxillary first molar has three diverging roots: the palatal, which is the largest and most widely divergent toward the palate, and the two buccal roots, which are often curved distally. The tooth is firmly anchored in the alveolar bone and its buccal surface is reinforced by the extension of the zygomatic process. This tooth therefore requires the application of strong force during its extraction, which may cause fracture of the crown or root tips. To avoid this from happening, initial movements must be gentle, with buccopalatal pressure and an increasing range of motion, especially buccally, where resistance is less. The final extraction movement is a buccal upwards curved motion, following the direction of the palatal root. Because the root tips are close to the maxillary sinus, their removal requires careful consideration, due to the risk of oroantral communication.
Extraction of the maxillary second molar may be accomplished in the same way as for the maxillary first molar, because the teeth have similar anatomy.
Extracting the second molar, however, is considered to be easier than extracting the first molar, because there is less resistance from the buccal alveolar process and relatively little divergence of the roots. Quite often the roots of this tooth are fused together in a conical shape.
In this case, extraction of the tooth is even easier.
5.3.6
Extraction of Maxillary Third Molar
Instruments. Maxillary third molar forceps.
In order to extract maxillary third molars, the dentist must be positioned in front of and to the right (or to the left, for left-handed dentists) of the patient. The fingers of the nondominant hand are placed in exactly the same way as for maxillary premolar extraction.
The maxillary third molar is the smallest of all molars
and varies greatly in size, number of roots, and root morphology. It has three to eight roots. It most commonly has three roots just like the other maxillary molars, but smaller and converging. They are usually fused together in a conical shape, curved distally. Extraction of the tooth depends on its location, as well as on the number and shape of the roots. If the third molar has erupted completely and its roots are fused (conical shape), its extraction does not usually present any difficulty and it may be removed with only buccal pressure. The risk of fracturing the palatal alveolar process is avoided this way, which would otherwise occur if force were applied palatally (the palatal bone is thinner and lower than the buccal bone). When the tooth has three or more roots, though, its extraction is accomplished by applying buccal pressure and very gentle palatal pressure.
The final extraction movement must always be buccal. Root anatomy of the third molar permitting, extraction is easily accomplished using the straight elevator. The elevator is positioned between the second and third molars and the tooth is luxated according to the direction of its roots.
5.3.7
Extraction of Mandibular Anterior Teeth
Instruments. Mandibular universal forceps or no. 151 forceps.
In order to extract mandibular anterior teeth 33– 42, right-handed dentists may be positioned in front of and to the right of the patient, or behind and to the right of the patient, with their left hand placed around the patient’s head. Left-handed dentists may be positioned in front of and to the left of the patient to extract mandibular anterior teeth 32–43, or behind and to the left of the patient, with their right hand placed around the patient’s head. The mandible is stabilized with the four fingers, which are placed on the submandibular area, and the thumb is placed on the occlusal surfaces of the teeth.
Mandibular incisors have narrow flattened roots, which are not very firmly anchored in the alveolar bone. These teeth have one root and are curved at the root tip, especially the lateral incisor. Their extraction is easy, due to their morphology and the thin labial alveolar bone surrounding the root.
Extraction pressure is applied labially and lingually, gradually increasing in intensity. Due to the flattened roots of the teeth, only slight rotational force is permitted (Figs. 5.14, 5.15).
Chapter 5 Simple Tooth Extraction |
81 |
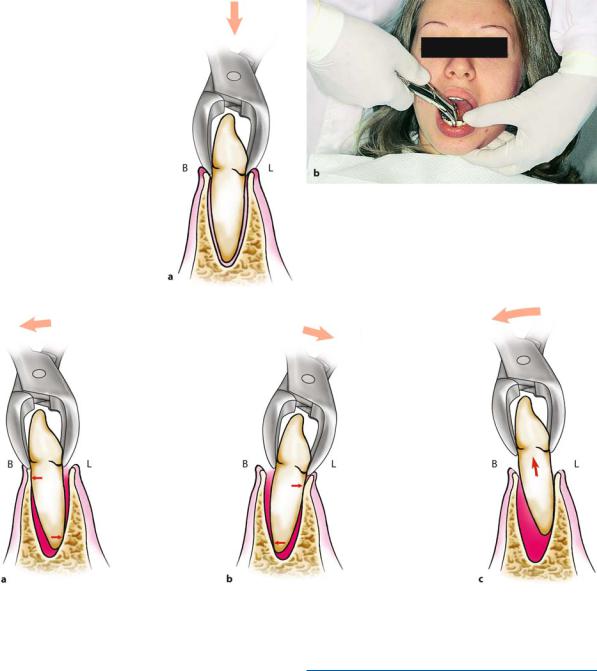
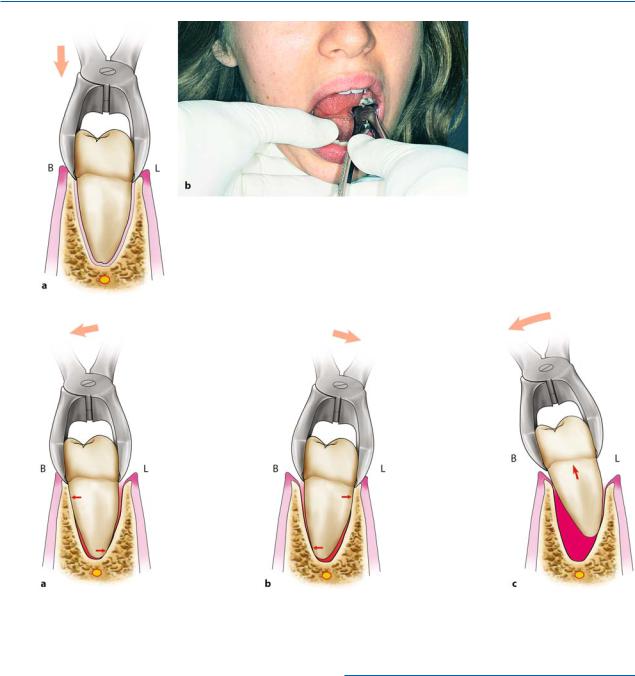
Fig. 5.14 a, b. Extraction of anterior mandibular tooth (central incisor). a Diagrammatic illustration and b clinical photograph showing how to hold the tooth with forceps and support the mandible with fingers of the nondominant hand. (B Buccal, L lingual)
Fig. 5.15 a–c. Extraction movements: a buccal (B), b lingual (L), and c final extraction movement, which is curved, with the concave part of the arch facing downwards (that is, the opposite direction compared to the extraction of maxillary teeth)
Mandibular canines usually have only one root.
Seventy per cent of these teeth have a straight root, while 20% present distal curvature. Compared to incisors, canines are more difficult to extract, due to the long root and frequent curvature of the root tip. Extraction movements are the same as those employed for central and lateral incisors.
The final extraction movement for all anterior teeth is labial, curved outwards and downwards. Damage of maxillary teeth by the forceps is thus avoided.
5.3.8
Extraction of Mandibular Premolars
Instruments. Mandibular universal forceps or no. 151 forceps.
In order to extract mandibular premolars, the dentist must be positioned in front of and to the right (or to the left, for left-handed dentists) of the patient. For mandibular left (right for left-handed dentists) premolars, the mandible is stabilized by the four fingers on the submandibular area and the thumb on the incisor
82 F. D. Fragiskos
Fig. 5.16 a, b. Extraction of a mandibular left posterior
tooth (first molar). a Diagrammatic illustration and b clinical photograph showing how to hold the tooth with forceps and support the mandible with the nondominant hand. (B Buccal, L lingual)
Fig. 5.17 a–c. Extraction movements: a buccal, b lingual, c final extraction movement, always towards the buccal side, outwards and downwards
surface of the incisors, while for mandibular right (left for left-handed dentists) premolars, only the position of the thumb differs, which is placed on the occlusal surface of the molars of the same side.
Even though mandibular premolars are generally surrounded by dense, hard bone, their extraction is considered quite easy because their roots are straight and conical, although sometimes they may be thin or the root tip may be large. Buccolingual force is applied for extraction of these teeth. Gentle rotational force may also be applied when extracting the second premolar. The final extraction movement is outwards and downwards.
5.3.9
Extraction of Mandibular Molars
Instruments. Mandibular molar forceps.
In order to extract mandibular molars, the dentist must be positioned in front of and to the right (or to the left, for left-handed dentists) of the patient. The mandible is stabilized by the four fingers on the submandibular area, while the thumb is placed on the incisor surface of the incisors for the left side (right side for left-handed dentists), or on the occlusal surface of the premolars for the right side (left side for left-hand-

Chapter 5 Simple Tooth Extraction |
83 |
ed dentists). The mandibular first molar usually has two roots, a mesial and a distal one. The mesial root is larger, more flattened than the distal root and usually is curved distally. The distal root is straighter and narrower than the mesial root, and more rounded.
The mandibular second molar has a morphology similar to that of the first molar. Even though this tooth is surrounded by dense bone, it is removed more easily than the first molar, because its roots are smaller and less divergent, and they are often fused together.
The extraction technique is the same for both molars. More specifically, the forceps are adapted to the tooth as apically as possible, beneath the cervical line of the tooth, with the beaks parallel to the long axis of the tooth. Initially the movements are gentle with buccal and lingual pressure. After the tooth is slightly mobilized, force is gradually increased and the final extraction movement is buccal, taking care not to damage the maxillary teeth with the forceps (Figs. 5.16, 5.17).
5.3.10
Extraction of Mandibular Third Molar
Instruments. Mandibular third molar forceps.
In order to extract the third molar, the mandible is stabilized in the same way as for the first and second molar, or the thumb may be placed more posteriorly. The mandibular third molar usually has two roots, whose morphology is similar to that of the other molars. They are smaller, though, and usually are fused in a conical shape, widely diverging distally. Buccolingual pressure is applied and the range of motion depends on the morphology of the buccal and lingual alveolar bone. The lingual alveolar bone is very thin compared to the buccal alveolar bone, which is unyielding in the third molar area; therefore, the force that mobilizes the tooth must be applied in the lingual direction. Afterwards, pressure must be applied very carefully, so as to avoid fracture of both the tooth, due to excessive buccal force, and the lingual plate of bone.
If the third molar has one root or if the roots converge and are curved in the same direction, the extraction may be accomplished using the straight elevator alone.
In this case the elevator is positioned at the mesial surface of the tooth, which is delivered according to the direction of curvature of the roots.
Fig. 5.18. Deciduous mandibular molar with subjacent permanent tooth
Fig. 5.19. Extraction of deciduous molar with forceps. Forceps are positioned mesially or distally on the crown and not the center of the tooth
5.3.11
Extraction of Deciduous Teeth
Instruments. The forceps used to extract deciduous teeth are small and have narrow beaks, so that they can be adapted accordingly to the cervical region of the tooth to be extracted.
The extraction technique for deciduous teeth is similar to that used for permanent teeth. The dentist must pay particular attention when extracting deciduous molars because of the risk of simultaneously extracting the bud of the subjacent permanent tooth (Fig. 5.18). More specifically, because the crown of the deciduous molar is short, the beaks of the forceps may accidentally grasp the crown of the bud of the underlying permanent tooth as well and remove both. This is why the beaks of the forceps must be positioned on the mesial or the distal area of the tooth and not the center
(root bifurcation), underneath which is the permanent tooth (Fig. 5.19).