


84 F. D. Fragiskos
When the roots of the deciduous tooth embrace the crown of the subjacent premolar, the deciduous tooth must be removed by surgical extraction (see Chap. 6).
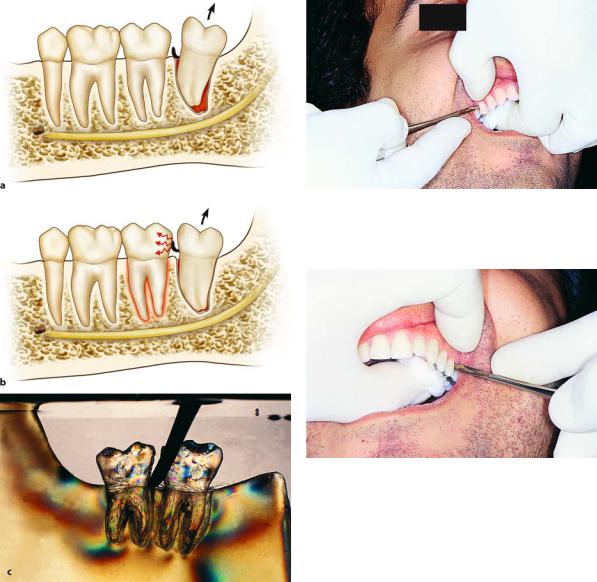
If the root of the deciduous tooth breaks during the extraction procedure, it may be removed using narrow elevators, taking care to avoid contact with the permanent tooth. Extraction of deciduous teeth is much easier than that of permanent teeth, especially if their roots are resorbed. Deciduous teeth are difficult to extract when root resorption is incomplete. The subjacent tooth then erupts partially, causing thinning of the roots instead of total resorption. These thin root remnants are interposed between the crown of the permanent tooth and the bone, and fracture easily during the attempt to extract the deciduous tooth. This extraction is deemed necessary because the deciduous tooth is not shed spontaneously due to incomplete resorption of the root or roots.
5.4
Extraction Technique Using Root Tip Forceps
The root tip forceps are used in exactly the same way as the tooth forceps. In order to use this instrument, the root must protrude out of the gingivae, so that it can be firmly grasped. If the root is at the same level as, or a little beneath, the alveolar margin, a small portion of the root must be exposed before the dentist is able to grasp the root with the root tip forceps. This is accomplished after carefully reflecting a small portion of the gingivae and removing part of the buccal and palatal alveolar bone. As for the dentist’s position, placement of fingers of the nondominant hand and extraction movements, they are no different than those described for intact teeth.
5.5
Extraction Technique Using Elevator
5.5.1
Extraction of Roots and Root Tips
A variety of elevators may be used to extract roots and root tips. The most commonly used elevator is the straight elevator. This elevator, besides root extractions, may also be used to remove intact teeth – especially the maxillary and mandibular third molars, root anatomy permitting. There is no doubt that the straight elevator is the ideal instrument in everyday dentistry, as long as it is used correctly. Otherwise, it may cause a number of undesirable complications. In order to
Fig. 5.20. Correct way to hold straight elevator. Index finger is placed near the blade
Fig. 5.21. Placement of gauze between finger and lingual side, for protection from injury in case the elevator slips
avoid such situations, certain basic rules must be followed:
ΟThe straight elevator must be held in the dominant hand and the index finger placed along the blade, leaving its anterior end exposed, which is used to luxate the tooth or root (Fig. 5.20).
ΟThis instrument must always be used buccally, and never on the lingual or palatal side.
ΟThe concave surface of the blade must be in contact with the mesial or distal surface of the tooth to be extracted, and be seated between the tooth and alveolar bone.
ΟWhen the instrument is placed between the maxillary posterior teeth, it must be perpendicular to their long axis. As for the rest of the teeth of both the maxilla and mandible, it may be perpendicular, parallel, or at an angle.
ΟDuring luxation, a cotton roll or gauze should be placed between the finger and palatal or lingual side, to avoid injury of the finger or tongue in case the elevator slips (Fig. 5.21).
Chapter 5 Simple Tooth Extraction |
85 |
Fig. 5.22 a–c. a During luxation of a tooth, the alveolar ridge is used as a fulcrum, not the adjacent tooth. b Incorrect placement of the instrument. c Photoelastic model showing extraction of the third mandibular molar using a straight elevator. Using the adjacent tooth (second molar) as a fulcrum creates great tension around the tooth, with a risk of injury to tissues surrounding the root
ΟDuring luxation, the adjacent tooth should not be used as a fulcrum, but only the alveolar bone. Otherwise, there is a risk of damaging the periodontal ligament fibers (Fig. 5.22 a–c).
ΟThe straight elevator should not be used to extract multi-rooted teeth, because there is a risk of fracturing their roots if they have not been sectioned previously.
Fig. 5.23. Extraction of maxillary right posterior tooth using straight elevator. Correct way to hold the instrument and alveolar process (thumb is buccal, index finger is palatal)
Fig. 5.24. Extraction of maxillary left posterior tooth using straight elevator. Correct way to hold the instrument and alveolar process (index finger is buccal, thumb is palatal)
During the luxation attempt using the straight elevator, the fingers of the nondominant hand must be in a certain position.
ΟMore specifically for right-handed dentists:
Maxilla: From the right premolar up to the right third molar (teeth 14–18), the index finger is placed palatallyandthethumbisplacedbuccally(Fig. 5.23).
From the right canine up to the left third molar (teeth 13–28), the index finger is placed labially or buccally and the thumb is placed palatally
(Fig. 5.24).
Mandible: From the right first premolar up to the right third molar (teeth 44–48), the nondominant hand embraces the patient’s head and the index finger is placed buccally, while the thumb is placed lingually (Fig. 5.25). From the right canine up to the left third molar (teeth 43–38), the index finger is placed lingually and the thumb is placed labially or buccally (Fig. 5.26).
86 F. D. Fragiskos
Fig. 5.25. Extraction of mandibular right posterior tooth using straight elevator. Correct way to hold the instrument and alveolar process (index finger is buccal, thumb is lingual)
Fig. 5.26. Extraction of mandibular left posterior tooth using straight elevator. Correct way to hold the instrument and alveolar process (thumb is buccal, index finger is lingual)
ΟMore specifically for left-handed dentists: Maxilla: From the left premolar up to the left third molar (teeth 24–28), the index finger is placed palatally and the thumb is placed buccally (Fig. 5.23). From the left canine up to the right third molar (teeth 23–18), the index finger is placed labially or buccally and the thumb is placed palatally (Fig. 5.24).
Mandible: From the left first premolar up to the left third molar (teeth 34–38), the nondominant hand embraces the patient’s head and the index finger is placed buccally, while the thumb is placed lingually (Fig. 5.25). From the left canine up to the right third molar (teeth 33–48), the index finger is placed lingually and the thumb is placed labially or buccally
(Fig. 5.26).
5.5.2
Extraction of Single-Rooted Teeth with Destroyed Crown
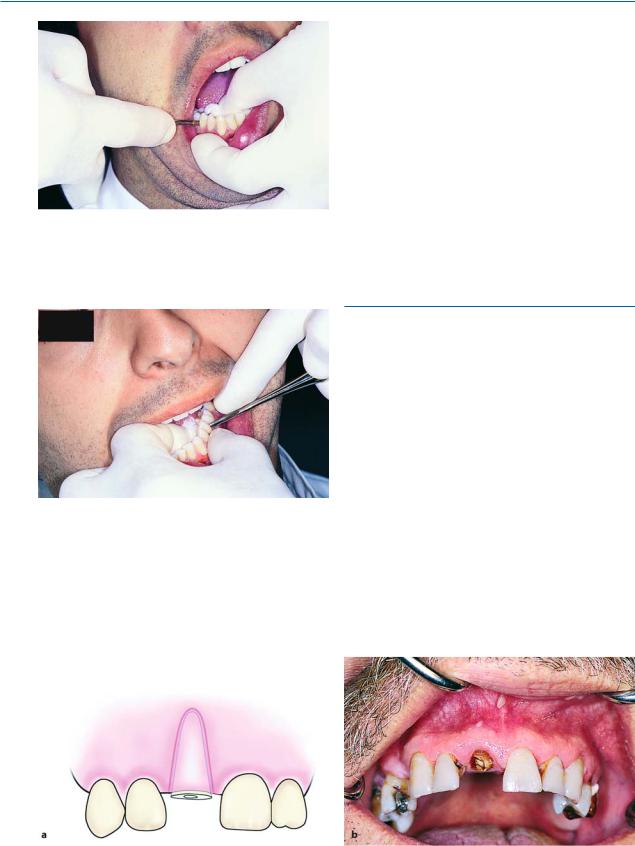
The removal of single-rooted teeth whose crown has been destroyed is accomplished with the help of the straight elevator. More specifically, the blade of the elevator is seated between the root and alveolar bone (perpendicular or at an angle), with the concave surface of the blade in contact with the mesial or distal surface of the root. Using the alveolar bone as a fulcrum, rotational forces are applied around the axis of the elevator, in the mesial and distal area, resulting in displacement of the root and elevation from the socket
(Figs. 5.27–5.29).
If the root is broken beneath the alveolar margin and its removal presents difficulty, the special instrument for removal of roots mentioned in Chap. 4
Fig. 5.27 a,b. a Root of maxillary central incisor. b The use of an elevator is indicated for its removal
Chapter 5 Simple Tooth Extraction |
87 |
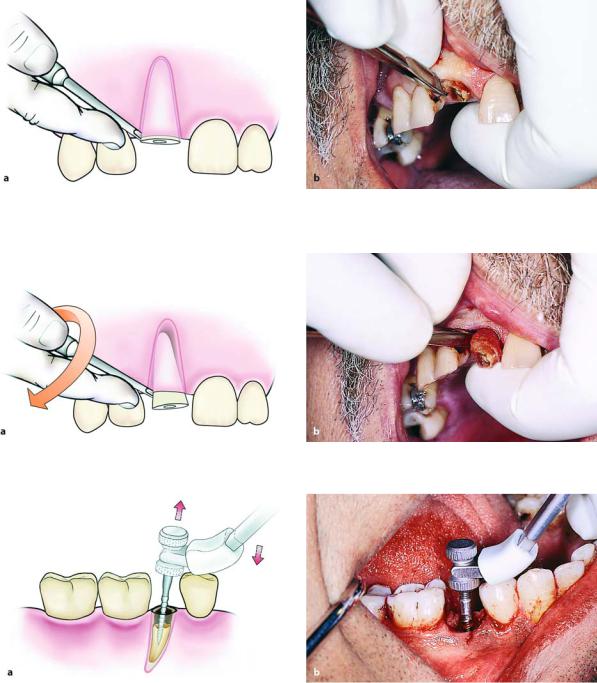
Fig. 5.28 a,b. Positioning of straight elevator on the distal surface of the root, either perpendicular to, or at an angle to, the root
Fig. 5.29 a,b. Luxation of the root of maxillary central incisor with straight elevator
Fig. 5.30 a,b. Removal of the root of mandibular premolar with the special instrument (endodontic file-based action) for root extraction
(Fig. 4.54) may be used. More specifically, after slight mobilization of the root using an elevator, a bur is used to widen the root canal and the special instrument is screwed into the root.
The root is then removed from the socket (Fig. 5.30), using the occlusal surface of the adjacent tooth as a fulcrum.
88 F. D. Fragiskos
Fig. 5.31 a,b. Separation of roots of the mandibular first molar with fissure bur
5.5.3
Extraction of Multi-Rooted Teeth with Destroyed Crown
The extraction of roots of multi-rooted teeth whose crown is destroyed is impossible using extraction forceps or root tip forceps. In such cases, removal is accomplished after separating the roots using the procedure described below.
If the roots are above the alveolar bone, the roots are sectioned and separated after creating a deep perpendicular buccolingual groove using a fissure bur, which reaches the intraradicular bone (Fig. 5.31). The roots are then removed separately one at a time, using either root tip forceps or an elevator.
Sectioning may also be accomplished using the straight elevator, after placing its blade in the root bifurcation, with the concave surface of the instrument in contact with the distal root. At the same time, the fingers are placed as described for the extraction using an elevator, protecting the tissues from the sharp end of the blade in case the instrument slips (Figs. 5.32– 5.34). The roots are separated employing rotational movements, while at the same time the distal root is elevated relatively easily from its socket (Figs. 5.35, 5.36). The mesial root may then be removed using the elevator with T-bar handles or the angled Seldin elevator. The elevator is placed so that the blade is positioned in the empty socket with its end facing the root. The intraradicular bone is removed first (if it is higher than the root) and then the tip of the elevator comes into contact with the root, which is removed after carefully applying rotational pressure upwards (Figs. 5.37, 5.38).
Fig. 5.32. Roots of mandibular first molar. Extraction is accomplished by sectioning roots using a straight elevator
Fig. 5.33. Clinical photograph of the radiograph shown in Fig. 5.32
Chapter 5 Simple Tooth Extraction |
89 |
Fig. 5.34 a, b. Positioning of the elevator and the fingers of the left hand for separation of molar roots
Fig. 5.35 a, b. Separation of roots with seating and rotation of the elevator at the bifurcation point
Fig. 5.36 a, b. Removal of distal root using a straight elevator
90 F. D. Fragiskos
Fig. 5.37 a, b. Using an elevator with T-shaped handles to remove intraradicular bone
Fig. 5.38 a, b. Luxation of root with rotation of the elevator upwards
5.5.4
Extraction of Root Tips
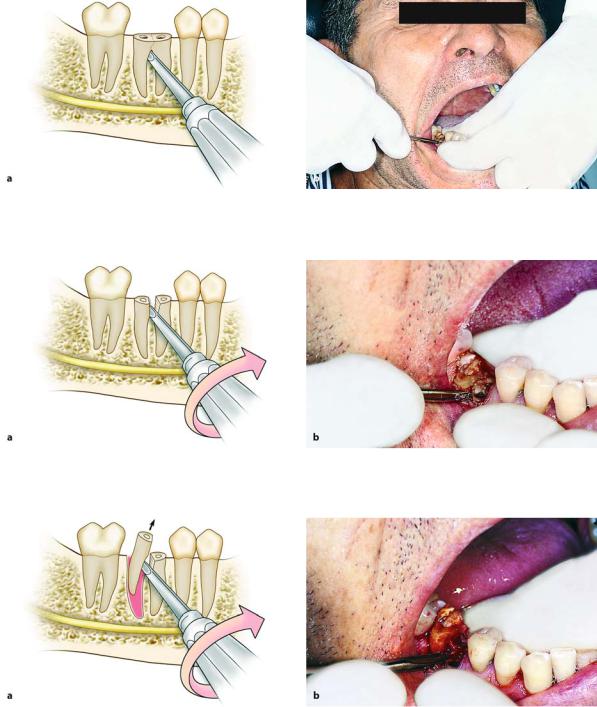
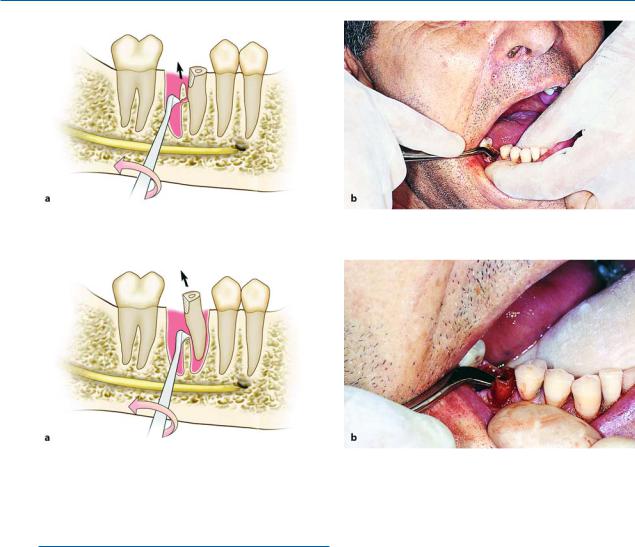
In order to extract root tips from the maxilla and mandible, double-angled elevators are considered the most appropriate instruments, due to their sharp tip, which fits easily between the root tip and the alveolar bone, first mobilizing and then luxating the root tip from the socket (Fig. 5.39 a, b). In these cases, especially useful instruments are those that have very narrow blades of various shapes (straight, hooked, etc.). Their use is indicated for the removal of small root tips remaining at the bottom of the socket, since they may be placed in that area more easily than standard elevators.
The procedure for extracting a root tip is now described. When the root tip is very small and deep in the socket, a narrow angled elevator is placed between the alveolar bone and the root tip, and the instrument is pushed forward gently as apically as possible. Luxation is then attempted until the root tip is mobilized. If
the root tip is not mobilized at all, attempts are continued on the mesial and distal aspects of the socket until the root tip is fully mobilized, upon which its removal is very easy. When the extraction involves a root tip of a maxillary or mandibular molar and the extraction proves difficult, part of the intraradicular bone is removed from inside the socket with a round bur or sharp instrument, creating room that will facilitate its luxation (Figs. 5.40 a, b, 5.41 a, b). If the root tip belongs to the palatal root, even though the extraction may be accomplished using the same procedure, the dentist must be especially careful, because there is an increased risk of displacing the root tip into the maxillary sinus. The root tip may also be removed with the aid of an endodontic file, which is first positioned inside the socket and then screwed into the root canal, upon which the root tip is delivered either by hand or with a needle holder (Fig. 5.42). When a needle holder is used, a protective gauze may be placed between it and the occlusal surface of the teeth on which it rests (Fig. 5.42 b).

Chapter 5 Simple Tooth Extraction |
91 |
Fig. 5.39 a, b. Diagrammatic illustrations showing luxation of the root tip of the mandibular second premolar, using double-angled elevators
Fig. 5.40 a, b. Technique for removing the tip of a mesial root of a mandibular molar. Removal of intraradicular bone and luxation of the root tip using a double-angled elevator
Fig. 5.41 a, b. Removal of the tip of the distal root of a maxillary molar, employing technique similar to that shown in Fig. 5.40