


Stepping through TestCalculator |
33 |
|
|
{
public void testAdd()
{
Calculator calculator = new Calculator(); double result = calculator.add(10, 50); assertEquals(60, result, 0);
}
}
When you start a JUnit test runner by typing java junit.swingui.TestRunner TestCalculator, the JUnit framework performs the following actions:
■Creates a TestSuite
■Creates a TestResult
■Executes the test methods (testAdd in this case)
We’ll present these steps using standard Universal Modeling Language (UML) sequence diagrams.
More about UML and design patterns
As the sage said, a picture tells a thousand words; a symbol tells ten thousand more. Today many developers rely on UML to represent software components and design patterns to symbolize the deeper meanings of designs. To learn more about UML, we recommend UML Distilled: A Brief Guide to the Standard Object Modeling Language, by Martin Fowler and Kendall Scott (Reading, MA: Addison-Wesley, 1999). For more about design patterns, we recommend the classic Design Patterns, by Erich Gamma et al (Reading, MA: Addison-Wesley, 1995); and Patterns of Enterprise Application Architecture, by Martin Fowler (Boston: Addison-Wesley, 2003). You don’t need to understand UML or design patterns to test your code, but both disciplines can help you design code to test.
2.7.1 Creating a TestSuite
NOTE In the UML diagrams that follow, we refer to a TestRunner class. Although there is no TestRunner interface, the JUnit test runners all extend the BaseTestRunner class and are named TestRunner: junit.swingui.TestRunner for the Swing test runner and junit.textui.TestRunner for the text test runner. By extrapolation, we are giving the name TestRunner to any class that extends BaseTestRunner. This means whenever we mention TestRunner, you can mentally replace it with any JUnit test runner.
34CHAPTER 2
Exploring JUnit
:TestRunner :TestCase
:suite()
:new()

 theSuite : TestSuite
:new("testAdd")  testAdd : TestCalculator
theSuite:
Figure 2.7 JUnit creates an explicit test suite (when the suite method is defined in the test case).
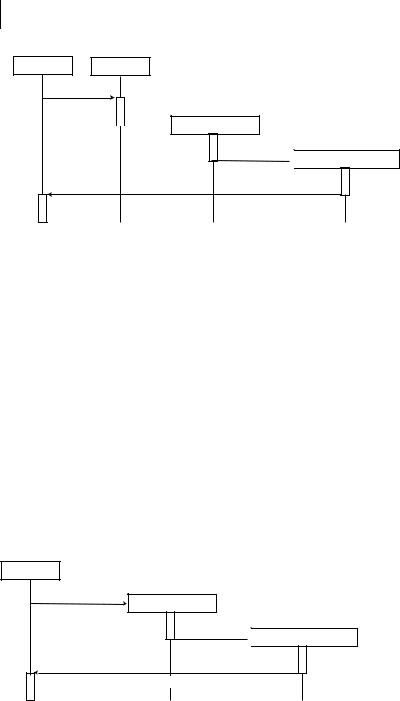
The TestRunner begins by looking for a suite method in the TestCalculator class. Had one existed, the TestRunner would have called it, as shown in figure 2.7. Then this suite method would have created the different TestCase classes, adding them to the test suite (see section 2.3).
Because there is no suite method in the TestCalculator class, the TestRunner creates a default TestSuite object, as shown in figure 2.8.
The main difference between figures 2.7 and 2.8 is that in figure 2.8, the discovery of the TestCalculator test methods is done using Java introspection, whereas in figure 2.7, the suite method explicitly defines the TestCalculator test methods. For example:
public static Test suite()
{
TestSuite suite = new TestSuite(); suite.addTest(new TestCalculator("testAdd")); return suite;
}
:TestRunner
:new(TestCalculator)
theSuite : TestSuite
:new("testAdd")  testAdd : TestCalculator
theSuite:
Figure 2.8 JUnit creates an
automatic test suite (when the suite method is not defined in the test case).
Stepping through TestCalculator |
35 |
|
|
2.7.2Creating a TestResult
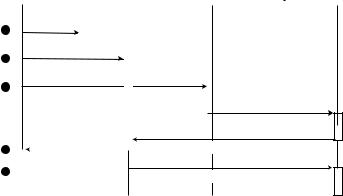
Figure 2.9 demonstrates the steps that JUnit follows to create a TestResult object that contains the test results (success or failures or errors).
:TestRunner |
|
|
|
|
theSuite : TestSuite |
|
|
testAdd : TestCalculator |
|||||||||
|
|
|
|
|
|
|
|
|
|
|
|
|
|
|
|
|
|
b |
|
|
:new() |
|
|
|
|
|
|
|
|
|
|
|
|
|
|
|
|
theResult : TestResult |
|
|
|
|
|
|
|
|
|
|
|||||
|
|
|
|
|
|
|
|
|
|
|
|
||||||
|
|
|
|
|
|
|
|
|
|
|
|
|
|
|
|||
C |
|
:addListener(this) |
|
|
|
|
|
|
|
|
|
|
|||||
|
|
|
|
|
|
|
|
|
|
|
|
|
|
|
|
|
|
|
|
|
|
|
|
|
|
|
|
|
|
|
|
|
|||
|
|
|
|
:run(theResult) |
|
|
|
|
|
||||||||
D |
|
|
|
|
|
|
|
|
|
|
|
|
:run(theResult) |
||||
|
|
|
|
|
|
|
|
|
|
|
|
||||||
|
|
|
|
|
|
|
|
|
|
|
|
||||||
|
|
|
|
|
|
|
|
|
|
|
|
|
|||||
|
|
|
|
|
|
|
|
|
|
|
|
|
|
|
|
|
|
E |
|
|
|
|
|
|
|
|
:run(testAdd) |
|
|
|
|
|
|||
|
|
|
|
|
|
|
|
|
|
|
|
|
|||||
|
|
:startTest(testAdd) |
|
|
|
|
|
||||||||||
F |
|
|
|
|
|
|
|
|
|
runBare() |
|
|
|
|
|
||
|
|
|
|
|
|
|
|
|
|
|
|
|
|
||||
|
|
|
|
|
|
|
|
|
|
|
|
|
|
|
|||
|
|
|
|
|
|
|
|
|
|
|
|
|
|
|
|
|
|
Figure 2.9 JUnit creates a TestResult object to collect the test results (good or bad).
These steps are as follows:
1At b in the figure, the TestRunner instantiates the TestResult object that will hold the test results as the tests are executed one after another.
2The TestRunner registers against the TestResult so that it will receive events that happen during the execution of the tests (c). This is a typical example of the Observer pattern in action. A TestResult advertises these methods:
■A test has been started (startTest; see E).
■A test has failed (addFailure; see figure 2.10).
■A test has thrown an unexpected exception (addError; see figure 2.10).
■A test has ended (endTest; see figure 2.10).
3Knowing about these events allows the TestRunner to display a progress bar as the tests progress and to display failures and errors as they happen (instead of having to wait until the end of all the tests).
4The TestRunner starts the tests by calling the TestSuite’s run(TestResult) method (D).
36CHAPTER 2
Exploring JUnit
5The TestSuite calls the run(TestResult) method for each of the TestCase instances it holds.
6The TestCase uses the TestResult instance that was passed to it to call its run(Test) method, passing itself as a parameter so that the TestResult can then call it back with runBare (F). The reason is that JUnit needs to give the control to the TestResult instance so that it can alert all its listeners that the test has started (E).
2.7.3Executing the test methods
You have seen in the previous section that for each TestCase in the TestSuite, the runBare method is called. In this case, because you have a single testAdd test in TestCalculator, it will be called only once.
Figure 2.10 highlights the steps for executing a single test method. The steps in figure 2.10 are as follows:
1At b in the figure, the runBare method executes the setUp, testAdd, and tearDown methods.
2If any test failure or test error happens during the execution of any of these three methods, the TestResult notifies its listeners by calling addFailure (C) and addError (D), respectively.
3If any errors occur, the TestRunner lists them. Otherwise, the bar turns green—and you know the code is clean.
:TestRunner |
|
theResult : TestResult |
|
testAdd : TestCalculator |
|
|
|
|
|
b
C
D
E
:runBare()
:setUp()
:testAdd()
:tearDown()
:addFailure(testAdd, AssertionFailedError)
:addError(testAdd, Throwable)
:endTest(testAdd)
Figure 2.10 JUnit executes a test method and notifies test listeners about failure, errors, and the end of the test.