


102CHAPTER 5
Automating JUnit
Are automated unit tests a panacea?
Absolutely not! Automated tests can find a significant number of bugs, but manual testing is still required to find as many bugs as possible. In general, automated regression tests catch 15–30% of all bugs found; manual testing finds the other 70–85% (http://www.testingcraft.com/regression-test- bugs.html).
Are you sure about that?
Some test-first design / unit testing enthusiasts are now reporting remarkably low numbers of bug counts, on the order of one or two per month or fewer. But these results need to be substantiated by formal studies and replicated by other teams. Your mileage will definitely vary.
5.3 Running tests from Maven
Once you have used Ant on several projects, you’ll notice that most projects almost always need the same Ant scripts (or at least a good percentage). These scripts are easy enough to reuse through cut and paste, but each new project requires a bit of fussing to get the Ant buildfiles working just right. In addition, each project usually ends up having several subprojects, each of which requires you to create and maintain an Ant buildfile.
Maven (http://maven.apache.org/) picks up where Ant leaves off, making it a natural fit for many teams. Like Ant, Maven is a tool for running other tools, but Maven is designed to take tool reuse to the next level. If Ant is a source-building framework, Maven is a source-building environment.
5.3.1Maven the goal-seeker
Behind each target in every Ant buildfile lies a goal. The goal might be to generate the unit tests, to assemble the Javadocs, or to compile the distribution. The driving force behind Maven is that under the hood, each software project almost always does things the same way, following several years of best practices. Most differences are arbitrary, such as whether you call the target output directory target or output.
Instead of asking developers to write their own targets with tasks, Maven provides ready-to-use plugins to achieve the goals. At the time of this writing, Maven boasts more than 70 plugins. Once Maven is installed (see the sidebar on the next page), you can type maven -g to get the full list of the available plugins and goals. Reference documentation for the plugins is available at http://maven.apache.org/reference/ plugins. The following list describes a few common Maven plugins:

Running tests from Maven |
103 |
|
|
■jar—Generates a project jar and deploys it to a local or remote jar repository
■junit—Executes JUnit tests
■site—Generates a project documentation web site that contains lots of useful reports and project information, in addition to containing any docs you wish to include
■changelog—Generates a change log report (CVS changelog, Starteam changelog, and so forth)
■checkstyle—Runs Checkstyle on the source code and generates a report
■clover—Runs Clover on the source code and generates a Clover report
■eclipse—Automatically generates Eclipse project files from the Maven project description
■ear—Packages the application as an ear file
■cactus—Automatically packages your code, deploys it in a container of your choice, starts the container, and runs Cactus tests (see chapter 8)
■jboss—Supports creation of JBoss Server configurations and deployments of war, ear, and EJB-jar in JBoss using a simple copy or JMX
Having well-defined plugins not only provides unprecedented ease of use, it also standardizes project builds, making it easy for developers to go from project to project.
Installing Maven
Installing Maven is a three-step process:
1Download the latest distribution from http://maven.apache.org/ builds/release/ and unzip/untar it in the directory of your choice (for example, c:\maven on Windows or /opt/maven on UNIX).
2Define a MAVEN_HOME environment variable pointing to where you have installed Maven.
3Add MAVEN_HOME\bin (MAVEN_HOME/bin on UNIX) to your PATH environment variable so that you can type maven from any directory.
You are now ready to use Maven. The first time you execute a plugin, make sure your Internet connection is on, because Maven will automatically download from the Web all the third-party jars the plugin requires.

104CHAPTER 5
Automating JUnit
5.3.2Configuring Maven for a project
Using Ant alone, you describe your build at the level of the tasks. With Maven, you describe your project structure and the plugins use this directory structure, so you don’t have to be an Ant wizard to set up your project. Maven handles the wizardry.
Let’s look at a Maven description for a simple project based on the sampling project you wrote in chapter 3 and that you ran with Ant earlier in the chapter. The goal is to run your unit tests with Maven.
Configuring Maven for a project requires writing only one file: project.xml (also called the POM, short for project object model). It contains the full project description. Listing 5.6 shows the first part of this file, which contains background information about the project.
Listing 5.6 First part of project.xml showing background project information
<?xml version="1.0" encoding="ISO-8859-1"?> |
|
|
<project> |
b |
|
<pomVersion>3</pomVersion> |
||
<id>junitbook-sampling</id> |
c |
|
<name>JUnit in Action - Sampling JUnit</name> |
d |
|
<currentVersion>1.0</currentVersion> |
e |
|
<organization> |
|
|
<name>Manning Publications Co.</name> |
|
|
<url>http://www.manning.com/</url> |
|
|
<logo>http://www.manning.com/front/dance.gif</logo> |
|
|
</organization> |
|
|
<inceptionYear>2002</inceptionYear> |
|
|
<package>junitbook.sampling</package> |
|
|
<logo>/images/jia.jpg</logo> |
|
|
<description> |
|
f |
Chapter 3 presents a sophisticated test case to show how JUnit |
|
|
works with larger components. The subject of our case study is |
|
|
a component found in many applications: a controller. We |
|
|
introduce the case-study code, identify what code to test, and |
|
|
then show how to test it. Once we know that the code works as |
|
|
expected, we create tests for exceptional conditions, to be |
|
|
sure our code behaves well even when things go wrong. |
|
|
</description> |
|
|
<shortDescription> |
|
|
Chapter 3 of JUnit in Action: Sampling JUnit |
|
|
</shortDescription> |
|
|
<url>http://sourceforge.net/projects/junitbook/</url> |
|
|
<developers>
<developer>
<name>Vincent Massol</name>
g

Running tests from Maven |
105 |
|
|
<id>vmassol</id>
<email>vmassol@users.sourceforge.net</email>
<organization>Pivolis</organization>
<roles>
<role>Java Developer</role> </roles>
</developer>
<developer>
<name>Ted Husted</name> <id>thusted</id>
<email>thusted@users.sourceforge.net</email> <organization>Husted dot Com</organization> <roles>
<role>Java Developer</role> </roles>
</developer>
</developers> [...] </project>
 g
g
bTell Maven the version of the POM you are using to describe the project. As of this writing, the version to use is 3. Maven uses it to perform automatic migration of
old POM versions to the new one if need be.
cDefine the project ID. Several plugins use this ID to name files that are generated. For example, if you run the jar plugin on the project, it generates a jar named
junitbook-sampling-1.0.jar (<id>.<currentVersion>.jar).
dGive a human-readable name for your project. It is used, for example, by the site plugin, which generates the documentation web site.
eThis is the current version of your project. For example, the version suffixed to the jar name comes from the definition here.
fDescribe background information about your project that is used by the site plugin for the web site.
gDescribe the developers working on this project and their roles. This information is used in a report generated by the site plugin.
Executing Maven web-site generation
Let’s use the Maven site plugin to generate the web site and see how the information you have provided is used. Open a command-line prompt in the sampling/ project directory (see chapter 3, section 3.4 for details of setting up the project directory structure) and enter maven site, as shown in figure 5.3.
106CHAPTER 5
Automating JUnit
Figure 5.3 Beginning of the site-generation plugin execution showing the names of the different reports that will be generated
Figure 5.3 shows only the very beginning of the site plugin’s execution. The website generation is quite rich. Maven generates several reports by default, as shown by figure 5.3. For example, you can see that it will generate metrics (maven- jepend-plugin), a Checkstyle report (maven-checkstyle-plugin), a change log report (maven-changelog-report), a JUnit report (maven-junit-report-plugin), a check for broken URL links in the documentation (maven-linkcheck-plugin), and so forth.
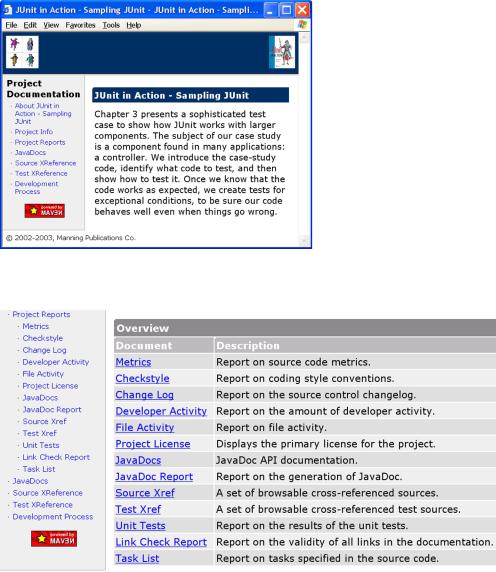
Figure 5.4 shows the welcome page of the generated web site. The generated web site makes good use of the information you entered in project.xml. For example, the images at the top are the ones you defined in listing 5.6 with the two logo elements. Each is linked to the URLs defined by the two corresponding url elements. The description comes from the description element, and the header is the project name (name element).
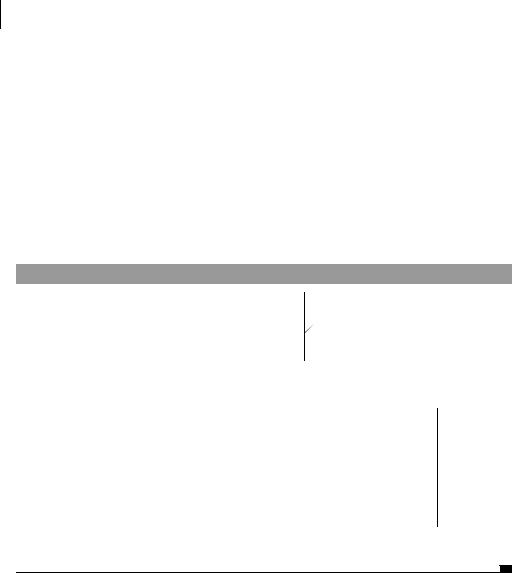
On the left are several menus, some of which contain submenus. For example, clicking Project Reports yields the screen in figure 5.5, showing all the generated default reports.
Running tests from Maven |
107 |
|
|
Figure 5.4 Welcome page of the generated site showing how the information entered in project.xml is used
Figure 5.5 List of Maven-generated default reports for the sampling project
108CHAPTER 5
Automating JUnit
It is possible to control exactly what reports you want for your web site by explicitly listing the desired reports in project.xml. For example, if you want only the unit test report and the checkstyle report, you can write the following at the end of project.xml:
<reports>
<report>maven-junit-report-plugin</report> <report>maven-checkstyle-plugin</report>
</reports>
Describing build-related information
Let’s complete the project object model (POM) by entering build-related information into project.xml (listing 5.7).
Listing 5.7 Second part of project.xml containing build-related information
<!--dependencies> <groupId>log4j</groupId> <artifactId>log4j</artifactId> <version>1.2.8</version>
</dependencies-->
b
<build>
<sourceDirectory>src/java</sourceDirectory> c <unitTestSourceDirectory>src/test</unitTestSourceDirectory> d <unitTest>
<includes> <include>**/Test*.java</include>
</includes>  e
e
<excludes>
<exclude>**/Test*All.java</exclude>
<exclude>**/TestDefaultController?.java</exclude>
</excludes>
</unitTest>
</build>
</project>
bDescribe the project’s external dependencies. A dependency typically specifies a jar, but a dependency can be of any type. All jar dependencies are added to the
classpath and used by the different plugins, such as the junit plugin. In this case, you have no external dependencies, which is why the log4j dependency is commented out in listing 5.7. In section 5.3.4, we describe in detail how Maven handles dependencies with the notion of local and remote repositories.
c Describe the location of the runtime sources. d This is the location of the test sources.